I love the moment when guests see a dessert table and assume something was baked all morning—then you tell them these are no-bake. If you want showstopping, elegant desserts without turning on the oven, these 14 No-Bake Desserts That Look Shockingly Fancy are your secret weapon.
You’ll find everything from silky chocolate domes to pretty parfaits and tartlets that chill instead of bake. I use a KitchenAid stand mixer for whipped fillings and a roll of parchment paper to line pans so slices lift cleanly. Each recipe includes full ingredients, step-by-step instructions, and serving tips so you can plate like a pro.
Whether you’re feeding a crowd or prepping desserts in advance for a dinner party, these no-bake desserts that look shockingly fancy deliver big flavor and big style with minimal fuss. Pin your favorites and get ready to impress.
1. No-Bake Desserts That Look Shockingly Fancy: Mini Chocolate Silk Tarts
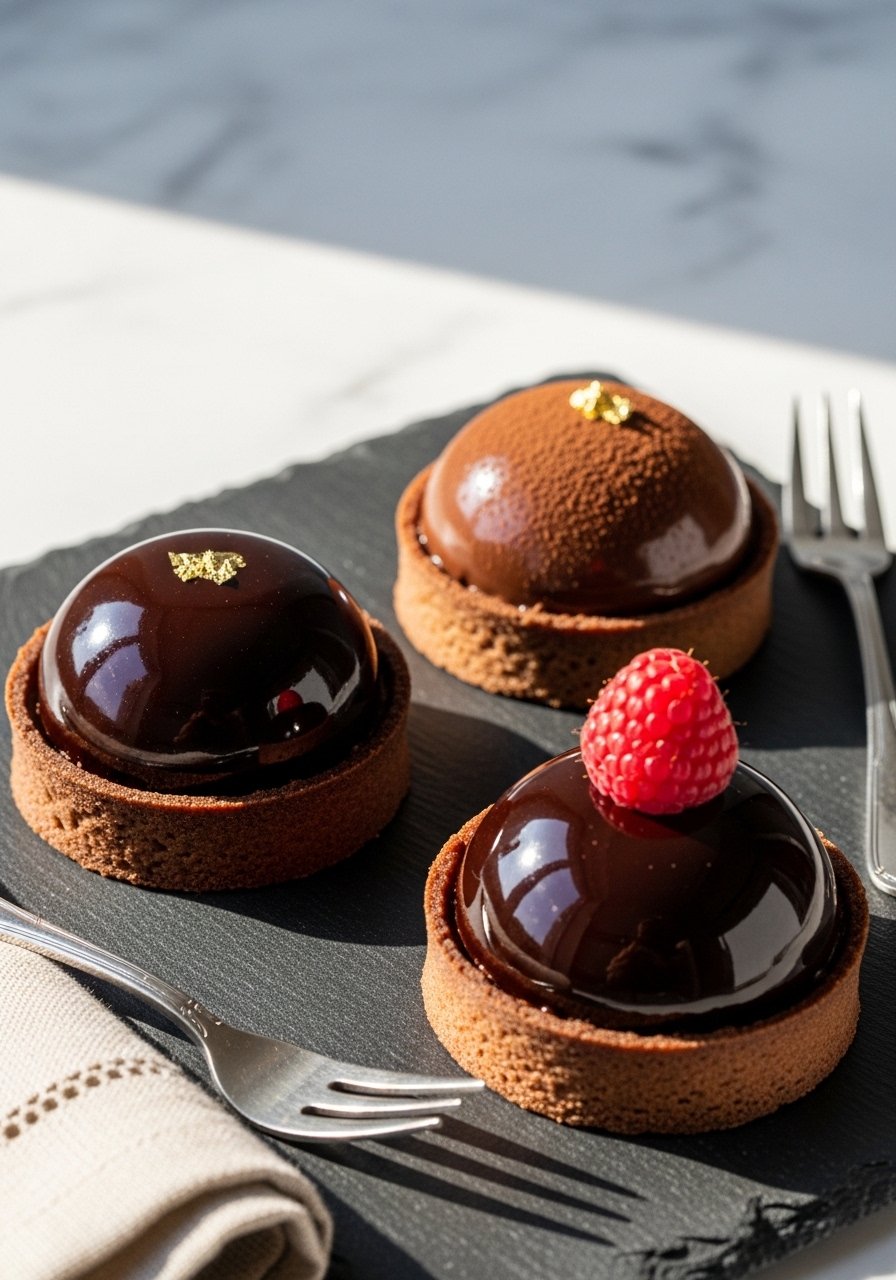
These mini chocolate silk tarts have a buttery cookie crust and a feather-light ganache filling that sets in the fridge. The texture is silky with a slight snap from the crust. They look like bakery tarts but take under 30 minutes active time. Chocolate lovers and dinner-party hosts will adore the glossy finish and gold-leaf accents.
Ingredients
- 1 1/2 cups chocolate cookie crumbs (about 18 Oreo cookies, finely crushed)
- 5 tbsp unsalted butter, melted and slightly cooled
- 8 oz high-quality dark chocolate (60-70%), finely chopped
- 1 cup heavy cream, cold
- 1/2 cup sour cream, room temperature
- 2 tbsp light corn syrup
- 2 tbsp granulated sugar
- 1 tsp vanilla extract
- Pinch fine sea salt
- Edible gold leaf and raspberries for garnish
Instructions
- Line a 12-cup mini tart pan with removable bottoms or use a muffin tin lined with parchment squares. Use a parchment paper strip to lift tarts later.
- Combine chocolate cookie crumbs and melted butter in a bowl. Press about 2 tbsp into each tart cup using the back of a spoon or a small measuring cup to compact the crust.
- Chill crusts in the fridge for 10 minutes to firm up.
- Place chopped dark chocolate in a heatproof bowl. Heat 1/2 cup heavy cream until just simmering and pour over chocolate. Let sit 1 minute, then stir until smooth (ganache base).
- Whisk remaining 1/2 cup heavy cream with sugar until soft peaks form using a hand mixer. Fold into chocolate mixture with sour cream, corn syrup, vanilla, and salt until uniform.
- Spoon or pipe the filling into chilled crusts. Smooth with an offset spatula for a clean top.
- Refrigerate for at least 2 hours until set, or freeze 30 minutes for faster set.
- Carefully unmold using the tart pan bottoms or parchment lift. Garnish with raspberries and a touch of edible gold leaf.
- Let tart sit 5 minutes at room temperature before serving so the ganache softens slightly for a silky mouthfeel.
How to Serve It
Serve on a white cake stand or dark slate to make the chocolate pop. Add a dusting of cocoa powder or flaked sea salt. Pair with espresso or a fruity dessert wine. Store in an airtight container in the fridge for up to 4 days. Make them a day ahead and add gold leaf just before serving.
2. No-Bake Desserts That Look Shockingly Fancy: Lemon Mousse Cups
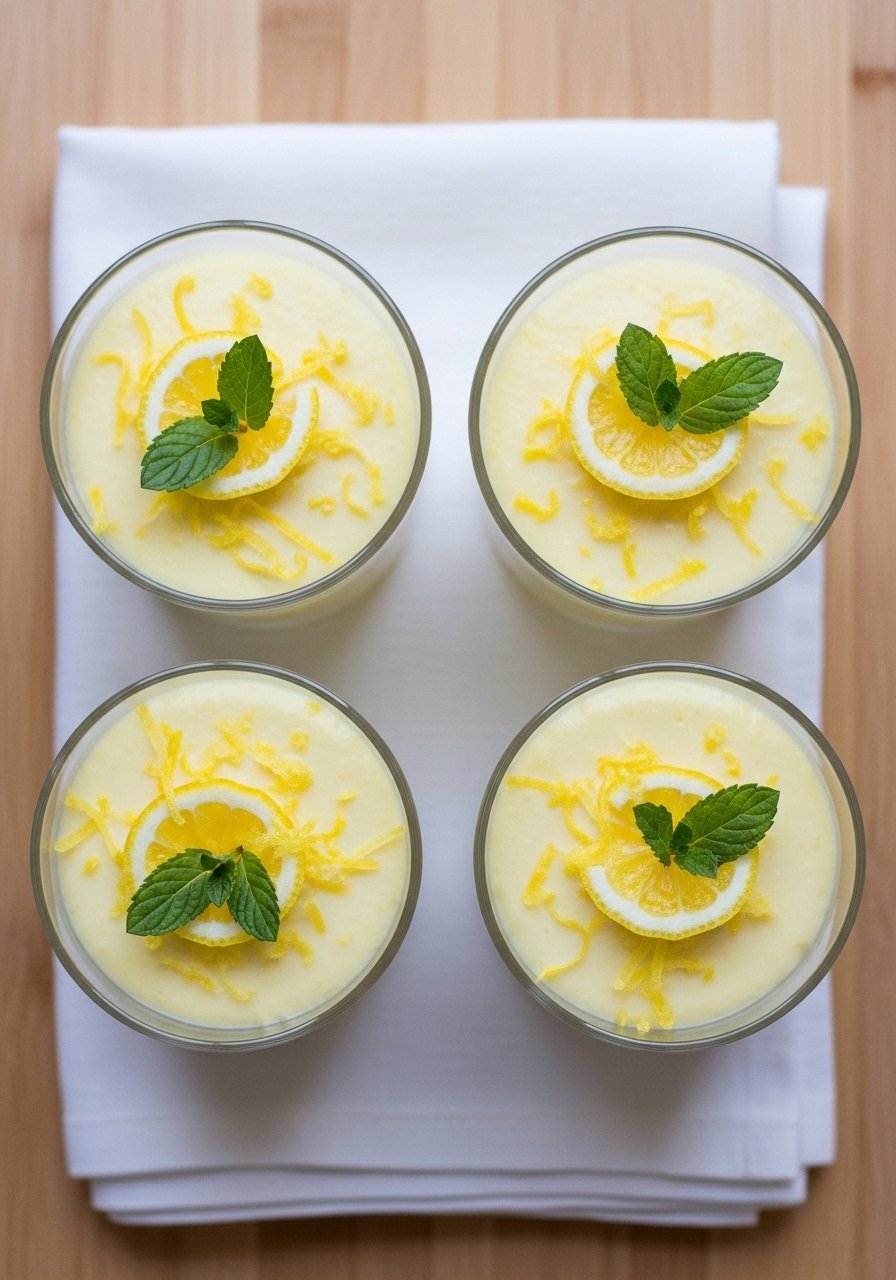
This lemon mousse is bright, airy, and perfectly balanced—tart, sweet, and cloud-light. It sets without gelatin thanks to whipped cream and cream cheese for structure. These cups are great for spring gatherings or anytime you want a refreshing finish. If you love citrus, you’ll adore the punchy lemon aroma.
Ingredients
- 1 cup heavy cream, cold
- 6 oz cream cheese, room temperature
- 1/2 cup powdered sugar, sifted
- 1/3 cup fresh lemon juice (about 2 lemons)
- 2 tbsp lemon zest, finely grated
- 1 tsp vanilla extract
- 1/4 cup Greek yogurt, full-fat
- 8 vanilla wafer cookies, crushed
- 2 tbsp unsalted butter, melted
- Candied lemon slices and fresh mint for garnish
Instructions
- Line a baking sheet with parchment paper for candied lemon slices if making them.
- Whip the cold heavy cream to soft peaks with a hand mixer.
- Beat cream cheese, powdered sugar, lemon zest, lemon juice, vanilla, and Greek yogurt in a bowl until smooth and light using a whisk or stand mixer.
- Fold whipped cream into the lemon mixture gently until fully combined and fluffy.
- Mix crushed vanilla wafers with melted butter and press a spoonful into the bottom of each serving cup.
- Pipe or spoon mousse over the cookie base using a disposable piping bag for clean presentation.
- Refrigerate cups for at least 2 hours to set and chill.
- Top with candied lemon and mint before serving.
How to Serve It
Serve in clear glass cups to show layers and color. Add a thin lemon wheel and a mint sprig for contrast. Pair with a light tea or Prosecco. Keep sealed in glass meal prep containers for up to 3 days. These are great to assemble the morning of your event.
3. No-Bake Desserts That Look Shockingly Fancy: Berry Mascarpone Verrines
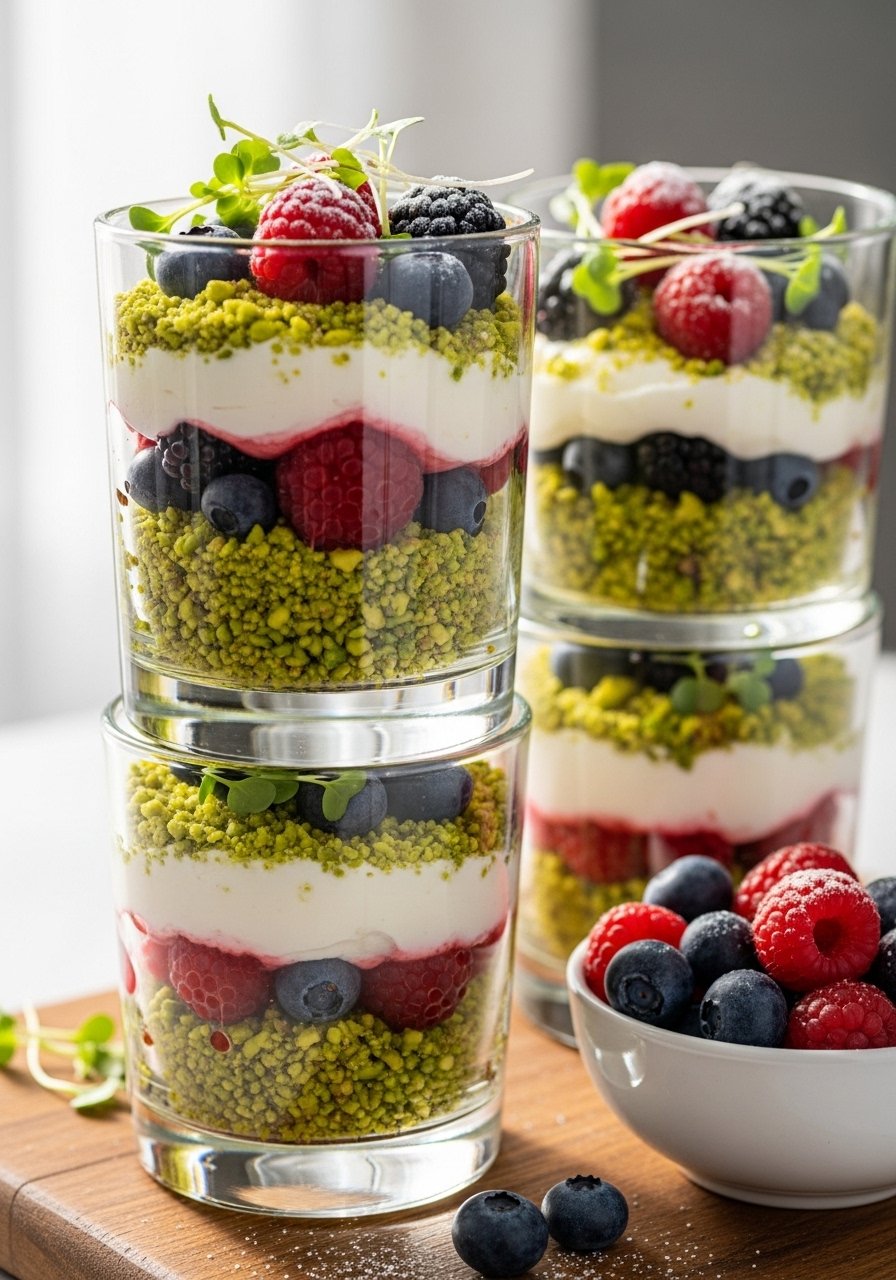
Layers of silky mascarpone cream, berry compote, and crunchy pistachio make these verrines taste like a posh dessert at a bistro. The textures—creamy, jammy, and nutty—play beautifully together. They’re ideal for summer dinners or brunches and are especially loved by fans of creamy Italian flavors.
Ingredients
- 1 cup mascarpone cheese, chilled
- 1 cup heavy cream, cold
- 1/3 cup powdered sugar
- 1 tsp vanilla extract
- 2 cups mixed berries (strawberries, raspberries, blueberries)
- 2 tbsp honey
- 1 tbsp lemon juice
- 1/2 cup roasted pistachios, chopped
- 8 ladyfinger cookies, roughly crumbled
- Fresh mint sprigs for garnish
Instructions
- In a saucepan, combine berries, honey, and lemon juice. Cook over medium heat until berries break down, about 5–7 minutes. Cool completely.
- Whip heavy cream to medium peaks with a hand mixer.
- Beat mascarpone with powdered sugar and vanilla until smooth.
- Fold whipped cream into mascarpone gently until light and airy.
- Layer crumbs of ladyfingers and chopped pistachios in the bottom of each glass to add crunch.
- Add a spoonful of berry compote, then a layer of mascarpone cream. Repeat to fill glasses.
- Chill for at least 1 hour to let flavors meld.
- Top with fresh berries and mint just before serving.
How to Serve It
Serve in narrow glass verrines or small mason jars for a modern look. Sprinkle extra pistachios for color and texture. Pair with a late-harvest white wine or cold brew coffee. Store in the refrigerator in airtight containers for up to 2 days; add fresh berries just before serving to keep them vibrant.
4. Salted Caramel Cheesecake Bars (No-Bake)
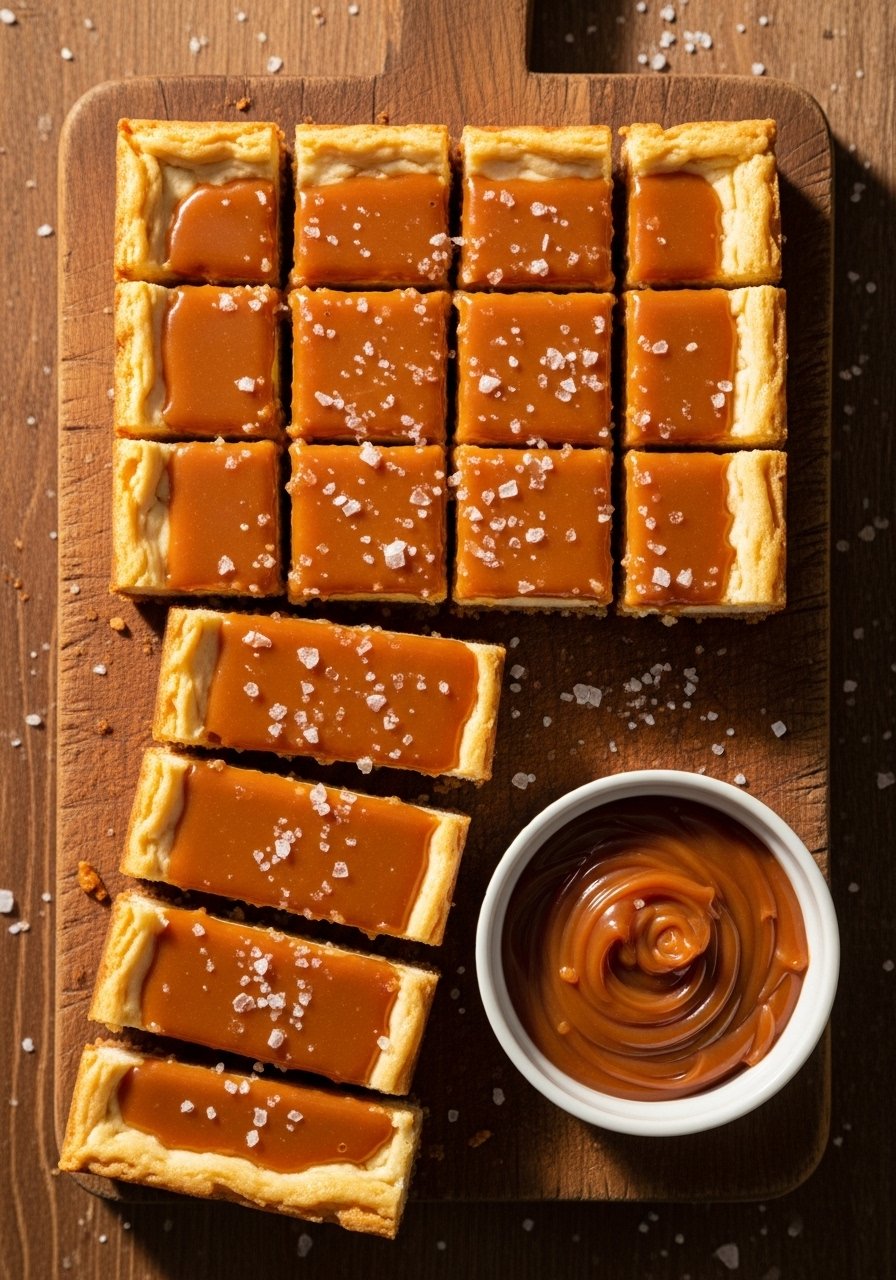
Creamy no-bake cheesecake on a graham cracker crust, finished with homemade salted caramel. These bars slice neatly and have a silky texture that’s sweet, salty, and indulgent. They’re a crowd-pleaser at potlucks and holiday tables.
Ingredients
- 2 cups graham cracker crumbs
- 6 tbsp unsalted butter, melted
- 16 oz cream cheese, room temperature
- 1 cup powdered sugar, sifted
- 1 cup heavy cream, cold
- 1 tsp vanilla extract
- 1/4 tsp fine sea salt
- For caramel:
- 1 cup granulated sugar
- 6 tbsp unsalted butter, cubed
- 1/2 cup heavy cream, warmed
- 1/2 tsp flaky sea salt
Instructions
- Line a 9×9-inch square pan with parchment paper leaving an overhang.
- Combine graham crumbs and melted butter; press evenly into prepared pan using the bottom of a measuring cup. Chill 15 minutes.
- Beat cream cheese until smooth, then add powdered sugar and vanilla.
- Whip heavy cream to soft peaks and fold into cream cheese mixture until smooth.
- Spread cheesecake mixture over chilled crust with an offset spatula. Smooth the top.
- Chill at least 4 hours or overnight until firm.
- For caramel: cook sugar in a heavy-bottomed saucepan over medium heat until melted and amber, stirring occasionally. Add butter and whisk until melted. Slowly add warm cream and whisk until smooth. Stir in flaky sea salt. Cool slightly.
- Pour cooled caramel over chilled cheesecake and spread evenly. Return to fridge 15 minutes.
- Use a sharp knife warmed under hot water and wiped dry to slice into bars.
How to Serve It
Serve bars on a serving platter with extra flaky salt and a dollop of whipped cream. Pair with black coffee or a rich stout. Store in an airtight container in the fridge for up to 5 days. Make caramel up to 3 days ahead and warm gently before drizzling.
5. Cardamom Pistachio Parfaits with Rose Syrup
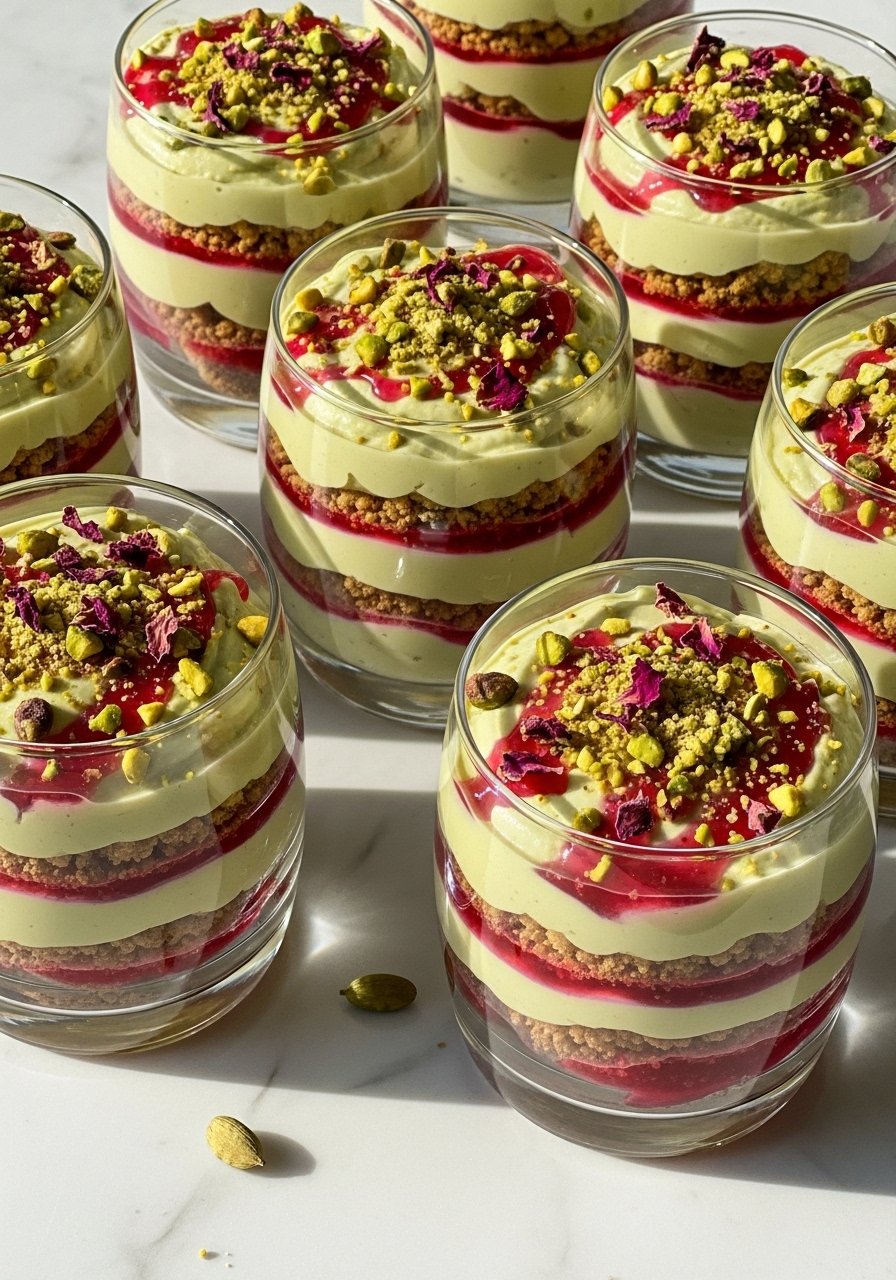
These parfaits blend exotic flavors—earthy pistachio, floral rose, and warm cardamom—into a refined dessert. The green hue and rose-splashed layers look luxurious on the table. Fans of Middle Eastern flavors will be drawn to the fragrant finish.
Ingredients
- 1 cup pistachios, shelled and unsalted
- 1/2 cup powdered sugar
- 8 oz cream cheese, room temperature
- 1 cup heavy cream, cold
- 1/3 cup sweetened condensed milk
- 1/2 tsp ground cardamom
- 2 tbsp rose water
- 1/4 cup sugar (for rose syrup)
- 1/4 cup water (for rose syrup)
- 8 shortbread or butter cookies, crushed
- Dried rose petals and extra chopped pistachios for garnish
Instructions
- Make rose syrup by simmering sugar and water until dissolved, then add rose water off heat. Cool.
- Pulse pistachios and powdered sugar in a food processor until finely ground, scraping sides as needed.
- Beat cream cheese with condensed milk and cardamom until smooth.
- Whip heavy cream to medium peaks and fold into pistachio-cream mixture.
- Layer crushed cookies, pistachio cream, a drizzle of rose syrup, and repeat.
- Chill at least 2 hours to allow flavors to meld.
- Garnish with chopped pistachios and dried rose petals before serving.
How to Serve It
Serve in tall clear glasses to show the layers. Add a drizzle of rose syrup and a sprinkle of extra cardamom for aroma. Pair with mint tea or sparkling water. Keep parfaits chilled in glass meal prep containers for up to 3 days, adding garnishes right before serving.
6. Classic Tiramisu Cups (No-Bake)

A reliable crowd-pleaser, this tiramisu is light but coffee-forward, with mascarpone cream and espresso-soaked ladyfingers. Individual cups make for elegant plating and easy portioning. Anyone who loves coffee desserts will reach for seconds.
Ingredients
- 1 cup strong espresso or cold-brew concentrate, cooled
- 2 tbsp coffee liqueur (optional)
- 8 oz mascarpone cheese, chilled
- 1 cup heavy cream, cold
- 1/2 cup powdered sugar
- 1 tsp vanilla extract
- 24 ladyfinger cookies
- Cocoa powder for dusting
- Dark chocolate shavings for garnish
Instructions
- Combine espresso and coffee liqueur in a shallow bowl.
- Whip heavy cream to soft peaks with a hand mixer.
- Beat mascarpone with powdered sugar and vanilla until smooth.
- Fold whipped cream into mascarpone until light and airy.
- Quickly dip each ladyfinger into espresso (do not soak) and layer in individual serving cups.
- Spoon a layer of mascarpone cream over ladyfingers and repeat to create two layers.
- Chill at least 4 hours or overnight for best texture.
- Dust with cocoa powder and add chocolate shavings before serving.
How to Serve It
Serve in clear cups on a small dessert plate with a demitasse spoon. Dust additional cocoa at the table for drama. Pair with an espresso or dessert wine. Store covered in the fridge for up to 2 days; the ladyfingers will soften over time—still lovely. Use disposable piping bags to pipe cream for a neat finish.
7. Key Lime Pie Jars (No-Bake)
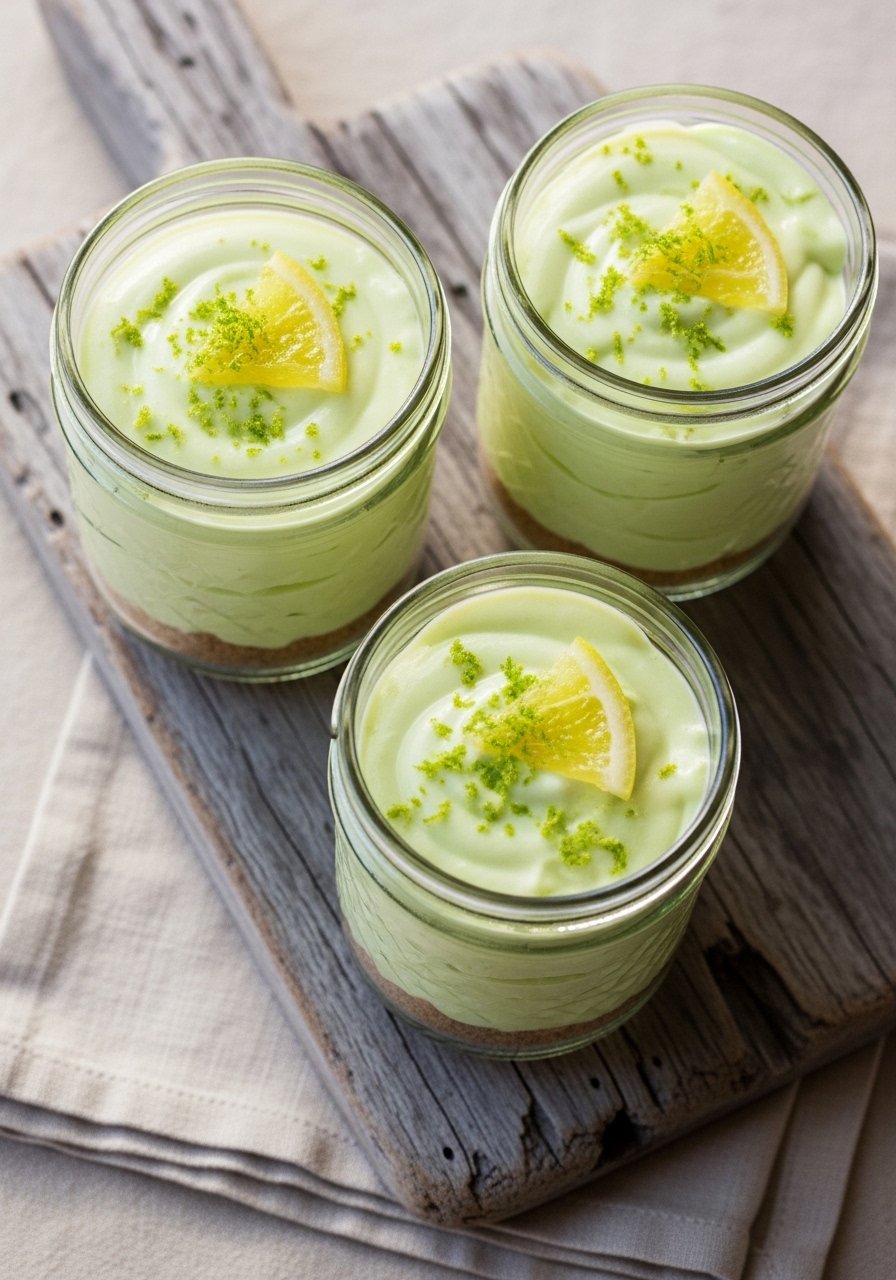
These key lime pie jars are tart, creamy, and adorable. The bright citrus flavor is balanced by a buttery graham crust. They’re portable and perfect for picnics or poolside dessert service.
Ingredients
- 1 1/2 cups graham cracker crumbs
- 5 tbsp unsalted butter, melted
- 14 oz sweetened condensed milk (about 1 can)
- 1/2 cup key lime juice (fresh), or regular lime
- 3 egg yolks, room temperature (optional—see note)
- 1 cup heavy cream, cold
- 2 tbsp lime zest
- 1/4 cup powdered sugar
- Lime slices and extra zest for garnish
Instructions
- In a bowl, mix graham crumbs and melted butter; press into the bottom of 6 small mason jars.
- Whip heavy cream with powdered sugar to soft peaks using a hand mixer.
- In another bowl, combine sweetened condensed milk and lime juice; if using egg yolks, temper them by whisking yolks with a spoonful of the milk mixture, then mix back in.
- Fold whipped cream into the lime mixture until smooth and pale.
- Spoon filling over crust in each jar and smooth the top.
- Chill at least 3 hours or overnight to set.
- Garnish with lime zest and slices before serving.
Note: For a fully eggless no-bake version, omit yolks and rely on condensed milk and whipping cream.
How to Serve It
Serve chilled in mason jars or small glasses for a casual, refined look. Add a tiny spoon and a sprig of mint. These pair well with a light cocktail or iced tea. Store jars in the refrigerator in airtight containers or with lids for up to 3 days.
8. Chocolate Hazelnut Mousse Domes
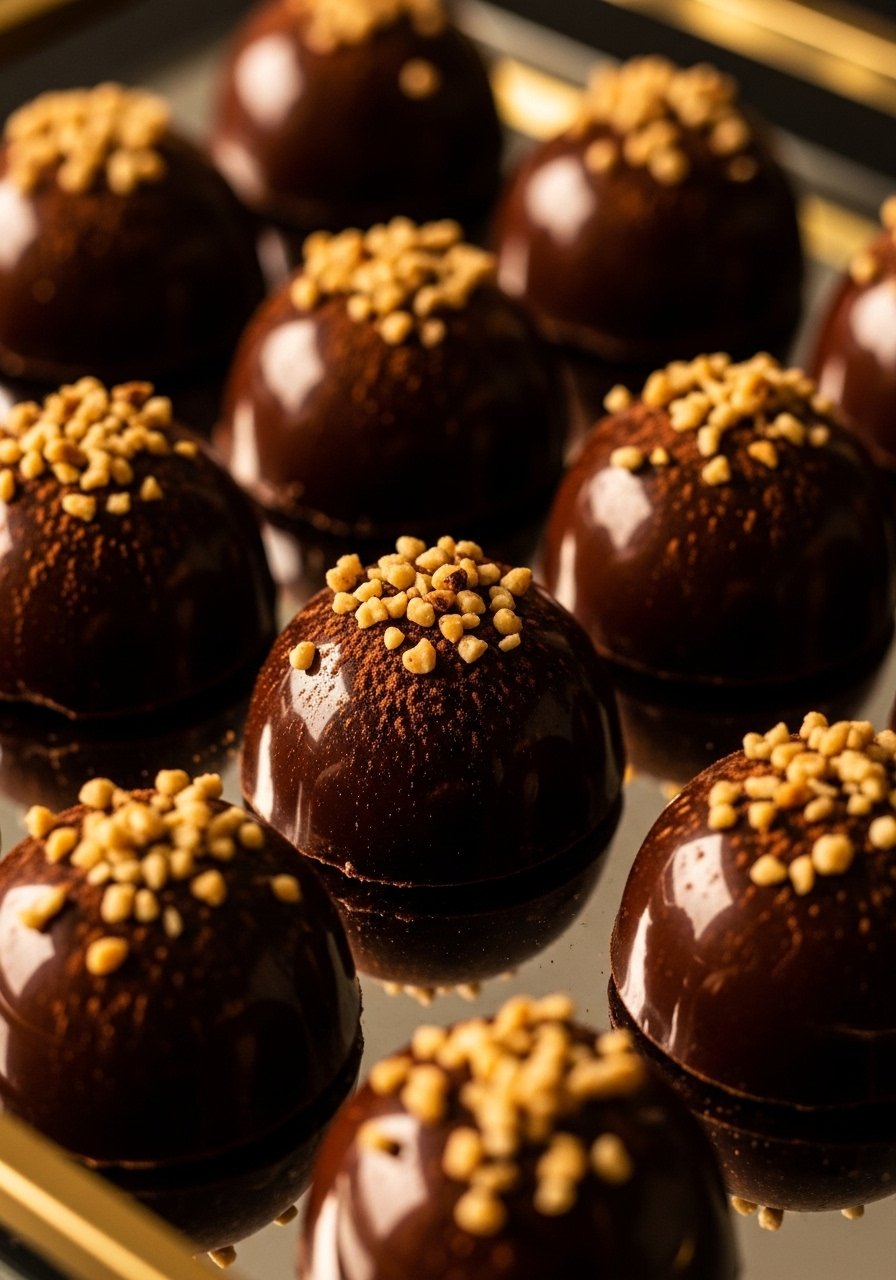
Silky chocolate mousse molded into domes and glazed for that mirror finish—without baking. The nutty crunch from toasted hazelnuts gives contrast, and they look extremely polished on a dessert tray.
Ingredients
- 8 oz dark chocolate, finely chopped
- 1 1/4 cups heavy cream, divided (1 cup + 1/4 cup)
- 3 tbsp unsalted butter
- 1/2 cup hazelnut spread (Nutella)
- 2 tbsp powdered sugar
- 1 tsp vanilla extract
- 1/2 cup toasted hazelnuts, chopped
- 6 oz white chocolate (optional, for drizzle)
Instructions
- Heat 1/4 cup heavy cream until steaming and pour over chopped dark chocolate and butter; whisk until smooth to make ganache.
- Stir in hazelnut spread and vanilla; cool to room temperature.
- Whip 1 cup heavy cream with powdered sugar to soft peaks.
- Fold whipped cream into cooled ganache gently until uniform.
- Spoon mousse into silicone dome molds (use a silicone baking mat under molds for stability) and freeze 1–2 hours until firm.
- Unmold domes and place on a wire rack set over a tray.
- Warm remaining ganache or prepare a glossy glaze and pour over frozen domes for a mirror finish.
- Sprinkle chopped toasted hazelnuts and allow glaze to set in the fridge 20–30 minutes before serving.
How to Serve It
Place domes on individual dessert plates and add a drizzle of warmed white chocolate for contrast. A few extra chopped hazelnuts and a mint sprig finish the plate. Keep in the fridge in a glass meal prep container for up to 3 days; if frozen, thaw 30 minutes before serving.
9. Vanilla Panna Cotta with Berry Gelée (No-Bake)
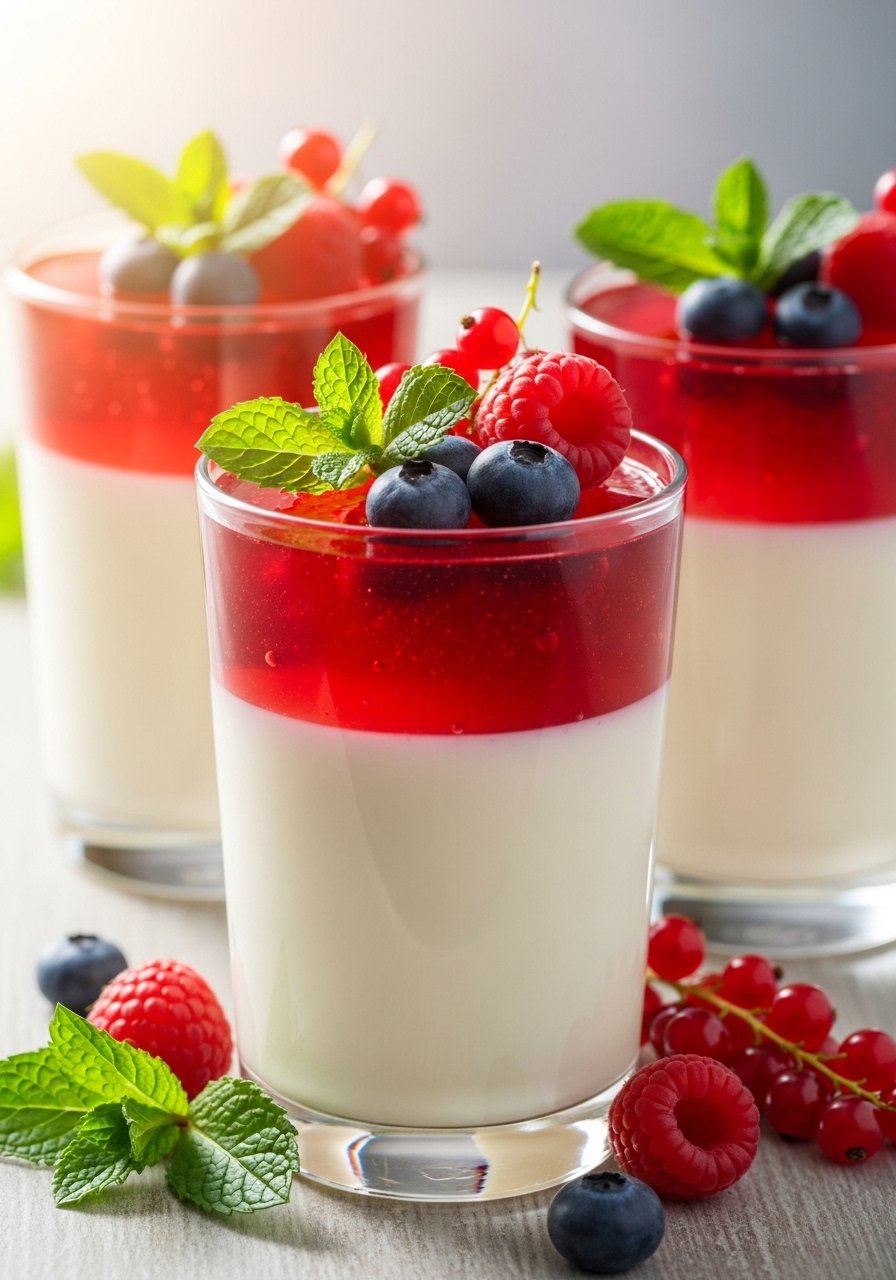
Smooth vanilla panna cotta topped with a bright berry gelée—this dessert looks like it took hours but requires only simple chilling. The panna cotta is silky and fragrant, while the gelée adds bright color and a fruity pop.
Ingredients
- 2 cups heavy cream
- 1 cup whole milk
- 1/2 cup granulated sugar
- 1 tbsp pure vanilla extract or 1 vanilla bean scraped
- 2 1/4 tsp powdered gelatin (about 1 envelope)
- 3 tbsp cold water (to bloom gelatin)
- For berry gelée:
- 1 cup mixed berries
- 2 tbsp granulated sugar
- 1 tsp lemon juice
- 1 tsp powdered gelatin
- 1 tbsp cold water
Instructions
- Bloom the first gelatin in 3 tbsp cold water and set aside.
- Heat cream, milk, and sugar in a saucepan until sugar dissolves and mixture is hot but not boiling. Add vanilla.
- Remove from heat and stir in bloomed gelatin until fully dissolved.
- Pour into molds or glasses and chill until just set, about 2–3 hours.
- For gelée, simmer berries with sugar and lemon until they break down. Strain to remove seeds if desired.
- Bloom 1 tsp gelatin in 1 tbsp water, then stir into warm berry puree until dissolved. Cool until thick but still pourable.
- Carefully pour cooled gelée over set panna cotta and return to fridge to fully set, about 1–2 hours.
- Unmold panna cotta by briefly dipping molds in warm water and inverting onto plates, or serve directly in glasses.
How to Serve It
Serve on a platter with whole berries and mint sprigs. A cake stand works beautifully for multiple servings. Panna cotta keeps in the fridge for up to 3 days in sealed airtight containers.
10. No-Bake Mango Coconut Cheesecake
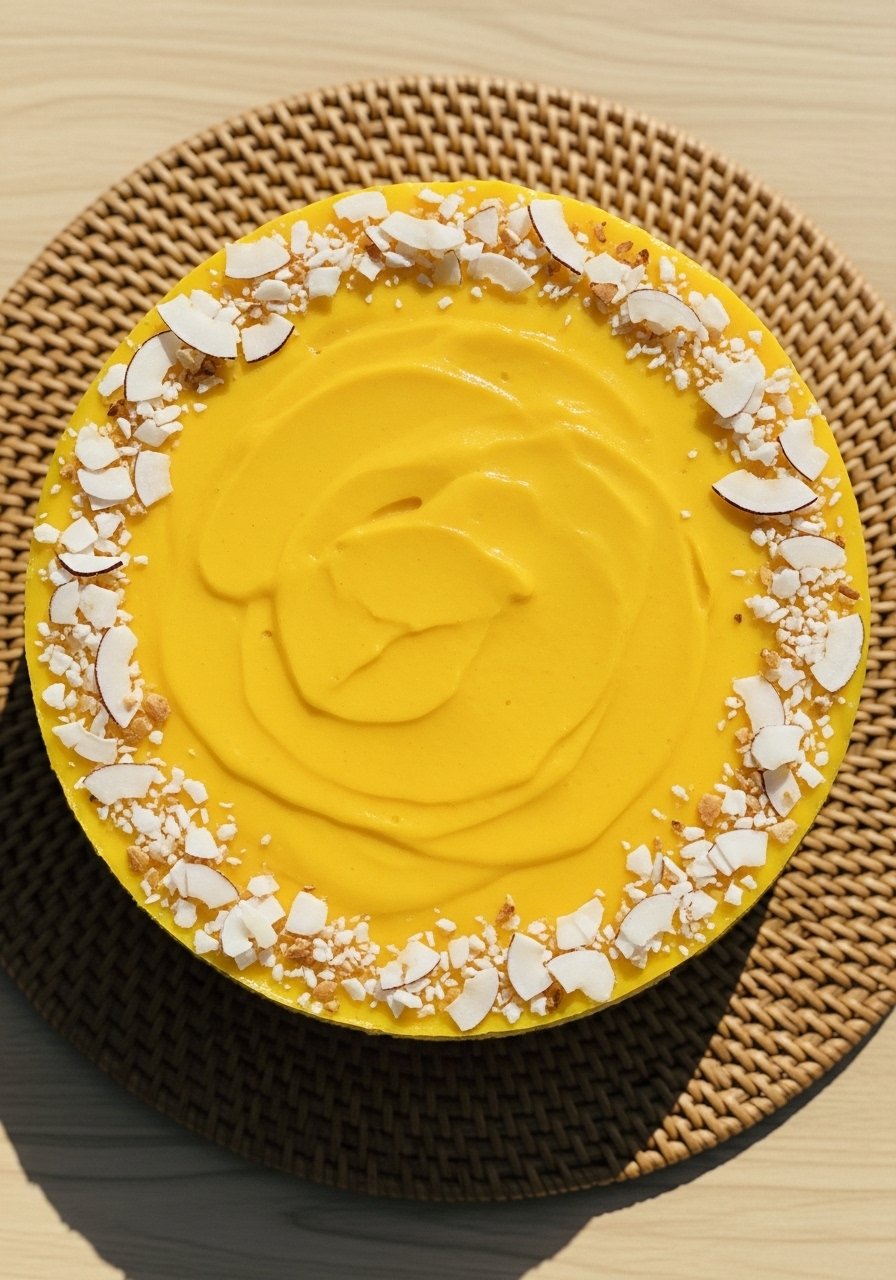
This no-bake cheesecake blends tropical mango and coconut for a bright, summery dessert. The mango topping is glossy and vibrant, and toasted coconut adds a toasty note. Great for backyard dinners and warm-weather celebrations.
Ingredients
- 2 cups vanilla wafer crumbs
- 6 tbsp unsalted butter, melted
- 16 oz cream cheese, room temperature
- 1 cup powdered sugar
- 1 cup heavy cream, cold
- 1/2 cup sweetened shredded coconut, toasted
- 1 cup mango purée (fresh or frozen, pureed)
- 2 tbsp lime juice
- 2 tbsp honey
- 1 tsp vanilla extract
Instructions
- Line a 9-inch springform pan with parchment paper and press crust mixture of wafer crumbs and melted butter into the bottom. Chill 15 minutes.
- Beat cream cheese with powdered sugar and vanilla until smooth.
- Whip heavy cream to soft peaks and fold into cream cheese mixture.
- Stir in toasted shredded coconut for texture.
- Spread filling over crust and smooth with an offset spatula.
- Blend mango purée with lime and honey to taste; spoon over cheesecake and smooth into an even layer.
- Chill at least 6 hours or overnight until fully set.
- Run a hot knife around the edge before releasing the springform for clean slices.
How to Serve It
Serve slices on a serving platter with extra toasted coconut and thin lime zest. Pair with iced green tea or a tropical spritz. Store in the fridge in a glass meal prep container for up to 5 days.
11. Nutella Tartlets with Pretzel Crust

Sweet and salty come together in these Nutella tartlets with a crunchy pretzel crust. They’re quick to assemble and impressive to serve. The contrast between creamy chocolate-hazelnut filling and salty crunch is addictive.
Ingredients
- 2 cups crushed pretzels
- 6 tbsp unsalted butter, melted
- 8 oz Nutella or chocolate-hazelnut spread
- 1/2 cup heavy cream
- 4 oz cream cheese, room temperature
- 2 tbsp powdered sugar
- 1 tsp vanilla extract
- 1/2 cup toasted hazelnuts, chopped
- Flaky sea salt for finishing
Instructions
- Press pretzel crumbs and melted butter into a mini tart pan or muffin tin lined with parchment paper squares. Chill 15 minutes to firm.
- Heat Nutella with heavy cream in a small saucepan until smooth, or microwave in 20-second bursts.
- Beat cream cheese with powdered sugar and vanilla until smooth.
- Fold warm Nutella mixture into cream cheese until silky.
- Fill crusts with Nutella mixture and smooth with an offset spatula.
- Chill at least 2 hours until set.
- Garnish with chopped hazelnuts and flaky sea salt before serving.
How to Serve It
Serve on a dark slate or small dessert plates for contrast. Pair with milk or cold brew coffee. Store in the fridge for up to 3 days in an airtight container.
12. Matcha White Chocolate Truffles (No-Bake)
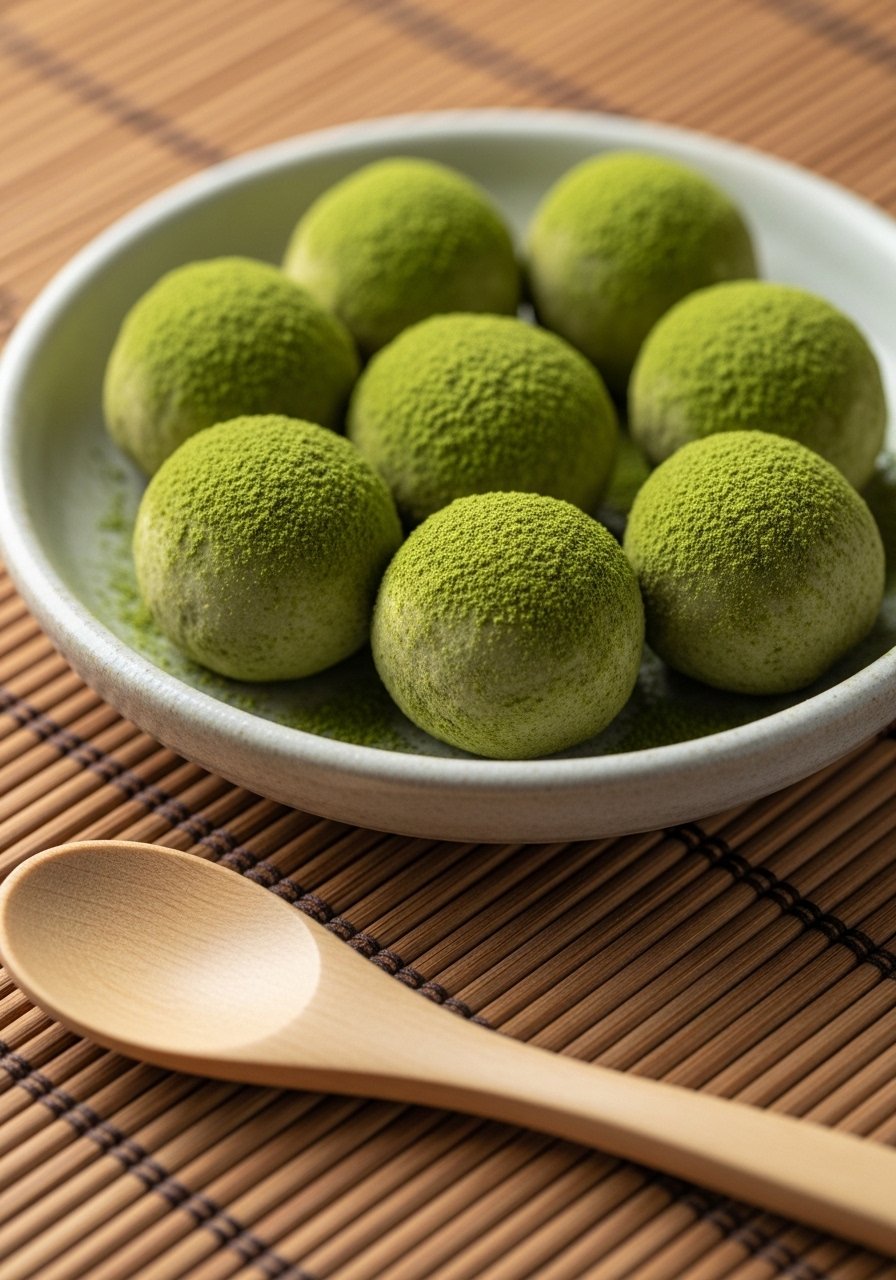
These matcha white chocolate truffles are delicate, elegant, and whisper-green. The matcha provides an earthy, slightly bitter contrast to creamy white chocolate. They’re small, sophisticated, and perfect for gifting.
Ingredients
- 8 oz white chocolate, finely chopped
- 1/2 cup heavy cream
- 2 tbsp unsalted butter
- 1 1/2 tsp ceremonial-grade matcha powder, plus extra for dusting
- 1/4 cup powdered sugar
- 1/2 tsp vanilla extract
- Cocoa nibs or toasted sesame seeds (optional for rolling)
Instructions
- Heat heavy cream and butter until just simmering. Remove from heat.
- Pour hot cream over white chocolate and let sit 2 minutes. Stir until smooth.
- Sift in matcha powder and powdered sugar, then mix to combine. Add vanilla.
- Chill mixture until firm enough to scoop, about 1–2 hours.
- Use a cookie scoop or spoon to portion and roll into balls with slightly damp hands.
- Roll truffles in sifted matcha or cocoa nibs for texture.
- Chill again for 30 minutes to firm up before serving.
How to Serve It
Arrange on a small platter or in mini candy cups for gifting. Pair with green tea or a delicate sparkling wine. Store truffles in the fridge in a glass meal prep container for up to 2 weeks; bring to room temperature before serving for best flavor.
13. Raspberry Lemon Cream Cheese Bars (No-Bake)
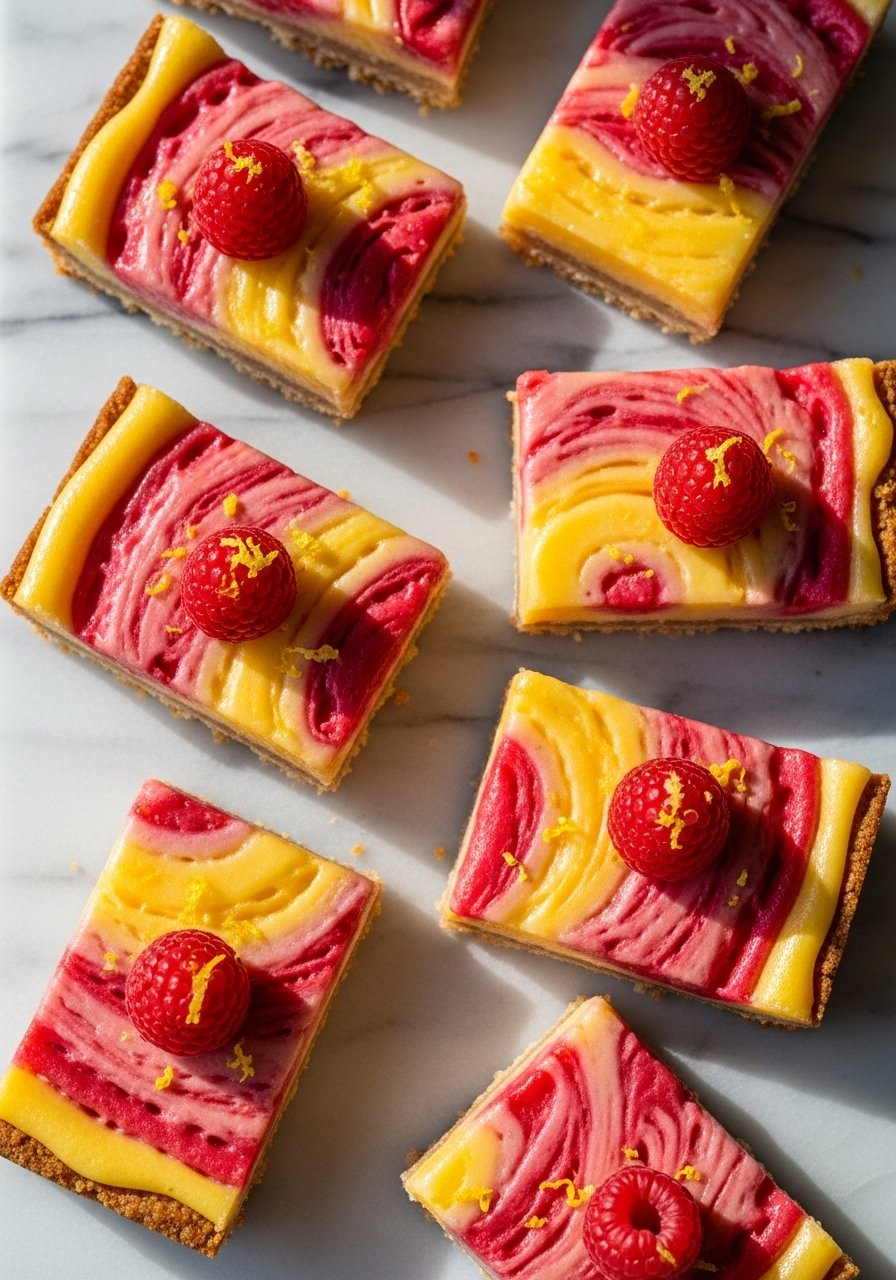
Buttery shortbread crust, tangy lemon cream, and vibrant raspberry swirls—these bars are both bright and elegant. The color contrast makes them look fancy, while the flavors stay fresh and clean.
Ingredients
- 1 3/4 cups all-purpose flour
- 3/4 cup powdered sugar
- 12 tbsp unsalted butter, cold, cubed
- 8 oz cream cheese, room temperature
- 1 cup powdered sugar
- 1/2 cup lemon curd
- 1 tbsp lemon zest
- 1 cup raspberries, mashed
- 1 tbsp sugar (for raspberries)
- 1 tsp vanilla extract
Instructions
- Make a quick no-bake shortbread base by pulsing flour, powdered sugar, and cubed cold butter in a food processor until clumpy. Press into an 8×8-inch pan lined with parchment paper.
- Chill crust for 20 minutes.
- Beat cream cheese with powdered sugar, lemon curd, lemon zest, and vanilla until smooth.
- Sweeten mashed raspberries with 1 tbsp sugar.
- Spread cream cheese mixture over chilled crust. Drop spoonfuls of raspberry purée and use a skewer to create swirls.
- Chill at least 4 hours or overnight until firm.
- Slice with a warm knife for clean edges and wipe between cuts.
How to Serve It
Serve bars on a dessert tray with extra raspberries and lemon curls. Pair with a light white tea or Champagne. Store bars in an airtight container for up to 4 days; keep chilled.
14. Bourbon Peach Icebox Cake (No-Bake)
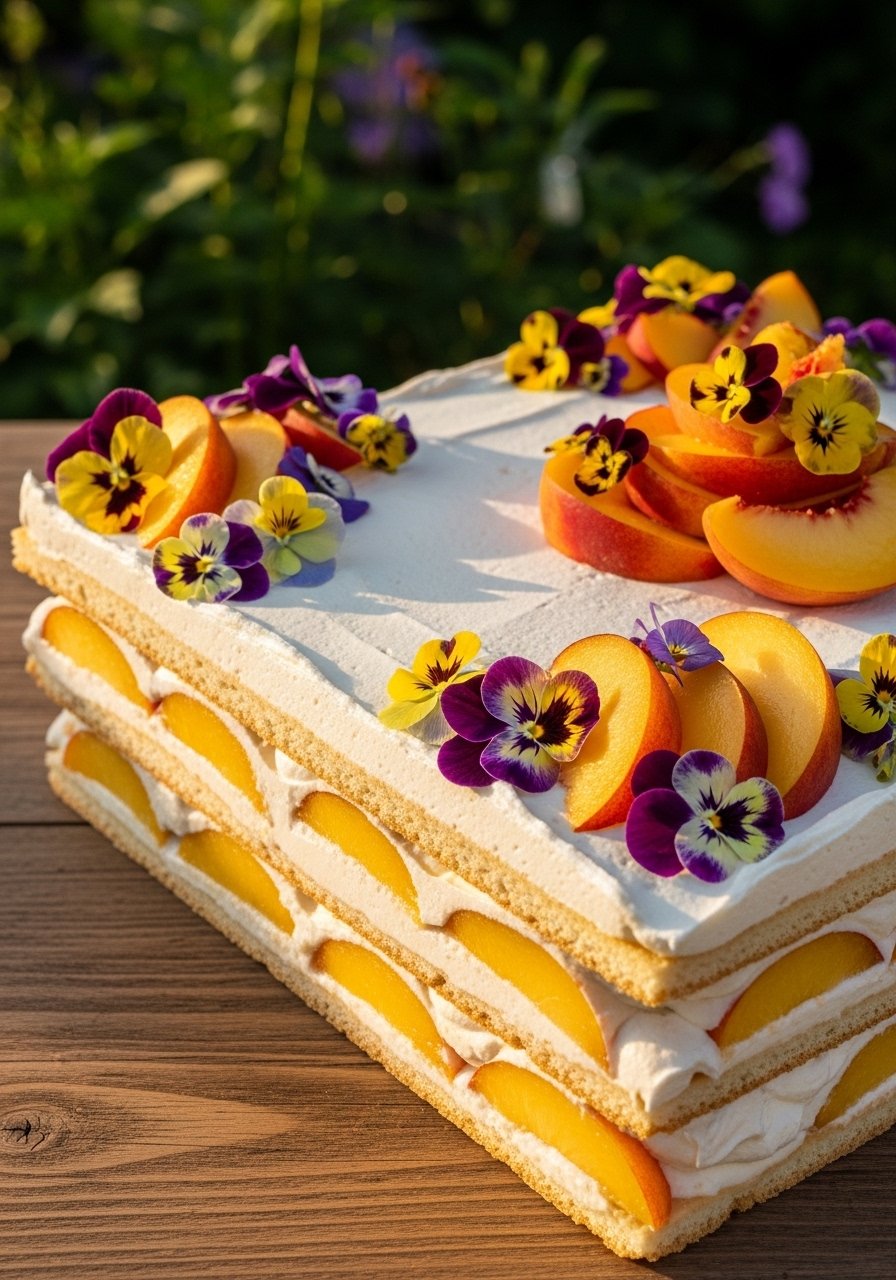
Layers of Bourbon-spiked whipped mascarpone, thinly sliced peaches, and buttery graham crackers form a stunning icebox cake that tastes like summer in the South. The bourbon adds depth while the peaches keep it bright.
Ingredients
- 2 cups heavy cream
- 8 oz mascarpone cheese, room temperature
- 1/2 cup powdered sugar
- 1/4 cup bourbon
- 3 tbsp peach jam
- 3 ripe peaches, thinly sliced
- 12 graham cracker sheets
- 1 tbsp lemon juice
- Fresh mint and edible flowers for garnish
Instructions
- Whip heavy cream, powdered sugar, and bourbon to soft peaks with a hand mixer.
- Fold whipped cream into mascarpone until smooth.
- Lightly toss peach slices with lemon juice to prevent browning.
- Spread a thin layer of mascarpone on the bottom of a 9×5-inch loaf pan lined with parchment paper.
- Layer graham crackers, mascarpone mixture, a smear of peach jam, and a single layer of peach slices. Repeat until pan is full, finishing with mascarpone.
- Cover and chill overnight to allow graham crackers to soften and flavors to meld.
- Remove from pan using parchment overhang and slice with a sharp knife warmed briefly under hot water.
How to Serve It
Serve slices on a chilled plate with a drizzle of peach jam and mint. This pairs well with iced tea or a light bourbon cocktail. Keep in the refrigerator in a glass meal prep container for up to 3 days; slices are best the next day after chilling.
You now have 14 no-bake desserts that look shockingly fancy and are remarkably doable. From glossy chocolate domes to breezy lemon mousse cups, there’s a style and flavor for every occasion. Save or pin your favorites and give one a try this week—the fridge does most of the work.
Want one tool recommendation that helps across nearly all these recipes? A good hand mixer speeds up whipping and keeps textures consistent, whether you’re making mousse, whipping cream, or the light fillings used in these desserts. Which recipe are you trying first—something chocolatey, citrusy, or fruit-forward? Share with friends and tag them when you make it.