You know those get-togethers where the snacks vanish before the main course arrives? That’s the magic of great finger foods — they’re easy to eat, big on flavor, and designed to disappear fast. This list gives you 12 foolproof finger foods that work for casual game nights, last-minute potlucks, and summer porch parties.
Inside you’ll find no-cook skewers, shareable pull-apart breads, air-fryer veg bites, and a couple of spicy upgrades that bring bold flavor without extra fuss. I also toss in practical tips (like the pretzel dip trick for pigs-in-blanket crust) and cleanup-friendly gear so you spend more time with guests and less time at the sink.
Grab your cast iron skillet for skillet-fried fritters and a parchment paper roll for baking—these small tools save time and give reliably great results. Ready to make snacks that get passed around and polished off? Let’s get cooking.
1. Everything Bagel Pigs in a Blanket (Finger Foods Pretzel Twist)

These are classic pigs in a blanket with a pretzel-style crust—boiling soda dip creates that salty, chewy edge. The seasoning gives punch while a simple cheater aioli keeps things creamy. Crowd-pleasing, handheld, and perfect for passing around.
Ingredients
- 1 (8 oz) package cocktail sausages (about 24)
- 1 (8 oz) tube refrigerated crescent dough (or sheet crescent)
- 3 cups water
- 3 tbsp baking soda
- 1 large egg, beaten (for egg wash)
- 2 tbsp melted butter
- 1 tbsp everything bagel seasoning
- Salt, flaky, to taste
- For cheater aioli: 1/2 cup mayonnaise, 1 garlic clove (minced), 1 tsp lemon juice, 1/2 tsp smoked paprika
Instructions
- Preheat oven to 400°F (200°C). Line a baking sheet with parchment paper.
- Bring 3 cups water to a simmer in a wide saucepan. Stir in baking soda until dissolved.
- Separate crescent dough into rectangles; cut each into 24 small strips. Wrap each cocktail sausage snugly in dough.
- Dip each wrapped sausage into the simmering baking soda bath for 10–15 seconds, then place on the parchment-lined sheet. This creates the pretzel crust texture.
- Brush each roll with beaten egg, sprinkle with everything bagel seasoning and flaky salt.
- Bake 12–15 minutes until golden brown and puffed. Edges should be deep golden; rotate pan halfway for even browning.
- While baking, whisk aioli ingredients in a bowl. Chill briefly.
- Brush finished rolls with melted butter for shine. Let rest 3 minutes before serving.
(Use a heavy-duty baking sheet for even color and a slotted spoon to lift from the soda bath.)
How to Serve It
Serve warm on a wooden board with ramekins of cheater aioli and mustard. Garnish with extra everything seasoning on the side. These reheat well in a 350°F oven for 6–8 minutes—store in airtight containers up to 3 days. Great next to pickles and a crisp pilsner for a casual spread.
2. Tomato-Peach Caprese Skewers — No-Cook Finger Foods
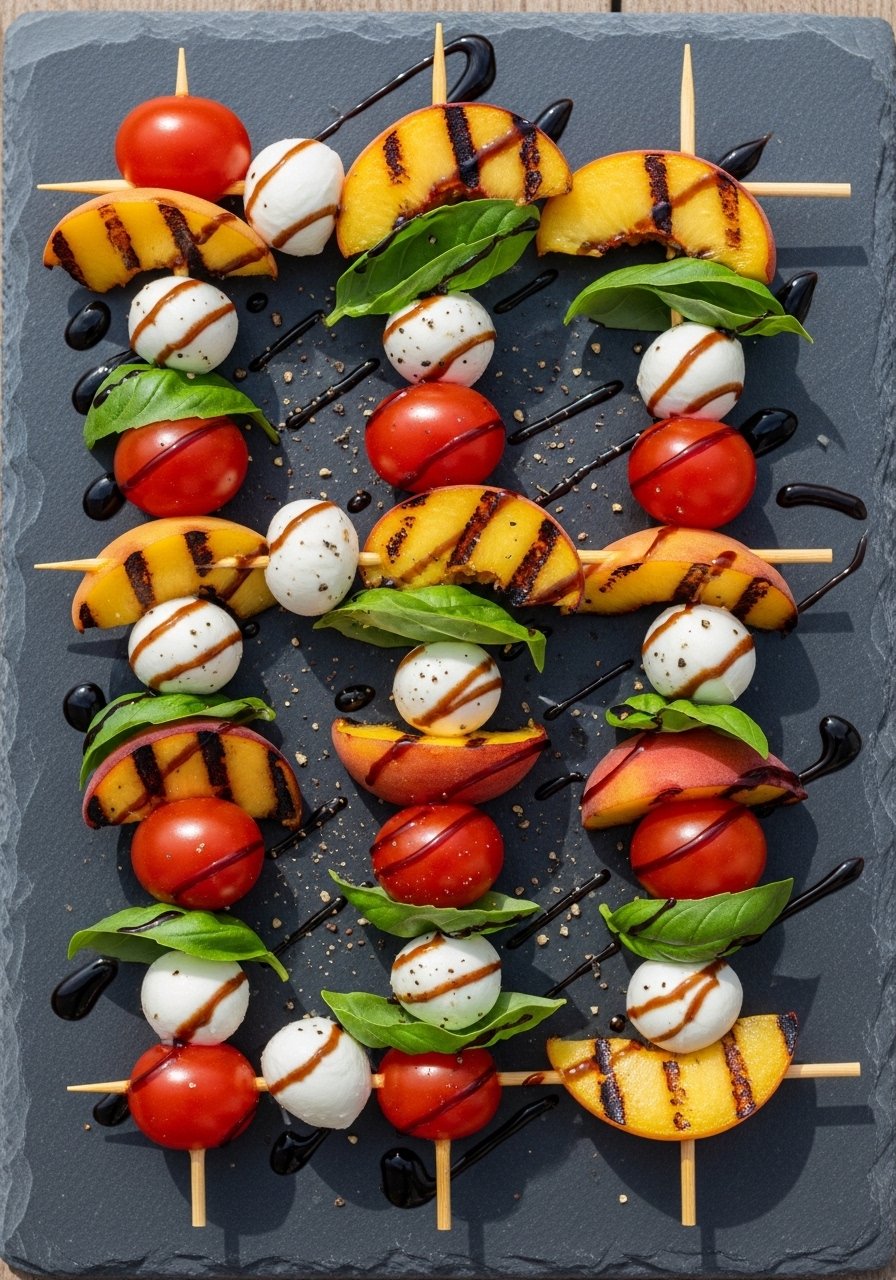
These are no-cook and gorgeous: sweet peach meets bright toms and creamy mozzarella. They’re juicy, fresh, and vanish fast at warm-weather gatherings. Ideal for beginner cooks and anyone who wants low cleanup.
Ingredients
- 24 wooden skewers (4-inch)
- 12 cherry tomatoes, halved
- 2 ripe peaches, sliced into 24 wedges (or use 24 grilled peach slices)
- 12 bocconcini (mini mozzarella balls), halved
- 24 fresh basil leaves
- 2 tbsp extra-virgin olive oil
- 1 tbsp honey
- 2 tbsp balsamic glaze
- Flaky sea salt
- Freshly ground black pepper
- Zest of 1 lemon (optional)
Instructions
- If grilling peaches, heat a grill pan or outdoor grill and char slices for 1–2 minutes per side. Let cool.
- On each skewer thread tomato half, basil leaf (folded), peach slice, mozzarella half.
- Whisk olive oil and honey; brush lightly over skewers or drizzle.
- Arrange on a platter and finish with balsamic glaze, a pinch of flaky salt, lemon zest, and black pepper.
- Serve immediately or chill up to 1 hour—don't assemble more than 2 hours ahead to avoid sogginess.
- For transport, layer skewers between parchment in a shallow container.
(If you want neat skewers fast, use 24-count disposable bamboo skewers.)
How to Serve It
Place on a long platter with small forks for guests who prefer utensils. Pair with light white wine or sparkling water. Store any leftovers in a single layer in glass meal prep containers for up to one day.
3. Corn Fritters with Elote Dip — Best Finger Foods for a Crowd

These corn fritters bring a street-food vibe—crispy outside, tender and sweet inside—with a tangy elote dip. They’re quick to pan-fry and easy to portion for a crowd. Spice lovers and kids both reach for seconds.
Ingredients
- 2 cups fresh or frozen corn kernels (thawed if frozen)
- 1 cup all-purpose flour
- 1/2 cup cornmeal
- 2 tsp baking powder
- 1/2 tsp baking soda
- 2 large eggs, room temperature
- 1/2 cup milk
- 3 tbsp finely chopped scallions
- 1/2 cup crumbled cotija or feta cheese
- 1/2 tsp smoked paprika
- Salt and pepper to taste
- Vegetable oil for frying (about 1/2 cup)
For elote dip:
- 1/2 cup mayonnaise
- 1/4 cup sour cream
- 1 tsp lime zest + 1 tbsp lime juice
- 1/2 tsp chili powder
- 2 tbsp chopped cilantro
Instructions
- Whisk flour, cornmeal, baking powder, baking soda, smoked paprika, salt and pepper in a medium bowl.
- In another bowl, whisk eggs and milk until blended. Stir into dry ingredients until mostly combined.
- Fold in corn, scallions, and cotija. Let batter rest 5 minutes to thicken.
- Heat 2 tbsp oil in a cast iron skillet over medium-high heat. Spoon heaping tablespoons of batter into skillet, flattening slightly.
- Fry 2–3 minutes per side until deep golden brown and crisp. Drain on paper towels.
- For dip, whisk mayo, sour cream, lime zest, juice, chili powder, and cilantro.
- Serve fritters hot with dollops of elote dip.
(An instant-read thermometer isn’t necessary, but if you use one, the oil temp around 350°F is ideal for consistent crisping.)
How to Serve It
Stack fritters on a shallow bowl with lime wedges and sprinkle extra cotija. They pair nicely with cold beers or margaritas. Keep leftovers in an airtight container and reheat in an air fryer at 350°F for 4–6 minutes to reclaim the crisp.
4. Easy Pinwheels (Beginner-Friendly Finger Foods)

Pinwheels are bright, portable, and visually appealing—tight rolling is the trick. These Italian-American-style bites are creamy and tangy with a perfect spiral presentation. Chill before slicing for clean rounds.
Ingredients
- 6 large flour tortillas
- 8 oz cream cheese, softened
- 1/2 cup grated mozzarella
- 1/3 cup sun-dried tomatoes (oil-packed), drained and chopped
- 1 cup fresh spinach leaves, thinly sliced
- 1/4 cup thinly sliced pepperoni (optional)
- 2 tbsp chopped fresh basil
- 1 tsp garlic powder
- Salt and pepper to taste
- Olive oil for brushing
Instructions
- Chill cream cheese if needed, then beat in a bowl until smooth using a hand mixer or sturdy spoon.
- Stir in mozzarella, garlic powder, basil, salt and pepper.
- Lay tortilla flat; spread an even layer (~2–3 tbsp) of cheese mixture, leaving a 1/2-inch border.
- Scatter spinach, sun-dried tomatoes, and pepperoni if using.
- Tightly roll the tortilla into a log. Wrap in plastic and chill 30 minutes—this firms the log for neater slices.
- Unwrap and slice into 3/4-inch rounds with a sharp knife. Use a serrated knife for cleaner cuts.
- Brush lightly with olive oil and serve on a platter.
(Using a rolling pin to press lightly over the filled tortilla before rolling helps compact layers for neater spirals.)
How to Serve It
Arrange cut pinwheels on a platter with toothpicks or small skewers. Garnish with fresh basil leaves. Store leftovers in a glass meal prep container for up to 2 days—best served chilled.
5. Smoked Salmon & Cucumber Appetizers (Scandi-Style Finger Foods)
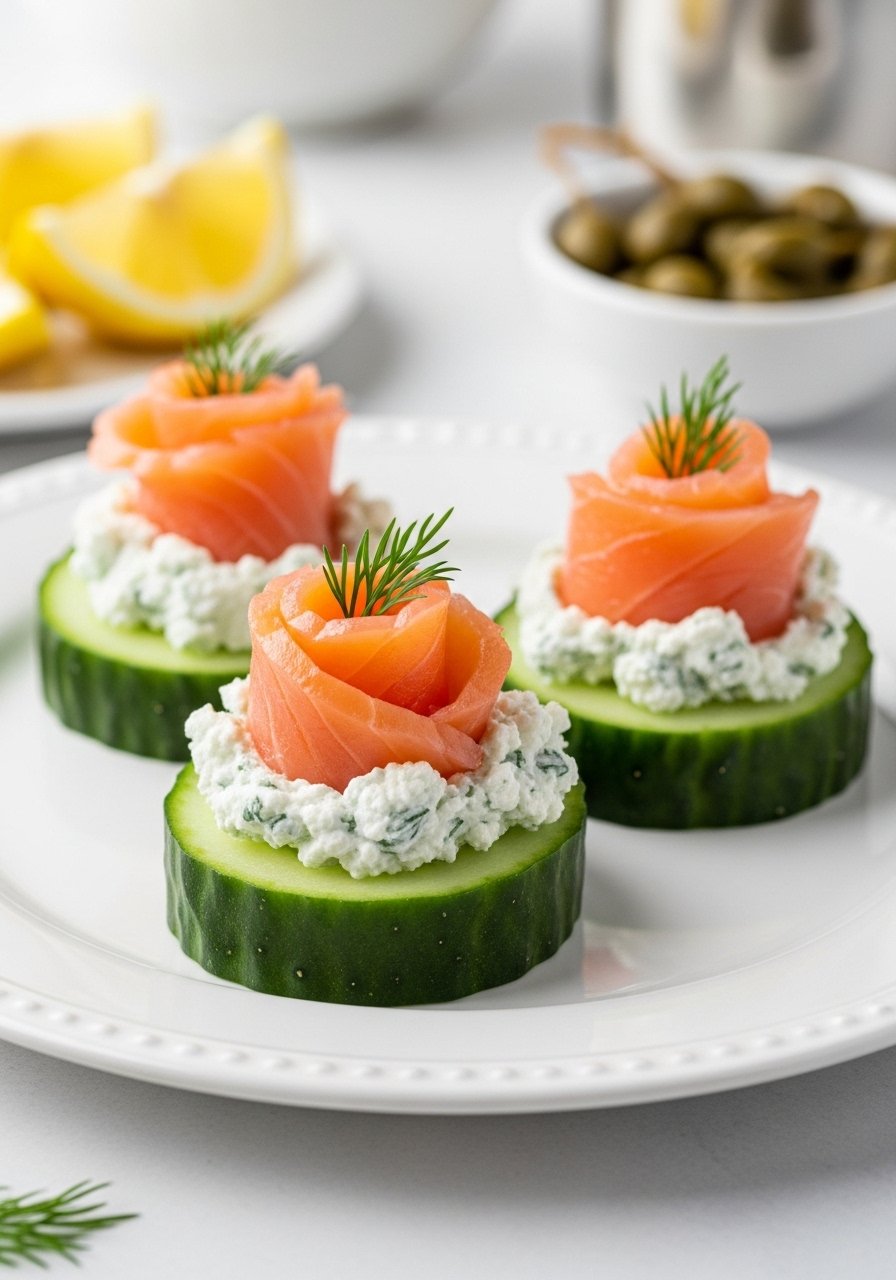
These look fancy but are effortless. Crisp cucumber bases keep things light while silky salmon and herbed cheese bring richness. They’re a refined cold option that helps balance a heavy spread.
Ingredients
- 2 large English cucumbers, sliced into 1/2-inch rounds
- 8 oz cream cheese, softened
- 2 tbsp sour cream
- 1 tbsp lemon juice
- 1 tbsp chopped fresh dill
- 1 tsp grated lemon zest
- Salt and pepper
- 8 oz smoked salmon, sliced into bite-sized pieces
- 1 tbsp capers, drained
- Fresh dill sprigs for garnish
Instructions
- Pat cucumber slices dry with paper towel to remove excess moisture.
- In a bowl, whip cream cheese, sour cream, lemon juice, lemon zest and chopped dill until smooth—an immersion blender makes it extra silky.
- Pipe or spoon a dollop of herbed cheese onto each cucumber round.
- Top with a fold of smoked salmon and a few capers.
- Garnish with small dill sprig and a light grind of black pepper.
- Chill until serving—assemble up to 4 hours ahead to avoid sogginess.
(A piping bag gives a neat finish when dolloping the cheese.)
How to Serve It
Arrange on a chilled platter with lemon wedges. Pair with crisp white wine or champagne. Store in a single layer in airtight containers for up to 1 day.
6. Pull-Apart Pigs-in-a-Blanket Bread (Shareable Finger Foods)

This is communal comfort-food: mini sausages tucked into biscuit dough in a pull-apart loaf. Guests love ripping pieces, and it’s a forgiving recipe if you’re short on time. Perfect for game days and casual parties.
Ingredients
- 2 cans (16.3 oz each) refrigerated biscuit dough (buttermilk biscuits)
- 24 mini sausages or cocktail franks
- 1/4 cup brown mustard
- 1/4 cup honey mustard
- 1/4 cup melted butter
- 1/2 tsp garlic powder
- 1 tbsp poppy seeds (optional)
- 2 tbsp chopped chives
- Salt and pepper to taste
- For dipping: grainy mustard and ketchup
Instructions
- Preheat oven to 375°F (190°C). Grease a bundt pan or line a circular baking dish with parchment paper.
- Flatten each biscuit lightly and brush with a thin layer of brown mustard.
- Wrap each mini sausage in a biscuit and place seam-side down in the pan in concentric circles.
- Whisk melted butter with garlic powder and brush over the top. Sprinkle poppy seeds and chives.
- Bake 25–30 minutes until biscuits are golden and cooked through. A toothpick inserted should come out clean from the biscuit dough.
- Let rest 5 minutes, then invert onto a serving board and pull apart.
(Use a silicone basting brush to apply butter evenly.)
How to Serve It
Serve warm on a platter with small bowls of grainy mustard and ketchup. Leftovers keep well in an airtight container and reheat covered in a 350°F oven for 10–12 minutes.
7. Slow Cooker Chipotle Meatballs — Set-and-Forget Finger Foods
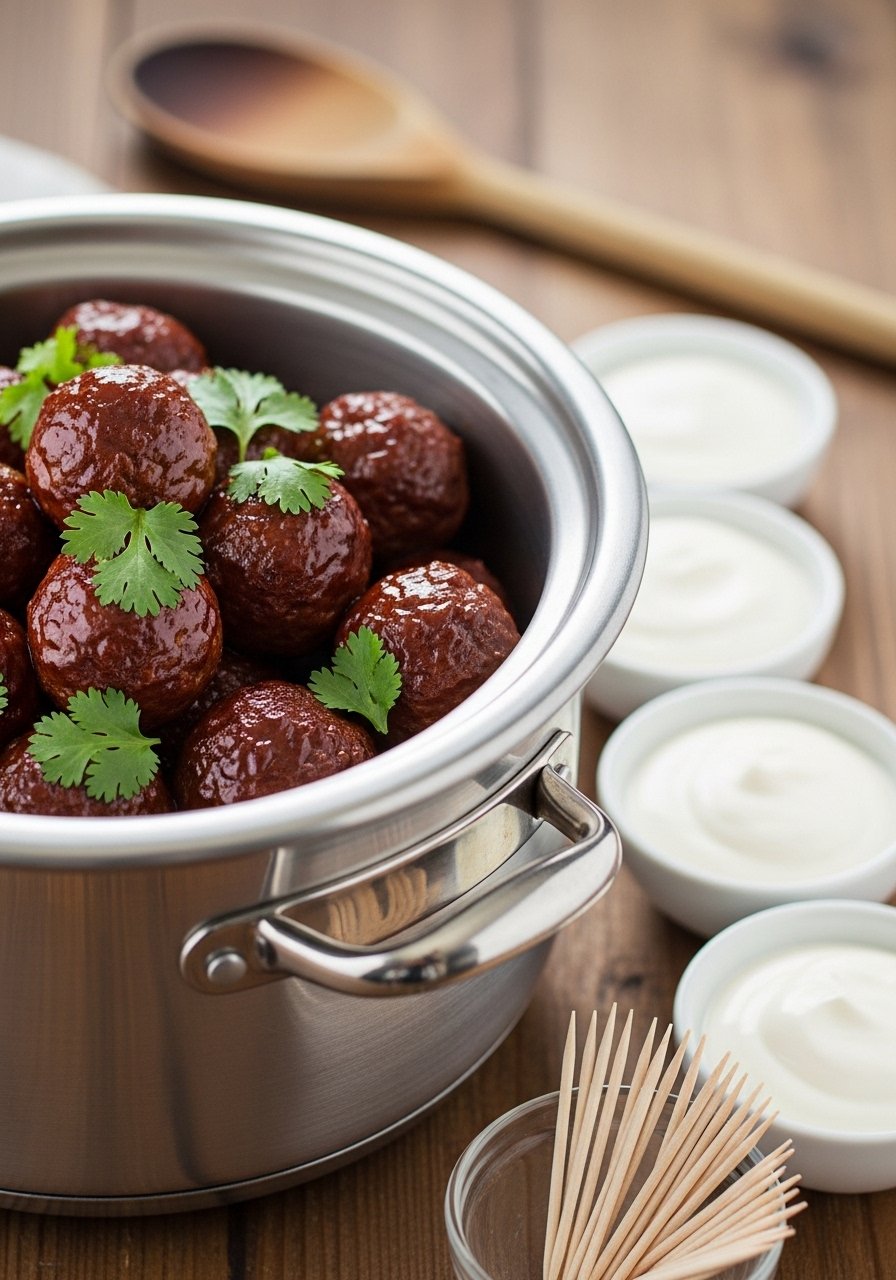
These meatballs are great when you need a warm, saucy finger food you can leave on low. Smoky chipotle adds depth and the slow cooker keeps them tender. Serve with toothpicks for mess-free passing.
Ingredients
- 2 lbs ground beef (or 1 lb beef + 1 lb pork)
- 1 cup fresh breadcrumbs
- 1/2 cup milk
- 1 large egg
- 1/4 cup grated onion
- 2 cloves garlic, minced
- 1 tsp smoked paprika
- 1 tsp salt
- 1/2 tsp black pepper
- 1 cup barbecue sauce
- 2 tbsp adobo sauce from chipotle peppers
- 1 tbsp brown sugar
- Chopped cilantro for garnish
- Toothpicks for serving
Instructions
- In a bowl, soak breadcrumbs in milk for 5 minutes.
- Mix soaked crumbs with ground meat, egg, onion, garlic, paprika, salt and pepper. Use hands to combine gently—don’t overmix.
- Form into 1-inch meatballs (about 40–45). Place on a tray.
- Brown meatballs in batches in a large non-stick pan over medium-high heat, 1–2 minutes per side (optional but helps texture).
- Whisk barbecue sauce, adobo sauce and brown sugar. Pour half into slow cooker.
- Nestle meatballs in the sauce, pour remaining sauce over top. Cook on low 3–4 hours or high 1.5–2 hours until internal temp 165°F.
- Stir gently before serving to coat. Garnish with cilantro and stick with toothpicks.
(An inexpensive slow cooker saves hands-on time—set it and forget it.)
How to Serve It
Serve warm from the slow cooker in a bowl with a ladle and toothpicks for guests. Leftovers freeze well—place cooled meatballs in freezer-safe containers for up to 3 months and reheat in a pot or microwave.
8. Mini Sausage Rolls (Flaky Pub-Style Finger Foods)

These mini sausage rolls are flaky with a juicy interior. Adding a splash of water to the sausage mix keeps the pastry from drying, giving a bakery-quality lift. They’re handheld, portable, and vanish quickly.
Ingredients
- 1 lb sausage meat (or 8–10 good-quality pork sausages, casings removed)
- 1 sheet puff pastry, thawed (about 8 oz)
- 1 small onion, finely chopped
- 1/4 cup fresh breadcrumbs
- 1 egg, beaten (for egg wash)
- 1 tbsp cold water
- 1 tsp dried thyme
- Salt and pepper
- 1 tbsp Dijon mustard (for brushing)
- Sesame or poppy seeds for sprinkling
Instructions
- Preheat oven to 400°F (200°C). Line a baking sheet with parchment paper.
- In a bowl, combine sausage meat, onion, breadcrumbs, thyme, salt and pepper. Add 1 tbsp cold water and mix; this keeps the filling moist.
- Roll puff pastry into a rectangle. Spread a thin layer of Dijon mustard along the center.
- Shape sausage mixture into two logs down the pastry center. Fold pastry over and seal edges (use a little beaten egg if needed).
- Cut into 1-inch pieces and place seam-side down. Brush with beaten egg and sprinkle seeds.
- Bake 18–22 minutes until pastry is puffed and golden, and filling reaches 160°F.
- Let cool slightly; serve warm.
(Use a bench scraper to portion rolls cleanly.)
How to Serve It
Serve on a platter with mustard or sweet chili sauce. Keep in a glass meal prep container up to 3 days and reheat in a 375°F oven for 8–10 minutes.
9. Nduja Sausage Rolls — Spicy Italian Finger Foods

If you want heat and umami, nduja adds instant punch to sausage rolls. It’s bold, spreadable, and combines beautifully with flaky pastry. Serve with cooling yogurt dip if kids are present.
Ingredients
- 1 sheet puff pastry, thawed (8 oz)
- 8 oz sausage meat
- 3 tbsp nduja paste
- 1/4 cup grated Pecorino Romano
- 1 small shallot, finely minced
- 1 egg, beaten
- 1 tbsp water
- Fresh parsley, chopped
- Salt and pepper
- Greek yogurt dip: 1/2 cup Greek yogurt, 1 tsp lemon juice, 1 tsp honey
Instructions
- Preheat oven to 400°F (200°C). Line a baking sheet with parchment.
- Mix sausage meat, nduja, Pecorino, shallot, parsley, salt and pepper. Add 1 tbsp water to bind.
- Roll out pastry, form filling into a log down center, fold over, seal and cut into 1-inch pieces.
- Brush with beaten egg and bake 18–22 minutes until golden and cooked.
- Mix Greek yogurt dip ingredients for a cooling contrast.
- Serve warm with dip on the side.
(If you’re new to nduja, a small jar goes a long way—store extras in the fridge or freezer.)
How to Serve It
Serve with a cool yogurt dip and pickled vegetables to balance heat. Store in airtight containers up to 3 days; re-crisp in a hot oven before serving.
10. Air-Fryer Cauliflower Popcorn — Vegan Finger Foods
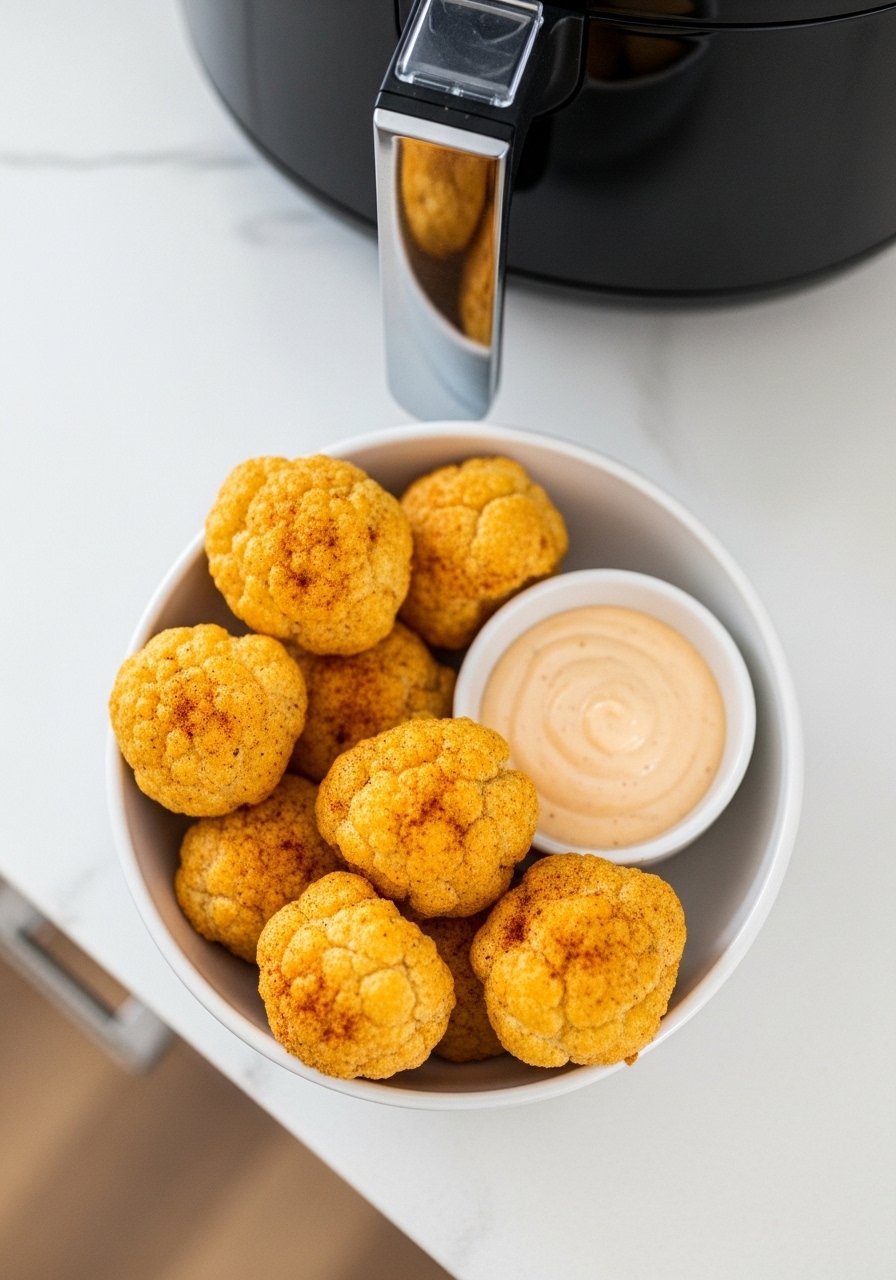
This air-fryer trick produces crunchy, oil-free cauliflower nuggets with huge snack appeal. They’re light, vegan-friendly, and easy to scale. Pat the florets dry for the best crunch.
Ingredients
- 1 medium head cauliflower, cut into small florets (about 4 cups)
- 2 tbsp olive oil
- 1/2 cup chickpea flour (or all-purpose)
- 1/2 cup water
- 1 tsp garlic powder
- 1 tsp smoked paprika
- 1/2 tsp salt
- 1/4 tsp black pepper
- 2 tbsp nutritional yeast (optional, for "cheesy" flavor)
- For dip: 1/2 cup vegan mayo, 1 tbsp lemon juice, 1 clove garlic (minced)**
Instructions
- Pat cauliflower dry thoroughly—moisture prevents crisping.
- Whisk chickpea flour, water, olive oil, garlic powder, smoked paprika, salt and nutritional yeast into a thin batter.
- Toss florets in the batter until evenly coated.
- Arrange in a single layer in the basket of an air fryer (you may need two batches).
- Air-fry at 400°F (200°C) for 12–15 minutes, shaking basket halfway, until golden and crisp.
- Mix dip ingredients and serve alongside florets.
(Patting dry and using an air fryer basket that allows airflow are key.)
How to Serve It
Serve in small bowls with toothpicks and the dip. These are great with beers or zesty cocktails. Store leftovers in the fridge in an airtight container and re-crisp in the air fryer for 3–5 minutes.
11. Gochujang Chicken Wings — Spicy Asian-Fusion Finger Foods

These wings are sticky, spicy, and crave-worthy. Gochujang gives a sweet-umami heat while a quick broil or air-fry finishes them with charred edges. Perfect for groups who like bold flavors.
Ingredients
- 2 lbs chicken wings (flats & drumettes)
- 2 tbsp soy sauce
- 2 tbsp gochujang paste
- 2 tbsp honey
- 1 tbsp rice vinegar
- 1 tbsp sesame oil
- 2 cloves garlic, minced
- 1 tsp grated ginger
- Sesame seeds and sliced scallions for garnish
- Salt and pepper to taste
Instructions
- Pat wings dry and season lightly with salt and pepper.
- In a bowl, whisk soy sauce, gochujang, honey, rice vinegar, sesame oil, garlic and ginger.
- Toss wings in half the sauce and marinate 30 minutes (or up to 4 hours).
- Preheat oven to 425°F (220°C) or preheat an air fryer to 400°F.
- For oven: place wings on a wire rack over a baking sheet and bake 35–40 minutes, flipping once, until skin is crisp. Brush remaining sauce during last 5 minutes and broil 1–2 minutes for char.
- For air fryer: arrange in single layer and air-fry 20–25 minutes, shaking halfway, brush with sauce and cook 2–3 more minutes.
- Garnish with sesame seeds and scallions before serving.
(An instant-read thermometer helps ensure wings reach 165°F safely.)
How to Serve It
Serve on a platter with napkins and a cooling side like quick pickled cucumbers. Store leftovers in a glass container and reheat in an air fryer for 4–6 minutes.
12. Whipped Feta Dip with Warm Pita Chips (Whipped Dip Finger Foods)
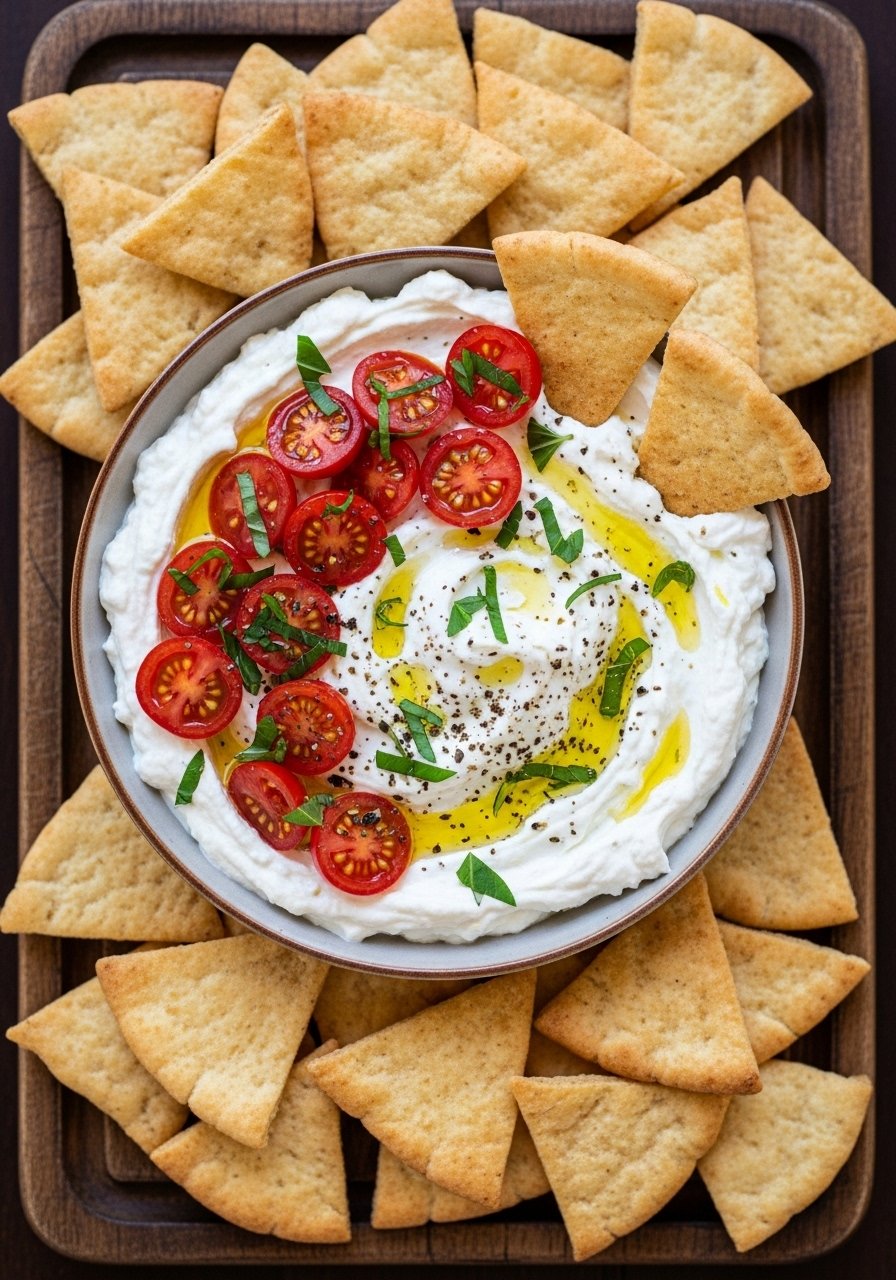
Whipping feta makes it fluffy and spoonable—an instant crowd-pleaser. Serve with warm pita chips or crisp veggies. The creamy texture makes it a top pick among finger foods for parties.
Ingredients
- 10 oz block feta cheese
- 4 oz cream cheese, softened
- 1/4 cup Greek yogurt
- 2 tbsp extra-virgin olive oil, plus extra for drizzling
- 1 clove garlic, minced
- 1 tbsp honey or lemon juice (choose sweet or bright)
- 1/4 cup roasted cherry tomatoes or chopped roasted peppers
- Fresh basil or oregano for garnish
- For pita chips: 6 pita pockets, cut into wedges, brushed with olive oil and sprinkled with za’atar**
- Salt and pepper to taste
Instructions
- Preheat oven to 400°F (200°C) for pita chips, if making. Toss pita wedges with olive oil and za’atar and bake 8–10 minutes until crisp.
- In a food processor, blend feta, cream cheese, yogurt, olive oil, garlic and honey/lemon until smooth and whipped—scrape sides and process again.
- Spoon into a serving bowl, drizzle with olive oil and top with roasted cherry tomatoes and herbs.
- Chill 10–15 minutes or serve right away with warm pita chips and crudités.
- If using a food processor, pulse until creamy for best texture.
How to Serve It
Serve on a shallow bowl with pita chips in a basket and a platter of sliced cucumber, carrots and radishes. Store leftovers in an airtight container up to 4 days. Re-whip briefly before serving if it separates.
You now have a dozen tried-and-true recipes that vanish from trays and get guests talking. From no-cook skewers to slow-cooker meatballs and air-fried veggies, these finger foods cover vegetarian, spicy, and comfort-food cravings. Pin this post to plan your next party and save recipes you want to try.
Which one are you making first—pretzel pigs, gochujang wings, or whipped feta dip? Share with friends and swap ideas; they’ll thank you when the plate is empty. And if you’re stocking your kitchen for party season, a silicone baking mat set makes cleanup and baking so much easier—no more scrubbing pans between batches.