Fresh food that looks gorgeous on camera feels like a small thrill—whether you're food-blogging, styling a brunch, or just posting to your favorite board. These aesthetic food recipes are designed to photograph beautifully and taste even better. They lean on color contrasts, neat plating, and texture play so your photos pop on Pinterest and Instagram.
You’ll find 14 recipes that cover breakfasts, snacks, desserts, and mains—each one crafted to be camera-friendly and approachable. I mention helpful tools as you go, like my go-to KitchenAid stand mixer for silky batters and a trusty cast iron skillet for charred edges that photograph deep, appetizing browns. Tips for plating, lighting, and quick fixes are tucked into each recipe so you'll get beautiful, consistent shots every time.
Bookmark this list of Aesthetic Food Recipes and try one this weekend—you'll get likes and, more importantly, a delicious result to be proud of.
1. Aesthetic Lemon Ricotta Pancakes with Honey Drizzle
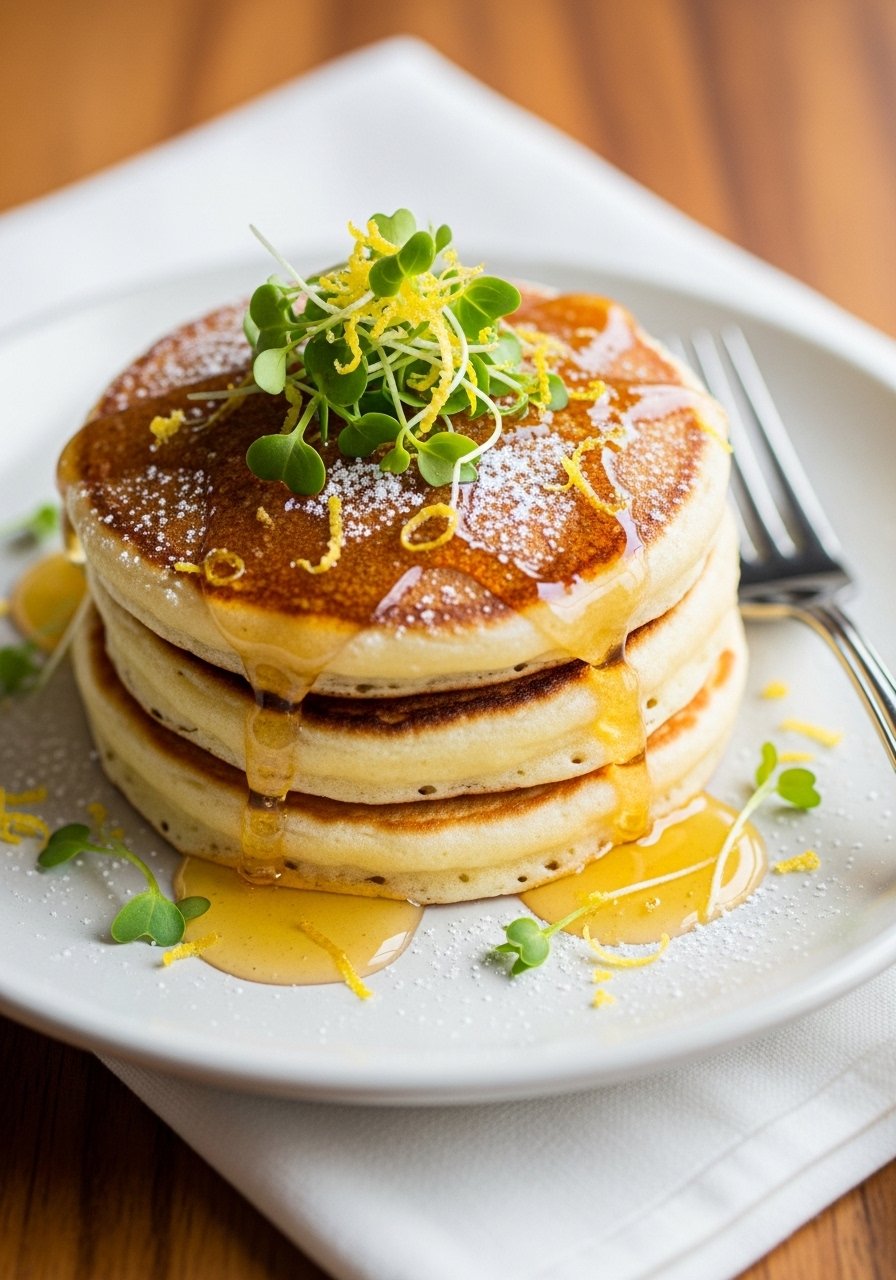
These pancakes are pillowy, barely sweet, and photograph with airy, rounded edges—perfect for breakfast flat-lays. The ricotta adds creaminess and texture, while lemon brightens the frame and taste. They’re quick to whip up and ideal for brunch shots with fresh fruit and gold-toned cutlery.
Ingredients
- 1 cup whole milk ricotta
- 1 cup all-purpose flour
- 2 tbsp granulated sugar
- 2 tsp baking powder
- 1/4 tsp fine sea salt
- 2 large eggs, room temperature
- 1/2 cup whole milk
- 2 tbsp unsalted butter, melted and cooled
- 1 tbsp lemon zest (from 1 large lemon)
- 1 tbsp lemon juice
- 1 tsp vanilla extract
- Butter or oil for the pan
- Honey and extra lemon zest for serving
Instructions
- In a bowl, whisk flour, sugar, baking powder, and salt until combined.
- In a separate bowl, beat ricotta, eggs, milk, melted butter, lemon zest, lemon juice, and vanilla until smooth.
- Fold dry ingredients into wet gently—do not overmix; small lumps are fine.
- Heat a non-stick skillet or griddle over medium heat and brush with butter. (Cast iron gives great color—try a cast iron skillet if you like crispy edges.)
- Spoon 1/4-cup batter per pancake onto the pan. Cook until bubbles form and edges look set, about 2–3 minutes, then flip and cook 1–2 minutes more until golden.
- Stack pancakes on a warm plate; drizzle with honey and finish with extra lemon zest. A quick check: the center should be set and spring back slightly.
How to Serve It
Serve stacked on a shallow white plate for contrast. Garnish with fresh berries, a sprig of mint, and a light dusting of powdered sugar. Pair with strong coffee or a citrusy tea. Store leftover pancakes in an airtight container in the fridge for up to 3 days; reheat in a toaster or skillet to restore texture. For prepping photos, keep a small dish of honey and a microplane nearby for last-minute zest.
2. Matcha Crepe Cake with Whipped Coconut Cream
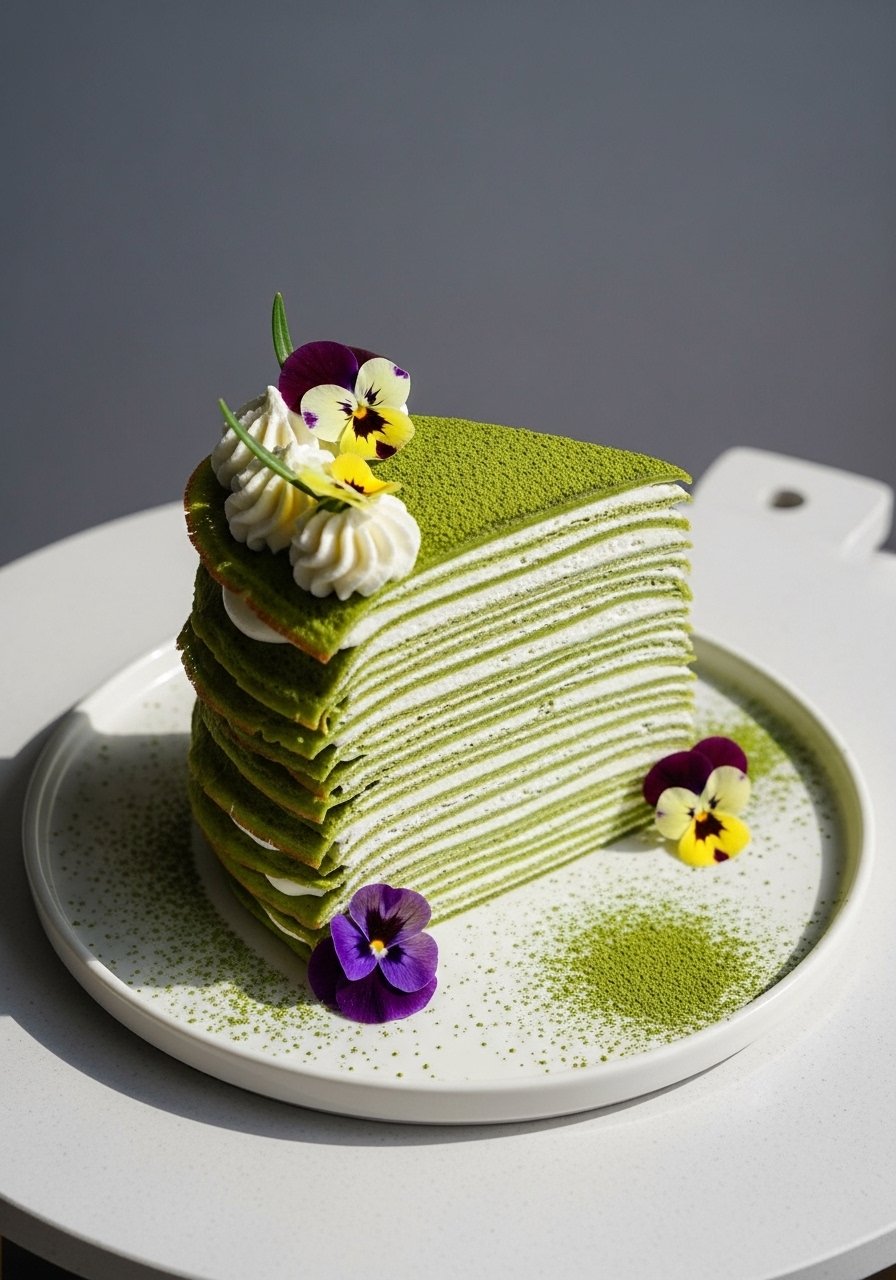
This layered crepe cake looks elegant and refined on camera—the thin, uniform layers create a striped side profile that's irresistible. The earthy matcha color pops against white whipped coconut cream, making it great for minimalist feeds and afternoon tea shots.
Ingredients
- 2 cups all-purpose flour
- 3 tbsp sugar
- 1/2 tsp fine salt
- 2 tbsp culinary matcha powder, sifted
- 3 large eggs
- 2 cups whole milk
- 1/2 cup water
- 3 tbsp melted unsalted butter, cooled
- 2 cans (13.5 oz each) full-fat coconut milk, chilled overnight
- 2 tbsp powdered sugar (for cream)
- 1 tsp vanilla extract
- Edible flowers or berries for garnish
Instructions
- Whisk flour, sugar, salt, and matcha in a large bowl.
- In another bowl, whisk eggs, milk, water, and melted butter until combined.
- Gradually whisk wet into dry until smooth. Let batter rest 30 minutes in the fridge.
- Heat a 9–10 inch non-stick skillet over medium-low. Lightly brush with butter. Pour ~1/4 cup batter, tilt to coat into a thin crepe—cook 30–45 seconds until edges lift, flip and cook 10–15 seconds.
- Stack crepes on parchment as you make them. Aim for 20–24 crepes for a tall cake.
- For coconut cream, open chilled cans and scoop thick cream into a bowl (discard excess liquid or save for smoothies). Whip with powdered sugar and vanilla until fluffy using a hand mixer.
- Layer 1 crepe, spread 2 tbsp cream, repeat until stack is done. Chill 1–2 hours to set.
- Dust top with matcha and garnish right before shooting.
How to Serve It
Slice with a clean, hot knife for sharp layers—dip the knife in hot water and wipe between cuts. Serve on a cake stand or white plate; top with fresh berries for color. Keep covered in the fridge up to 3 days in a glass meal prep container. Make ahead by up to a day for clean slicing.
3. Charred Peach and Burrata Salad with Honey-Balsamic
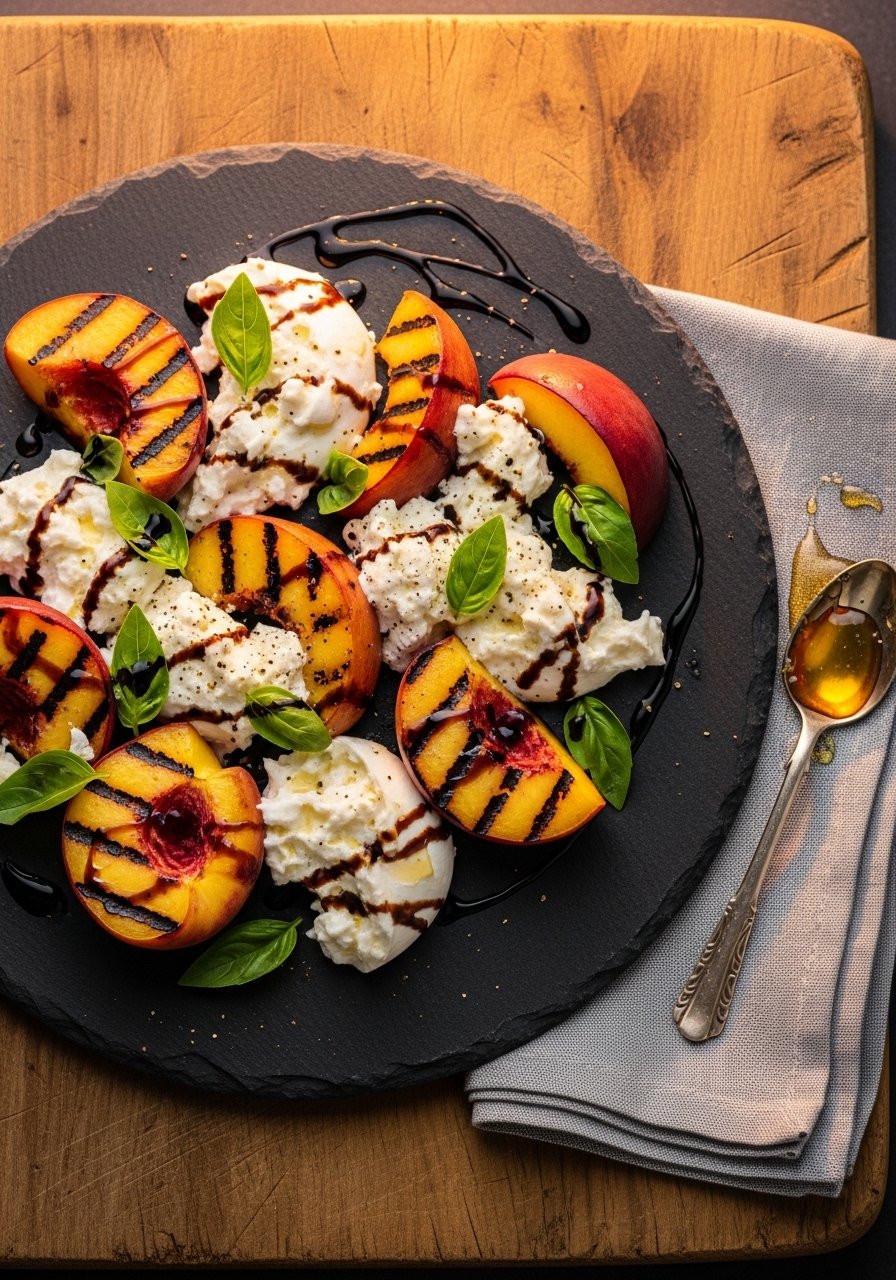
Grilling peaches adds caramelized color and depth, while burrata gives a creamy center that looks lush in photos. The contrast between charred edges and soft cheese makes each bite—and each frame—more interesting. It's a quick, elegant starter for warm-weather shoots.
Ingredients
- 4 ripe but firm peaches, halved and pitted
- 2 tbsp olive oil
- 4 oz burrata (1 ball)
- 2 cups arugula or mixed greens
- 2 tbsp honey
- 2 tbsp aged balsamic vinegar
- 1 tbsp lemon juice
- Salt and black pepper to taste
- 1 tbsp toasted pine nuts (optional)
- Fresh basil for garnish
Instructions
- Preheat grill or grill pan to medium-high. Brush peach halves with olive oil.
- Grill peaches cut-side down 3–4 minutes until charred; flip 1–2 minutes for grill marks.
- Whisk honey, balsamic, lemon juice, and a pinch of salt for dressing.
- Arrange greens on a platter, place charred peaches and torn burrata on top.
- Drizzle dressing, scatter pine nuts and basil. Taste and season.
- For precise char, use a hot grill and resist moving the peach until grill marks form.
How to Serve It
Serve on a wide, shallow plate to show the char marks and cheese. Pair with crusty bread and a chilled rosé. Press-fit photos with a drizzle of extra honey for shine. Store burrata separately and assemble just before serving; leftovers keep in an airtight container for 24 hours.
4. Berry Swirl Yogurt Parfaits with Granola Clusters
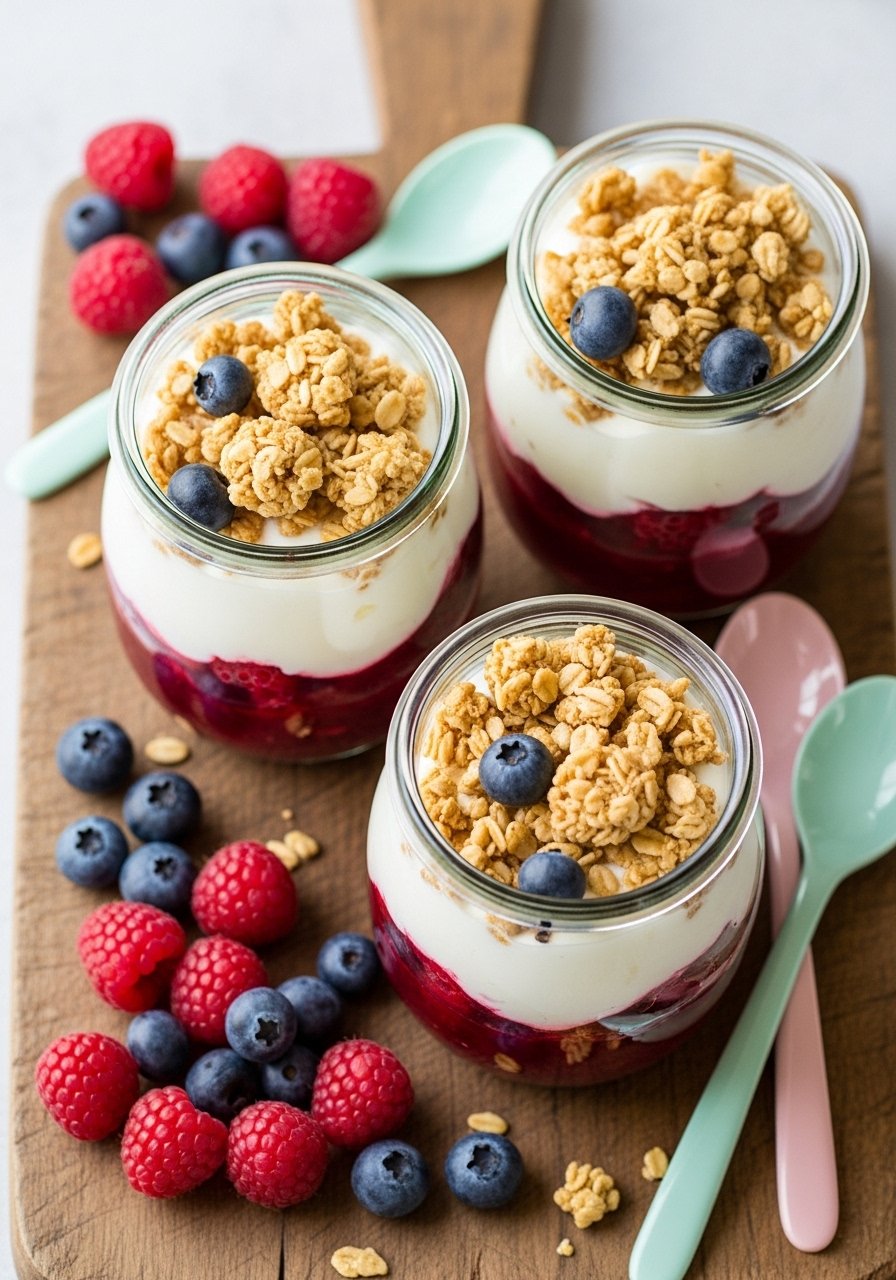
Clear layers and bright berry colors make these parfaits perfect for tall, vertical shots on Pinterest. The granola clusters add texture and catch highlights, while the swirl patterns give a handcrafted look.
Ingredients
- 2 cups mixed berries (fresh or frozen)
- 2 tbsp maple syrup
- 1 tsp lemon juice
- 3 cups Greek yogurt (plain or vanilla)
- 1/4 cup honey (for yogurt layer if needed)
- 2 cups rolled oats
- 1/2 cup sliced almonds
- 1/3 cup coconut oil
- 1/4 cup brown sugar
- 1 tsp vanilla extract
- Pinch salt
Instructions
- Make compote: simmer berries, maple syrup, and lemon juice 5–8 minutes until jammy. Cool.
- For granola, preheat oven to 325°F (163°C). Mix oats, almonds, coconut oil, brown sugar, vanilla, and salt.
- Spread on a sheet pan and bake 18–22 minutes, stirring halfway, until golden and clumpy.
- Cool granola so clusters form; break into pieces.
- Layer parfaits: 2–3 tbsp compote, 1/2 cup yogurt, 2 tbsp granola, repeat.
- Chill briefly for photos so layers settle.
How to Serve It
Serve in clear jars to highlight layers. Top with a drizzle of honey and a few whole berries. Store granola separately in an airtight container for up to 2 weeks and assemble parfaits just before serving to keep granola crunchy.
5. Aesthetic Sourdough Toast Board with Seasonal Toppings
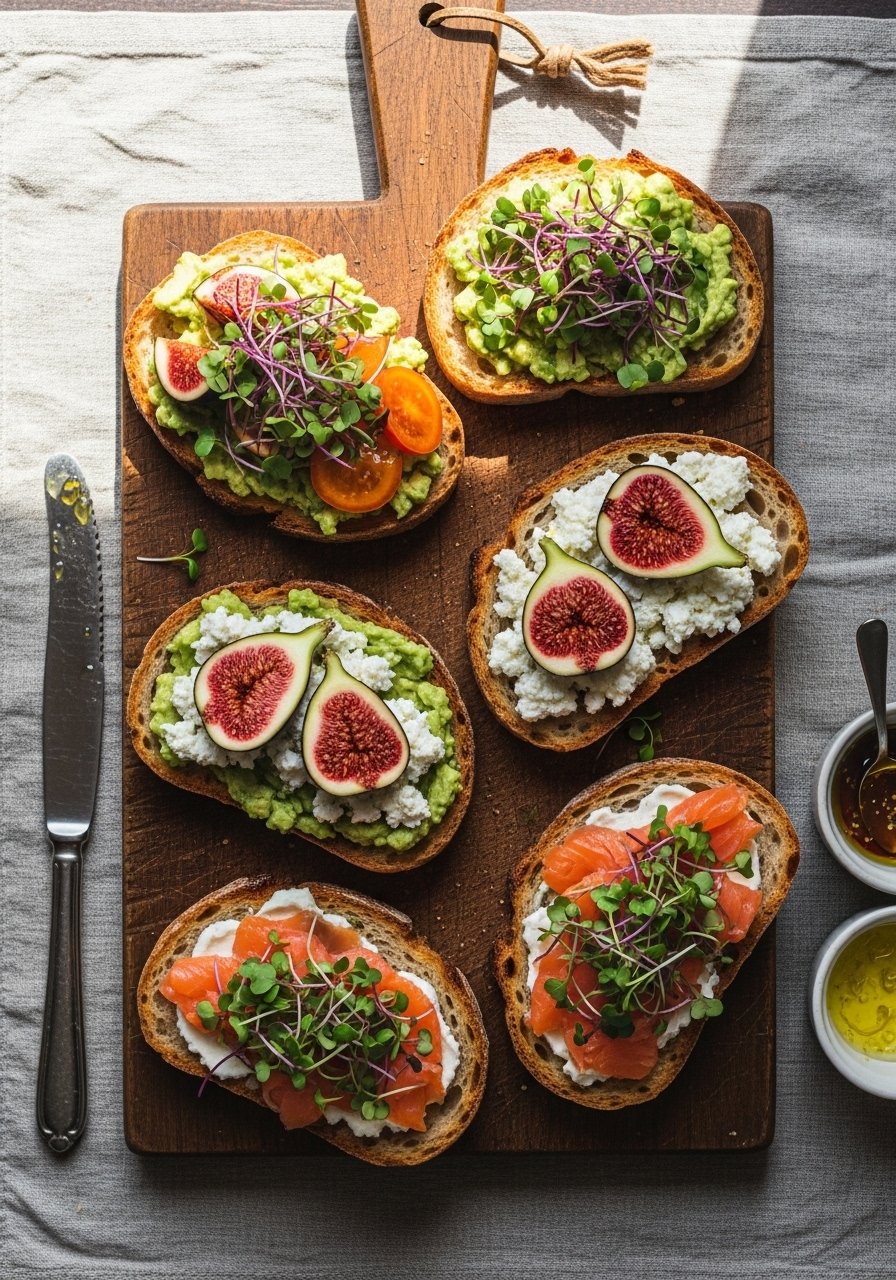
A toast board is a visual feast—and super easy to style for photos. Sourdough's open crumb and golden crust create great texture; arranging toppings in color blocks makes each shot pop. This is crowd-friendly and adaptable to vegan or gluten-free preferences.
Ingredients
- 1 large sourdough loaf (about 1 lb), sliced thick
- 2 ripe avocados
- 1 cup ricotta
- 4 oz smoked salmon (optional)
- 6 fresh figs, quartered
- 1/2 cup cherry tomatoes, halved
- 1 tbsp lemon juice
- Salt and pepper to taste
- Olive oil for drizzling
- Microgreens for garnish
- Optional: hummus, pickled onions, za'atar
Instructions
- Toast sourdough slices until golden and crisp—either in a toaster oven or on a grill pan over medium heat.
- Smash avocados with lemon, salt, and pepper. Spread ricotta and season lightly.
- Arrange toppings in small bowls or directly on slices—group colors for visual impact.
- For warm toasts, drizzle olive oil and finish with microgreens.
- If using smoked salmon, fold gently to create volume before placing on toast.
- For crisping bread with even color, try a heavy-duty baking sheet under the grill or oven.
How to Serve It
Serve as a laid-back brunch board on a wooden plank or slate. Garnish with lemon wedges and a small jar of honey or chili oil. Store leftover toppings in glass meal prep containers and assemble just before serving to keep bread crisp.
6. Beet Hummus Toasts with Feta and Pistachios (Vibrant Vegan Option)
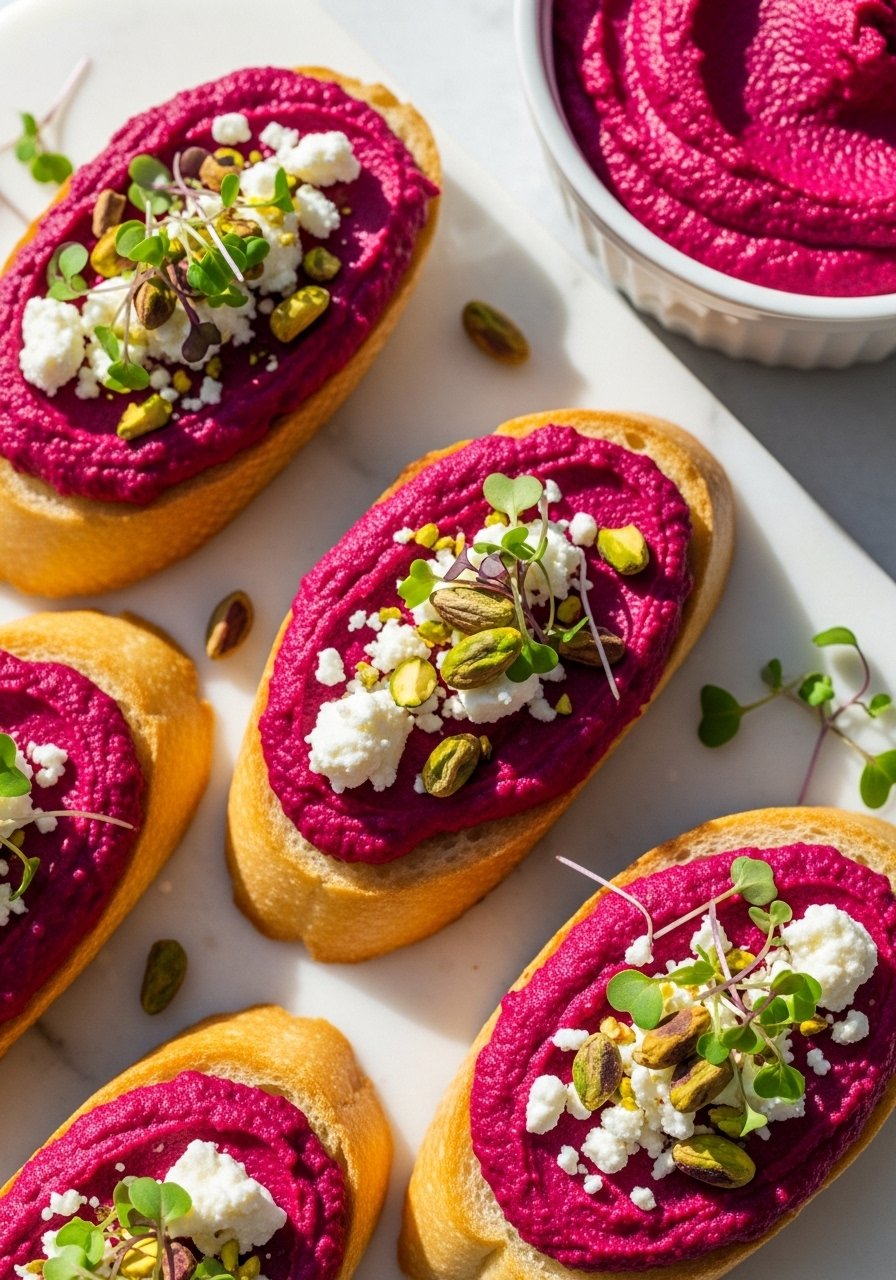
Beet hummus gives a bold color that photographers love. Spread thinly on crisp toast, it becomes a striking base for contrasting toppings like feta and green pistachios. It’s quick, healthy, and vegan-friendly if you skip feta.
Ingredients
- 2 medium roasted beets (about 1 cup), cooled and peeled
- 1 can (15 oz) chickpeas, drained and rinsed
- 2 tbsp tahini
- 2 tbsp lemon juice
- 1 clove garlic
- 2 tbsp olive oil plus more for drizzling
- 1/2 tsp ground cumin
- Salt to taste
- 1/4 cup crumbled feta (optional)
- 1/4 cup chopped pistachios
- 1 baguette, sliced and toasted
- Microgreens for garnish
Instructions
- In a food processor, combine beets, chickpeas, tahini, lemon, garlic, olive oil, cumin, and salt. Process until smooth. (A food processor works best.)
- Adjust seasoning and add a little water if too thick.
- Toast baguette slices until golden.
- Spread beet hummus on toast, sprinkle feta and pistachios.
- Drizzle with olive oil and finish with microgreens.
- For even coverage, use an offset spatula to spread hummus smoothly.
How to Serve It
Arrange toasts on a long wooden board for a showy presentation. Pair with crisp white wine or sparkling water with citrus. Store hummus in an airtight container in the fridge up to 5 days; toast just before serving.
7. Shakshuka with Feta and Harissa Swirl (One-Pan Brilliance)
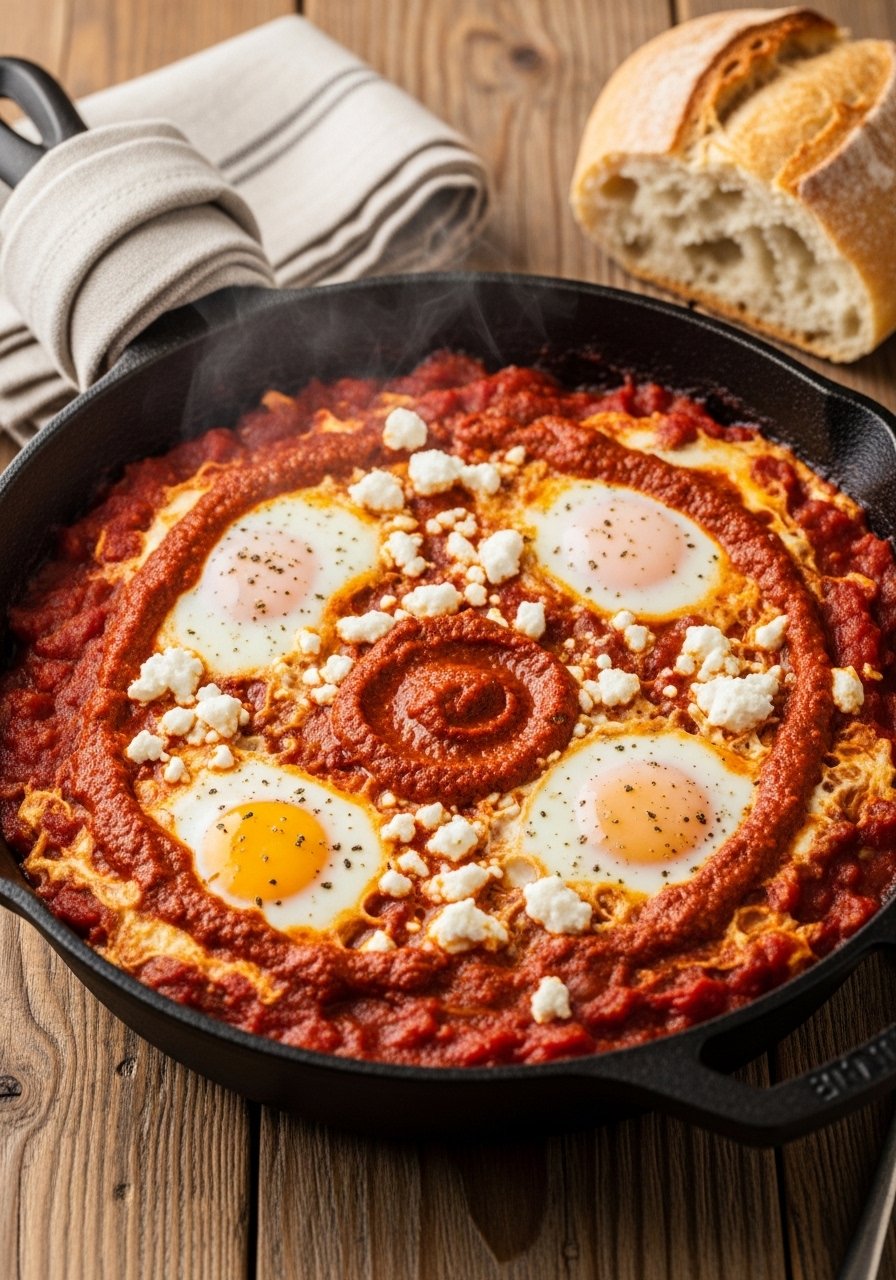
Shakshuka is a one-pan hero: the bubbling red tomato base and bright egg yolks look gorgeous in a skillet. The contrast of white feta and glossy yolks makes each spoonful photogenic, and it’s simple to make for brunch shots.
Ingredients
- 2 tbsp olive oil
- 1 medium onion, thinly sliced
- 1 red bell pepper, diced
- 3 cloves garlic, minced
- 1 tsp ground cumin
- 1 tsp smoked paprika
- 1/2 tsp chili flakes (optional)
- 1 can (28 oz) crushed tomatoes
- Salt and pepper to taste
- 4–6 large eggs
- 3 oz feta, crumbled
- 2 tsp harissa paste (optional)
- Fresh cilantro or parsley for garnish
- Crusty bread for serving
Instructions
- Heat a cast iron skillet or heavy pan over medium heat and add olive oil.
- Sauté onion and bell pepper until softened, 6–8 minutes.
- Add garlic, cumin, paprika, and chili flakes; cook 1 minute until fragrant.
- Pour in crushed tomatoes, simmer 10–12 minutes until slightly thickened. Season.
- Make wells and crack eggs into the sauce. Cover and cook 6–10 minutes until whites set and yolks are at desired doneness. Alternatively, finish under a broiler for 1–2 minutes to set tops.
- Crumble feta and dollop harissa, then garnish with herbs.
How to Serve It
Serve straight from the skillet with crusty bread. Spoon generous amounts of sauce and egg onto each plate for photos showing runny yolks. Leftovers keep in the fridge up to 3 days in an airtight container. Reheat gently on the stove so eggs don't overcook.
8. Caramelized Banana and Nutella Crepes (Decadent Dessert)
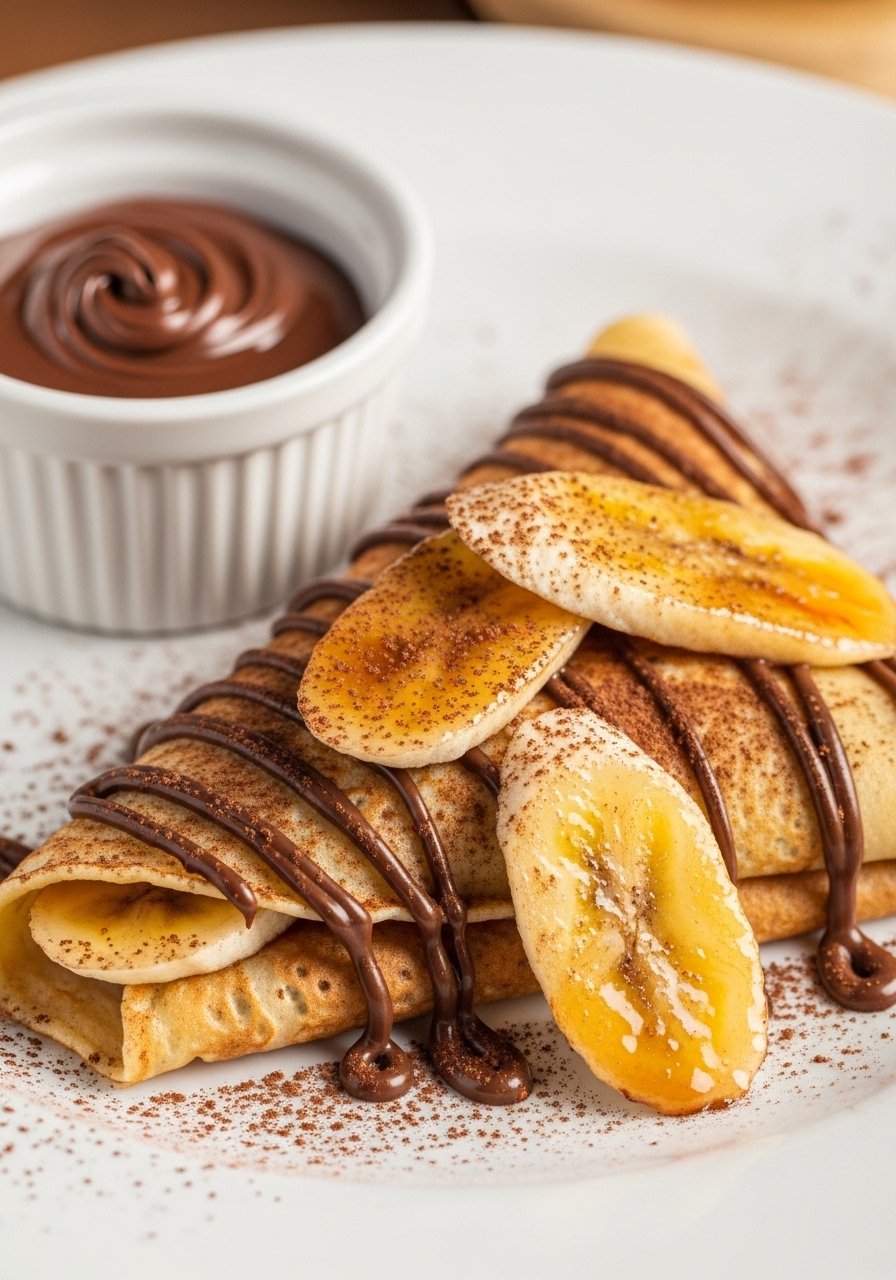
Thin crepes with glossy Nutella and caramelized bananas catch highlights for mouthwatering dessert shots. The shine on the banana and the glossy chocolate create depth in photos.
Ingredients
- 1 cup all-purpose flour
- 2 tbsp sugar
- 1/4 tsp salt
- 2 large eggs
- 1 1/4 cups milk
- 2 tbsp melted butter
- 2 tbsp vegetable oil (for pan)
- 2 ripe bananas, sliced into rounds
- 2 tbsp brown sugar
- 2 tbsp unsalted butter (for caramelizing)
- 1/2 cup Nutella or chocolate-hazelnut spread
- Powdered sugar for dusting
Instructions
- Whisk flour, sugar, and salt. Add eggs, milk, and melted butter; whisk until smooth. Rest 20–30 minutes.
- Heat a non-stick crepe pan over medium. Brush with oil and pour 1/4 cup batter, swirl thinly. Cook 30–45 seconds per side.
- In a skillet, melt butter and brown sugar; add banana slices and cook 1–2 minutes per side until caramelized.
- Spread 1–2 tbsp Nutella onto crepe, add bananas, fold.
- Dust with powdered sugar and drizzle extra Nutella if desired. For glossy photos, rewarm briefly so Nutella shines.
- Use a small offset spatula to spread chocolate neatly.
How to Serve It
Plate on a dark plate to show contrast between crepe and chocolate. Serve with espresso or dessert wine. Leftovers can be wrapped and kept at room temperature for a few hours; refrigerate for longer in an airtight container.
9. Aesthetic Layered Chia Pudding Cups (Vegan, Make-Ahead)
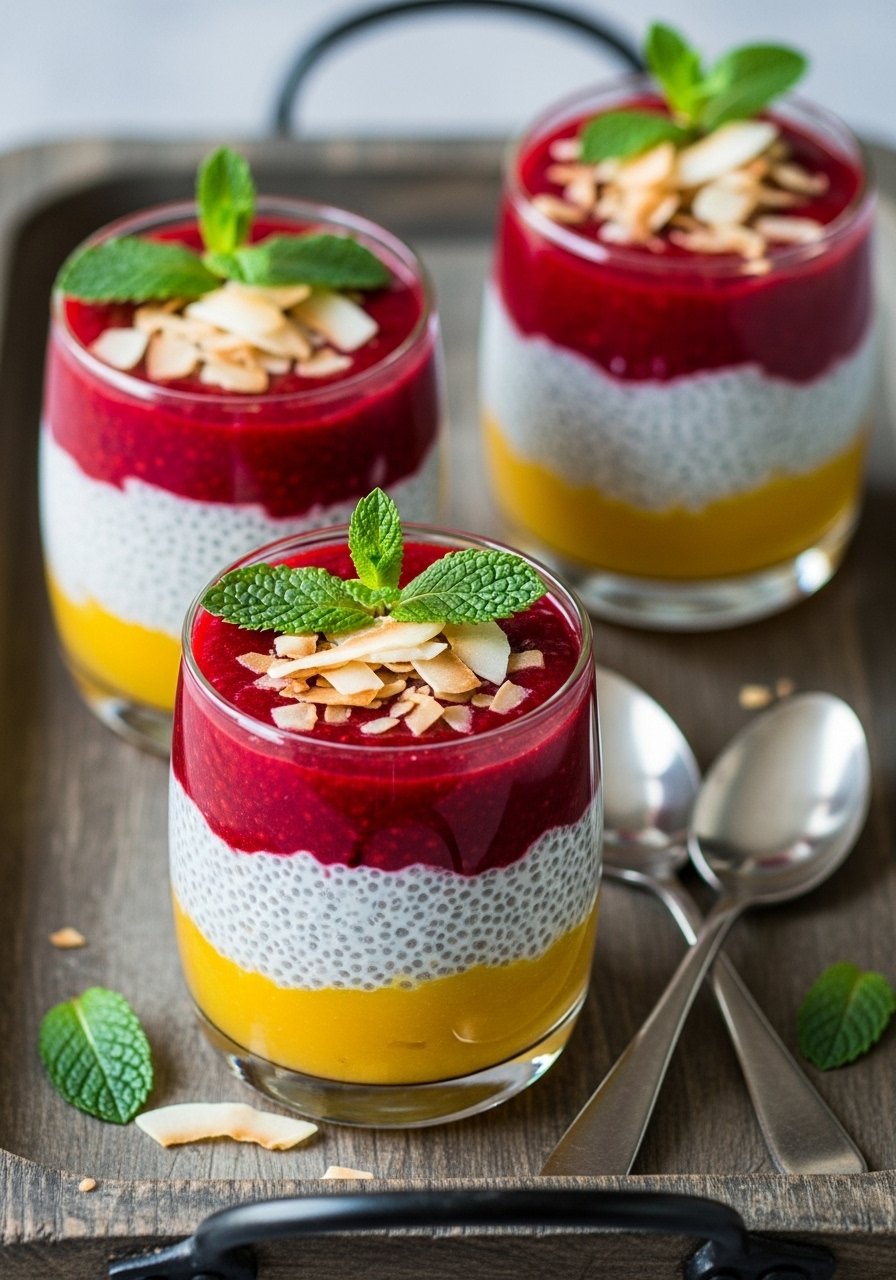
Layered chia pudding is great for vertical compositions and colorful stripes. It’s a make-ahead recipe that photographs well after the layers set, and it’s friendly to vegan and gluten-free diets.
Ingredients
- 1/2 cup chia seeds
- 2 cups almond milk (or other plant milk)
- 2 tbsp maple syrup
- 1 tsp vanilla extract
- 1 cup mango puree (fresh or frozen)
- 1 cup raspberry puree
- 2 tbsp shredded toasted coconut
- Fresh mint for garnish
- 1/4 cup granola (for topping)
Instructions
- Whisk chia seeds, almond milk, maple syrup, and vanilla in a bowl. Let sit 10 minutes, then whisk again to avoid clumps. Chill 2 hours or overnight until set.
- Prepare mango and raspberry purees in a blender; sweeten lightly if needed.
- Layer into clear glasses: 2–3 tbsp puree, 3–4 tbsp chia pudding, repeat to create 3 layers.
- Chill 1 hour before serving so layers firm up and clean lines form.
- Top with toasted coconut and granola just before shooting to keep crunch intact.
- For smooth purees, use an immersion blender or regular blender.
How to Serve It
Serve in tall clear glasses to emphasize layers. Pair with fresh fruit on the side. Store in the fridge up to 5 days in a glass meal prep container if made in bulk; add crunchy toppings just before serving.
10. Sesame-Togarashi Roasted Cauliflower Steaks (Bold, Photogenic Veg Dish)
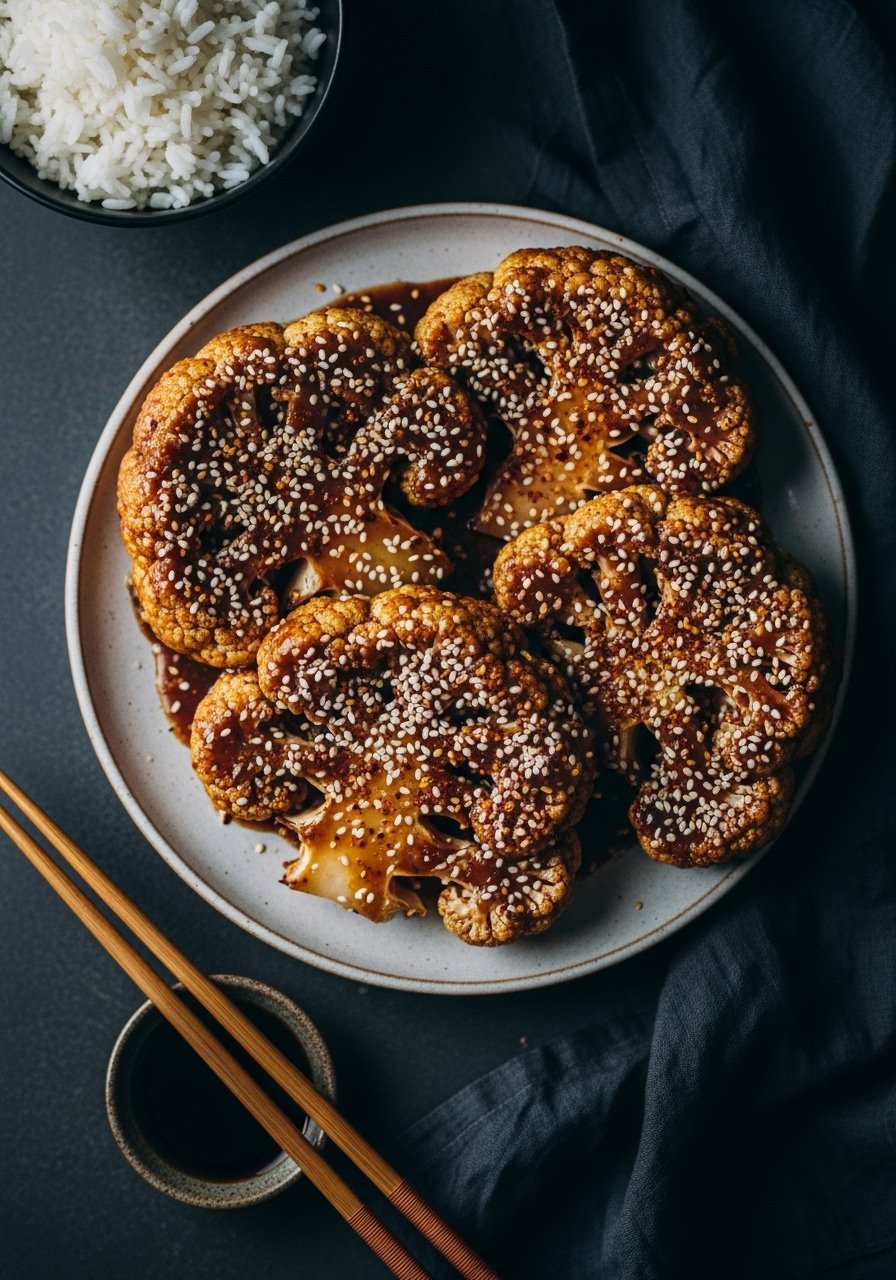
Thick-cut cauliflower steaks take on beautiful char and carry glaze well. The toasted sesame and togarashi add speckles and vibrant color—great for editorial-style food photography.
Ingredients
- 1 large cauliflower head
- 3 tbsp olive oil
- 2 tbsp white miso paste
- 1 tbsp soy sauce or tamari
- 1 tbsp maple syrup
- 1 tsp rice vinegar
- 1 tsp sesame oil
- Sesame seeds for garnish
- 1 tsp togarashi (Japanese chili spice) or chili flakes
- Salt and pepper to taste
- Lemon wedges for serving
Instructions
- Preheat oven to 425°F (218°C) and line a sheet pan with parchment paper.
- Trim leaves and core; slice cauliflower into 3/4–1 inch thick steaks.
- Whisk miso, soy, maple, rice vinegar, sesame oil, and 1 tbsp olive oil.
- Brush both sides of steaks with oil, season, and roast on the sheet pan 20–25 minutes, flipping halfway, until edges brown.
- In the last 4 minutes, brush glaze on and return to roast until glossy and caramelized.
- Sprinkle sesame seeds and togarashi before serving.
How to Serve It
Serve on a dark plate for contrast and squeeze lemon over the top. Pair with steamed rice and pickled vegetables. Leftovers keep in an airtight container up to 3 days; reheat gently to preserve glaze.
11. Parisian-Style Mini Fruit Tartlets with Almond Crust
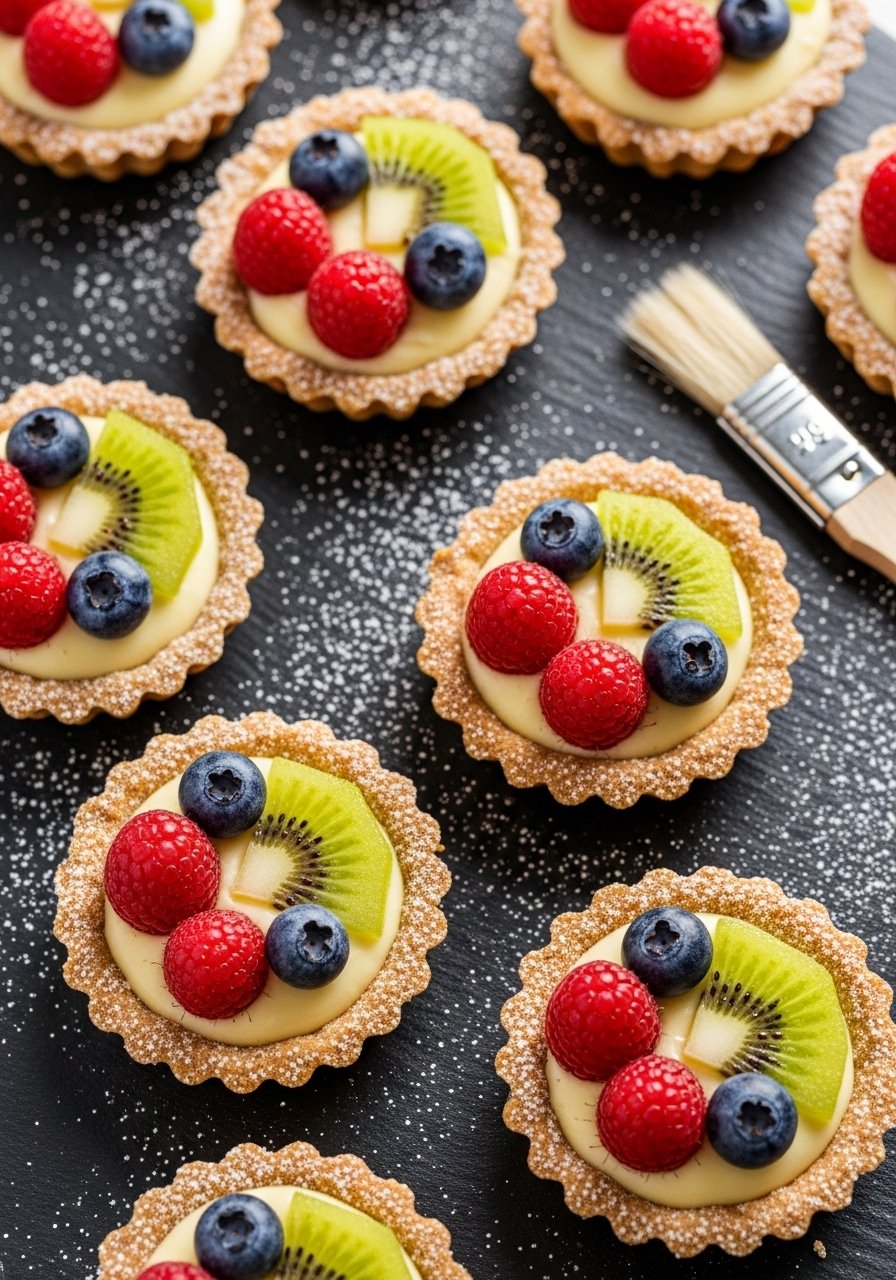
Mini tartlets photograph well because each tiny pie is a complete composition. The jewel-like fruit on a creamy base and fluted crust edges create a polished, bakery-style look.
Ingredients
- 1 1/2 cups all-purpose flour
- 1/2 cup almond flour
- 1/3 cup powdered sugar
- 1/4 tsp salt
- 10 tbsp cold unsalted butter, cubed
- 1 large egg
- 1 tsp vanilla extract
- 1 cup whole milk
- 3 tbsp cornstarch
- 2 tbsp sugar (for pastry cream)
- 1 egg yolk
- 2 tbsp butter (for pastry cream)
- Fresh berries, kiwi, or citrus segments for topping
- Apricot jam for glaze (optional)
Instructions
- Make crust: pulse flours, powdered sugar, salt, and cold butter in a food processor until crumbly. Add egg and pulse until dough forms.
- Press dough into mini tartlet tins or a muffin pan. Chill 30 minutes.
- Preheat oven to 350°F (177°C). Blind-bake shells for 12–15 minutes until golden; cool.
- For pastry cream, whisk milk in a saucepan. In bowl, mix sugar, cornstarch, and egg yolk. Temper egg mixture with hot milk, return to heat and whisk until thickens. Remove from heat, stir in butter and vanilla. Chill.
- Fill cooled shells with pastry cream, level with a small spatula.
- Arrange fruit on top in concentric patterns. Warm apricot jam and brush lightly for sheen.
How to Serve It
Place tartlets on a white platter and garnish with mint. Serve with tea or champagne for celebrations. Store tartlet shells and cream separately in airtight containers for up to 2 days and assemble right before serving to keep pastry crisp.
12. Golden Turmeric Latte with Coconut Foam (Photogenic Beverage)

A golden latte is eye-catching—its bright yellow tone contrasts beautifully with white foam and warm props. The coconut foam adds texture and reflects light for a shiny top that's great in close-ups.
Ingredients
- 2 cups unsweetened almond or oat milk
- 1 tsp ground turmeric
- 1/2 tsp ground ginger
- 1/4 tsp ground cinnamon
- 1 tbsp maple syrup or honey
- 1/2 tsp vanilla extract
- 1/2 cup canned coconut milk (chilled), for foam
- Pinch of black pepper (to increase curcumin absorption)
Instructions
- In a small pot, whisk milk, turmeric, ginger, cinnamon, and maple syrup. Heat until steaming but not boiling.
- Use an immersion blender or frother to froth the coconut milk until stiff peaks form.
- Pour spiced milk into a mug, spoon coconut foam on top, and dust with cinnamon.
- Taste and adjust sweetness. Serve immediately.
- For consistent foam, chill coconut milk and use a cold metal jug for frothing.
How to Serve It
Serve in a ceramic cup with a cinnamon stick and a small cookie on the side for scale in photos. Store extra spiced milk refrigerated up to 48 hours in an airtight container; reheat gently.
13. Mini Chocolate Pots de Crème with Sea Salt
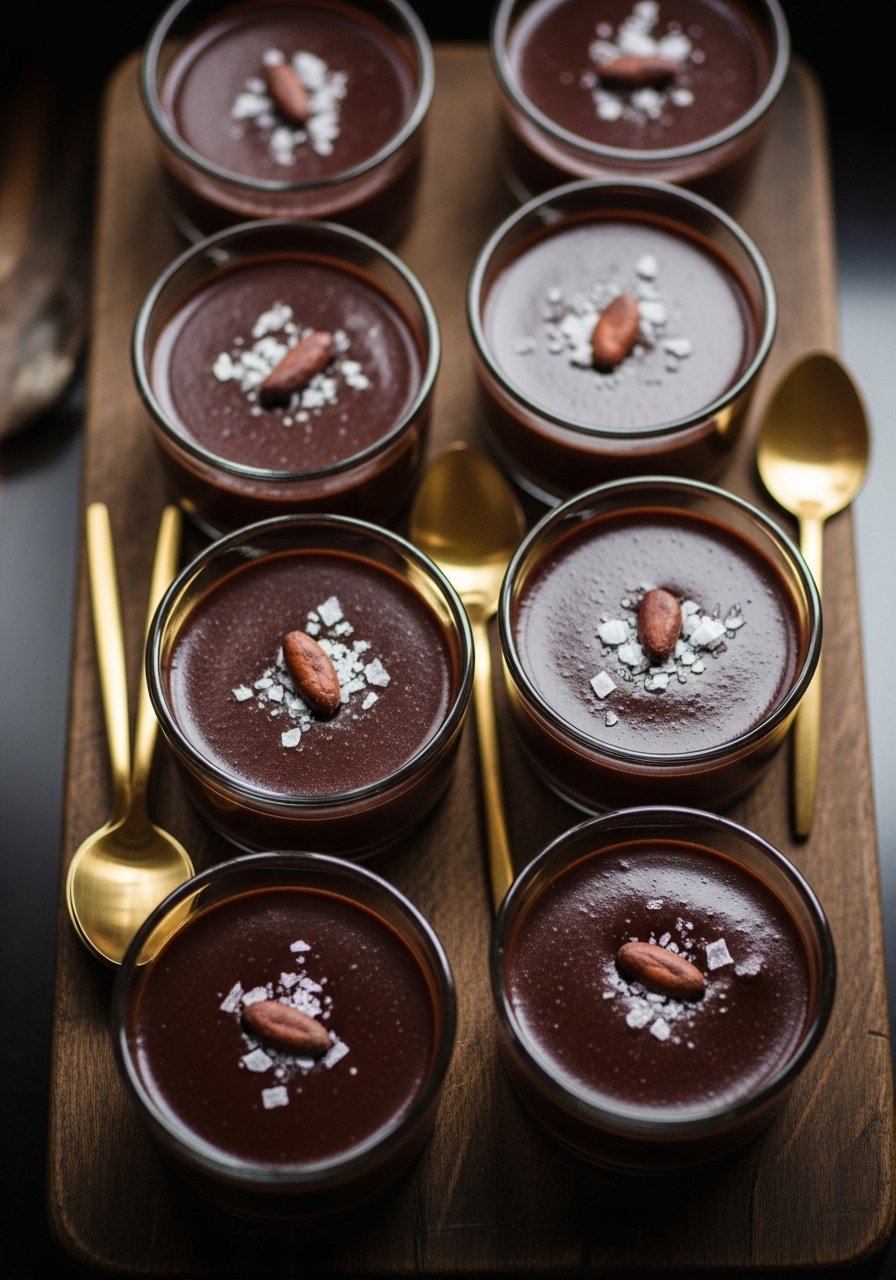
These tiny dessert pots are glossy and luxe—perfect for moody, high-contrast shots. The shine on the chocolate and the sprinkling of sea salt capture light beautifully.
Ingredients
- 8 oz dark chocolate (70% cacao), chopped
- 1 1/2 cups heavy cream
- 1/2 cup whole milk
- 3 large egg yolks
- 1/4 cup granulated sugar
- 1 tsp vanilla extract
- Flaky sea salt for finishing
- Cocoa nibs or whipped cream for garnish (optional)
Instructions
- Preheat oven to 325°F (163°C).
- Heat cream and milk until just simmering. Remove from heat and pour over chopped chocolate. Let sit 2 minutes, then whisk until smooth.
- In a bowl, whisk egg yolks, sugar until pale. Temper yolks by adding a bit of chocolate mixture, then whisk back into the main chocolate.
- Stir in vanilla. Strain mixture for extra smoothness.
- Pour into six 4-oz ramekins. Place ramekins in a baking dish and pour hot water into the dish to reach halfway up the sides.
- Bake 25–30 minutes until edges set but centers still slightly wobbly.
- Chill at least 2 hours before serving. Sprinkle flaky sea salt just before shooting.
How to Serve It
Serve pots on a slate board with small spoons to create a moodier scene. Keep chilled in the fridge up to 4 days in an airtight container or covered with plastic wrap.
14. Crispy Sesame Tofu Bites with Gochujang Glaze (Crunchy, Colorful)
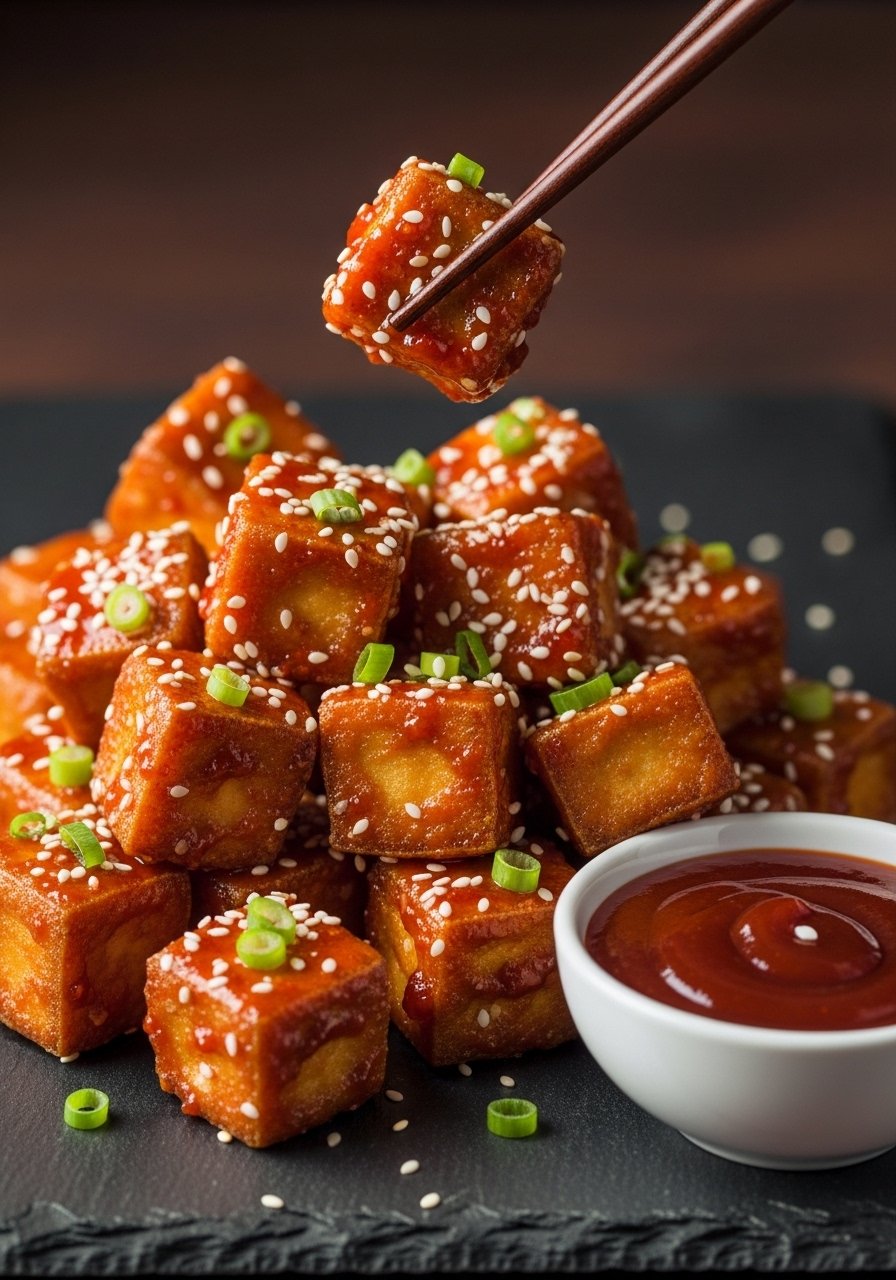
Crispy tofu with a glossy, spicy-sweet glaze makes for energetic, colorful photos. The bite-sized pieces layer well in bowls or arranged on skewers for overhead shots.
Ingredients
- 14 oz firm tofu, pressed and cut into 1-inch cubes
- 1/3 cup cornstarch
- 1/2 tsp salt
- 1/4 tsp black pepper
- 2 tbsp sesame oil
- 2 tbsp vegetable oil
- For glaze:
- 2 tbsp gochujang
- 1 tbsp soy sauce
- 1 tbsp rice vinegar
- 1 tbsp honey or maple syrup
- 1 tsp toasted sesame oil
- 2 tbsp sesame seeds
- 2 scallions, sliced
Instructions
- Press tofu at least 30 minutes to remove excess moisture. Pat dry.
- Toss tofu cubes with cornstarch, salt, and pepper until evenly coated.
- Heat vegetable oil and sesame oil in a non-stick pan over medium-high. Fry tofu in batches until golden and crispy, 3–4 minutes per side. Transfer to a wire rack to keep crisp. (A cooling rack helps retain texture.)
- Whisk glaze ingredients together in a small bowl.
- Heat glaze in a skillet for 30 seconds, toss crispy tofu to coat until glossy.
- Sprinkle sesame seeds and scallions before serving.
How to Serve It
Serve over steamed rice and quick-pickled cucumbers for color contrast. Arrange tofu on a matte black plate to make the glaze pop. Leftovers keep in the fridge in an airtight container for up to 3 days; re-crisp in an air fryer or oven at 375°F (190°C) for 8–10 minutes.
When you try any of these Aesthetic Food Recipes, remember light and plating are half the work—natural soft light, contrasting plates, and small garnishes like herbs or edible flowers make a huge difference. Pin your favorites so you can come back when you need a photo-ready recipe for a party or a brand shoot. Which one will you make first? Share your photos with friends and tag someone who’d love to cook through the list.
One last tip: a good silicone baking mat and a reliable digital kitchen thermometer have saved me time and helped keep results consistent across almost every recipe here—great tools to have on hand when you’re photographing food.