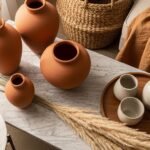
You walk into a room and feel calm — that's the quiet power of earth tone decor. These warm beiges, soft terracottas, and muted greens help rooms feel balanced and grounded. This list collects 26 approachable earth tone decor "recipes" — DIY projects and styling ideas you can make this weekend to give your home that lived-in, cozy look.
Each idea includes a materials list, step-by-step instructions, and styling notes so you can customize the palette to your space. I link tools I actually use, like a handy hot glue gun and a trusted painter's brush set when they make a step easier. Whether you're refreshing a shelf, sewing a pillow cover, or refinishing wood, these earth tone decor projects will help you craft a calm, intentional home.
Grab a cup of tea, pick an idea that speaks to you, and let the warm, grounded energy of earth tone decor guide your next weekend project.
1. Earth Tone Decor: Neutral Mason Jar Vases
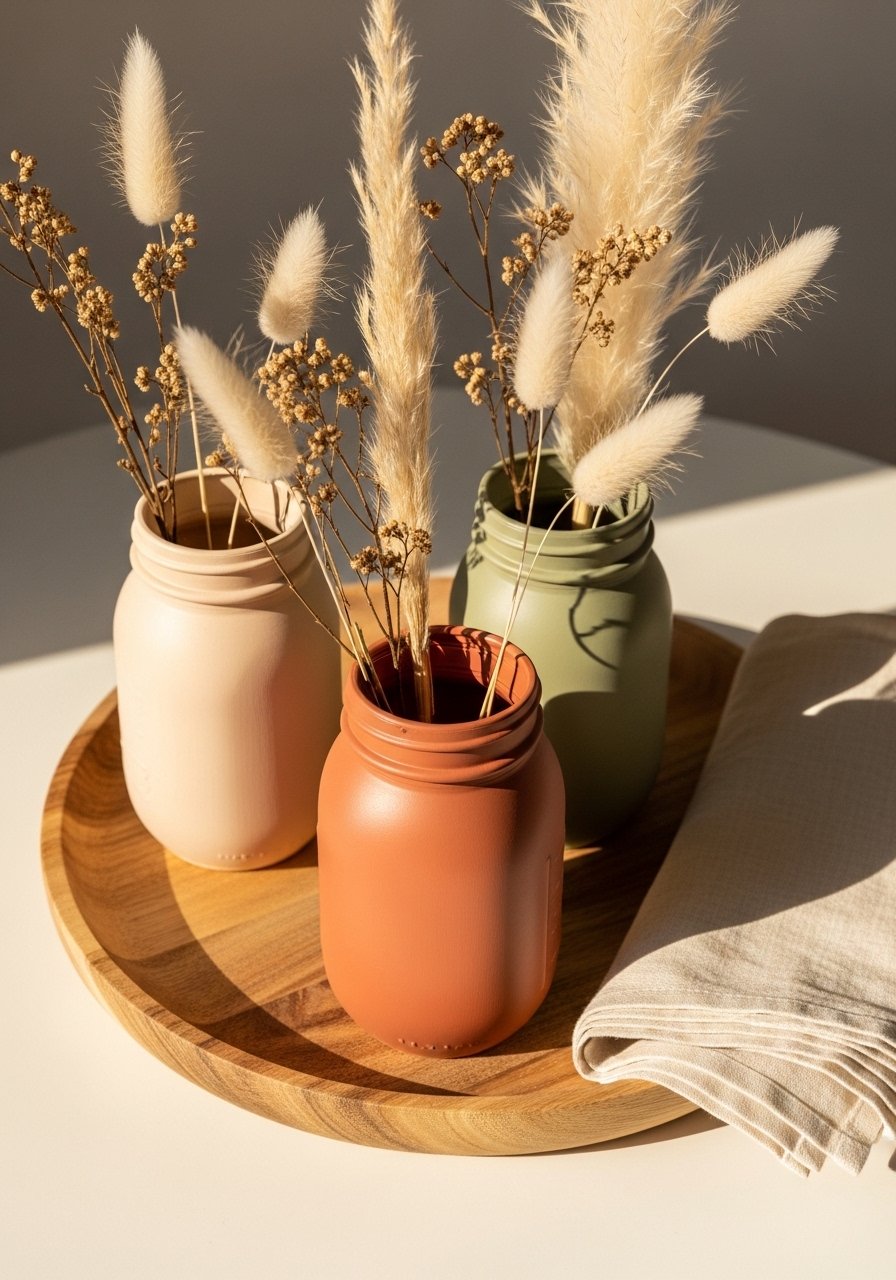
These simple mason jar vases are an instant way to introduce earth tone decor to shelves and tables. They have a soft matte finish and feel organic when grouped together. The textured paint and twine add a handmade look that smells faintly of fresh paint and dried grass. Anyone who loves pared-back, natural styling will reach for these. I like using a matte spray sealer at the end to keep the finish soft and chip-resistant.
Ingredients
- 3 small mason jars (8 oz)
- 1/2 cup fine sand (per jar)
- 3 tbsp white gesso or acrylic primer
- 3 tbsp terracotta acrylic paint
- 3 tbsp warm beige acrylic paint
- 3 tbsp muted olive acrylic paint
- 3 foam brushes
- 3 lengths natural jute twine (12 inches each)
- 1 bottle matte spray sealer
- Handful dried stems or pampas grass
Instructions
- Clean jars and remove labels. Dry thoroughly.
- Add 1-2 tbsp of fine sand to each jar to weight them and create texture.
- Use a foam brush to apply a thin coat of gesso inside each jar; let dry 15 minutes.
- Paint the outsides: one jar terracotta, one beige, one olive. Use horizontal strokes for an organic look. Let dry 30 minutes.
- Add a second coat where needed. Let dry completely (about 1 hour).
- Wrap jute twine around the neck of each jar and secure with a dab from your hot glue gun.
- Spray a light coat of matte sealer in a well-ventilated area; let cure 12 hours.
- Arrange dried stems inside and style on a wooden tray.
How to Serve It
Display the trio on a coffee table or mantel on a wood serving tray for a curated look. Add a stack of neutral books and a small ceramic bowl. Store extra stems in a mason jar sealed with a lid. These are ideal for entryways and can be made ahead and wrapped in tissue for gifting.
2. Layered Neutral Throw Pillow Covers
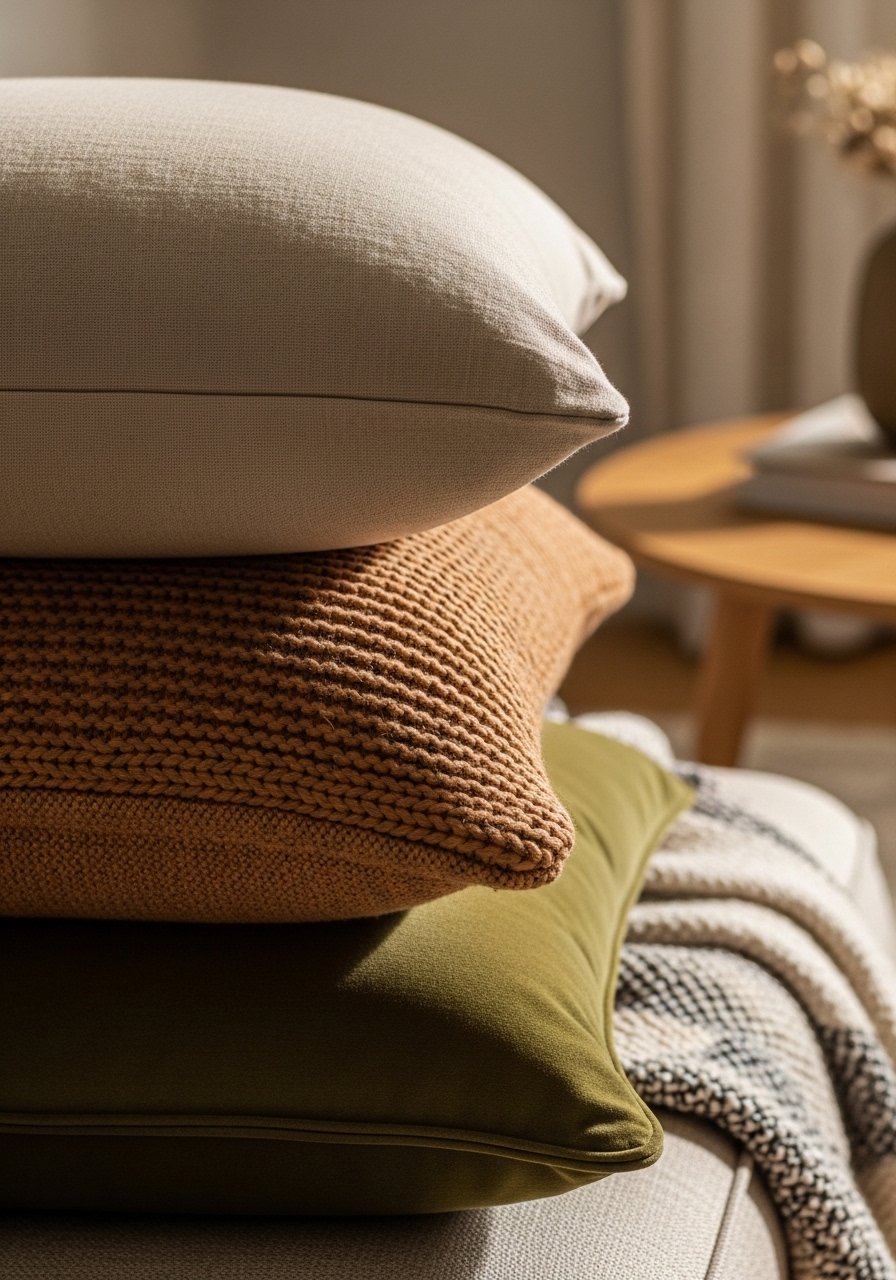
Hand-sewn or no-sew pillow covers let you swap colors seasonally and add depth to your sofa with earth tone decor. The mix of textures — linen, knit, velvet — creates visual balance and invites touch. If you're new to sewing, a basic sewing machine will speed things up and feel rewarding.
Ingredients
- 2 linen pillow covers (18×18 inches)
- 1 knit throw panel (18×18 inches)
- 1 olive velvet fabric piece (18×18 inches)
- Thread neutral color
- 2 pillow inserts (18×18 inches)
- 1 spool heavy-duty needle
- 1 yard hem tape (for no-sew option)
- Fabric scissors
- Measuring tape
- Chalk or fabric marker
Instructions
- Measure your pillow inserts and cut fabric panels with 1/2 inch seam allowance.
- For sewn covers: place right sides together, pin edges, and sew three sides with a 1/2 inch seam allowance.
- Insert pillow and hand-stitch the remaining side closed with an invisible stitch.
- For no-sew: fold fabric over the insert, use hem tape on edges, press with a hot iron for 8–10 seconds per seam.
- Finish edges by turning inside out and smoothing with a seam roller or fingers.
- Mix textures: place the knit pillow in front, linen behind, velvet accent on top for contrast.
- Fluff inserts and give pillows a final steam or press for a sharp look.
How to Serve It
Create a cozy sofa cluster with 3–5 pillows and a neutral throw. Swap one cover seasonally to refresh colors. Store spare covers in a breathable fabric storage bag to avoid dust. Pair with warm wood tones and a ceramic lamp for a grounded vignette.
3. Terracotta Dip-Painted Planters
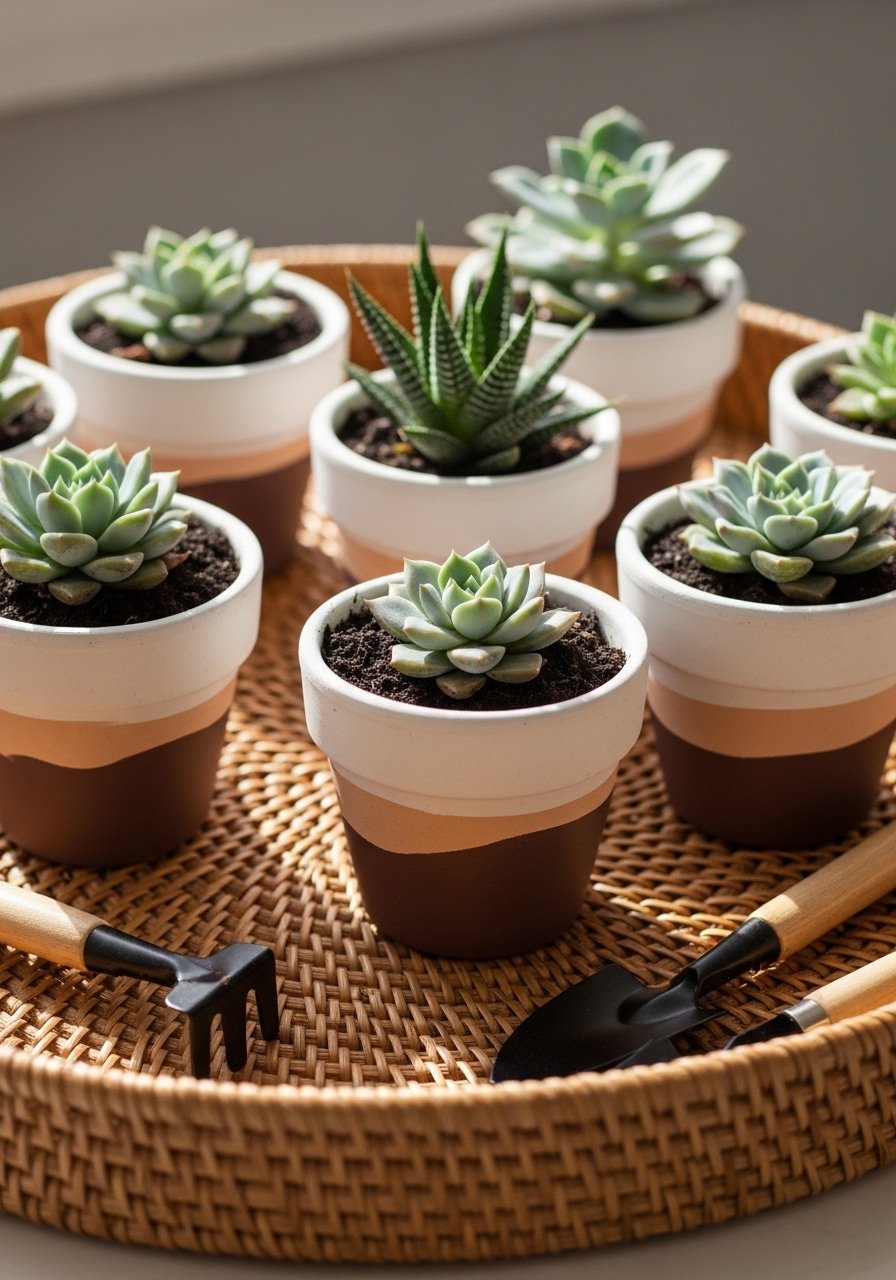
Dip-painting terra cotta planters creates the perfect neutral pop for houseplants, enhancing earth tone decor with organic color. The paint line is intentionally imperfect, giving a handcrafted feel. These are quick to make and smell faintly of fresh paint, which fades as they cure. A sanding block helps remove rough edges before painting.
Ingredients
- 6 small terracotta pots (4-inch)
- 3 colors of acrylic paint (beige, cream, deep brown)
- 1 plastic tub for dipping
- 1 bottle matte sealer
- Potting soil for succulents
- 6 small succulents
- 1 sanding block
- Painter's tape
- Old towel or drop cloth
Instructions
- Sand pots lightly and wipe clean.
- Tape off any rim you want unpainted.
- Pour chosen paint into a plastic tub; dip each pot halfway and twist to remove excess.
- Allow paint to dry 20–30 minutes; touch up edges with a small brush if needed.
- Spray with matte sealer and let cure 8–12 hours.
- Add soil and plant succulents.
- Place on a sunny windowsill and water sparingly.
How to Serve It
Cluster pots on a windowsill or stair landing in groups of odd numbers. Use a plant saucer set to protect surfaces. Rotate plants occasionally for even sun exposure. These make lovely hostess gifts when wrapped in kraft paper.
4. Woven Wall Hanging in Warm Neutrals
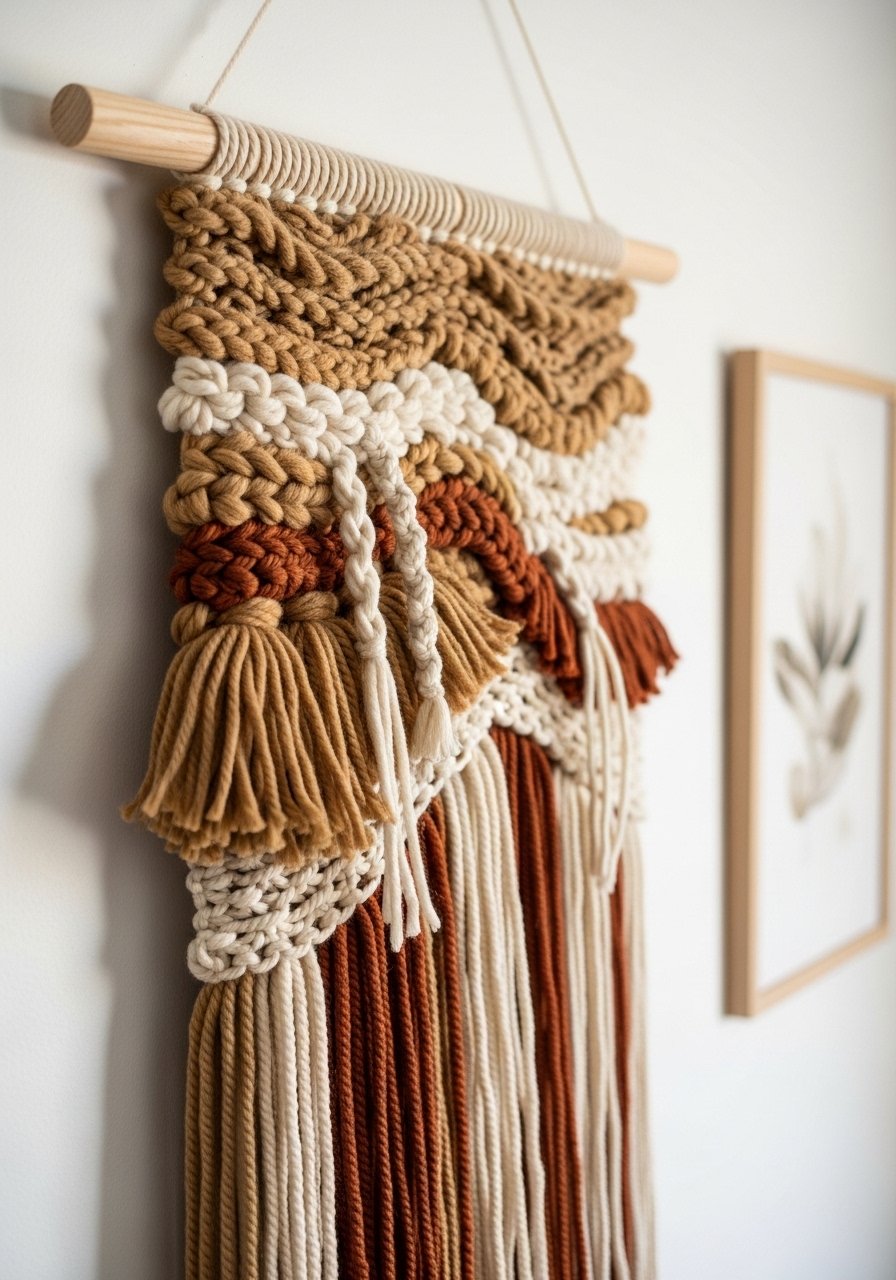
A handwoven wall hanging introduces texture and movement while staying true to earth tone decor. You’ll enjoy the tactile process of weaving chunky yarns and cords. The finished piece smells faintly of natural fibers and adds a soft focal point to any room. A basic weaving loom kit makes this approachable.
Ingredients
- 1 small wooden loom (12×12 inches)
- 3 skeins chunky yarn (tan, cream, rust)
- 1 spool natural cotton cord
- 1 wooden dowel (12 inches)
- 1 tapestry needle
- Scissors
- Measuring tape
- Wood glue (optional)
- Comb or fork (for packing weft)
Instructions
- Warp the loom with cotton cord following loom instructions.
- Thread the tapestry needle with chunky yarn.
- Weave alternating rows of tan and cream using plain weave.
- Add rust-colored fringe rows and textured rya knots for interest.
- Pack rows with a comb to tighten structure.
- Finish by knotting warp ends, remove from loom, and tie onto dowel.
- Trim fringe evenly and secure knots with a dab of wood glue if needed.
How to Serve It
Hang centered above a console table or bed to anchor the space. Pair with a wood picture ledge for layered wall styling. For cleaning, gentle spot clean with a soft brush and air dry.
5. Sanded Wood Candle Tray
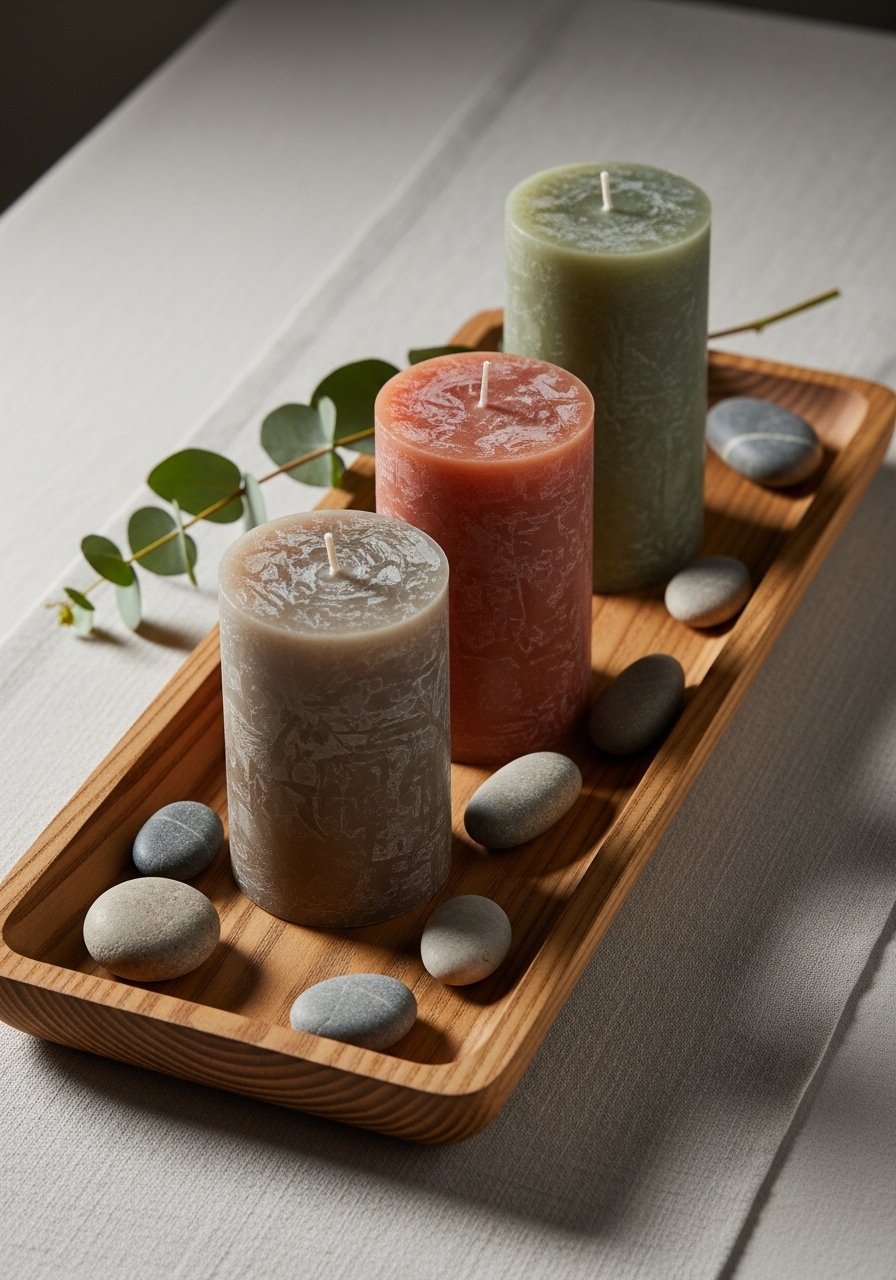
A sanded wood tray with pillar candles makes a calm centerpiece and ties together earth tone decor with natural grain and warm finishes. The sanding releases a rich wood scent that complements candle fragrance. A random orbital sander smooths edges quickly.
Ingredients
- 1 unfinished wood plank (18×6 inches)
- 3 pillar candles (3", 2.5", 2")
- 1 small bag river stones
- 1 mini bottle wood stain (walnut)
- 1 bottle wood beeswax or finish
- Sandpaper (80, 120, 220 grit)
- 1 foam brush
- Rags
- 2 felt pads for base
Instructions
- Cut plank to size and sand with 80 grit to remove roughness, then 120, then 220 for smoothness.
- Wipe away dust with a damp rag.
- Apply a thin coat of wood stain with a foam brush; wipe off excess and let dry 1–2 hours.
- Seal with beeswax or finish for a soft sheen; let cure 4 hours.
- Place felt pads on bottom to protect surfaces.
- Arrange candles and stones on top, ensuring candle flame clearance.
How to Serve It
Center the tray on a dining table with a runner beneath. Replace candles with seasonal accents—pinecones in winter or shells in summer. Store the tray in a dry place wrapped in cloth when not in use.
6. Clay Textured Coasters
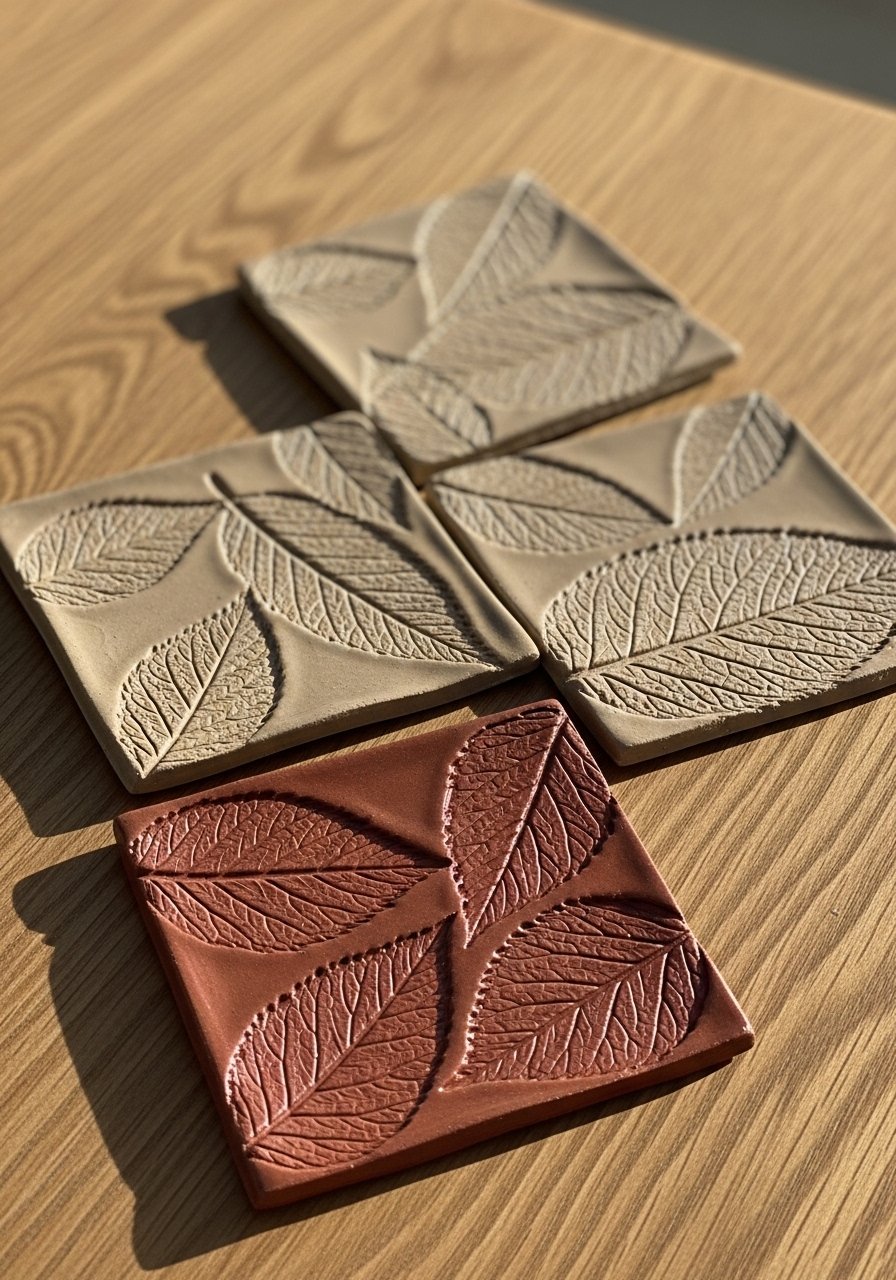
Textured clay coasters bring subtle earth tone accents to coffee tables and protect surfaces with charm. Pressing leaves or stamps creates organic patterns that feel lived-in. Using an air-dry clay kit is easy for beginners.
Ingredients
- 2 lbs air-dry clay
- 1 rolling pin
- 1 leaf or texture stamp set
- 4 coaster-sized circle cutters (3.5" diameter)
- Fine sandpaper
- Acrylic glazes (beige, terracotta)
- Clear acrylic sealer
- Parchment paper
- Small sponge
Instructions
- Roll clay to 1/4 inch thickness on parchment paper.
- Press leaf or stamp patterns gently into clay.
- Cut circles with cutter and smooth edges with a damp sponge.
- Let dry 24–48 hours until fully hardened.
- Sand edges lightly for smoothness.
- Paint with muted glazes; blend colors for variation.
- Seal with clear acrylic sealer and let cure 12 hours.
- Add felt pads to underside to protect surfaces.
How to Serve It
Stack coasters in a ceramic holder near the beverage station. They pair well with a stoneware coffee mug set. Wash gently with a soft cloth; avoid full submersion. Gift them in a small kraft box.
7. Earth Tone Decor: Driftwood Floating Shelf
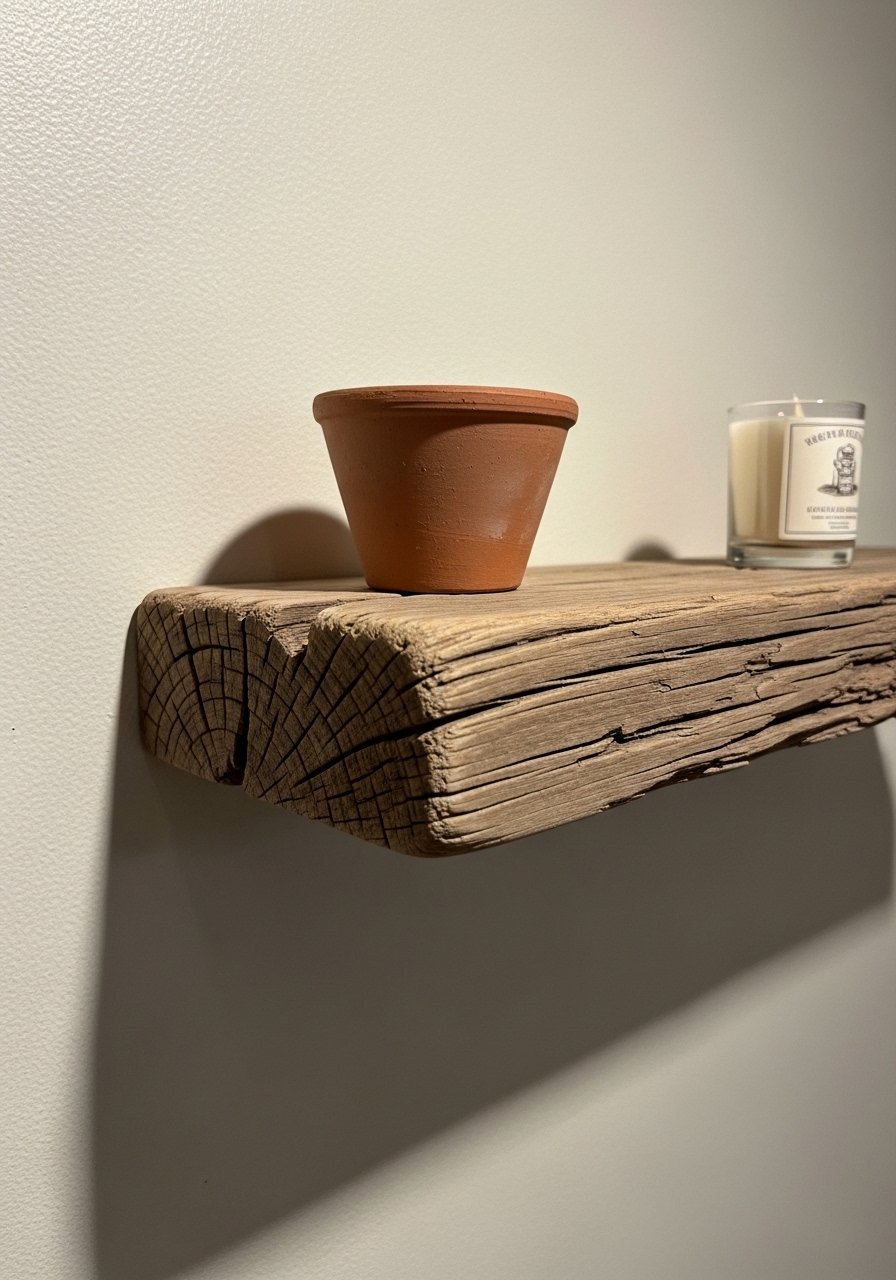
A driftwood floating shelf adds sculptural warmth and supports small displays that reinforce earth tone decor. The wood’s weathered texture anchors lighter walls and smells faintly of the coast if recently collected. A stud finder and wall anchors kit makes installation safe and simple.
Ingredients
- 1 reclaimed driftwood piece (18–24 inches)
- 1 floating shelf bracket kit
- 1 set wall anchors and screws
- Sandpaper (120 grit)
- 1 small foam brush
- Clear wood sealant
- Measuring tape
- Pencil
- Duster cloth
Instructions
- Choose a straight section of driftwood and sand any rough bits lightly.
- Measure and mark bracket placement for a level shelf.
- Install bracket into studs or use wall anchors per kit instructions.
- Fit driftwood onto bracket; secure with screws if needed.
- Apply clear sealant to protect wood; let dry 4 hours.
- Dust shelf and style with small ceramics or a single framed photo.
How to Serve It
Use the shelf to display a tiny plant, candle, and small framed print for a balanced vignette. For heavier items, ensure bracket rating matches weight. Clean with a soft cloth and re-seal every few years to protect the finish.
8. Natural Fiber Table Runner
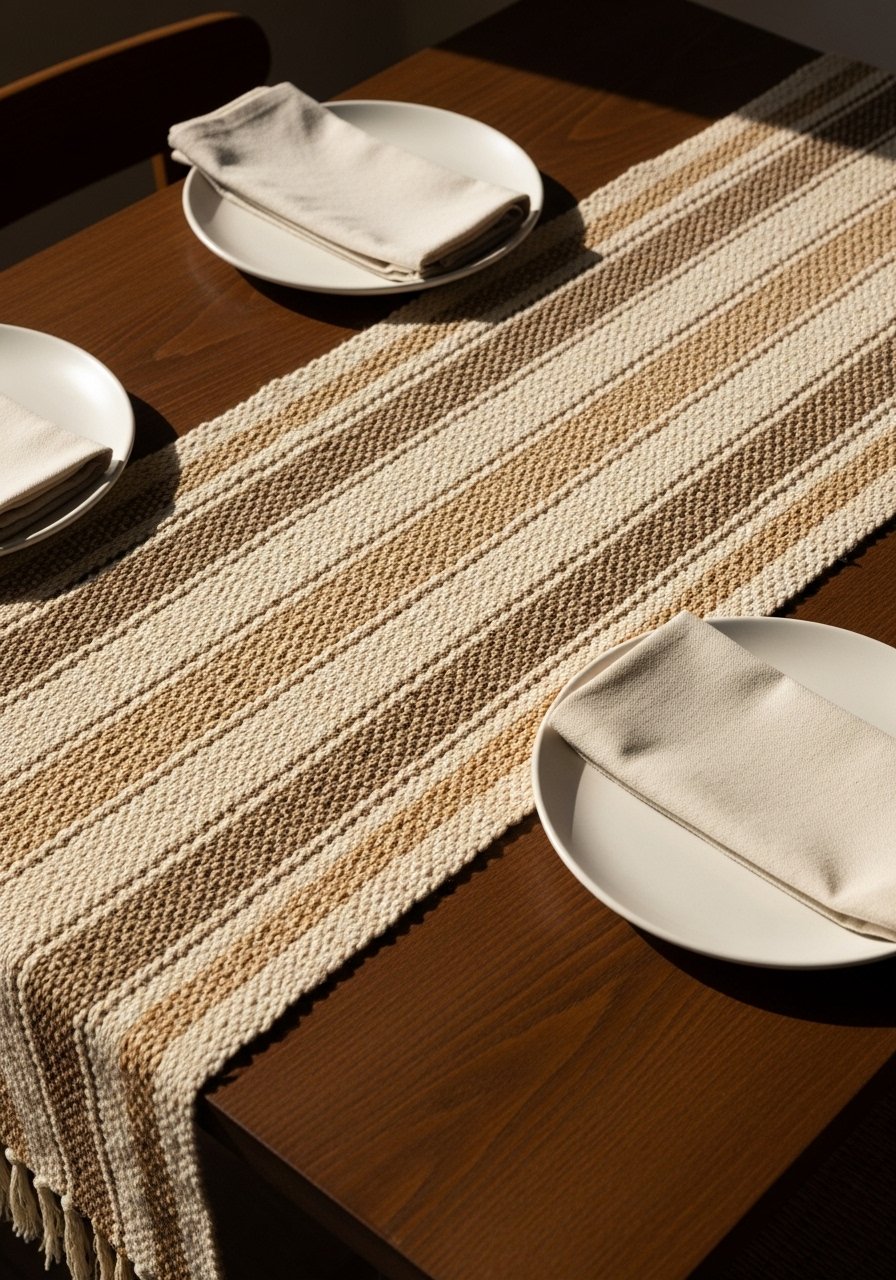
A natural fiber table runner anchors place settings and reinforces earth tone decor through texture and linear pattern. The fibers smell faintly of natural jute when new. A hand loom or macrame kit helps beginners craft a straight, even weave.
Ingredients
- 2 yards natural jute or cotton fabric
- 3/4 yard contrasting brown cotton strip
- Thread matching
- Sewing needle or machine
- Fringe trim (optional)
- Measuring tape
- Fabric scissors
- Pins
- Iron
Instructions
- Cut main fabric to 14 inches wide and 72 inches long (adjust for table length).
- Hem long edges 1/2 inch and press with iron.
- Sew contrasting brown strip centered lengthwise for interest.
- Add fringe trim to short ends if desired, securing with tight stitching.
- Press the entire runner for a crisp finish.
How to Serve It
Use under a centerpiece or candle trio. Machine wash on gentle cycle if cotton; air dry flat. Store rolled in a linen drawer to prevent creases. Pair with neutral tableware for a cohesive dining setup.
9. Stained Driftwood Photo Frame
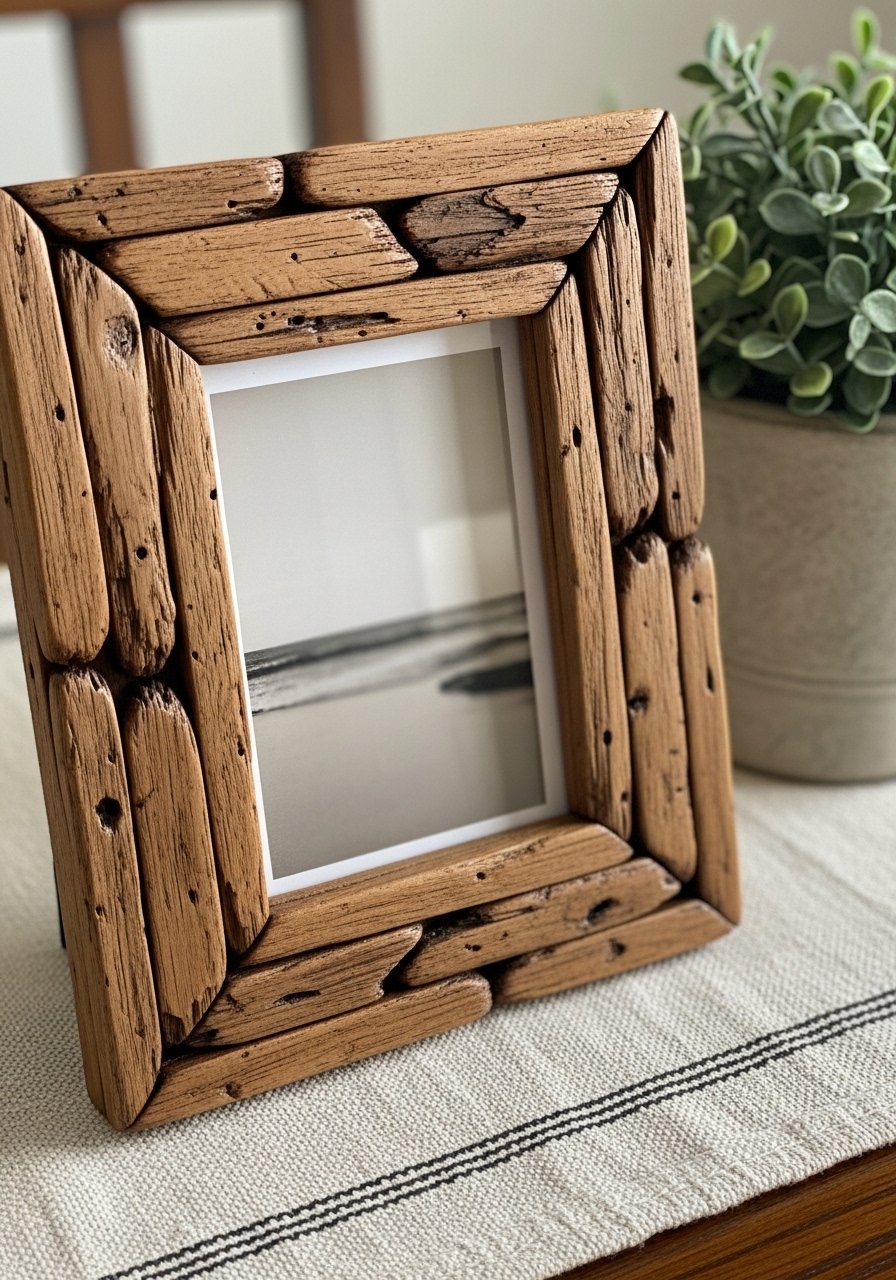
This DIY frame highlights wood grain and complements earth tone decor with raw, natural edges. The stain intensifies warm hues and the scent of fresh-cut wood lingers during the project. A small woodworking clamp set keeps pieces aligned while glue dries.
Ingredients
- 4 pieces reclaimed wood (for 4×6 frame)
- Wood glue
- Small nails or brad nails
- Mini hammer
- Wood stain (walnut)
- Rag for wiping
- Clear sealer
- Glass or acrylic for frame front
- Backing board
- Sandpaper
Instructions
- Cut wood pieces to frame dimensions with mitred corners or simple butt joints.
- Sand edges and dry-fit pieces together.
- Apply wood glue at joints and clamp until set (about 30 minutes).
- Reinforce with small nails if desired.
- Stain frame with walnut, wiping off excess; let dry 1–2 hours.
- Seal with clear coat and let cure overnight.
- Insert glass, photo, and backing board; secure with clips.
How to Serve It
Lean the frame on a shelf or hang as part of a gallery wall with other neutral frames. Clean glass with glass cleaner and wood with a dry cloth. Group frames with a ceramic bud vase for layered interest.
10. Clay Bead Garland
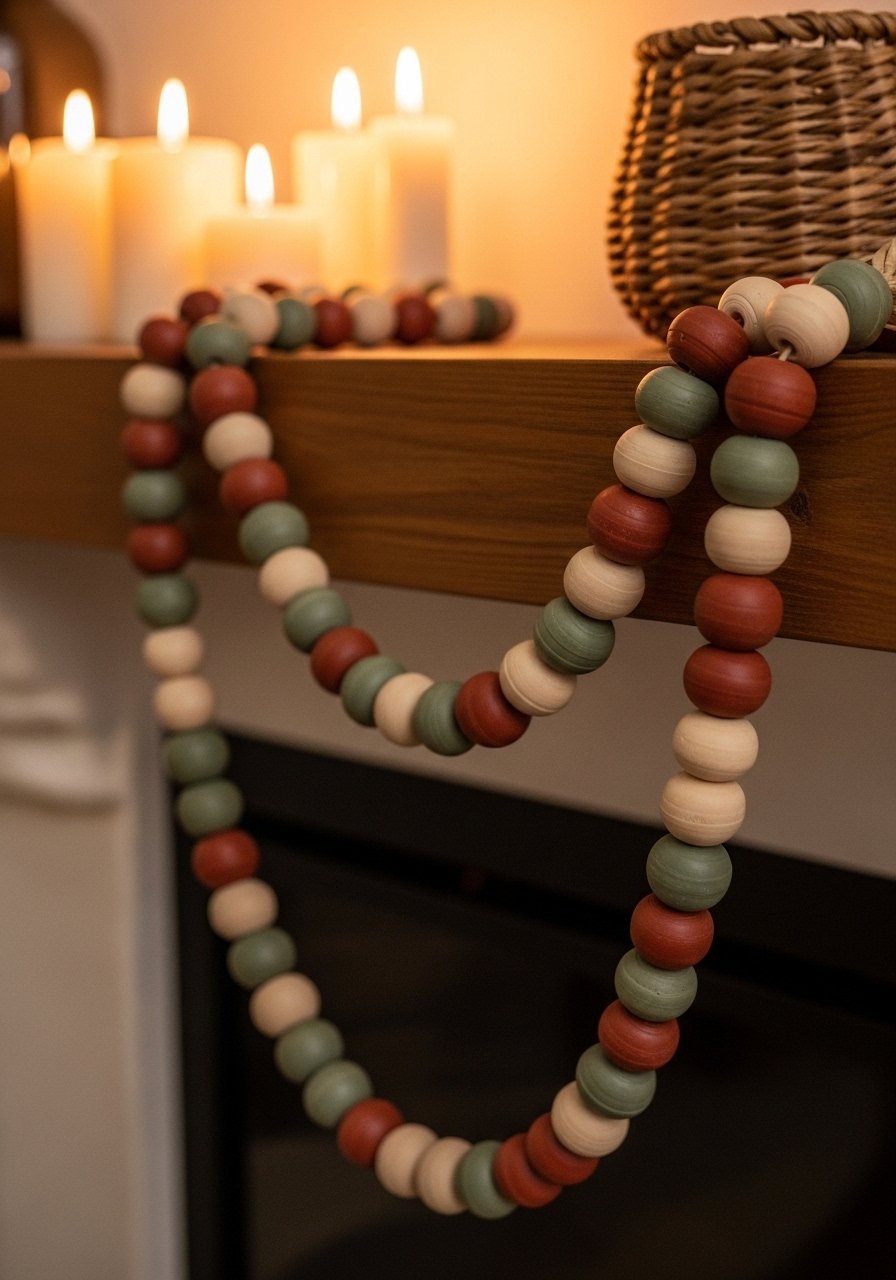
Bead garlands feel handcrafted and add movement to a mantel or shelf in earth tone decor. Rolling and baking clay beads produces a warm, tactile chain that smells of baked clay briefly. Use a bead reamer tool to clean holes for stringing.
Ingredients
- 1 lb polymer clay in beige, rust, olive
- 1 baking tray and parchment
- 1 wooden skewer or bead reamer
- Waxed cotton cord (60 inches)
- Clear glaze
- Needle-nose pliers
- Measuring tape
- Small bowl of water
- Optional: tassel materials
Instructions
- Condition polymer clay by kneading until soft.
- Roll small balls (3/4 inch diameter) in mixed colors to create variety.
- Poke hole with skewer and place on parchment-lined tray.
- Bake per clay instructions (typically 265°F–275°F for 15–30 minutes).
- Allow beads to cool fully; sand any rough spots.
- String beads on waxed cord in desired pattern and tie secure knots at ends.
- Add tassels or loops for hanging.
How to Serve It
Drape along a mantel, wrap loosely around a planter, or hang on a peg rail. Store in a cloth bag to avoid dust. For a more weathered look, sand beads lightly after glazing.
11. Leather-Strap Magazine Holder
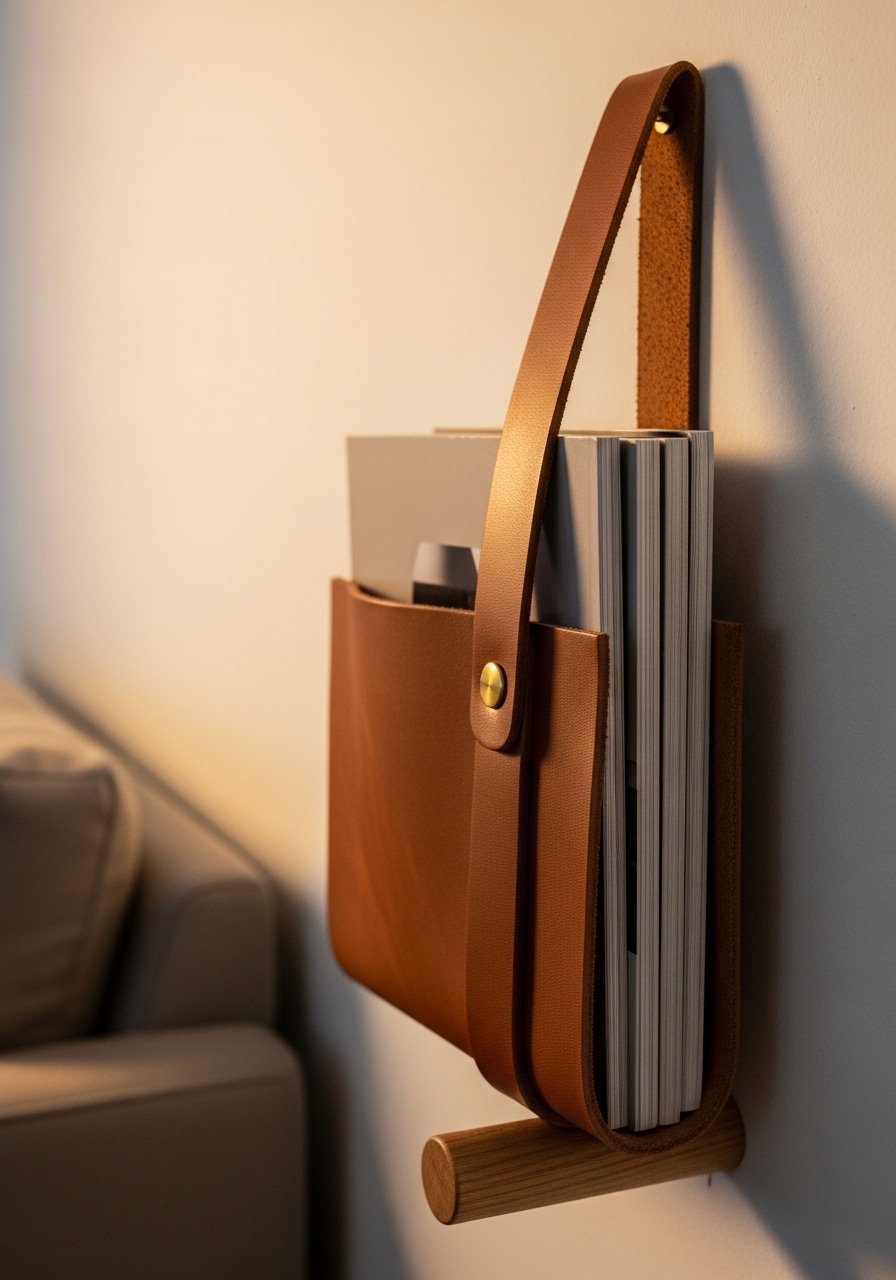
This holder combines wood and leather for an understated accessory that compliments earth tone decor. The leather ages nicely and releases a warm, tannic scent. A leather punch and rivet kit simplifies assembly.
Ingredients
- 1 wooden board (12×8 inches) sanded and stained
- 2 leather straps (1.5 inches wide, 14 inches long)
- 4 brass screws with washers
- Leather punch
- Ruler and pencil
- Drill with small bit
- Wood stain (warm walnut)
- Clear finish
- Magazines to display
Instructions
- Stain the wood board and seal; let dry thoroughly.
- Measure and mark strap placement on board.
- Punch holes in leather straps for screws.
- Pre-drill small pilot holes in the wood to prevent splitting.
- Attach straps with screws and washers, creating a sling for magazines.
- Hang on wall using concealed bracket or rest on floor leaning against wall.
How to Serve It
Place beside a reading chair with a cozy lamp and a small side table. Keep current magazines or a folded throw inside. Clean leather with a dry cloth and treat occasionally with leather conditioner.
12. Neutral Ceramic Dip Bowls (Polymer Clay + Glaze)

Making small ceramic-style dip bowls from oven-bake clay yields delicate, earth-toned serving pieces that accent neutral table settings. They feel smooth and slightly cool to the touch. An oven thermometer helps ensure correct baking temperature if using polymer clay.
Ingredients
- 1 lb polymer clay in cream, terracotta, and brown
- Bowl molds (small ramekin or stainless steel)
- Rolling pin
- Sanding sponges
- Clear glaze suitable for polymer clay
- Parchment paper
- Small paintbrush
- Oven thermometer (optional)
- Optional: cork board for base
Instructions
- Condition clay and press into molds to form thin-walled bowls.
- Smooth lip edges with a damp fingertip.
- Bake according to clay instructions with oven thermometer to ensure accuracy (265°F–275°F typical).
- Cool completely and sand any rough spots.
- Apply clear glaze with a small brush and cure as directed.
- Allow to cure 24 hours before first use.
How to Serve It
Use for condiments, spices, or small snacks and present on a wooden board. Clean by hand; avoid high heat. Store nested in a padded container or display on a ceramic condiment tray.
13. Earth Tone Decor: Painted Gallery Wall Frames
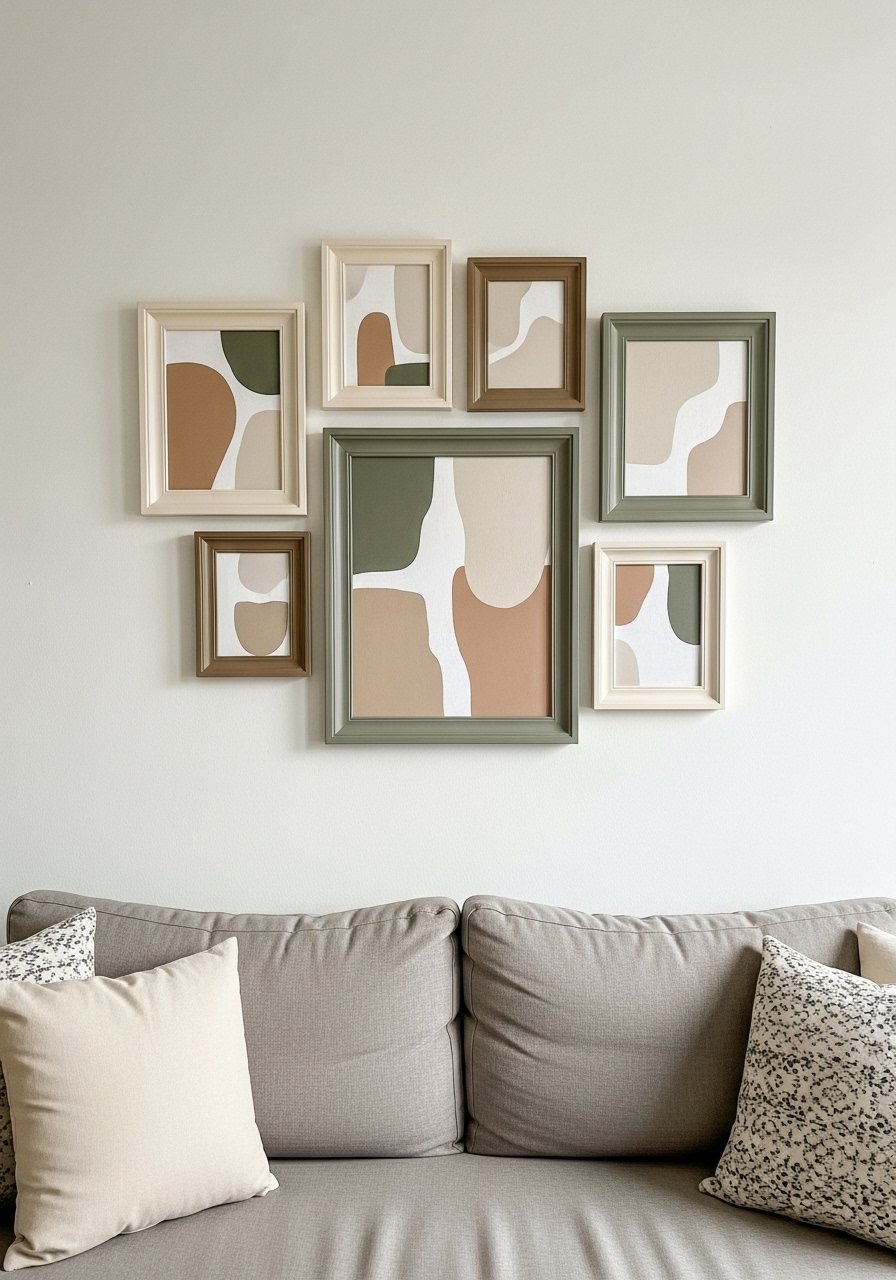
Painting frames in coordinated earth tones gives a gallery wall unity without matching everything perfectly. The layered finishes—matte, chalk, or distressed—add depth. A picture hanging kit keeps placement precise and safe.
Ingredients
- 8 picture frames (various sizes)
- 3 paints in coordinating earth tones
- Fine sandpaper
- Painter's tape
- Drop cloth
- Paintbrushes assorted sizes
- Level and measuring tape
- Picture hanging hardware
- Rag for wiping
Instructions
- Lay frames on a drop cloth and sand lightly for paint adhesion.
- Tape glass if you don’t remove it.
- Paint frames in chosen colors; allow 30 minutes between coats.
- Distress edges lightly with sandpaper for a worn look.
- Arrange frames on the floor to test composition before hanging.
- Use a level and picture hanging kit to mount securely.
How to Serve It
Create balance by mixing photo and art prints with neutral mats. Swap prints seasonally for fresh feels. Clean frames with a soft, dry cloth and store extras flat in a protective box.
14. Washed Linen Curtain Tiebacks
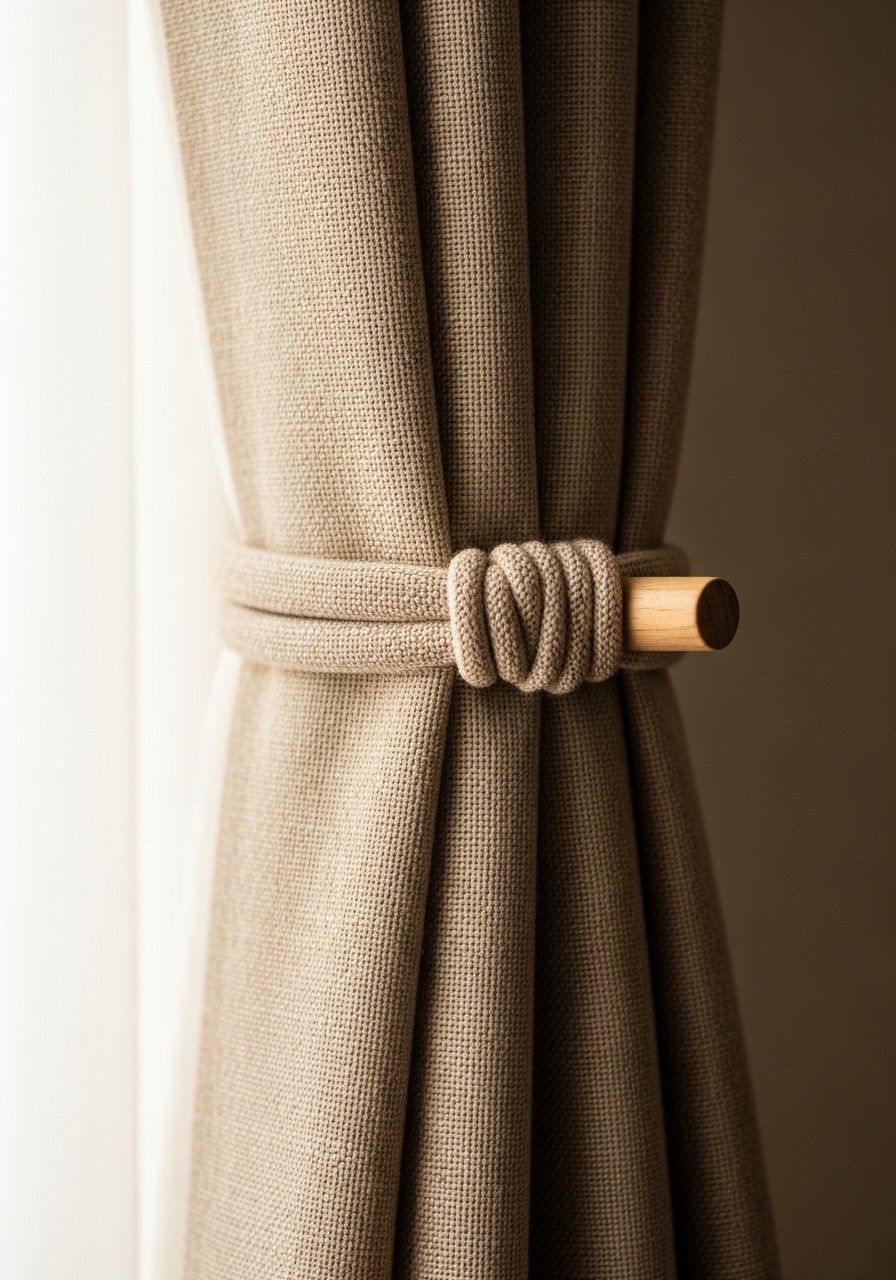
Tiebacks in soft, washed linen blend seamlessly into earth tone decor and add a relaxed, tailored look to windows. The fabric smells faintly of natural fibers and softens over time. A hand-sewing needle and thread set helps finish seams neatly.
Ingredients
- 1 yard washed linen fabric
- 1 wooden button or leather tab
- Thread matching tone
- Sewing needle
- Scissors
- Measuring tape
- Pins
- Iron
Instructions
- Cut fabric into 4-inch wide strips long enough to wrap around curtains with overlap.
- Fold long edges in 1/2 inch and press with iron.
- Fold in half lengthwise and stitch long edge to form a strap.
- Attach wooden button or leather tab to one end for closure.
- Trim threads and press final tieback.
How to Serve It
Tie around curtains to let light in and frame windows. Store extra tiebacks in a drawer to avoid creases. Pair with natural wood curtain rods for cohesive styling.
15. Pebble Mosaic Tray
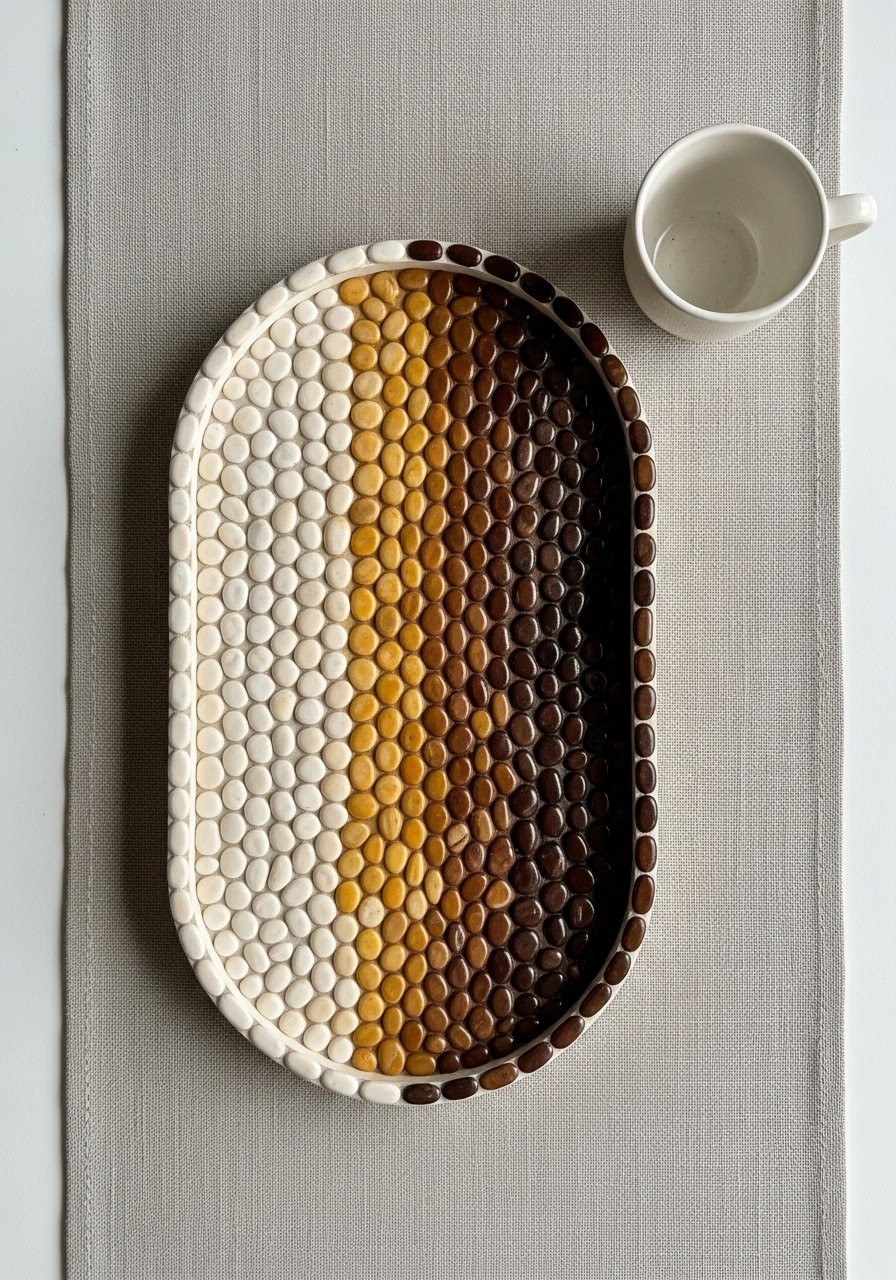
A pebble mosaic tray brings a tactile, natural element that complements earth tone decor. The stones provide subtle color variation and a cool, smooth texture. A clear epoxy resin kit helps seal the stones for a glossy finish.
Ingredients
- 1 wooden tray base
- Assorted river pebbles in earth tones (1–2 lbs)
- Clear epoxy resin and hardener
- Mixing cups and stir sticks
- Painter's tape
- Sandpaper
- Rags
- Gloves
- Small brush
Instructions
- Lay out pebbles in desired pattern on tray base.
- Mix epoxy resin per kit instructions in a well-ventilated area.
- Tape tray edges to prevent drips.
- Pour resin over pebbles evenly; use a stir stick to eliminate bubbles.
- Let cure per resin instructions (often 24–48 hours).
- Sand edges gently if needed and wipe clean.
How to Serve It
Use under a vase or candle group to create a stable, decorative surface. Clean with a soft, damp cloth. Store flat to avoid warping.
16. Rattan Pendant Light Makeover
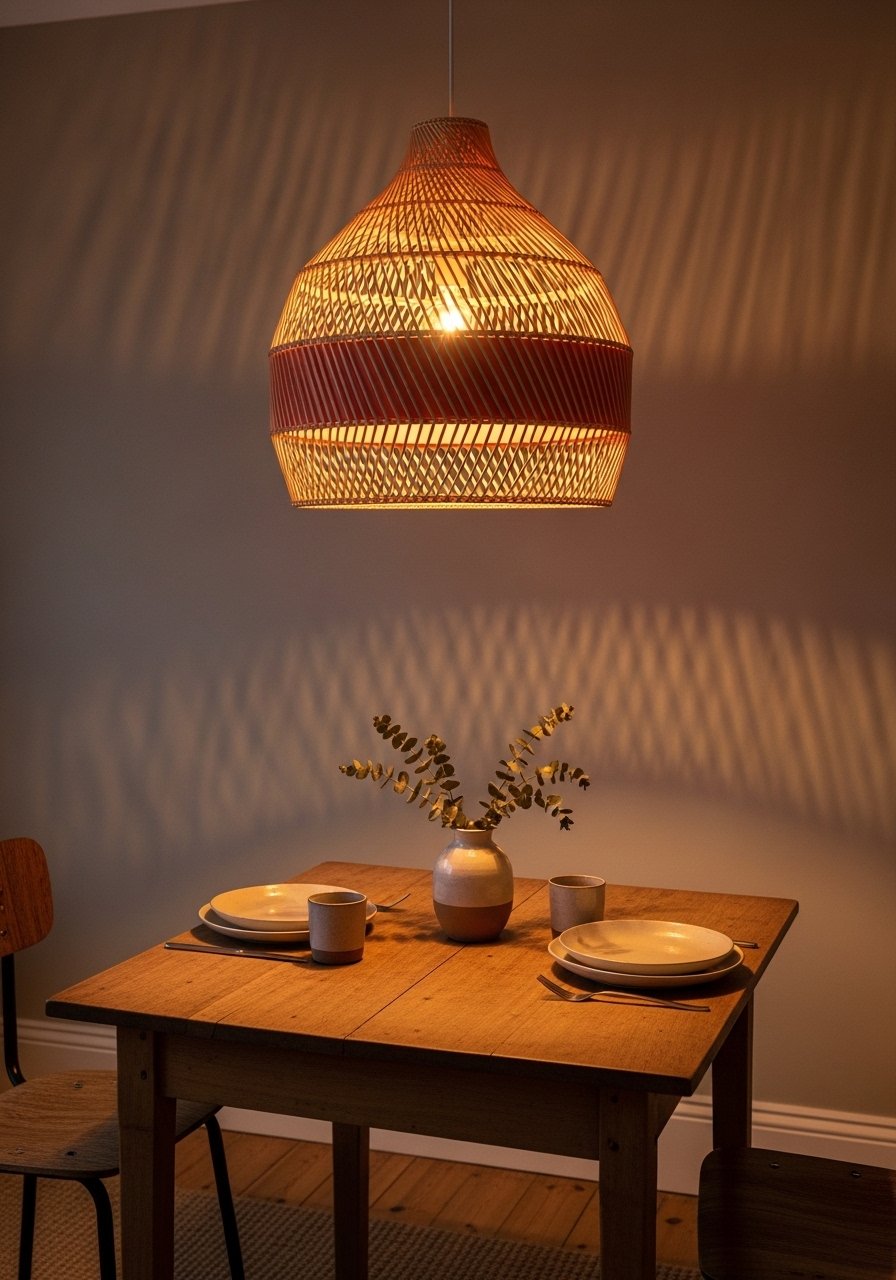
Updating a rattan pendant with a soft interior paint gives a warm glow and ties into earth tone decor without replacing fixtures. Paint fumes fade as the paint cures. Use a ladder or step stool for safe access while painting.
Ingredients
- 1 rattan pendant shade
- 1 can interior-grade spray paint (terracotta or warm cream)
- Drop cloth
- Painter's tape
- Gloves
- Step stool
- Light bulb (warm LED)
- Dusting brush
Instructions
- Remove shade and clean dust with a soft brush.
- Work outdoors or in a well-ventilated area; tape any areas you don’t want painted.
- Apply several light coats of spray paint, keeping can 8–10 inches away.
- Let dry 30 minutes between coats and cure 24 hours.
- Reinstall shade and use a warm LED bulb for a cozy color temperature (~2700K).
How to Serve It
Hang center over a table or reading nook. The painted interior will cast a warmer light on surroundings. Dust regularly with a soft brush and replace bulbs with similar color temperature for consistent ambiance.
17. Linen-Wrapped Books for Shelves
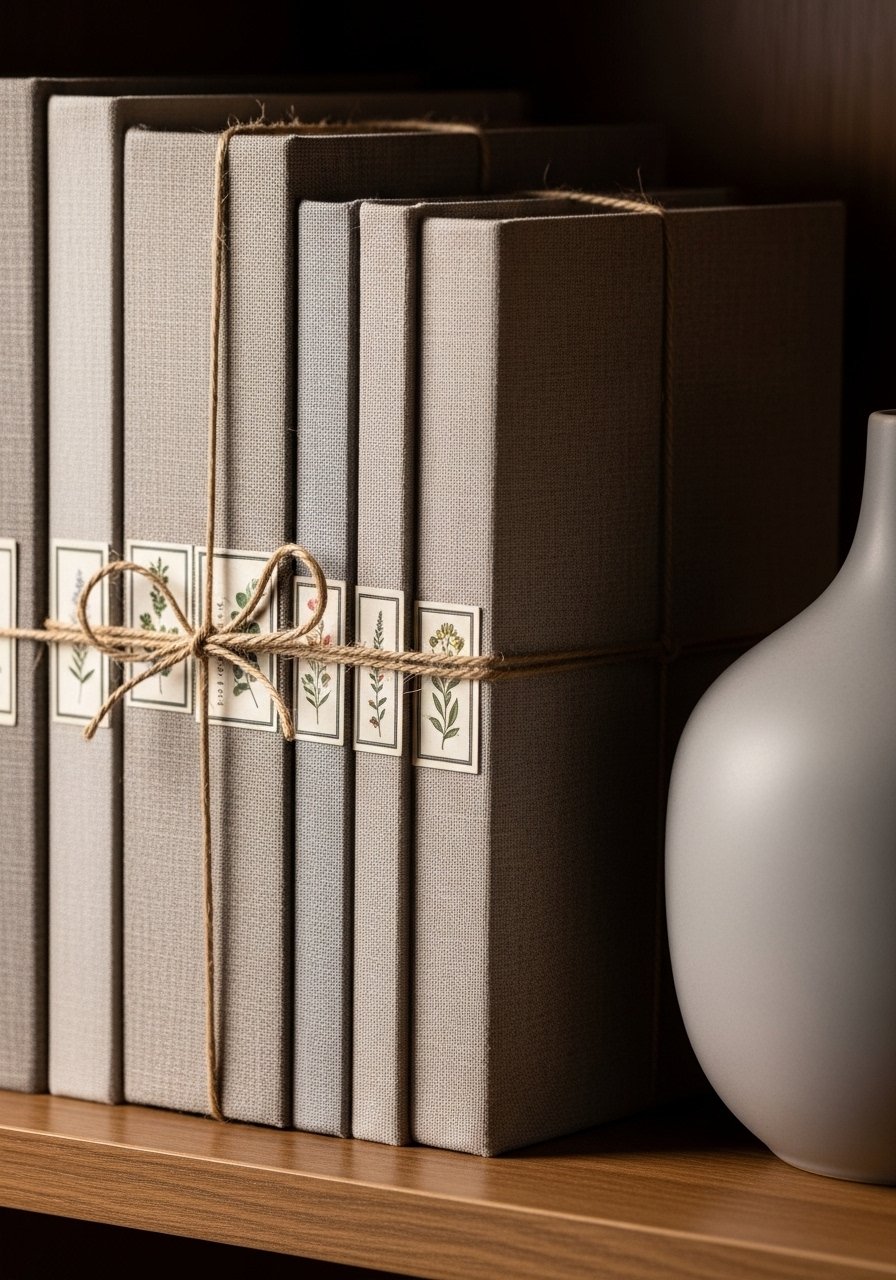
Wrapping old books in linen creates a cohesive shelf display and brings subtle texture aligned with earth tone decor. The fabric gives a soft, tactile surface and carries a faint linen scent. A fabric scissors set keeps cuts clean.
Ingredients
- 6–8 hardcover books (various sizes)
- 1.5 yards linen fabric
- Twine or ribbon
- Small kraft labels
- Double-sided tape
- Scissors
- Measuring tape
- Bone folder (optional)
Instructions
- Measure fabric to wrap each book with 1 inch overlap.
- Wrap fabric snugly and secure with double-sided tape along the inside covers.
- Tie a length of twine around the book and tuck a kraft label beneath the knot.
- Arrange wrapped books on a shelf, alternating sizes for interest.
How to Serve It
Group with ceramics and greenery for a curated look. Store wrapped books upright and avoid humid spaces. These make elegant gifts when paired with a small ceramic mug.
18. Stoneware Vase Refinish

Refreshing a plain stoneware vase with a muted ombré glaze integrates it into earth tone decor and unifies a shelf group. The glaze texture looks soft and matte when finished. Use a small angled paintbrush set for smooth transitions.
Ingredients
- 1 plain stoneware vase
- 3 ceramic paints (sand, terracotta, moss)
- 1 soft angled brush
- Painter's tape
- Paper towels
- Clear matte ceramic sealer
- Mixing palette
- Water cup
Instructions
- Clean vase and tape off any area you want unpainted.
- Mix paints to create gradient shades.
- Apply light layers from lightest to darkest, blending where they meet.
- Let each layer dry 15–20 minutes before adding the next.
- Seal with a matte ceramic sealer and let cure 24 hours.
How to Serve It
Fill with dried stems or tall grasses and place on a console or side table. Clean gently with a dry cloth. Store in a padded box if you change displays seasonally.
19. Cork Pinboard with Leather Trim
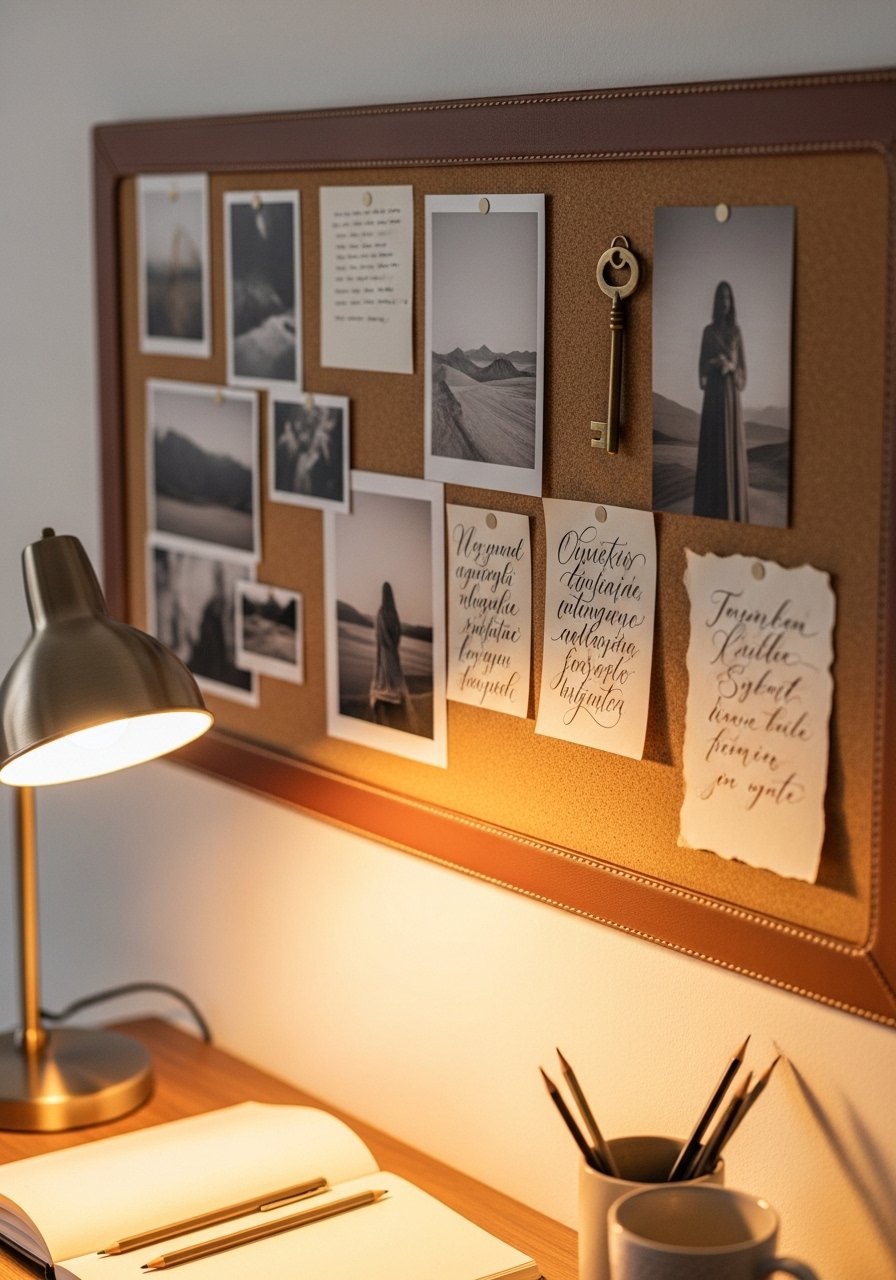
A cork board trimmed in leather adds practical warmth and coordinates with earth tone decor. The materials smell faintly of leather and cork when new. Use a leather stitching awl kit for neat leather edges.
Ingredients
- 1 cork sheet (12×18 inches)
- Leather strip (for trim)
- Strong adhesive
- Heavy-duty thread
- Needle or awl
- Ruler
- Scissors
- Hanging hardware
- Pins or tacks
Instructions
- Cut cork to desired size and sand edges lightly.
- Attach leather trim to cork edge with adhesive and stitch for reinforcement.
- Add hanging hardware to the back.
- Pin photos, notes, and fabric swatches to create a neutral inspiration board.
How to Serve It
Hang above your workspace for mood-boarding or in the kitchen for notes. Replace pins as needed and store spare tacks in a small ceramic dish nearby.
20. Painted Terracotta Mirror Frame
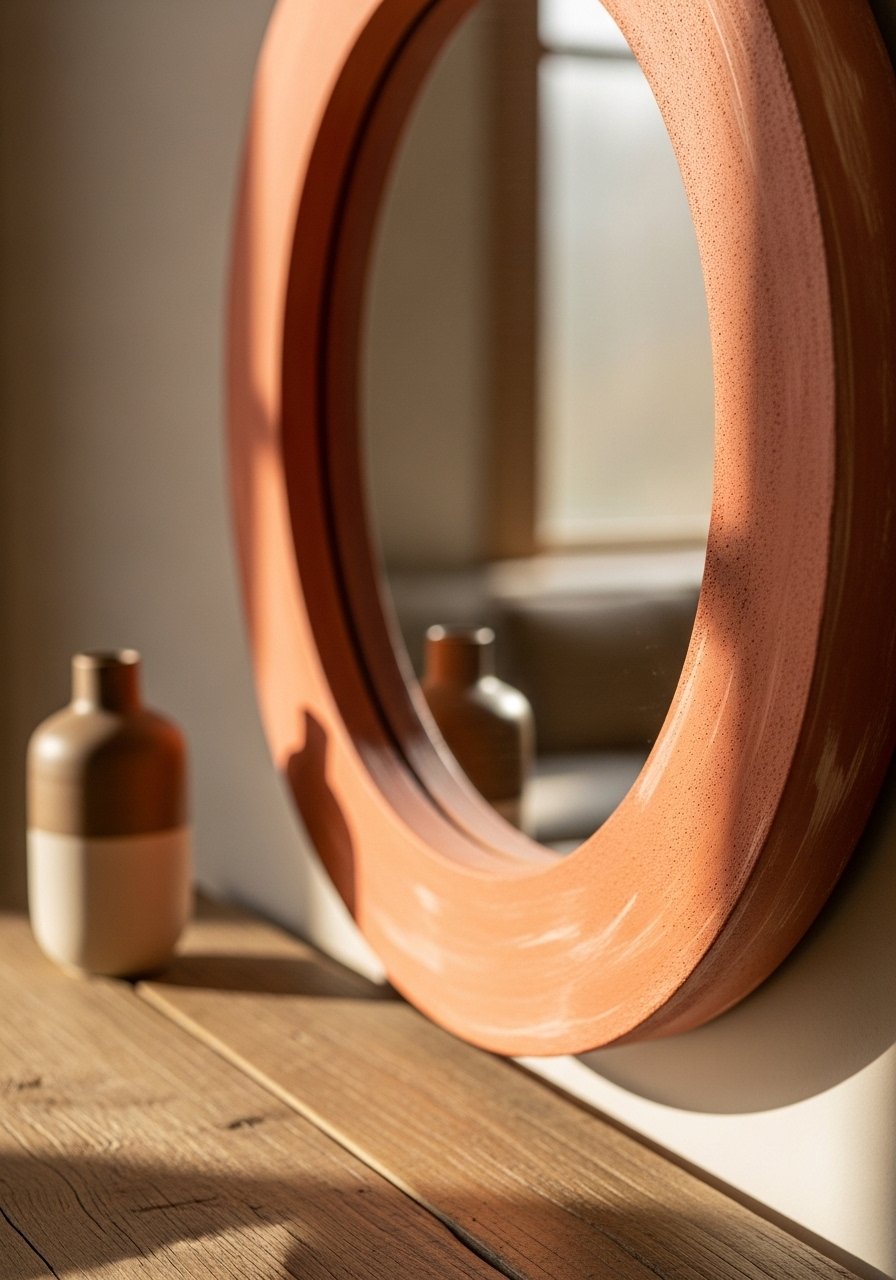
Painting a simple round mirror frame in earth tones ties reflection into your room's palette and adds warmth to the glass. A mirror hanging kit ensures a secure mount.
Ingredients
- 1 round mirror with removable frame
- Acrylic paints in terracotta and beige
- Foam brush
- Fine sandpaper
- Painter's tape
- Clear matte sealer
- Rags
- Hanging hardware
Instructions
- Remove frame if possible and sand lightly.
- Tape mirror edges to protect the glass.
- Paint frame in base color and add subtle brush stroke accents in terracotta.
- Seal frame with matte sealer and let cure 12 hours.
- Reattach frame and hang securely with mirror hanging kit.
How to Serve It
Position across from a window to bounce soft, warm light into the room. Clean glass with standard glass cleaner and keep frame dust-free.
21. Natural Dye Linen Napkins
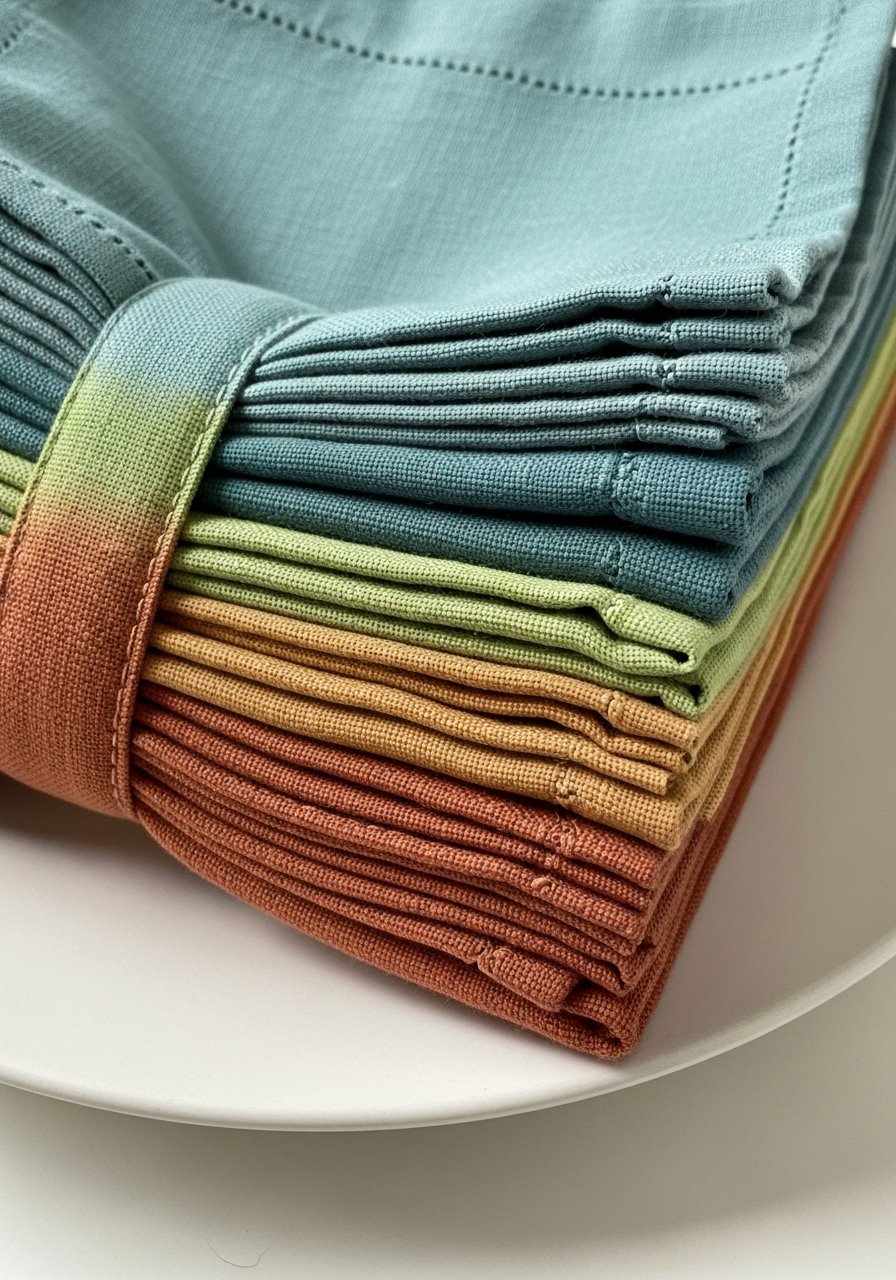
Dyeing linen with natural ingredients like tea or avocado pits produces subtle, earthy hues that enhance earth tone decor on your table. The dyed fabric retains a faint botanical scent at first. A natural dye kit helps with consistent results.
Ingredients
- 6 linen napkins (12×12 inches)
- Water for dye baths
- Black tea bags (for beige tones)
- Avocado pits (for peachy tones)
- Rusty nails or iron (for aged tones)
- Large pot
- Tongs
- Salt or mordant as instructed in dye kit
- Gloves
Instructions
- Prepare a dye bath: e.g., steep 8–10 tea bags in boiling water for 30 minutes.
- Pre-wet napkins and add to dye bath; simmer gently for 30–60 minutes until desired shade.
- Stir occasionally for even color.
- Remove and rinse in cool water until clear.
- Air dry flat away from direct sunlight.
- Fix color per dye kit instructions if using mordant.
How to Serve It
Use these napkins for casual dinners and pair with neutral stoneware. Store folded in a drawer lined with lavender sachets. Wash gently in cool water to preserve color.
22. Neutral Terrarium with Driftwood Accent
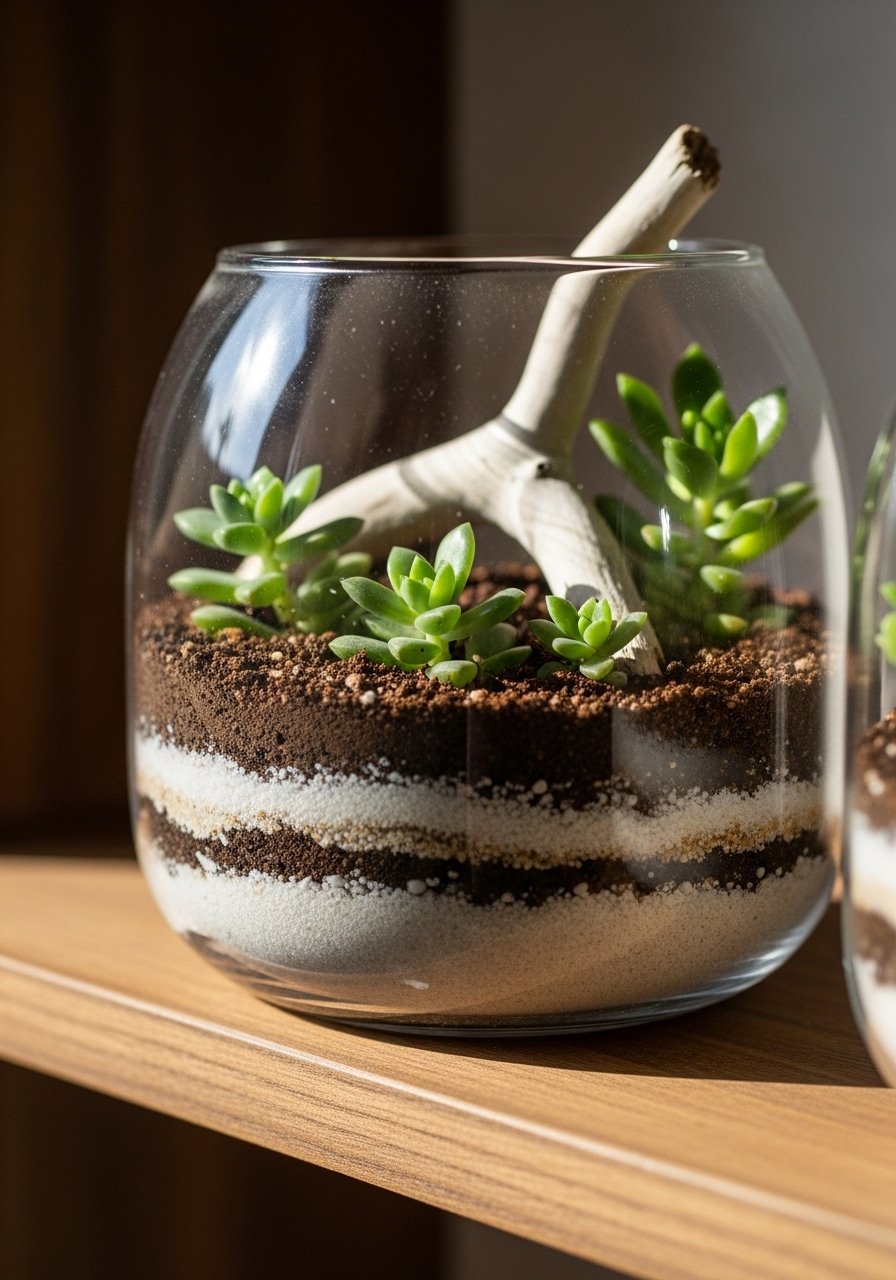
A neutral terrarium is a miniature landscape that echoes earth tone decor through sand, stone, and muted green plants. The earthy scent of soil is present when first planted. A succulent potting kit includes the right soil and tools.
Ingredients
- 1 glass terrarium container
- 1 cup small pebbles or drainage stones
- 1 cup activated charcoal
- 2 cups succulent/cactus potting mix
- 3–5 small succulents
- 1 small driftwood piece
- 2 tbsp coarse sand (for top layer)
- Small spoon or tweezers
- Spray bottle
Instructions
- Add pebbles to bottom for drainage, then a thin layer of charcoal.
- Add potting mix and create small depressions for succulents.
- Plant succulents gently and arrange driftwood as a focal point.
- Top with coarse sand for a finished look.
- Mist lightly and place in bright, indirect light. Water sparingly.
How to Serve It
Place on a shelf or coffee table where it receives light but not direct midday sun. Mist every 10–14 days depending on humidity. Store terrarium on a felt coaster to protect furniture.
23. Neutral Macrame Plant Hanger
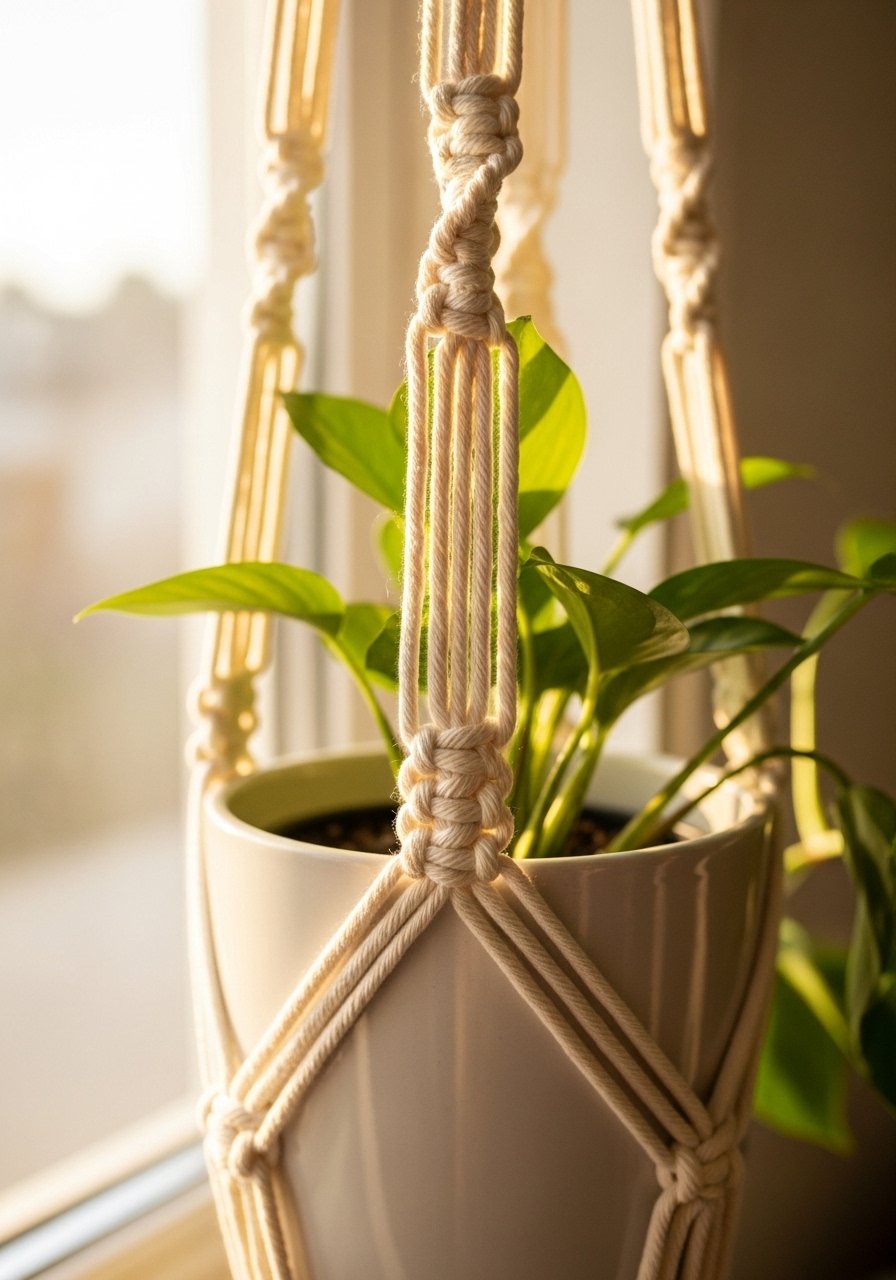
A macrame hanger brings vertical interest and texture that complements earth tone decor. The soft cotton cords smell clean and natural. A macrame cord bundle makes it easy to get started.
Ingredients
- 50 ft cotton macrame cord (3–4 mm)
- 1 metal ring
- 1 pot (4–6 inch)
- Scissors
- Measuring tape
- Comb for fringe
- Beads (optional)
Instructions
- Cut cord into 8 pieces of 6 feet each.
- Fold cords through metal ring and secure with a lark's head knot.
- Work square knots and spiral knots to form a basket for the pot.
- Measure to ensure even length and tie a final gathering knot below the pot opening.
- Trim fringe and comb for a neat finish.
How to Serve It
Hang near a window to free up shelf space and add green height. Use a drip tray under the pot to protect floors. Replace knots or cords if fraying occurs.
24. Warm Neutral Tray Tables
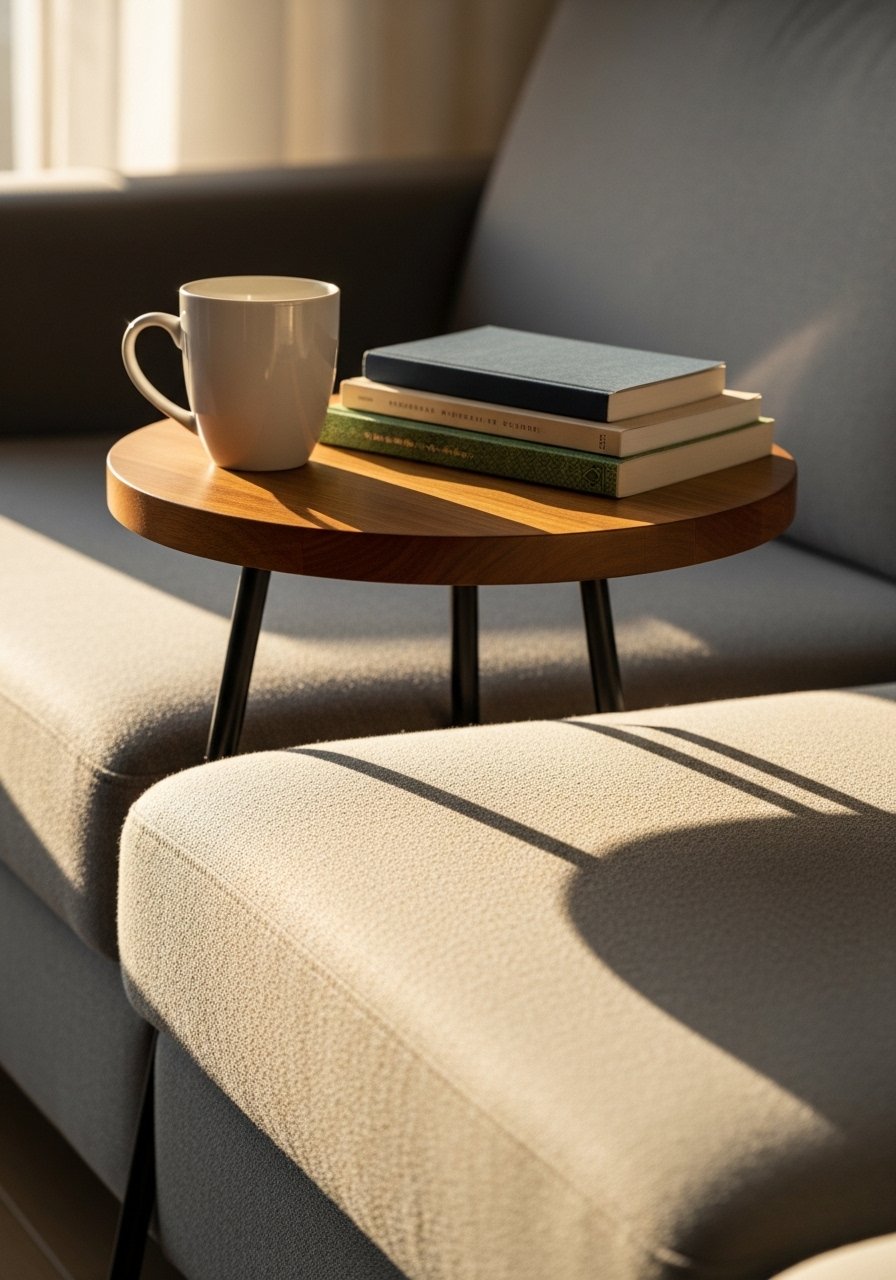
A small tray table with a warm wood top anchors drinks and decor while reinforcing earth tone decor. The wood gives off a subtle scent of finish when new. A miniature drill driver helps assemble legs neatly.
Ingredients
- 1 round wood top (12–14 inches)
- 3 metal hairpin legs or tripod legs
- Screws for attaching legs
- Wood stain (optional)
- Screwdriver or drill
- Sandpaper
- Clear sealant
- Felt pads
Instructions
- Sand the wood top smooth and apply stain if desired; let dry.
- Seal with a clear coat and let cure.
- Attach legs using screws and a drill driver; ensure level.
- Apply felt pads to leg bottoms to protect floors.
- Style with a small stack of books and a cup.
How to Serve It
Use beside a chair or as a portable cocktail stand. Store folded legs if you need to transport. Clean with a dry or slightly damp cloth.
25. Earth Tone Decor: Layered Neutral Rug DIY
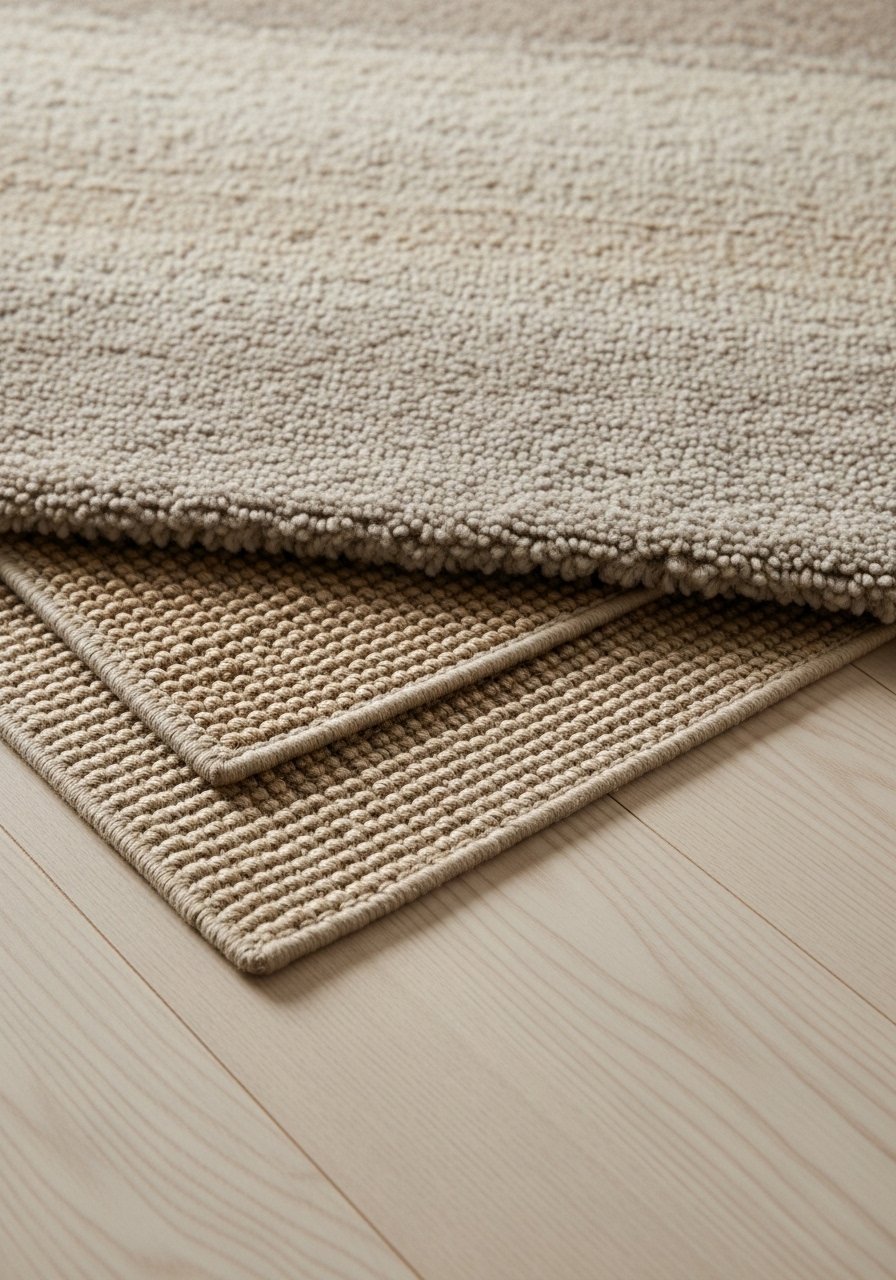
Layering rugs creates warmth and depth in a room while keeping to earth tone decor through natural fibers and subtle colors. The combined scents of wool and jute feel homely. A rug gripper set prevents slipping and keeps layers aligned.
Ingredients
- 1 small jute rug (4×6)
- 1 soft wool or faux wool rug (3×5)
- Rug pad or grippers
- Scissors (for trimming pad)
- Measuring tape
- Vacuum or broom
Instructions
- Place the jute rug as the base and lay the wool rug centered on top.
- Use rug grippers under the top rug and pad for non-slip security.
- Trim any excess pad for a precise fit.
- Vacuum both rugs regularly to keep fibers bright.
How to Serve It
Layer under a coffee table or at the entryway for texture contrast. Rotate rugs periodically for even wear. Clean according to fiber type and store rolled in a dry area.
26. Driftwood & Clay Key Tray
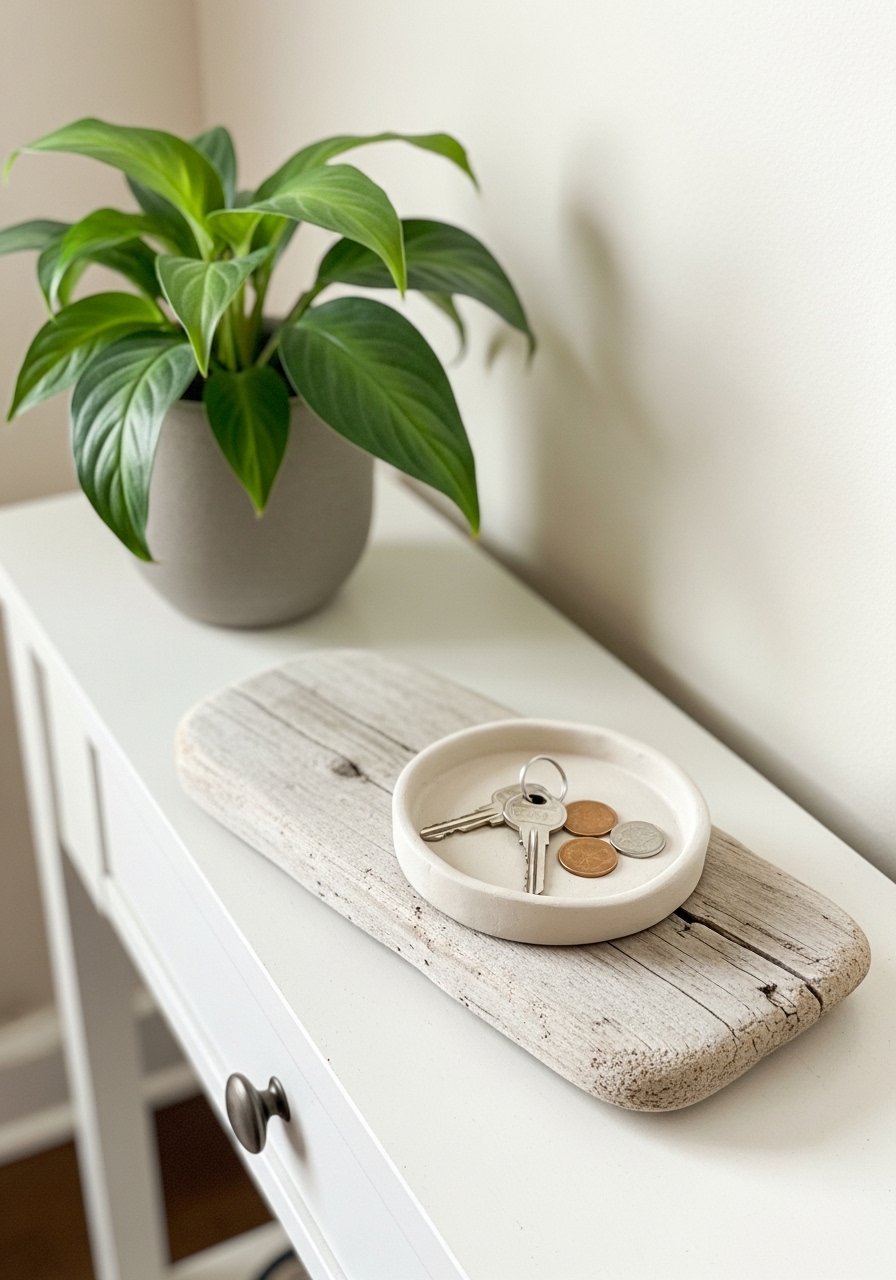
A small entry tray made from driftwood paired with a molded clay dish offers a practical landing spot that reinforces earth tone decor. The scent of wood and clay lingers faintly during crafting. A small craft knife set helps shape clay details precisely.
Ingredients
- 1 flat piece of driftwood (6–8 inches)
- 1/2 lb air-dry clay
- Sandpaper
- Strong adhesive
- Clear sealer
- Small paintbrush
- Felt pads
- Optional: brass hook for keys
Instructions
- Shape a shallow clay dish using hand molds and smooth edges with a damp finger.
- Let dish dry per clay instructions (24–48 hours).
- Sand driftwood lightly and apply clear sealer; let dry.
- Glue dried clay dish to driftwood with strong adhesive and let cure.
- Add felt pads to underside and optionally screw in a small brass hook for hanging keys.
How to Serve It
Place on a console near the door to collect keys, loose change, and small pieces. Clean clay dish with a dry cloth. For travel or moving, wrap gently in tissue to avoid chips.
Trusting these 26 approachable projects, you can weave calm, grounded energy into every room through thoughtful materials and muted color. Try one this weekend—start small with a painted vase or clay coaster—and work up to larger pieces like a driftwood shelf. Save or pin the idea that fits your space, and share which project you tried with friends.
If one tool helps across many of these ideas, a reliable hot glue gun and a set of painter's brushes will carry you through finishing touches, quick assemblies, and neat paintwork. Which earth tone decor project are you trying first?