You love interiors that feel cinematic, layered, and personal — and Dark Home Decor delivers exactly that mood. Whether you’re easing into broody tones with an accent wall or committing to full-on dramatic texture, these 24 ideas give you step-by-step “recipes” to craft atmosphere that feels curated, not staged.
Each idea below is written like a simple project recipe: materials (think paints, fabrics, hardware), clear instructions with timing and tools, and smart tips for styling and storage. You’ll see Dark Home Decor used as a guiding theme so you can mix, match, or repeat techniques across rooms.
Grab a reliable paint roller set for smooth finishes and a quiet cordless drill for hanging heavy pieces — both make these projects faster and cleaner. Ready? Let’s make your space feel dramatic, cozy, and unmistakably you.
1. Matte Black Accent Wall
This matte black wall is the fastest way to make a room feel moody and focused. The finish drinks light, so furniture silhouettes pop; glossy frames and brass hardware create contrast. People who love strong contrast and cozy edges will adore the tactile, velvety look.
Ingredients
- 1 gallon matte black interior paint (eg. 12 oz sample + 1 gal base)
- 1/2 gallon primer (if covering light color)
- 1 roll painter’s tape (60 yards)
- 1 9-inch paint roller cover, medium nap
- 1 angled 2-inch sash brush
- 1 paint tray
- Drop cloth (6×9 ft)
- Light sanding block
- 1 can clear matte topcoat (optional, 12 oz)
- 1 stud finder
- 1 level
- Masking paper for switchplate protection
Instructions
- Move furniture away and lay down a drop cloth. Use a drop cloth to protect floors.
- Clean the wall, fill holes, and sand glossy spots smooth. Wipe dust with a damp cloth.
- Tape edges and cover switches with masking paper. Use a 1-inch painter’s tape for crisp lines.
- Prime if needed; let primer dry 2–4 hours. Sand lightly for a smooth base.
- Pour paint into tray and cut in edges with the angled brush. Roll paint in small W patterns for even coverage.
- Apply 2 thin coats, letting each dry 4 hours; matte finishes often need two coats for depth.
- Inspect for streaks; touch with brush. If desired, apply a clear matte topcoat for durability and let cure 24 hours.
- Remove tape slowly at a 45-degree angle. Rehang art using a stud finder to anchor heavy pieces.
How to Serve It
Hang a gallery of black frames or a single large brass mirror to bounce warm light. Add textured cushions and a woven rug for softness. Store leftover paint in a cool, dry spot and seal can with plastic wrap under the lid. For seasonal swaps, mount picture hooks with a picture hanging kit so you can rearrange quickly.
2. Charcoal Velvet Pillow Mix

A mix of charcoal velvet pillows instantly deepens a sofa and adds tactile warmth. Velvet reflects light differently, so a few pillows create a shifting, luxurious look. Great for anyone who wants drama without committing to permanent changes.
Ingredients
- 2 charcoal velvet pillow covers (18×18 in)
- 2 plum velvet pillow covers (16×16 in)
- 1 textured black knit lumbar pillow (12×20 in)
- 2 feather inserts (18×18 in)
- 1 set hidden zipper covers (2-pack)
- 1 lint roller
- 1 small fabric shaver
- 1 measuring tape
- 1 package fabric-safe sewing needles
- 1 spool strong thread
- 1 seam ripper (if altering inserts)
- 1 storage bag for off-season
Instructions
- Measure pillow openings and match insert sizes to covers. Use a measuring tape.
- Insert feather fills into velvet covers and shake to loft fibers evenly.
- If covers slip, stitch a few hidden tucks inside or add non-slip fabric strips.
- Remove lint and loose fibers with a lint roller. Use a fabric shaver to remove pilling if needed.
- Mix sizes and textures on the sofa — place the lumbar in front of larger cushions for depth.
- Fluff daily for the first week so feathers settle; occasional steam can revive crushed velvet.
How to Serve It
Arrange asymmetrically: two large pillows on one side, a lumbar in the middle. Pair with a soft throw blanket in a complementary tone. Store extras in a breathable storage bag to prevent mildew.
3. Dark Home Decor: Black-Framed Gallery Wall

A black-framed gallery wall reads sleek and intentional against moody paint. Use a mix of art sizes and finishes to create contrast — glossy frames next to matte prints keep things interesting. This works for collectors and casual curators alike.
Ingredients
- 8 assorted black frames (various sizes up to 16×20 in)
- 12 art prints (mix of black & white and muted color)
- 1 roll kraft paper for templates
- 1 pencil
- 1 tape measure
- 1 pack picture hanging hooks
- 2 D-ring hangers
- 1 felt bumpers pack
- 1 level
- 1 stud finder
- 1 cordless drill
- 1 small hanging wire (50 ft)
Instructions
- Lay prints out on floor and arrange composition. Trace frames onto kraft paper to make wall templates.
- Use a tape measure and level to mark wall placement.
- Find studs with a stud finder for heavy frames; use anchors for drywall.
- Attach D-rings or wire to frames. Hang starting from the center and work outward for balance.
- Use felt bumpers on corners so frames sit flush and avoid wall scuffs.
- Step back and tweak spacing; aim for 2–3 inches between frames for a tight, gallery feel.
How to Serve It
Highlight with picture lights or a floor lamp to create a warm pool of light. Place a low console with a sculptural object beneath for grounding. Keep spare prints and hardware in an artist portfolio bag.
4. Deep-Stained Wood Shelves
Dark-stained shelves add gravity to a small wall and showcase collections without competing with them. The rich grain reads both modern and rustic depending on accessories. People who love curated objects will appreciate how the stain frames each piece.
Ingredients
- 2 floating shelf boards (8 ft x 8 in, kiln-dried wood)
- 1 can dark wood stain (8 oz)
- 1 120-grit sanding sponge
- 1 lint-free rag
- 1 wood sealer (clear satin, 12 oz)
- 8 concealed floating shelf brackets
- 1 drill bit set
- 1 level
- 1 stud finder
- 1 set finishing nails
- Protective gloves
Instructions
- Sand boards with 120-grit to open grain; wipe with rag.
- Apply dark stain with a lint-free rag following wood grain. Wipe excess; allow 6–8 hours to dry.
- Sand lightly between coats and apply second coat for depth.
- Seal with clear satin; let cure 24 hours.
- Find studs and mount floating brackets using a cordless drill.
- Slide shelves onto brackets; check level and secure with finishing nails if needed.
How to Serve It
Style with layered books, a black ceramic vase, and brass accents. Use a plant mister for trailing greenery and keep seasonal swaps in a labeled bin beneath the shelf.
5. Moody Black Door Makeover
Painting doors black frames a room and adds architectural interest. Black doors anchor hallways and give everyday passages a dramatic pause. Ideal for renters who want an impactful but reversible update.
Ingredients
- 1 quart matte black door paint (eg. 16 oz)
- 1 shellac-based primer (8 oz)
- 1 2-inch angled brush
- 1 foam roller (4-inch)
- Sandpaper (220 grit)
- 1 drop cloth
- Painter’s tape
- Screwdriver to remove hardware
- New brass knob and hinges (optional)
- Lint-free cloth
Instructions
- Remove door hardware and lay door flat on sawhorses.
- Sand lightly to scuff the surface and wipe clean.
- Prime with shellac primer if door is glossy; dry 2 hours.
- Cut in with angled brush, then roll two thin coats with a foam roller for a smooth finish.
- Allow paint to dry 6–8 hours between coats; cure fully 48 hours before rehanging.
- Reinstall or upgrade hardware for added contrast.
How to Serve It
Swap to brass or matte black knobs for contrast. Add a wool tassel for texture. Keep spare hardware in a small hardware organizer in case you switch finishes later.
6. Blackened Brass Lighting Swap
Changing light fixtures to blackened brass adds warmth and drama. The patina softens the starkness of black and brings a vintage, collected feel. This is for people who want an immediate style upgrade with measurable impact.
Ingredients
- 1 blackened brass pendant light
- 1 LED warm bulb (2700K)
- Wire nuts and mounting hardware
- Voltage tester
- Screwdriver set
- Electrical tape
- Fixture canopy
- Rod or chain (adjustable)
- 1 step ladder
- Protective eyewear
- 1 shop vacuum for cleanup
Instructions
- Turn off power at the breaker and verify with a voltage tester.
- Remove old fixture and disconnect wiring.
- Attach mounting bracket and connect house wires to fixture wires with wire nuts.
- Secure canopy and adjust chain/rod length to desired height (typically 30–36 in above a table).
- Install LED bulb and restore power; check for flicker or buzzing and tighten connections if needed.
- Use a soft cloth to wipe fingerprints off the brass finish.
How to Serve It
Use dimmable bulbs with a compatible dimmer switch to set mood. Pair with dark shades or textured cords for an artisanal feel. Keep spare bulbs in an airtight storage box.
7. Black Marble or Faux Marble Tray Styling
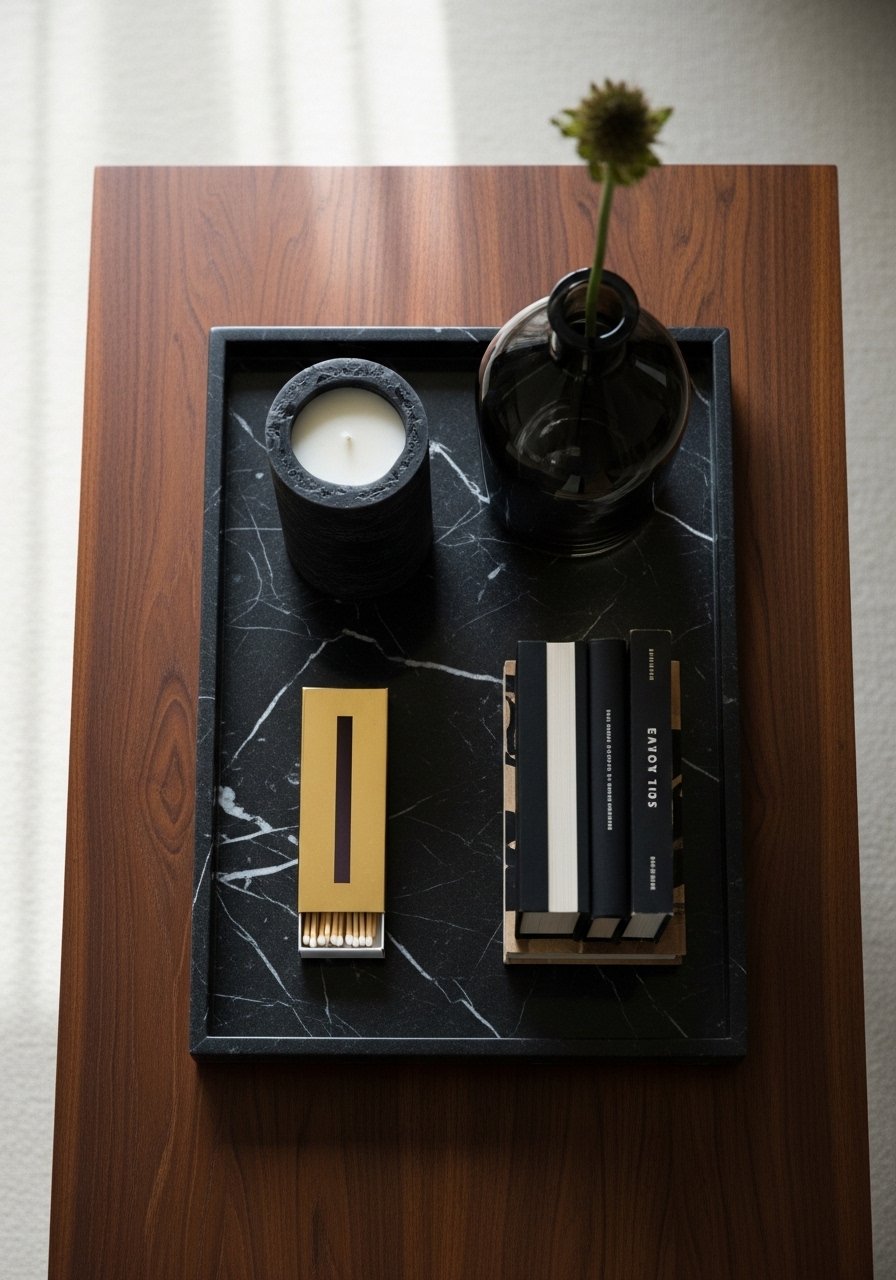
A black marble tray corrals items and adds polish to coffee tables or vanities. The veining provides visual interest while the dark base keeps the space moody and cohesive.
Ingredients
- 1 black marble tray (12×18 in)
- 1 black pillar candle
- 1 brass match striker
- 1 small stack of 2 hardcover books
- 1 amber glass vase
- 1 single dried stem (pampas or protea)
- Linen coaster
- 1 bottle felt pads
- 1 tray cleaner (soft cloth)
Instructions
- Place felt pads on tray underside to protect surfaces.
- Arrange books, candle, and vase in a triangular composition.
- Keep heavier items at the back and lighter objects at the front for balance.
- Wipe tray with a soft cloth after use to avoid water rings.
- Replace candle when burned down to prevent overheating tray.
How to Serve It
Center the tray on a coffee table or dresser and rotate seasonal decor. Use a decorative matchbox and keep the tray on a non-slip mat for safety.
8. Black Window Frames (Painted or Replaced)

Painting window frames black creates crisp architectural lines and frames your view. It works with light sheers to keep brightness while adding definition. Perfect if you want structure without heavy treatments.
Ingredients
- 1 cup trim paint in matte black (8 oz)
- 1 small angled sash brush
- Painter’s tape
- Drop cloth
- Fine grit sandpaper
- Putty for small imperfections
- Glazing compound (optional)
- Rubbing alcohol and rags
- 1 palm sander (optional)
- 1 cordless drill (if replacing hardware)
Instructions
- Clean frames with rubbing alcohol and let dry.
- Sand glossy finishes and fill any holes with putty; sand smooth.
- Tape glass edges with painter’s tape to protect panes.
- Cut in with an angled sash brush and apply 2 thin coats, letting dry 4 hours between.
- For replacement frames, remove hardware and install per manufacturer instructions using a cordless drill.
- Remove tape carefully and clean glass with a glass cleaner.
How to Serve It
Pair with light linen curtains for a high-contrast look. Keep window-cleaning supplies in a spray bottle and microfiber cloth kit.
9. Dark Rug Layering
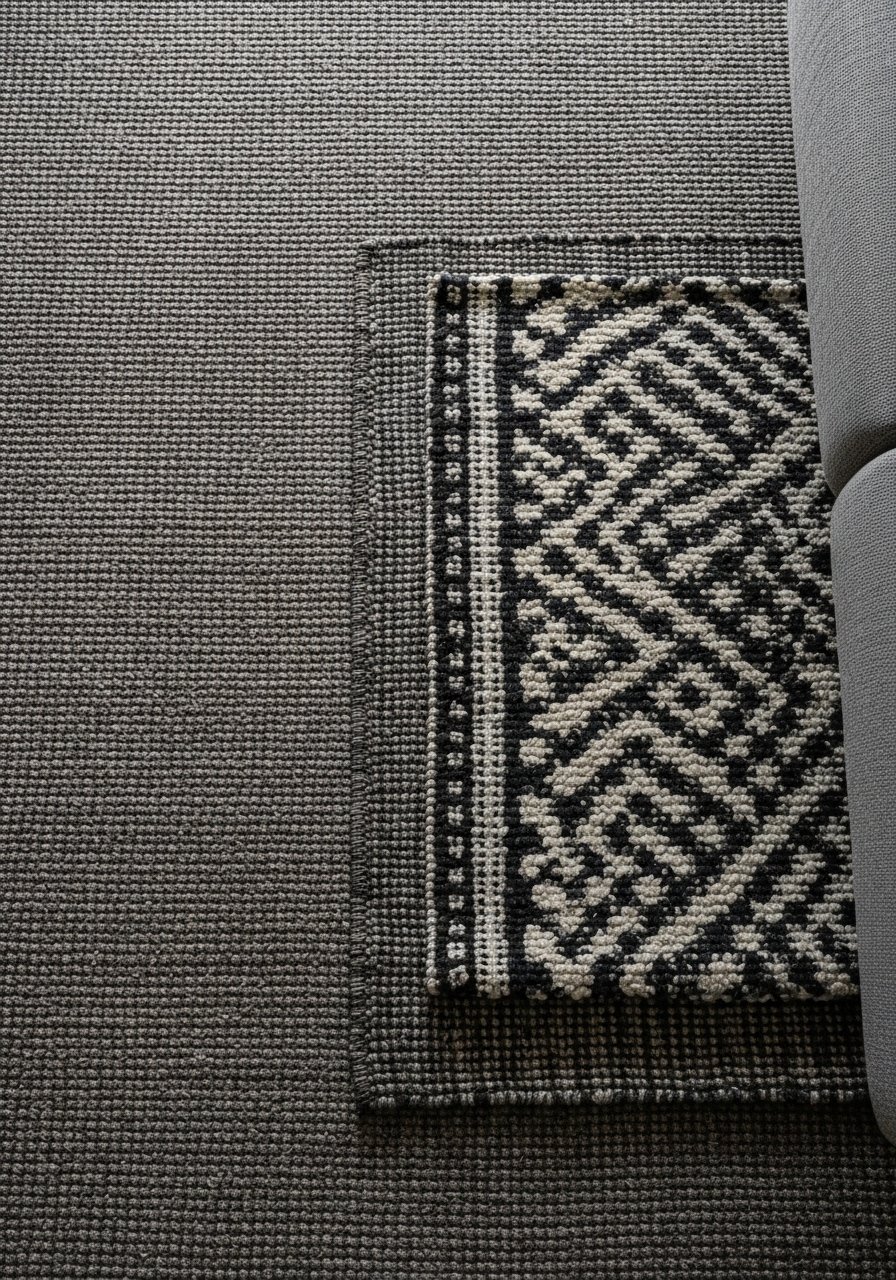
Layering rugs in deep tones adds warmth, sound dampening, and visual depth. Jute under a softer wool rug creates an interesting textural base that anchors furniture groups.
Ingredients
- 1 large charcoal jute rug (8×10 ft)
- 1 smaller black patterned wool rug (5×7 ft)
- 1 rug pad (8×10 in slip-resistant)
- 1 rug gripper tape
- 1 lint roller for pet hair
- 1 hand broom
- 1 spot cleaner
- Furniture coasters (felt)
- 1 measuring tape
Instructions
- Measure the room and position the large jute rug to define the seating area.
- Place a rug pad under both rugs to prevent slipping and add cushion.
- Layer the smaller rug centered or offset depending on the furniture layout.
- Use rug gripper tape at corners to keep layers in place.
- Vacuum both rugs regularly and spot-clean spills immediately with the cleaner.
How to Serve It
Round off edges with a low coffee table and textured cushions. Keep seasonal swaps rolled and stored in a vacuum storage bag to protect from dust.
10. Dark Home Decor: Charcoal Velvet Sofa Makeover

Reupholstering or swapping in a charcoal velvet sofa instantly reads luxe and moody. Velvet reflects light subtly, creating depth without glare. This suits people who want a centerpiece that reads both modern and comforting.
Ingredients
- Charcoal velvet sofa (2–3 seater)
- 2 velvet throw pillows
- 1 reversible sofa cover (optional)
- 1 upholstery cleaner
- 1 lint roller
- 1 fabric swatch kit
- Measuring tape
- 1 pair upholstery scissors
- 1 set upholstery needles and thread
- 1 furniture dolly (for moving)
Instructions
- Measure doorways to ensure sofa access. Use a measuring tape.
- If reupholstering, hire a pro or order replacement fabric swatches and follow upholstery guides.
- Place reversible sofa cover if you want a non-permanent option.
- Vacuum and use upholstery cleaner on stains, testing on a hidden spot first.
- Fluff cushions and rotate regularly for even wear.
- Use a lint roller to remove pet hair and keep velvet plush.
How to Serve It
Pair with a dark wood side table and a reading lamp. Keep extra throws in a woven storage basket to preserve texture.
11. Slate Tile Entryway Refresh

Slate or slate-look tiles are practical and instantly moody for an entryway. They hide dirt, feel grounded, and set the tone for the rest of the home. Great for high-traffic zones.
Ingredients
- Slate floor tiles (12×12 in)
- Thinset mortar (per square footage)
- Tile spacers
- Grout (dark charcoal)
- 1 grout float
- Tile cutter or wet saw
- 1 mixing bucket
- Floor sealer (penetrating)
- 1 notched trowel
- 1 knee pads
- 1 tile squeegee
Instructions
- Measure the space and calculate tile and mortar needs.
- Prepare substrate ensuring it’s level and clean.
- Spread thinset with notched trowel and lay tiles using spacers.
- Cut edge tiles with a wet saw or tile cutter to fit.
- Allow set time 24 hours, then grout with charcoal grout and wipe with sponge.
- After grout cures, apply a penetrating sealer to protect and enhance color.
How to Serve It
Add a dark-wash rug runner and a sturdy shoe cabinet. Keep entryway tools in a wall-mounted key holder to avoid clutter.
12. Blackened Metal Bed Frame

A blackened metal bed frame provides structure and a minimalist silhouette. It pairs well with textured linens and moody walls for a calm, enveloping sleep space.
Ingredients
- Blackened metal bed frame (queen)
- 4 bed slats or metal center support
- 2 dark linen duvet covers
- 1 set mattress anchors
- 1 set brass bedside lamps
- 1 mattress protector
- 1 step ladder (for assembly)
- 1 socket wrench set
- Furniture pads for legs
- 1 dust cover for seasonal storage
Instructions
- Assemble frame per manufacturer instructions using a socket wrench.
- Ensure center supports are secure for mattress weight.
- Place mattress protector and mattress, then linens.
- Adjust bed height to match bedside table; add furniture pads to avoid floor scratches.
- Use bedside lamps with warm LED bulbs for cozy lighting.
How to Serve It
Style with layered throws and a textured headboard cushion. Store off-season bedding in a breathable garment bag.
13. Deep-Toned Wallpaper Accent
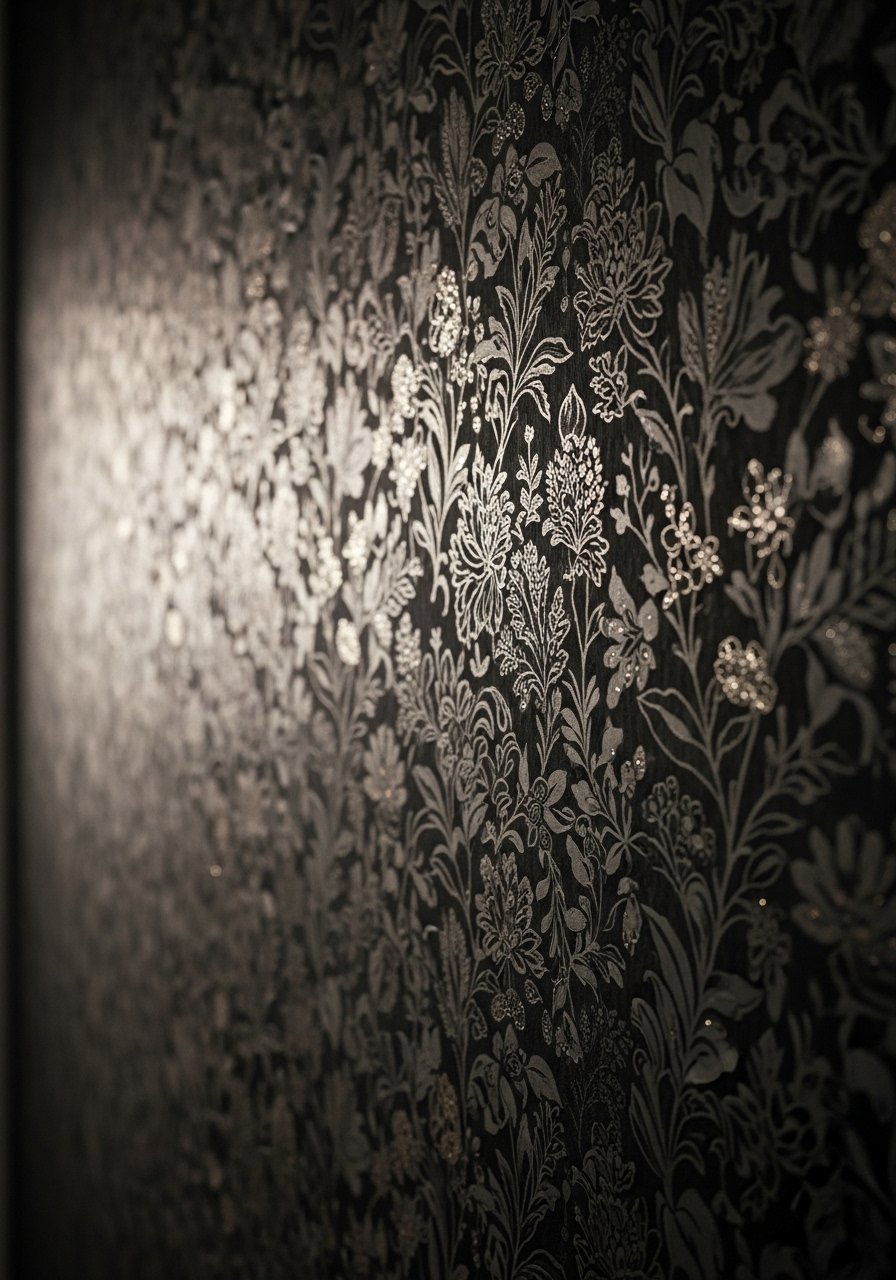
A dark-patterned wallpaper adds pattern while keeping tones low and moody. Choose a non-directional print for easier matching and a paste-the-wall or peel-and-stick option for renters.
Ingredients
- Rolls of dark patterned wallpaper (calculate square footage)
- Wallpaper paste or peel-and-stick rolls
- Wallpaper smoother
- Sharp utility knife
- Seam roller
- Measuring tape
- Plumb line
- 1 sponge and bucket
- 1 ladder
- 1 seam adhesive
Instructions
- Measure wall height and width to determine rolls.
- If paste-type, mix adhesive according to package.
- Snap a plumb line for the first panel to ensure vertical alignment.
- Apply wallpaper and smooth with a wallpaper smoother to remove bubbles.
- Trim excess with a sharp knife and press seams with a seam roller.
- Wipe away excess paste immediately with a damp sponge.
How to Serve It
Accent with simple black frames and brass hooks. Keep leftover trimmed strips in a small cardboard tube for patching.
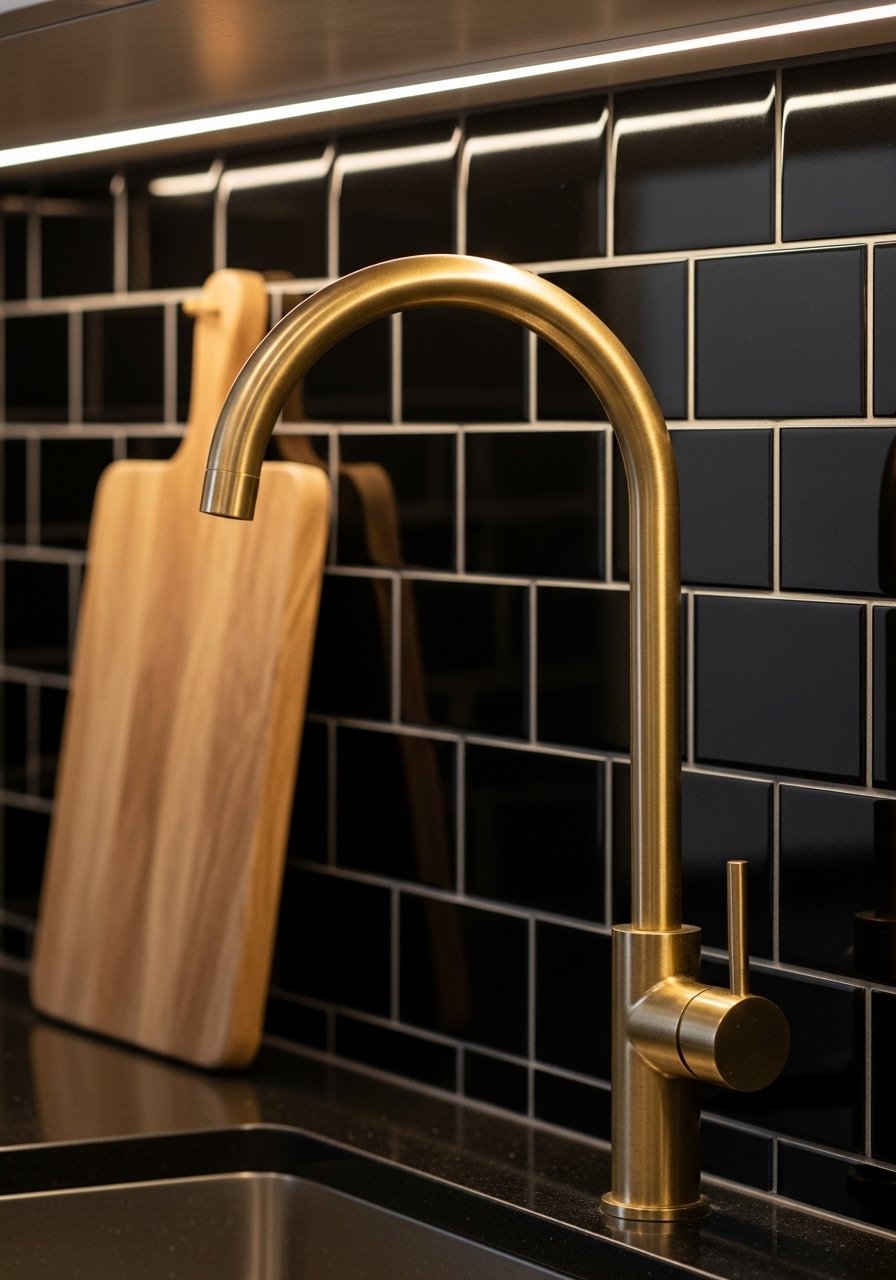
14. Moody Bathroom with Black Vanity
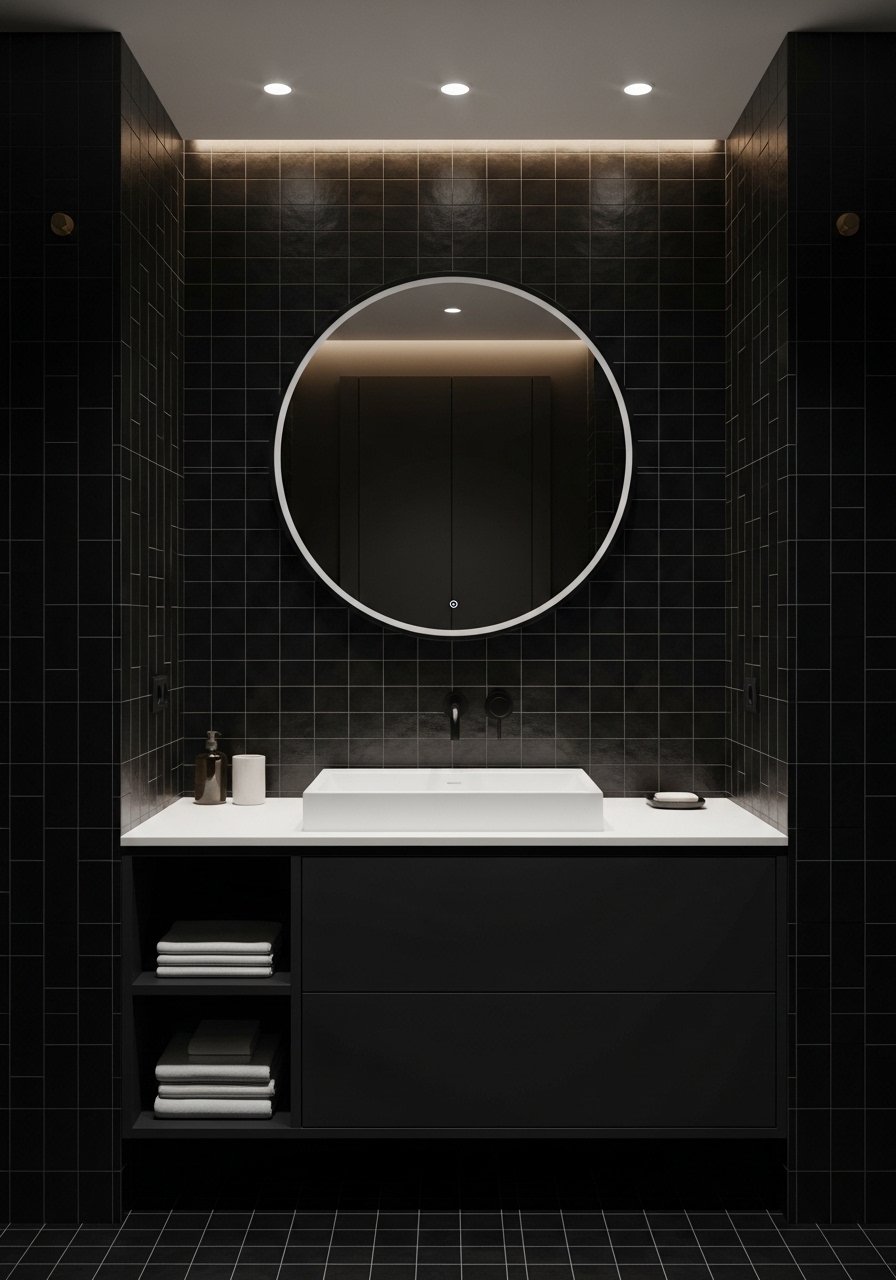
A black vanity anchors bathrooms and reads clean and contemporary. Pair with warm metals and textured linens to avoid a cold look.
Ingredients
- 1 black vanity (24–36 in)
- Matte black faucet set
- Round black-framed mirror
- Vanity top (quartz or marble-look)
- Plumbing connectors and sealant
- Silicone caulk
- 1 roll plumber’s tape
- Screwdriver and adjustable wrench
- Level
- Decorative hand towels (charcoal)
Instructions
- Turn off water and remove old vanity. Disconnect plumbing.
- Install new vanity per instructions and secure to studs.
- Fit vanity top and caulk edges with silicone; allow 24 hours to cure.
- Connect faucet and run water to test for leaks.
- Mount mirror and accessories, checking alignment with a level.
How to Serve It
Style with a black soap dispenser and brass tray. Keep extra towels rolled in a bamboo storage basket.
15. Sooty Fireplace Makeover
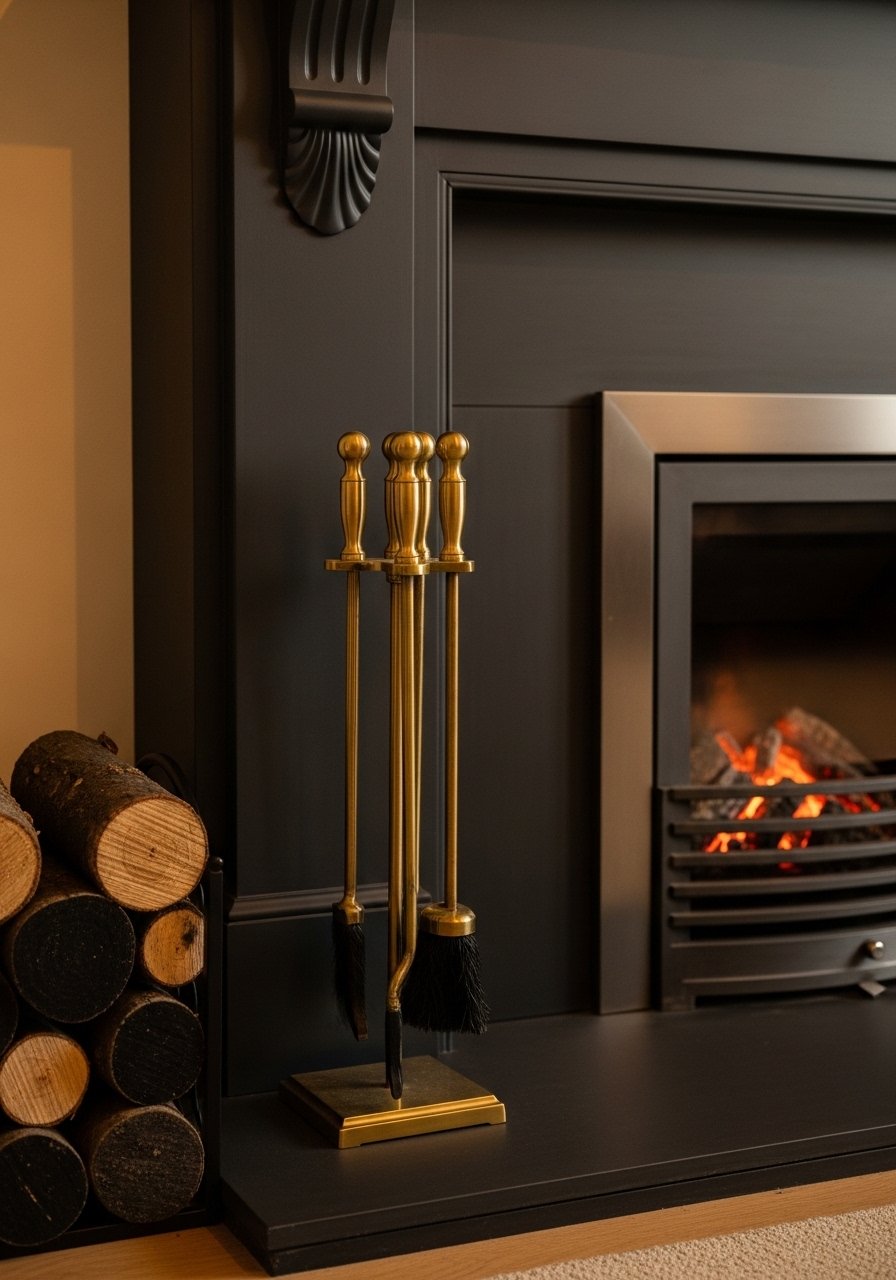
Painting a fireplace surround in a sooty tone modernizes and focuses attention on the hearth. It’s dramatic without a big renovation and pairs beautifully with brass accessories.
Ingredients
- 1 can heat-resistant black paint (12 oz)
- High-temp primer (if needed)
- 1 metal brush
- Sandpaper
- Painter’s tape
- Drop cloth
- Fireplace tool set in dark finish
- 1 ash bucket
- Gloves
- 1 fireplace screen (optional)
Instructions
- Clean the surround and remove soot; use a metal brush for metal surfaces.
- Sand and prime if surface is glossy or previously painted.
- Apply heat-resistant paint in thin coats; allow 4–6 hours between coats.
- Reinstall fireplace screen and tools once paint cures 24 hours.
- Burn a small test fire and check for any off-gassing; ventilate.
How to Serve It
Add a set of dark fireplace tools and a stack of neatly cut logs. Store kindling and matches in a metal ash bucket nearby.
16. Painted Kitchen Cabinets (Dark Lower)
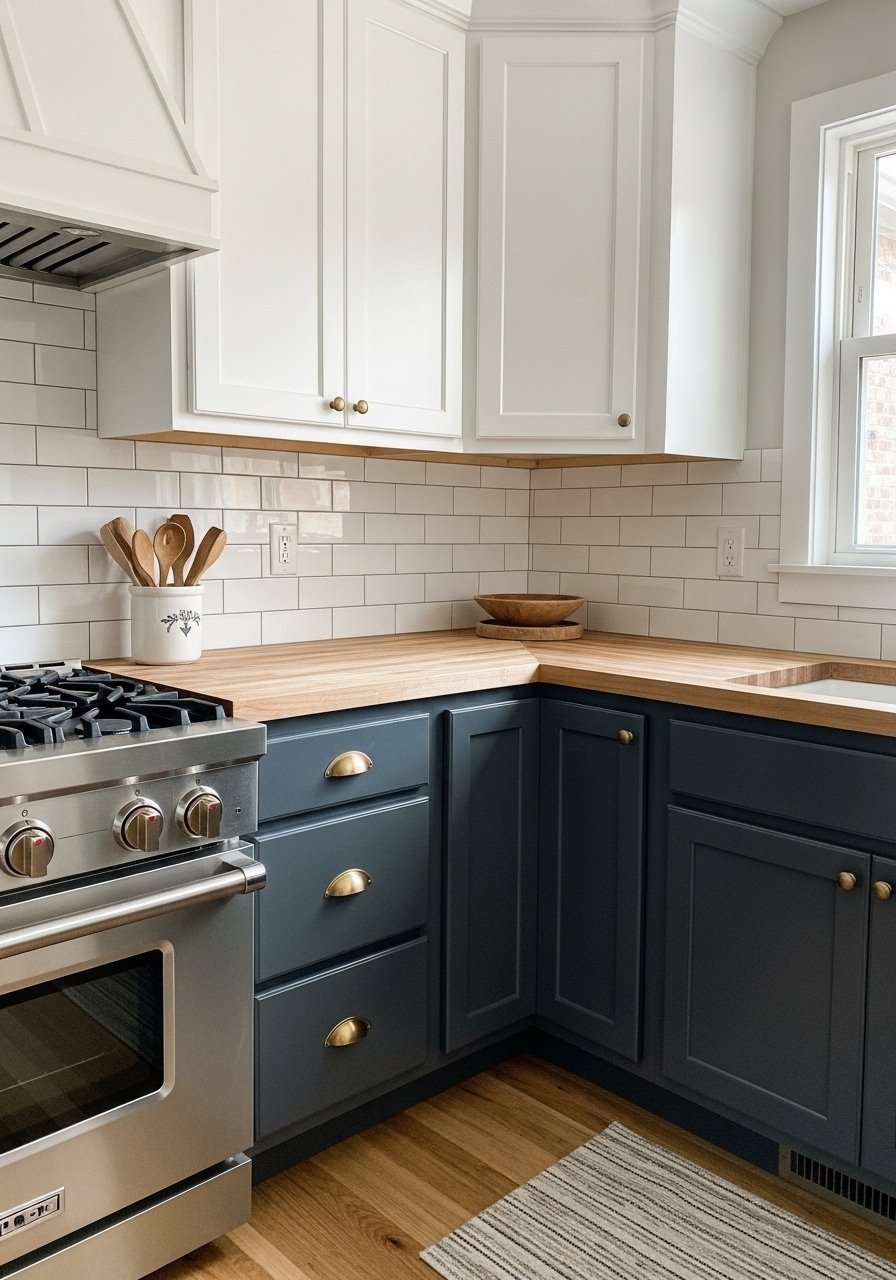
Painting lower cabinets in a deep tone while keeping uppers light balances drama and brightness. The contrast feels tailored and invites layered hardware finishes.
Ingredients
- 2 quarts cabinet paint (dark charcoal)
- Degreaser cleaner
- 120-grit sandpaper
- 1 foam roller for cabinets
- 1 angled brush for details
- New cabinet hardware (brass pulls)
- Painter’s tape
- Screwdriver for removing doors
- 1 cabinet hinge lubricant
- Microfiber cloths
Instructions
- Remove cabinet doors and hardware. Clean surfaces with degreaser and let dry.
- Sand lightly and wipe with a microfiber cloth.
- Prime if needed; apply two thin coats of cabinet paint using foam roller for flat surfaces.
- Paint edges and trim with angled brush for a crisp finish.
- Let doors cure 48–72 hours before reattaching hardware.
- Lubricate hinges for smooth operation.
How to Serve It
Swap to brass or matte black pulls for contrast. Keep extra paint in labeled jars for touch-ups in a small storage tote.
17. Black Trim on White Walls
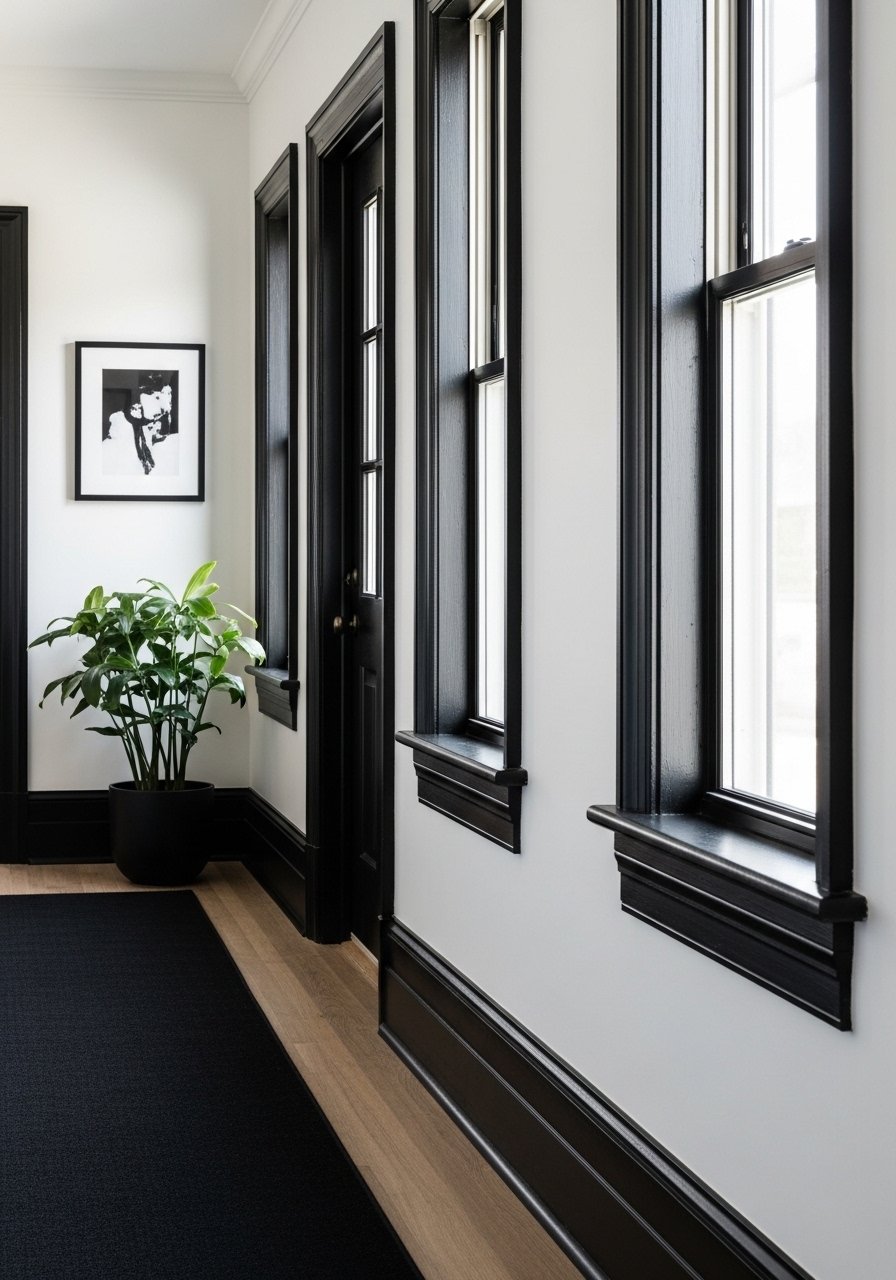
Black trim adds crisp definition and frames architectural features, making white walls read more modern. It’s a simple move with striking results.
Ingredients
- 1 quart semi-gloss black trim paint
- 1 roll painter’s tape
- 1 angled brush (1.5-inch)
- Drop cloth
- Fine sandpaper
- Caulk for gaps
- Putty for nail holes
- 1 damp cloth
- 1 step ladder
Instructions
- Sand and fill nail holes, then caulk gaps for a seamless look.
- Tape off walls with painter’s tape for straight edges.
- Cut in with an angled brush and roll where appropriate; apply two thin coats.
- Remove tape at a 45-degree angle while paint is slightly tacky for crisp lines.
- Touch up with a small brush for perfection.
How to Serve It
Pair with black window frames or hardware for cohesion. Keep touch-up paint in a mini paint can opener kit.
18. Dark Home Decor: Moody Monochrome Bedroom Refresh
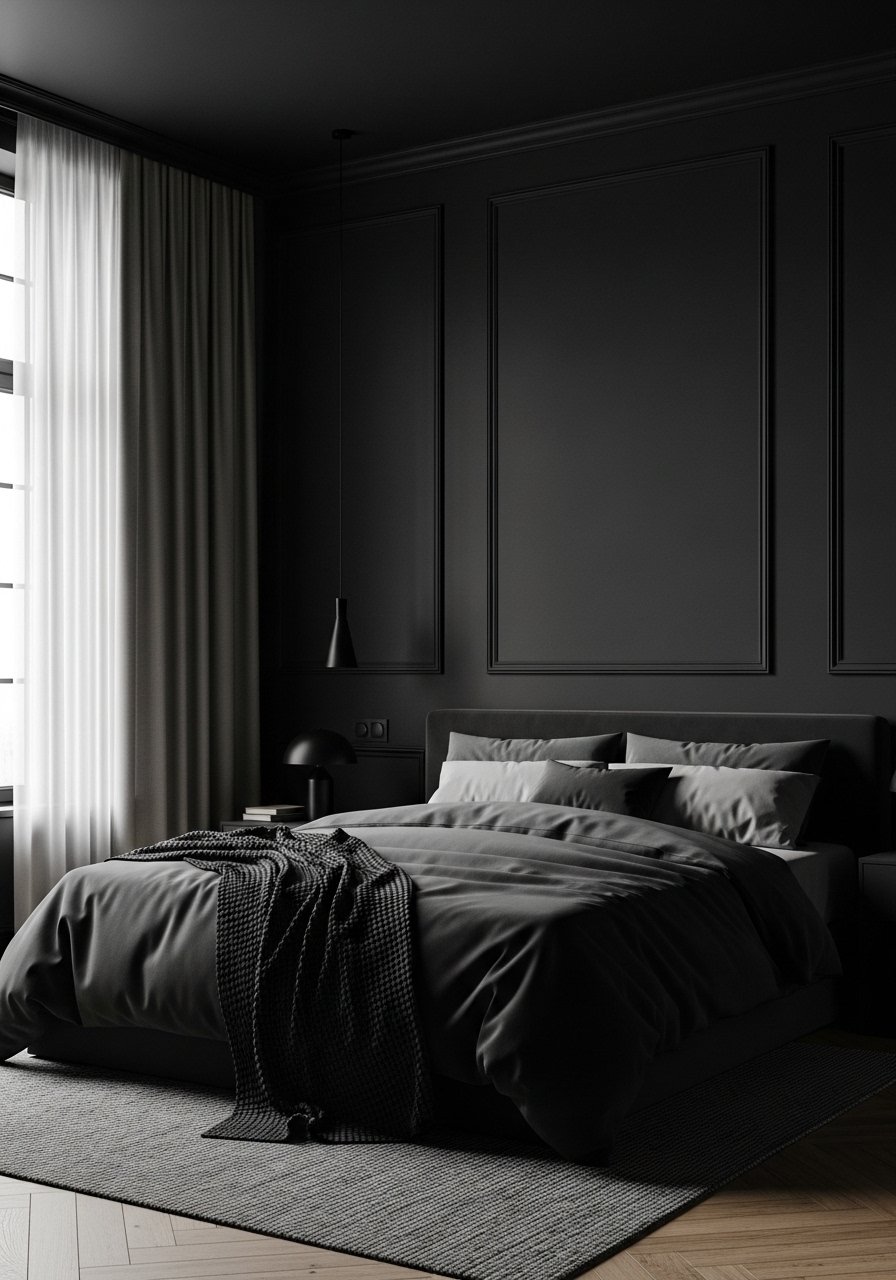
A monochrome bedroom in shades of black and gray feels enveloping and restful. Texture is key here: mixes of linen, velvet, and woven fibers keep the look cozy rather than flat.
Ingredients
- Charcoal paint (1 gallon)
- Black duvet cover
- 2 textured pillow shams
- 1 wool throw
- 1 blackout curtain pair (blackout)
- 1 bedside lamp (warm brass)
- 1 rug (low-pile dark)
- 1 mattress protector
- Scented candle
- 1 storage ottoman
Instructions
- Paint walls or select a focal wall in charcoal using previously described steps.
- Layer bedding: protector, sheet, duvet, then textured throws.
- Hang blackout curtains with a sturdy rod; ensure they brush the floor for luxury.
- Place soft rug under the lower two-thirds of the bed for warmth.
- Set bedside lighting on dimmers for adjustable mood.
- Add scent and low light for a calming pre-bed routine.
How to Serve It
Keep linens fresh in a vacuum storage bag for seasonal swaps. Pair with a bedside tray for a book and candle.
19. Black Ceramic Planters and Sculptural Greenery
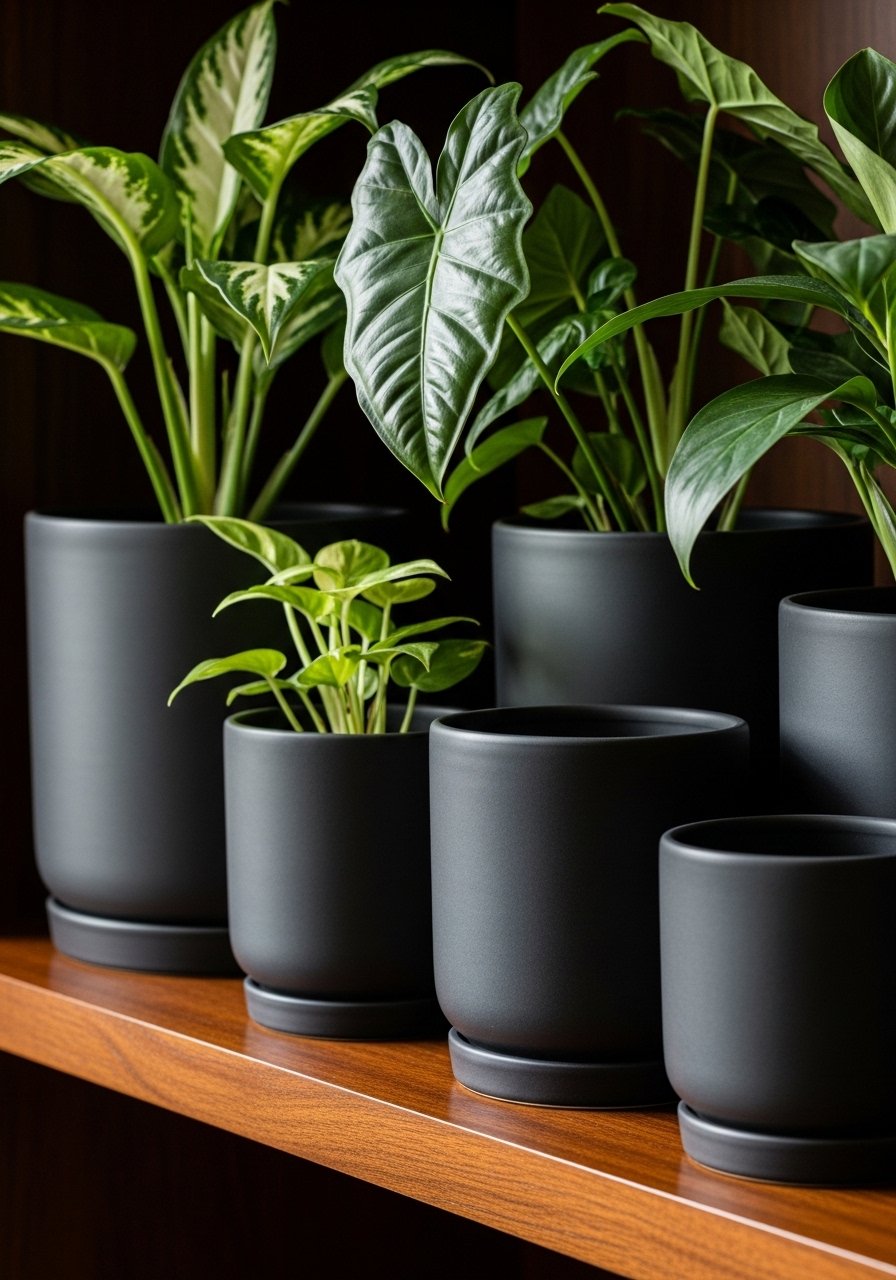
Black planters make plants feel like intentional sculptures. The contrast draws attention to leaf shapes and creates a calm, gallery-like plant display.
Ingredients
- 3 matte black ceramic planters (small, medium, large)
- Potting mix
- Activated charcoal (optional)
- Small stones for drainage
- Plants: fiddle leaf, snake plant, philodendron
- Small watering can
- Plant saucers
- Pruning shears
- Plant fertilizer (balanced)
Instructions
- Add small stones and a thin layer of activated charcoal to pot bottoms for drainage.
- Fill with potting mix and plant, tamping roots gently.
- Water lightly until excess drains; empty saucer after watering.
- Place larger plants on floor or shelves where they receive appropriate light.
- Prune dead leaves and fertilize monthly during growing season.
How to Serve It
Group planters in odd numbers for balance and place on a plant stand set to vary heights. Keep fertilizer and tools in a small tool caddy.
20. Blackout Roman Shades for a Cinematic Room
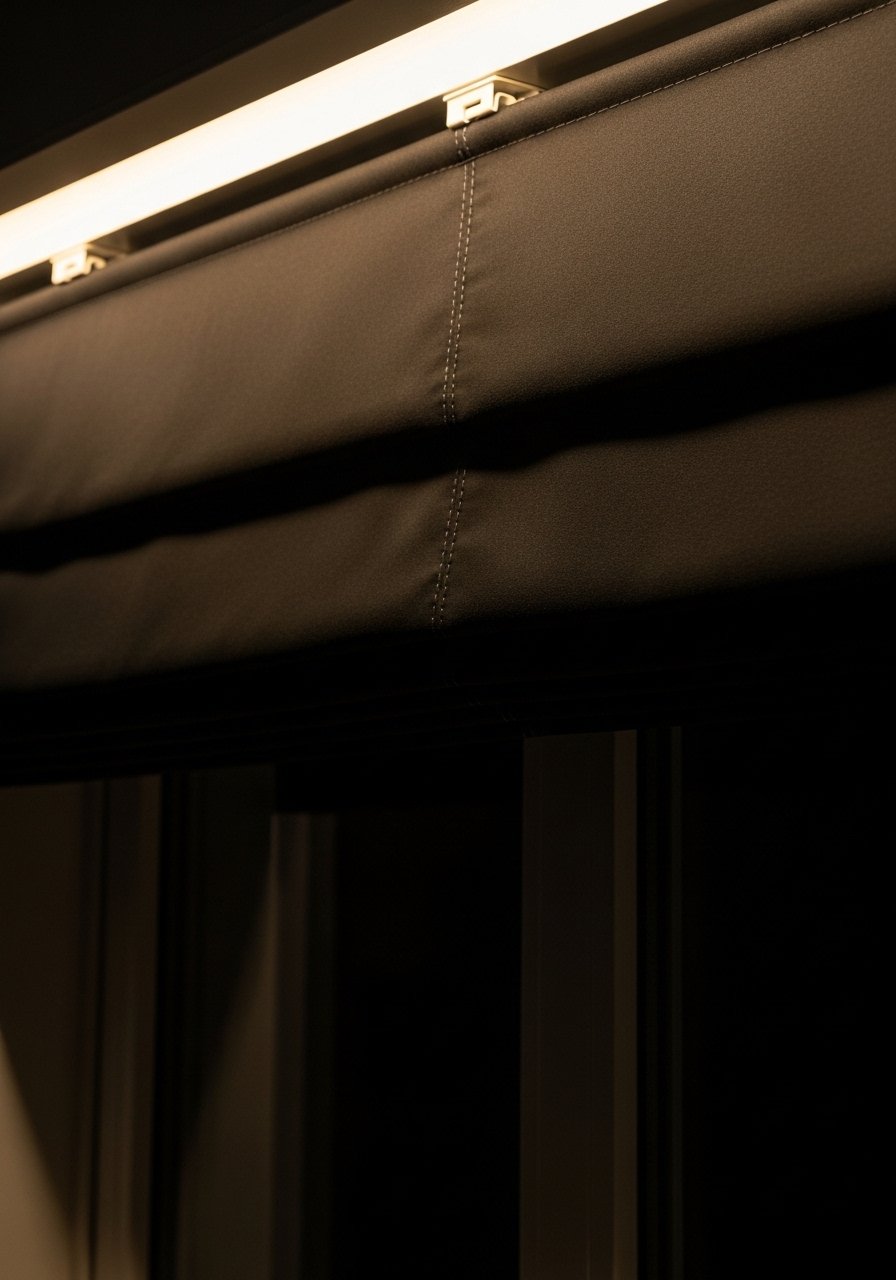
Blackout Roman shades give rooms a theater-like hush and block unwanted light for better sleep or movie nights. The folded fabric reads tailored and cozy.
Ingredients
- Blackout Roman shade (custom width)
- Mounting brackets
- Cordless lift mechanism (recommended)
- Measuring tape
- Screws and anchors
- 1 level
- 1 drill
- 1 step ladder
- 1 fabric cleaner for maintenance
- 1 curtain rod (if using full curtain)
Instructions
- Measure window width and height carefully and order shades.
- Mount brackets and install shades following manufacturer instructions.
- Use a cordless lift mechanism for child-safe operation.
- Test raise/lower function and adjust for even folding.
- Spot-clean fabric as needed with a fabric cleaner.
How to Serve It
Layer with a sheer for daytime softness. Store seasonal shade liners in a labeled box to protect from dust.
21. Dark-Tone Entry Console Styling
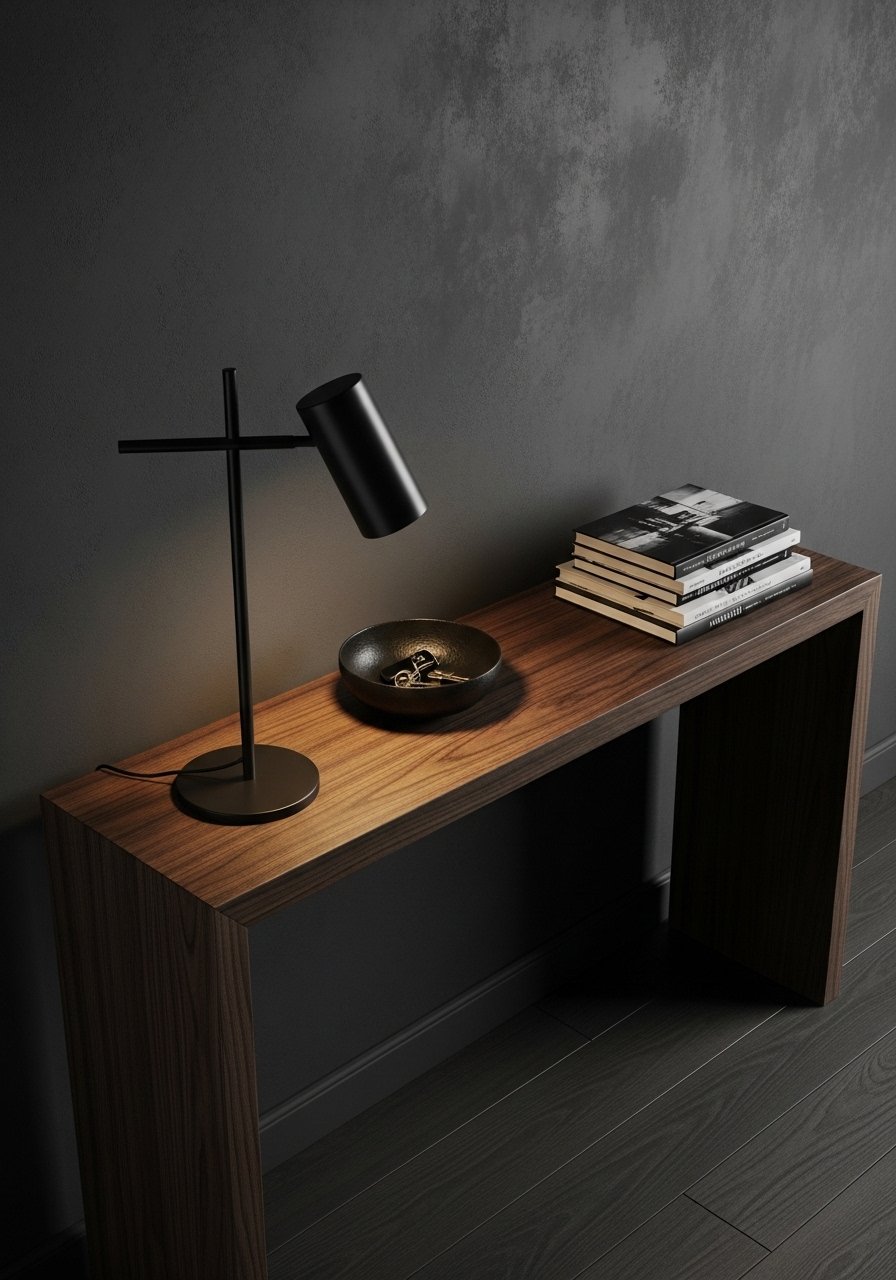
A dark console table in the entry creates a small stage for styling and functional storage. The console anchors the hallway and welcomes visitors into your mood.
Ingredients
- Dark wood console table (36–48 in)
- Black ceramic bowl for keys
- Mirror with black frame
- Small tray for mail
- Set of coasters
- Low basket for shoes
- Decorative object (stone or metal)
- Small lamp
- 1 rug runner
- 1 coat hook or rack
Instructions
- Place console with mirror above to visually widen the entry.
- Keep essentials in designated bowls or trays to avoid clutter.
- Use a basket below for shoes or umbrellas.
- Style with a single sculptural object and a plant for life.
- Rotate accessories seasonally to keep energy fresh.
How to Serve It
Use a tray organizer to keep mail tidy and a coat rack for guests’ outerwear.
22. Black Stair Riser Contrast
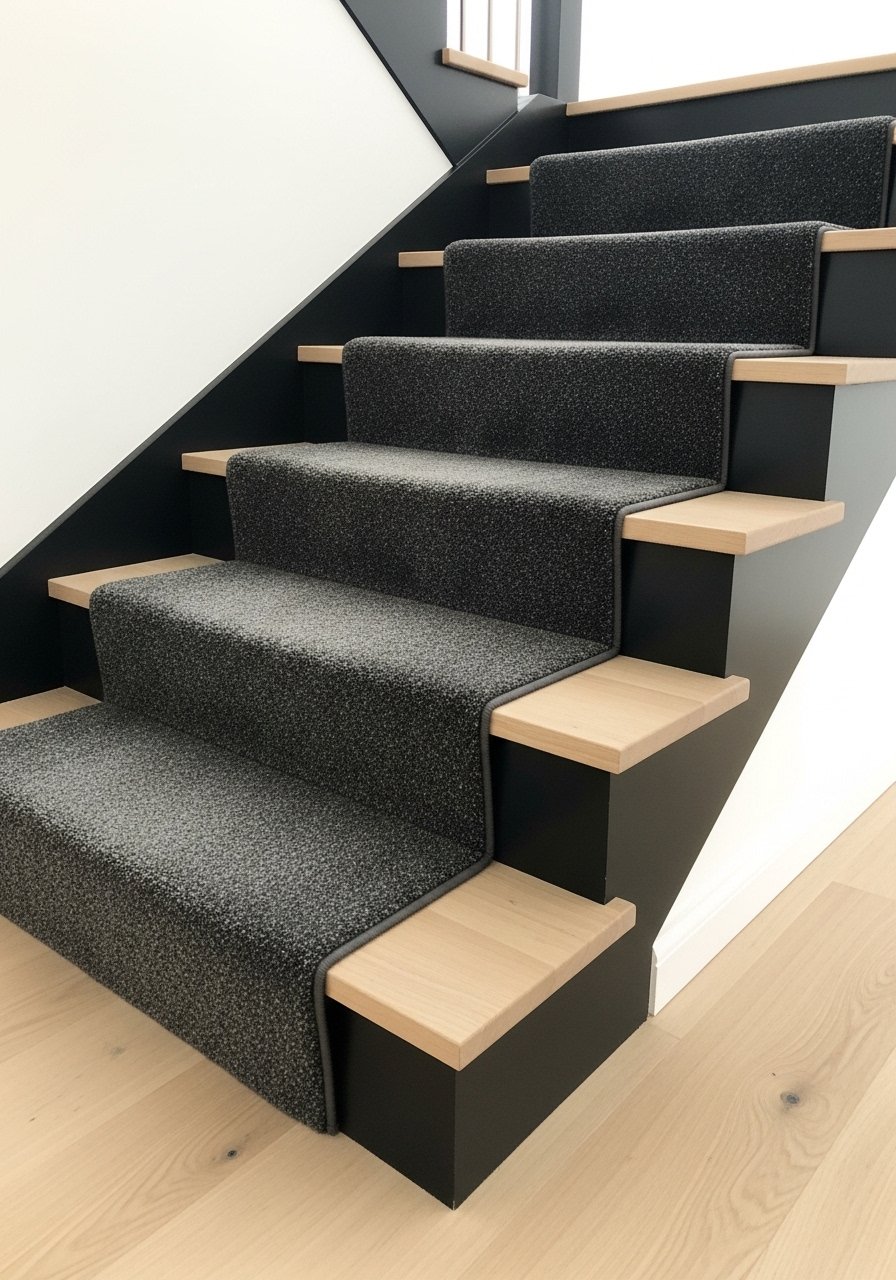
Painting stair risers black while keeping treads natural wood gives stairs a sculptural look and hides scuffs. It’s a bold, inexpensive architectural update.
Ingredients
- 1 pint black trim paint
- Blue painter’s tape
- Sandpaper
- Clear sealer for treads
- 1 small angled brush
- Drop cloth
- 1 measuring tape
- Stair runner or stair tape
- Grip adhesive for runner
Instructions
- Tape off tread edges and sand risers lightly.
- Apply two thin coats of trim paint; dry 4 hours between coats.
- Seal treads with a clear sealer to protect against traffic.
- Install runner or tape for traction if desired.
- Touch up edges with a small brush for crisp lines.
How to Serve It
Pair with wall-mounted sconces for stair lighting. Keep stair-care supplies in a small storage bin.
23. Black Kitchen Backsplash (Tile or Painted)
A black backsplash creates depth against lighter countertops and hides splatter. Whether tile or high-heat paint over metal, it reads modern and grounded.
Ingredients
- Black subway tiles (3×6 in) or high-heat backsplash paint
- Thinset mortar
- Dark grout
- Tile spacers
- Grout float
- Notched trowel
- Tile cutter
- Under-cabinet LED light strip
- Painter’s tape
- Sealer for grout
Instructions
- Remove fixtures and prepare wall, ensuring it’s flat and clean.
- Apply thinset and lay tiles in staggered brick pattern using spacers.
- Grout when set and wipe with sponge. Apply sealer to grout once cured.
- If painting, use high-heat paint and multiple thin coats; protect counters with tape.
- Install under-cabinet LED strip for task light and to highlight tile texture.
How to Serve It
Keep counter tools in a magnetic knife strip and place frequently used items on a cutting board nearby for easy reach.
24. Curated Dark Vignette (Coffee Table Styling)
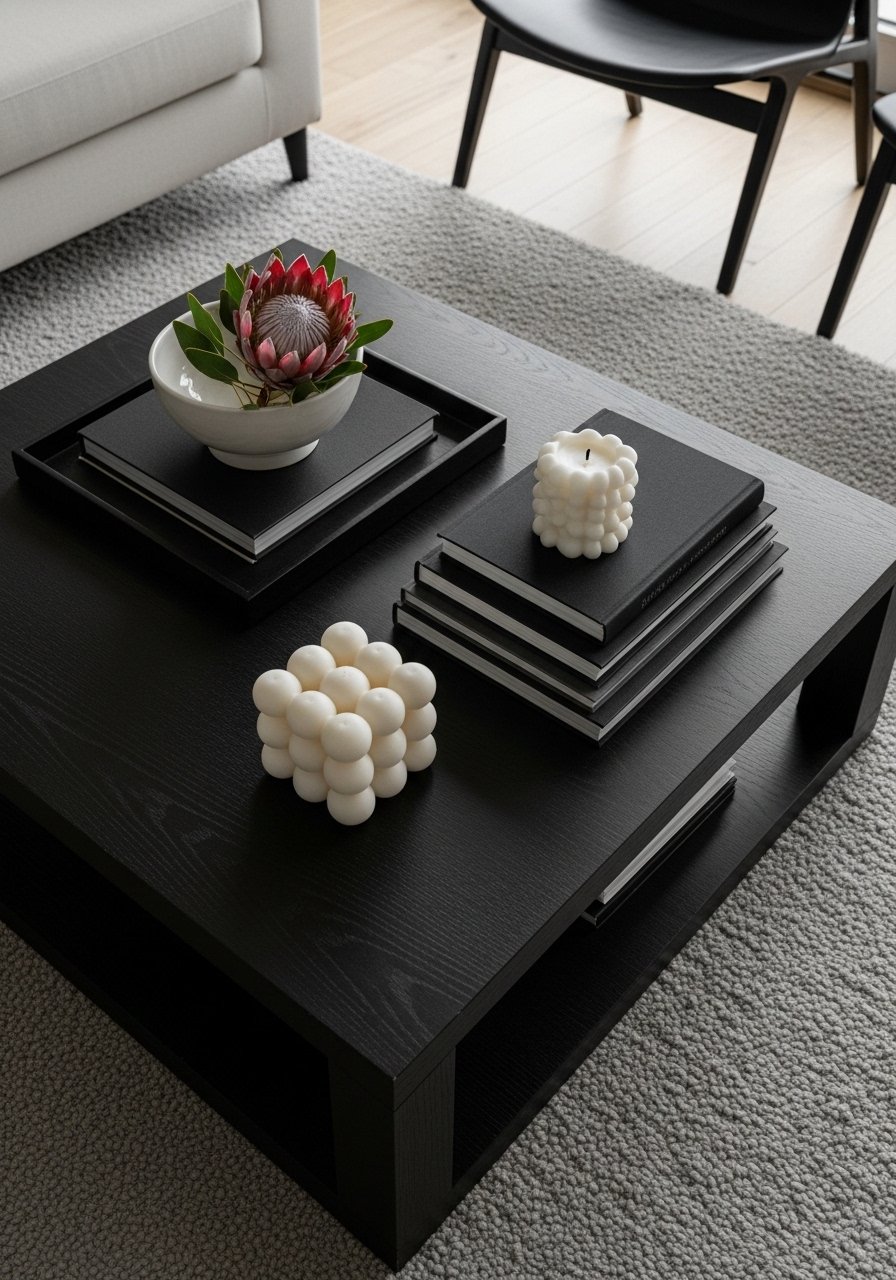
A curated dark vignette on a coffee table or console is the finishing touch that makes a room feel intentional. Balance hard and soft, glossy and matte for interest.
Ingredients
- 1 black serving tray
- 2 hardcover books with dark covers
- 1 sculptural candle
- 1 small ceramic bowl
- 1 single statement stem (fresh or dried)
- 1 pair coasters
- 1 decorative object (stone or metal)
- 1 cloth for dusting
- 1 small floral frog (optional)
Instructions
- Place tray centered on table and arrange books in a stack.
- Add candle and bowl, leaving negative space so the composition breathes.
- Insert single stem in bowl or vase for height and movement.
- Rotate objects occasionally to refresh the look.
- Dust weekly to keep finishes rich and intentional.
How to Serve It
Pair with a low ceramic bowl for snacks during gatherings and keep extra styling elements in a decor storage box.
These 24 projects give you practical ways to bring Dark Home Decor into every corner of your home. Try one small change — a painted door, a velvet pillow, or a black frame gallery — and notice how the room’s personality shifts. Save this pin so you can come back when you’re ready to tackle each idea, and share with a friend who loves moody interiors. If you want one tool that helps across projects, a dependable cordless drill sped through my installs and made hanging and assembling much less frustrating. Which of these Dark Home Decor ideas will you try first?