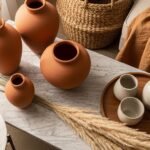
Bring a little calm into your space with green home decor that soothes the eye and feels lived-in. Whether you love soft sage, deep emerald, or lively chartreuse, this collection of 28 nature-inspired projects reads like a recipe book for peaceful interiors. You’ll find DIY ideas that range from quick, budget-friendly tweaks to weekend crafts that change a room’s mood.
I often repurpose a cast iron skillet as a rustic planter base and use a trusty digital kitchen scale when measuring potting mixes for consistency. These green home decor projects include clear materials lists, step-by-step instructions, and styling tips so you can finish one project per afternoon. Pin your favorites and make your home feel like a calm, natural retreat.
1. Moss Frame Wall Art
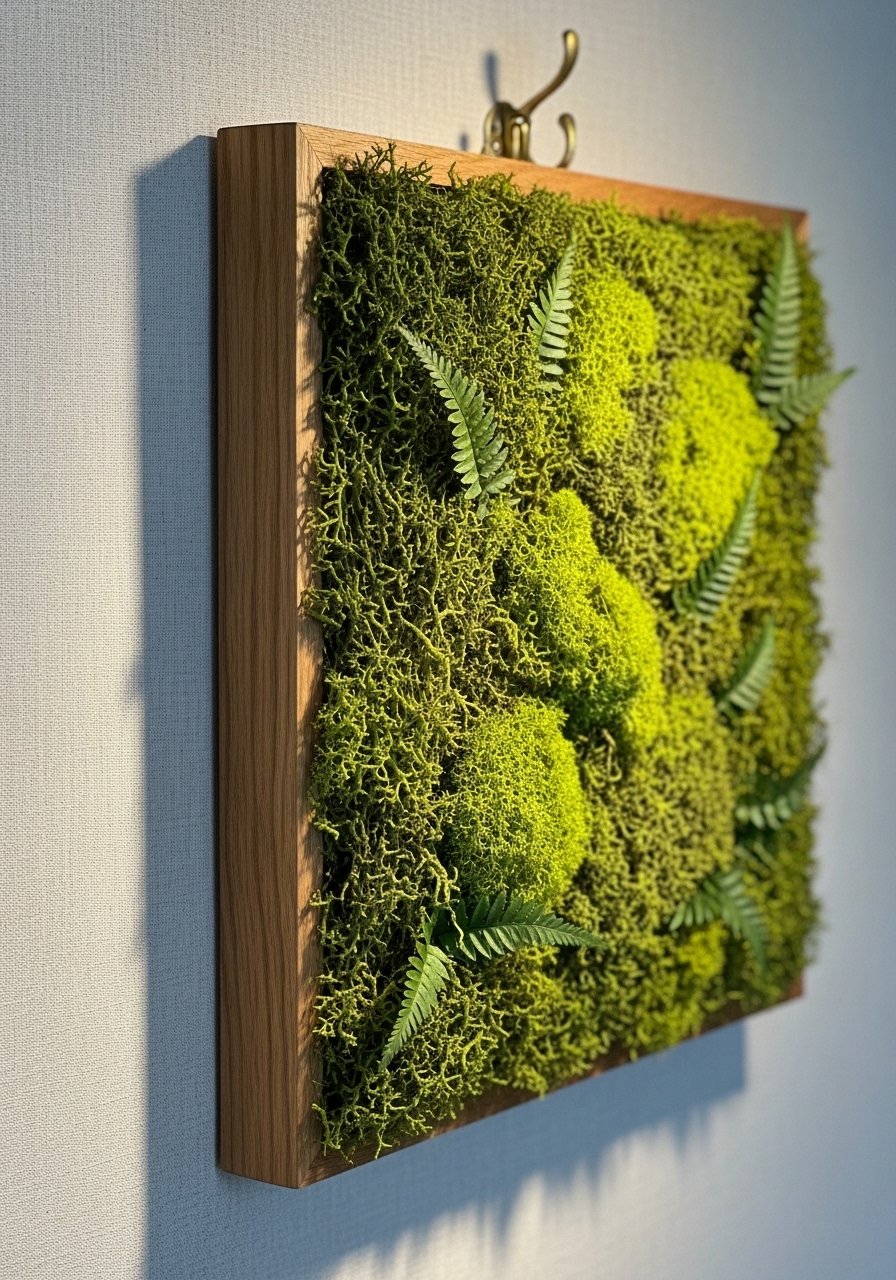
This moss frame brings a patch of forest indoors with minimal upkeep. The texture is velvety, the green tones vary, and the result is a tactile focal point that softens walls. It’s perfect for a hallway or above a console table, and plant lovers will appreciate its living look without the maintenance.
Ingredients
- 1 8×10 wooden frame (with backing removed)
- 1 sheet preserved sheet moss (10×12 inches)
- 4–6 small preserved ferns or moss clumps
- 1/4 cup hot glue (or craft adhesive)
- 1 foam brush
- 1 pencil
- 1 ruler or measuring tape
- Hanging hardware (sawtooth hanger or D-rings)
Instructions
- Lay the backing of the frame on a protected surface and measure the visible opening with a ruler.
- Trim the preserved sheet moss to fit the opening using scissors; keep a little extra for texture.
- Apply lines of hot glue to the backing with a glue gun, then press the moss sheet firmly in place. (Use a hot glue gun for quick adhesion.)
- Tuck small preserved fern pieces into gaps, securing with tiny dabs of glue for depth.
- Check edges and trim any overhang so the moss sits cleanly inside the frame.
- Attach hanging hardware to the frame’s back and let glue set for 30 minutes before hanging.
How to Serve It
Mount the moss frame at eye level for a calming effect. Pair with a wooden shelf and small ceramic vases for contrast. For hallway displays, group three frames in a row for continuity. To store between seasons, keep in an airtight box in a cool, dry place—use airtight containers if needed. This piece is low maintenance and never needs watering.
2. Mini Succulent Terrarium (Glass Dome)

A mini succulent terrarium adds a breath of green and looks delicate on a bedside table. It's low-water and very forgiving, with color contrast between soil, stone, and plants. This project is ideal if you want living green home decor that’s tiny but impactful.
Ingredients
- 1 glass dome or small glass cloche (6–8 inch)
- 1/2 cup small drainage pebbles
- 1 tbsp activated charcoal
- 1 cup cactus or succulent potting mix
- 3–5 small succulents (different textures)
- Handful preserved sheet moss
- 1 small bonsai rake or spoon
- Pair of long tweezers
Instructions
- Clean the glass dome and base with a microfiber cloth to remove dust.
- Add a layer of pebbles for drainage (about 1/2 inch).
- Sprinkle 1 tablespoon of activated charcoal on top of pebbles to keep soil fresh.
- Add 1 cup of succulent potting mix and gently level with a spoon.
- Use tweezers to place succulents into the soil; firm the soil gently around roots. (I use long tweezers to avoid crushing plants.)
- Add moss around plants for a finished look and mist lightly if needed. Replace the dome.
How to Serve It
Display the terrarium on a windowsill with bright, indirect light or a shaded desk. Mist sparingly—succulents prefer dry conditions. Re-pot into a larger container when roots crowd; use glass planters for a clean display. Terrariums make elegant table centerpieces for small gatherings.
3. Herb Ladder Planter
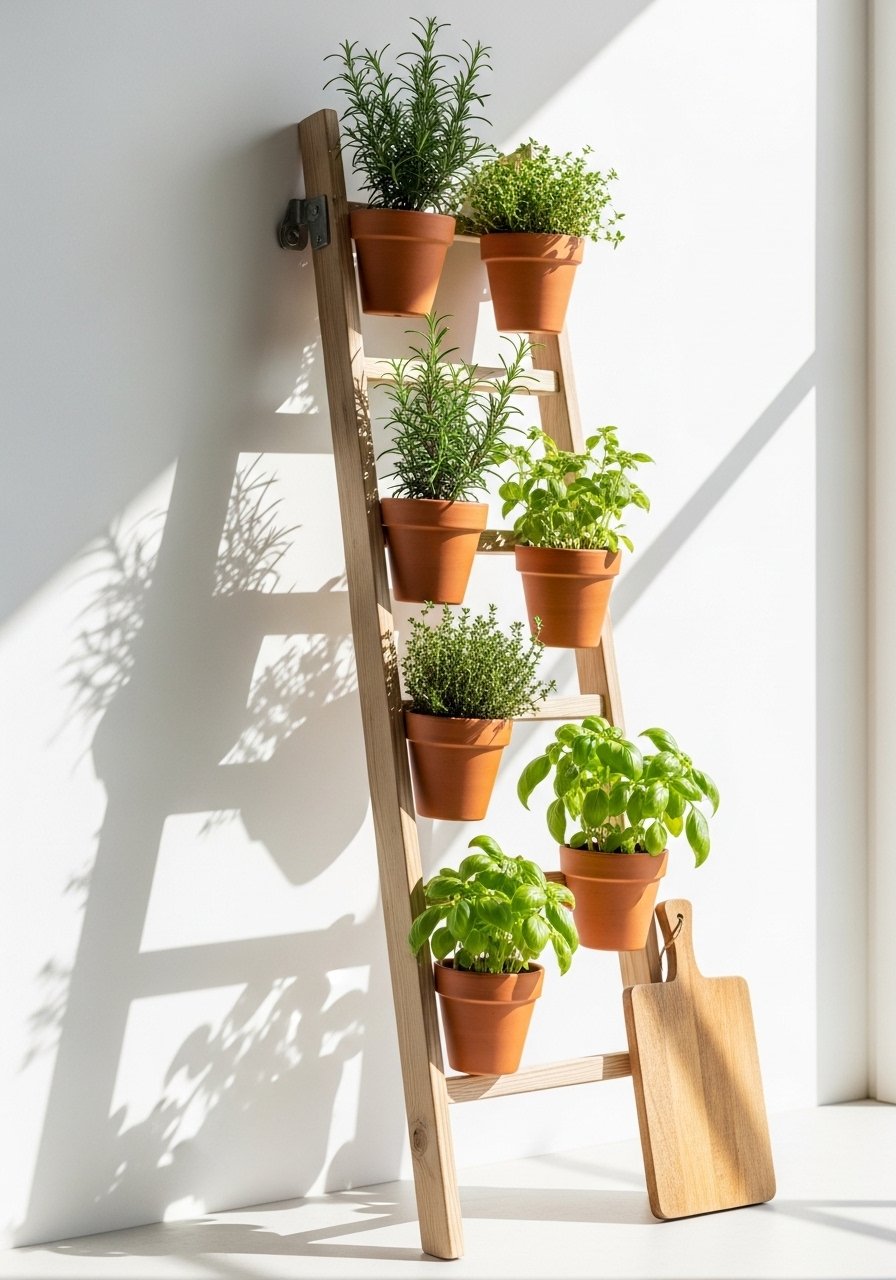
Turn a slim ladder into practical green home decor that feeds your kitchen. The vertical layout saves space and keeps fresh herbs close by. Expect fragrant rosemary and basil that add both scent and color.
Ingredients
- 1 narrow wooden ladder or ladder bookshelf (leaning style)
- 6–8 3-inch terracotta pots
- Potting mix for herbs, 3 cups total
- 6–8 herb seedlings (basil, parsley, thyme, rosemary)
- 1 roll of coconut coir or moss (optional)
- Twine for securing pots
- Small drill (if ladder rungs need holes)
Instructions
- Clean the ladder and decide which rungs will hold pots; measure spacing.
- If needed, drill drainage holes in terracotta pots and wrap rims with twine for rustic look.
- Fill pots with herb potting mix and plant seedlings, firming soil lightly.
- Secure each pot to a rung with twine on both sides so pots don’t tip.
- Water each herb thoroughly and allow excess to drain before placing on ladder.
- Lean the ladder against a kitchen wall with morning sun; rotate pots occasionally for even growth.
How to Serve It
Place the herb ladder near a sunny window so plants get morning light. Snip herbs for cooking and display a small pair of kitchen shears nearby for convenience. For winter, move the ladder to a brighter spot or supplement with a grow light. Terracotta pots keep roots cool and look timeless on natural wood.
4. Painted Sage Accent Wall
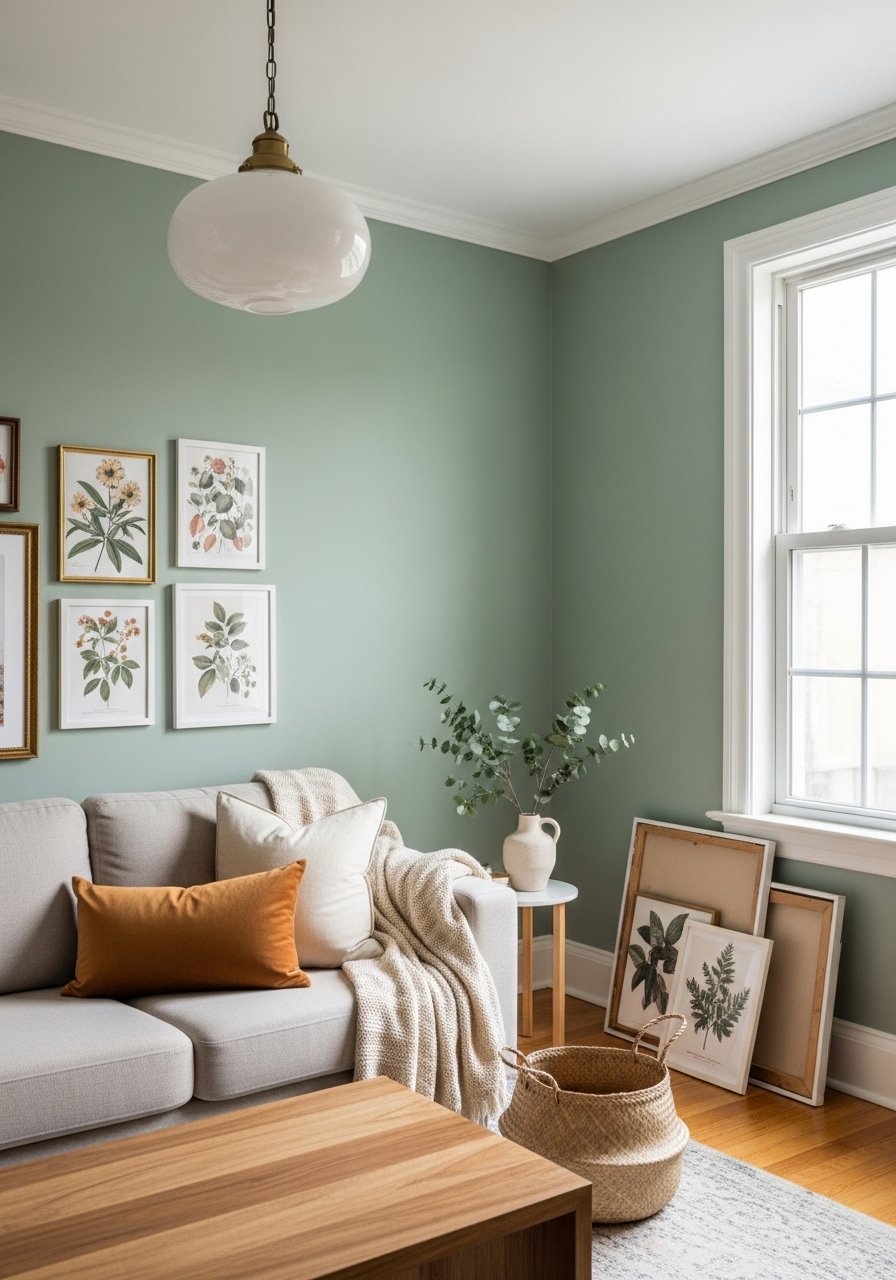
A sage accent wall grounds a room without overpowering it. The soft green reduces visual noise and pairs well with natural textures like jute and wood. This project is a quick way to refresh a room and create a calming focal point.
Ingredients
- 1 gallon sage interior latex paint (sample first)
- 1 paint roller kit (9-inch roller)
- 1 3-inch angled brush
- 1 painter’s tape roll
- 1 drop cloth (6×9 ft)
- 1 paint tray
- 2 rags for drips
- Sandpaper 120-grit for prepping
Instructions
- Move furniture away from wall and lay down a drop cloth to protect the floor.
- Sand surface lightly and wipe with a damp rag to remove dust.
- Apply painter’s tape along trim and outlets to protect edges.
- Cut in edges with a 3-inch angled brush, then fill in with a 9-inch roller using even strokes.
- Allow first coat to dry (usually 2–4 hours), then apply a second coat for full coverage.
- Remove tape while paint is still slightly tacky to avoid peeling.
How to Serve It
Style the wall with natural-toned art and a woven throw to echo earthy tones. Add an indoor plant in a ceramic pot for height—place on a plant stand to complete the vignette. Paint provides instant mood change and pairs well with muted metallic accents.
5. Living Wall Frame (Small)
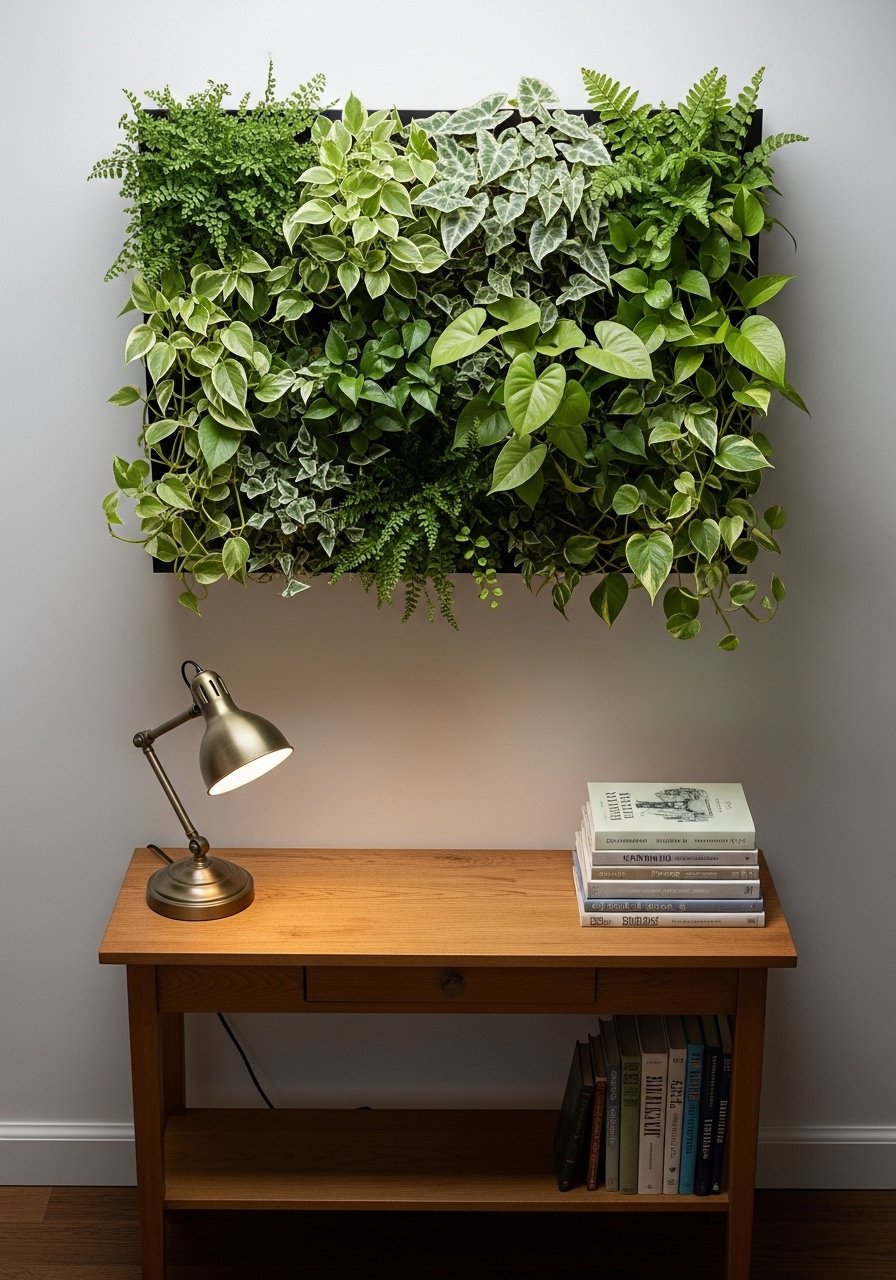
A living wall frame brings vertical greenery into compact spaces. Use hardy plants like pothos and philodendron that trail and create a lush effect. It’s a show-stopping piece above a console or bed that breathes life into plain walls.
Ingredients
- 1 living wall frame kit (16×20 inch)
- 3–5 small houseplants (pothos, philodendron, fern)
- Coconut coir liners or sphagnum moss
- Potting soil, 4–6 cups
- Staple gun and staples
- Mounting hardware rated for the frame weight
Instructions
- Assemble the living wall frame per kit instructions and staple the coir liner into place.
- Add a base layer of potting mix and tamp lightly.
- Position plants in pockets or compartments, pressing soil around roots.
- Water lightly to settle plants; allow excess to drain.
- Hang frame securely on wall studs using appropriate hardware.
- Mist weekly and water via top watering or drip method as plants establish.
How to Serve It
Group living wall frames in odd numbers for balance. Combine frames with botanical prints for a curated gallery wall. Use a plant mister to maintain humidity for ferns. Rotate plants occasionally so each gets light exposure.
6. Eucalyptus Shower Bunch Bundle
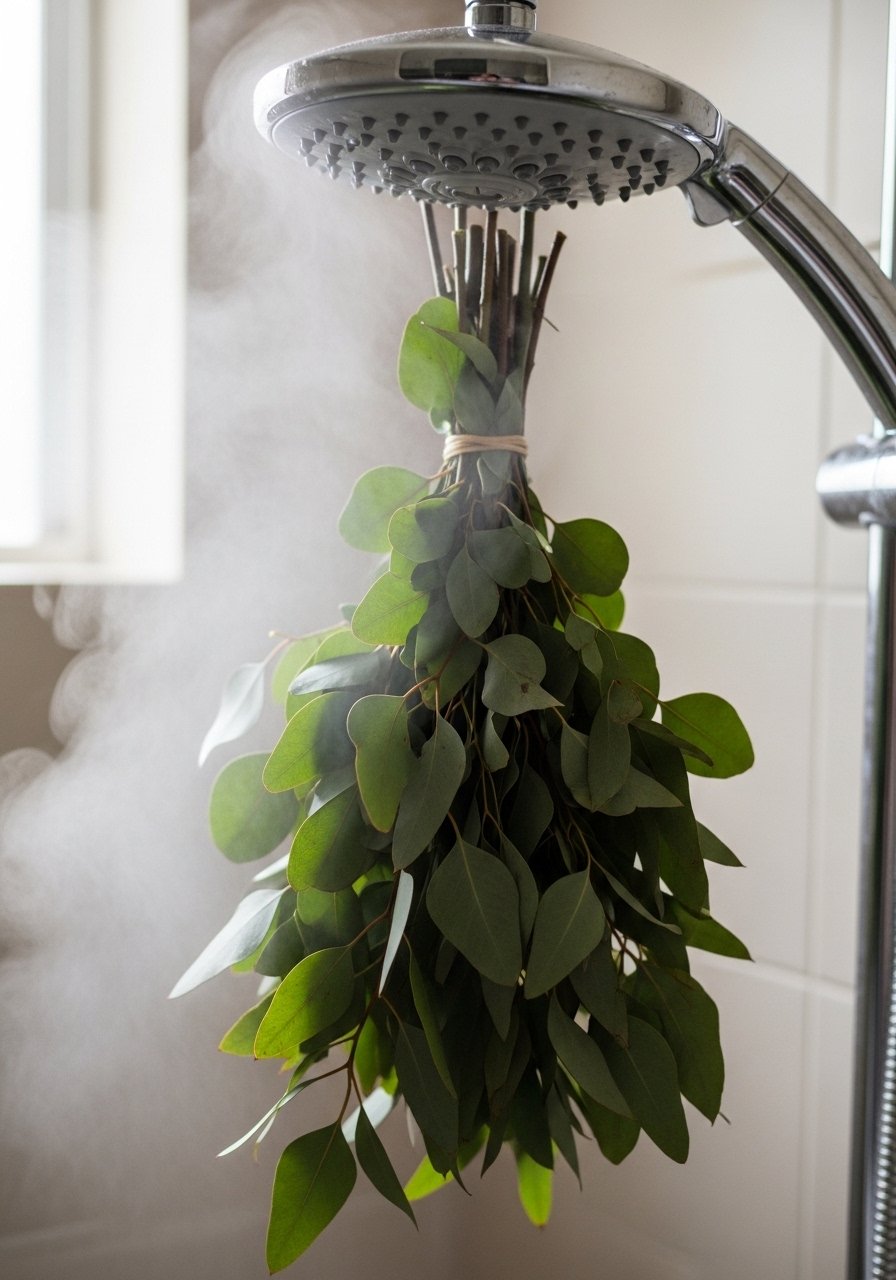
A eucalyptus shower bunch releases calming steam-scented oils and adds spa-like green home decor to your bathroom. It’s inexpensive, aromatic, and simple to hang—perfect for a quick upgrade to your self-care routine.
Ingredients
- 1–2 bundles of fresh eucalyptus (about 12–16 stems)
- Twine or natural cord (6–8 feet)
- Kitchen scissors or pruning shears
- Optional rubber band for initial hold
Instructions
- Gather 10–12 stems of eucalyptus and remove lower leaves to expose stems.
- Tie stems together tightly with twine or a rubber band.
- Wrap twine decoratively around the bunch and knot securely.
- Hang from your shower head or a hook away from direct water flow but where steam passes through.
- Replace bunch every 2–3 weeks or when fragrance fades.
How to Serve It
Hang the bundle in a tiled shower for a spa-like scent each time you shower. After use, dry the bunch out and use as a natural room freshener in a linen closet. Store extras in mason jars for an attractive pantry display.
7. Sage-Dyed Linen Napkins
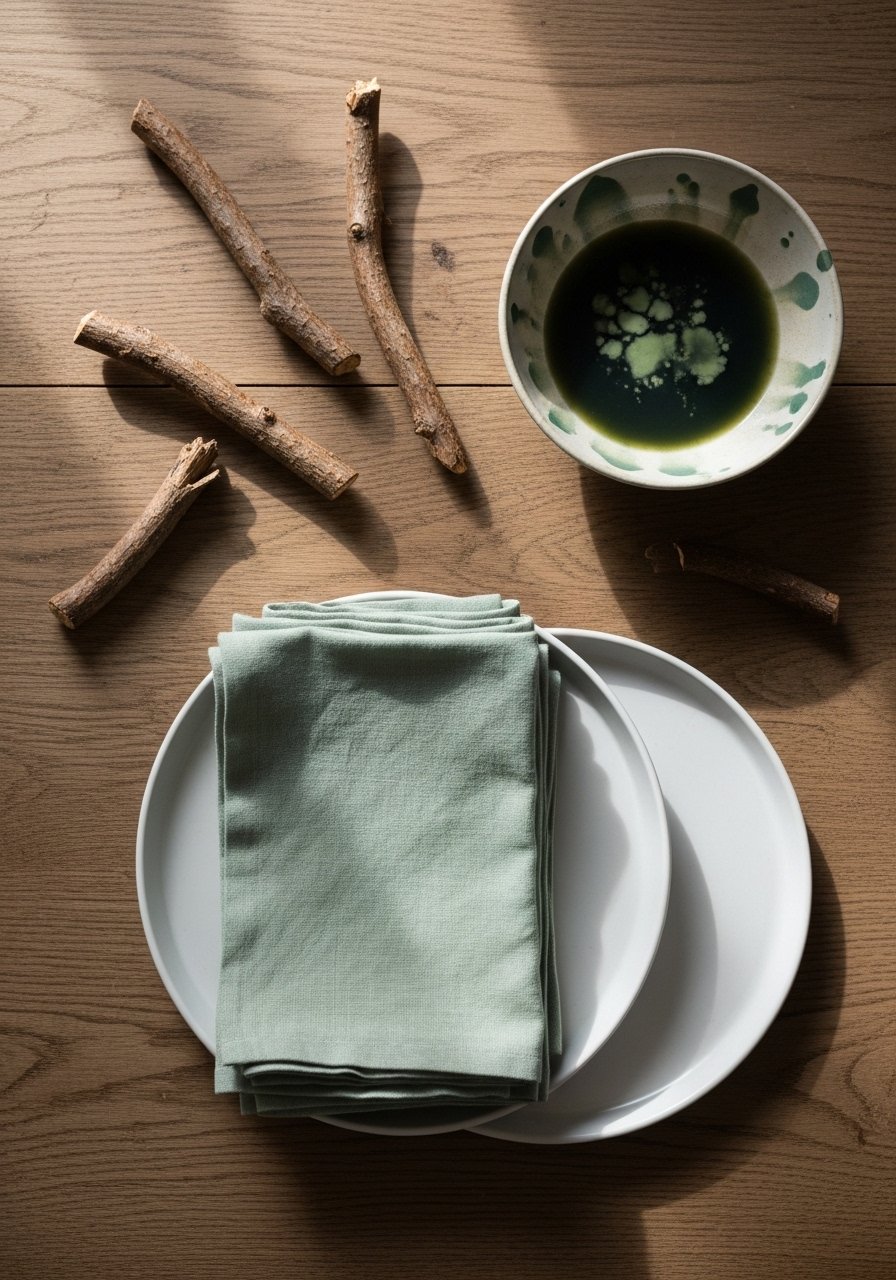
Sage-dyed linen napkins lend subtle color to tabletops and pair beautifully with neutral dinnerware. Dying fabric is an approachable craft and gives you control over the shade. These napkins are soft, washable, and perfect for casual dinners.
Ingredients
- 4 linen napkins (pre-washed)
- 2 cups sage or green fabric dye (powder or liquid)
- 2 tbsp salt or fixative per dye instructions
- Large stainless steel pot
- Wooden spoon
- Rubber gloves
- Measuring cup
Instructions
- Pre-wash napkins to remove sizing.
- Prepare dye bath in a large pot following dye package instructions; add salt if required.
- Submerge napkins fully and stir for even color using a wooden spoon.
- Let napkins soak 20–30 minutes for a medium shade; longer for deeper color.
- Rinse in cool water until water runs clear, then wash gently and air dry.
- Iron on linen setting for crisp edges.
How to Serve It
Pair dyed napkins with simple stoneware for an earthy table. Fold neatly or use a twig as a napkin ring for rustic charm. Store extras in a drawer with lavender sachets in fabric storage bins to keep them fresh between uses.
8. Olive Branch Table Runner
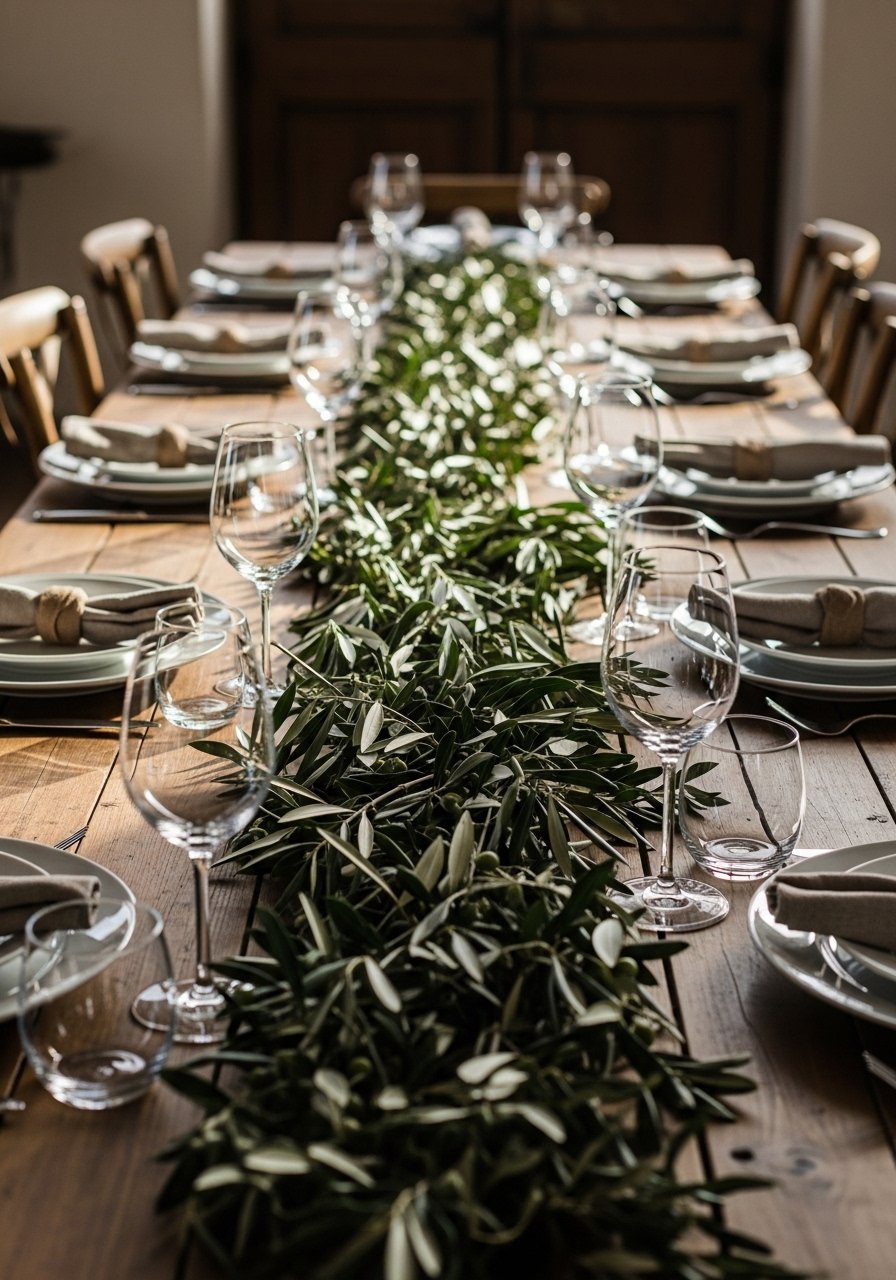
An olive branch runner creates an elegant, low-profile centerpiece that feels organic and airy. Fresh branches lend a Mediterranean vibe and are easy to swap out seasonally.
Ingredients
- 4–6 fresh olive branches (or eucalyptus)
- 1 jute runner or linen strip
- Floral wire (thin)
- Pruning shears
- Small scissors
Instructions
- Lay the jute runner down the center of your table.
- Trim olive branches to lengths that layer well across the runner.
- Arrange branches in a slightly offset pattern for natural flow.
- Secure thicker stems with thin floral wire underneath if needed.
- Replace branches as they dry to keep the runner fresh.
How to Serve It
Keep place settings slightly off the runner edges for easy access. Add a few pillar candles in glass holders for warmth—use a glass candle holder for safety. After the event, compost the branches or let them dry for a rustic look.
9. Jade Terracotta Planters (Hand-Painted)
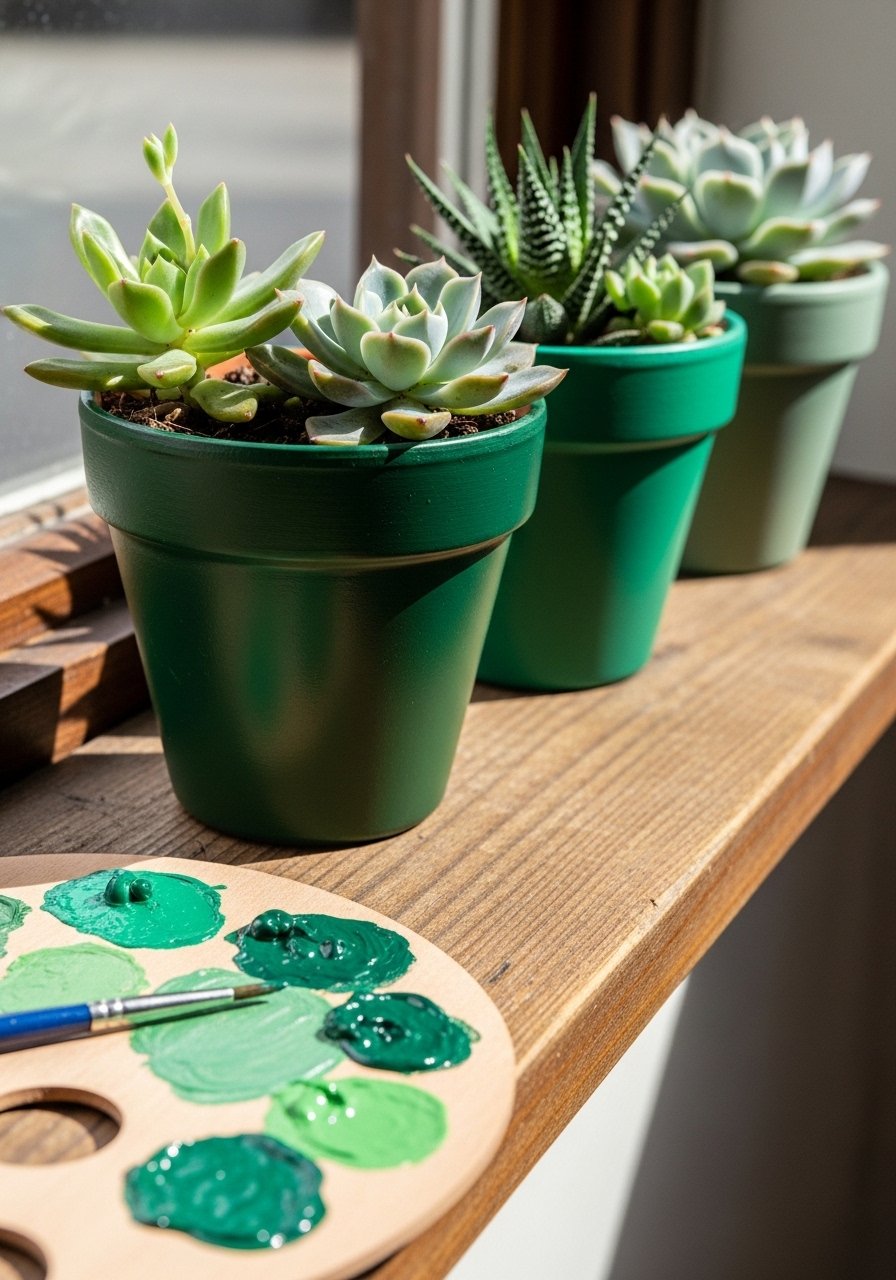
Hand-painting terracotta planters in jade tones personalizes your plant collection. The warm terracotta peeking through adds earthy contrast to green glazes and pairs perfectly with wooden shelves.
Ingredients
- 3 4-inch terracotta pots
- Acrylic paint in shades of jade, sage, and forest green
- 2 small paintbrushes (angled and round)
- 1 sealant spray
- Painter’s tape (optional)
- Newspaper to protect surface
Instructions
- Clean pots and allow them to dry fully.
- Apply a base coat of sage and let dry 30 minutes.
- Add darker jade near rims and blend with a dry brush for ombre effect.
- Use painter’s tape for stripes or geometric patterns if desired.
- Once paint is dry, seal with spray sealant to protect finish.
- Pot with succulents or herbs after sealant cures per product instructions.
How to Serve It
Group painted pots by color gradient on a shelf or windowsill. Line up on a plant tray to protect furniture from water. These pots also make thoughtful housewarming gifts.
10. Green Glass Bottle Vase Cluster
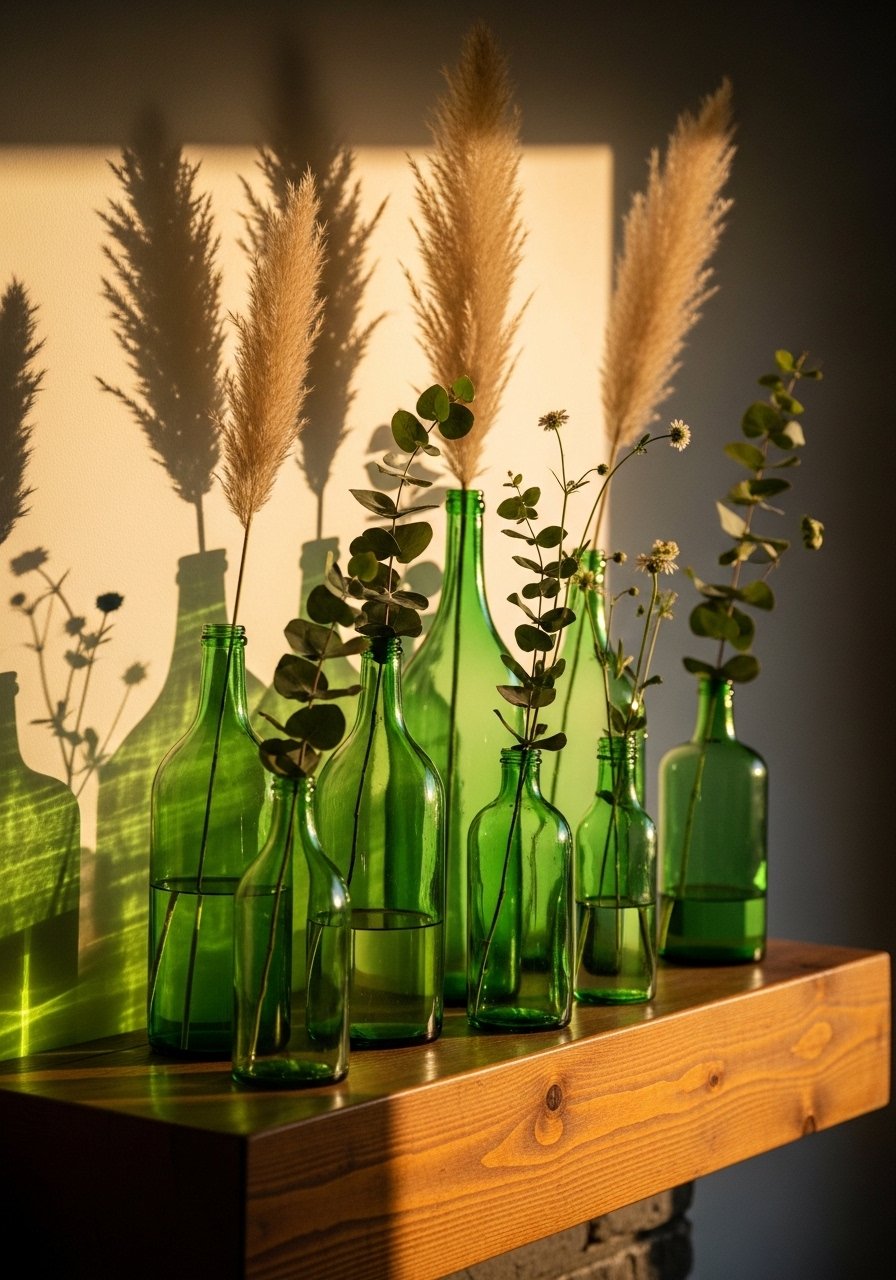
A collection of green glass bottles feels collected rather than matched, giving a relaxed, coastal-meets-country vibe. Mix heights and tones for a layered display that’s perfect on a mantel or windowsill.
Ingredients
- 6–8 assorted green glass bottles (varying heights)
- Fresh stems (wildflowers, eucalyptus, or dried grasses)
- Small funnel for water
- Mild dish soap for cleaning bottles
Instructions
- Clean bottles thoroughly and remove labels by soaking if needed.
- Arrange bottles by height, leaving space between each.
- Trim stems to appropriate lengths and place one or two stems per bottle.
- Add water with a small funnel to each bottle as needed.
- Rotate bottles occasionally so flowers receive even light.
How to Serve It
Cluster bottles on a mantel, grouped on a serving tray for portability. Swap flowers by season—dried grasses in autumn and fresh wildflowers in spring for varied texture.
11. Green Ombré Macramé Wall Hanging
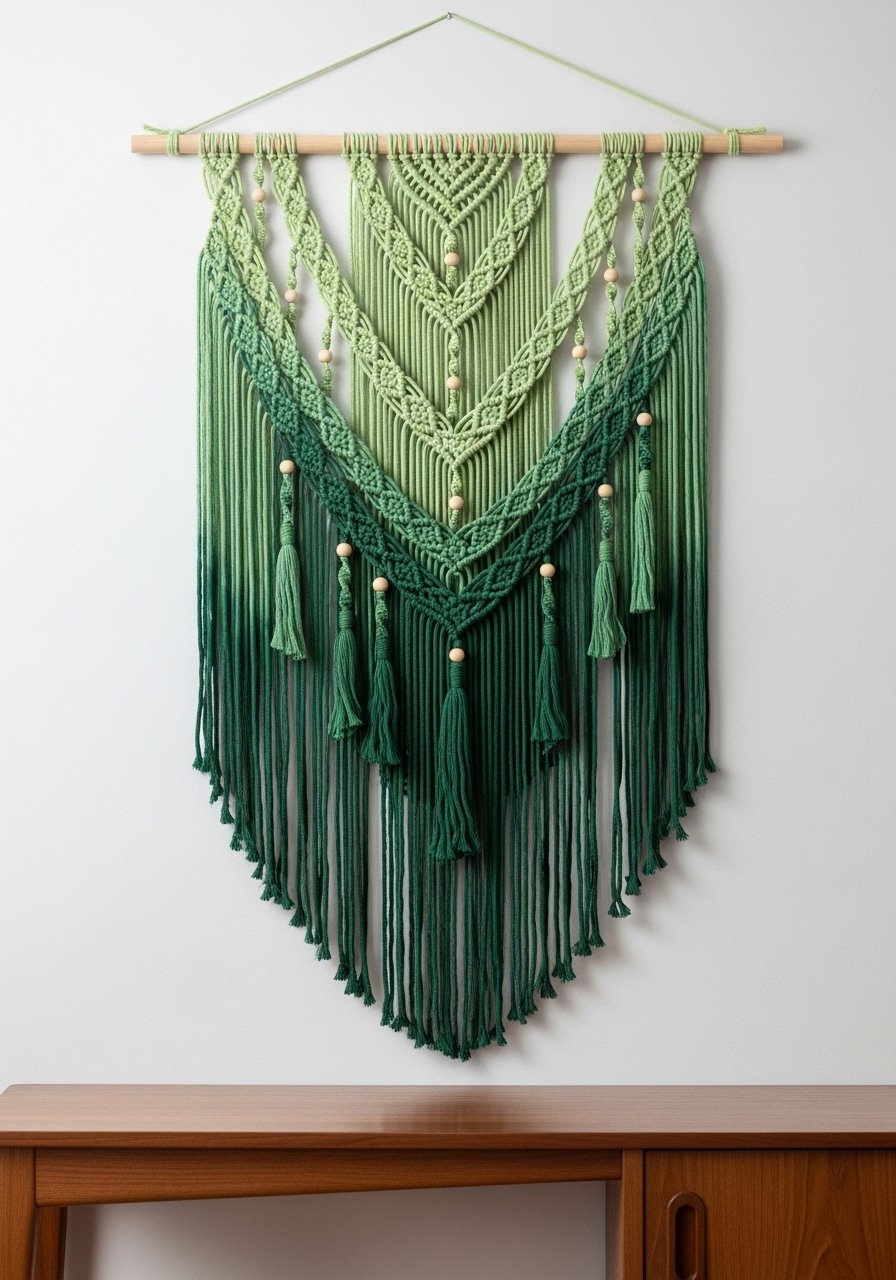
A green ombré macramé piece adds texture and a handcrafted vibe to a neutral wall. The gradation of tones provides subtle interest without overpowering the room.
Ingredients
- 200 ft cotton macramé cord (3–4 mm)
- 1 wooden dowel (24 inches)
- Fabric dye in pale, medium, and dark green
- Measuring cup
- Scissors
- Comb for fringe finishing
Instructions
- Cut cords to length as per your pattern (commonly 4–6 times desired finished length).
- Dye sections of cords in three tones following dye package instructions, rinse, and dry.
- Knot cords onto the dowel using square knots to form the base pattern.
- Create layered rows and add wooden beads if desired.
- Trim fringe and comb for a clean finish.
How to Serve It
Hang over a console or bed to anchor the space. Pair with a potted fiddle leaf fig for added height. For dusting, shake gently outside or use a handheld fabric steamer on low to refresh fibers.
12. Moss-Covered Candle Holders
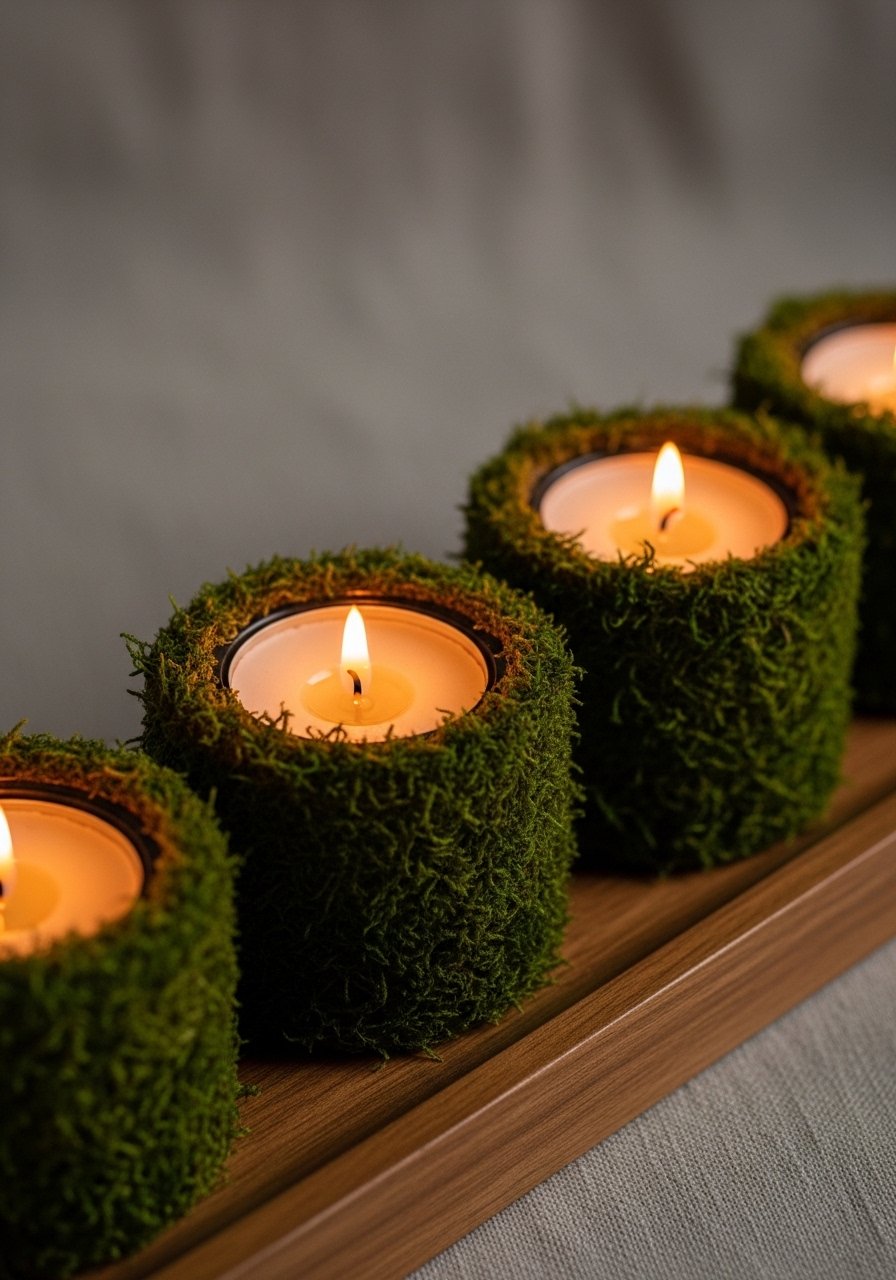
Moss candle holders bring a woodland feel to tabletops. Preserved moss is easy to work with and creates a soft, tactile contrast to wax and flame.
Ingredients
- 3 small glass votives
- Preserved sheet moss, small pieces
- Hot glue sticks and glue gun
- Scissors
- Tea lights (unscented recommended)
- Tray for display
Instructions
- Cut moss into strips to wrap around votive glass.
- Apply hot glue in sections and press moss onto the glass, covering evenly.
- Trim excess and allow glue to set fully.
- Place a tea light inside and light carefully; never leave unattended.
- Display on a tray to catch any loose bits.
How to Serve It
Arrange in groups of three on a wooden serving tray with seasonal accents like pinecones or citrus. Store extra moss in a cool, dry box—use airtight containers to preserve texture.
13. Recycled Fabric Green Pillow Covers
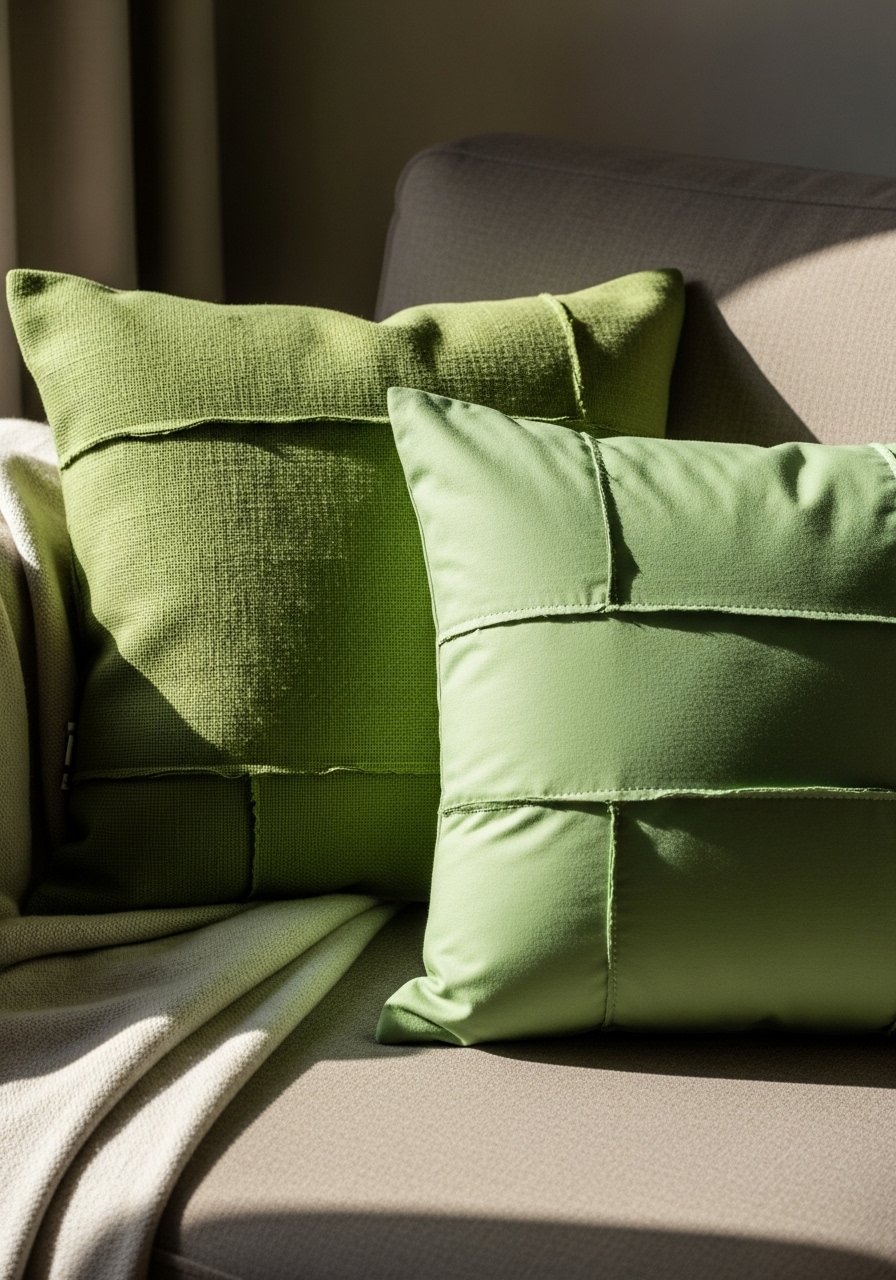
Sewing pillow covers from recycled fabrics is eco-friendly and instantly refreshes seating areas. Mixing textures—linen, cotton, velvet—adds depth while sticking to a green palette.
Ingredients
- 2 pillow inserts (18×18 inches)
- Assorted fabric scraps in green shades (enough for 18×18 squares)
- 1 zipper per cover (18 inches)
- Thread to match
- Sewing pins
- Sewing machine or needle for hand stitching
Instructions
- Cut fabric to 19×19 inches for seam allowance.
- Pin fabric right sides together and insert zipper on one side.
- Sew three sides, leaving zipper accessible, then turn cover right side out.
- Insert pillow form and zip closed.
- Press seams with an iron for crisp edges.
How to Serve It
Mix these covers with neutral pillows for balance and layer throws for seasonal swaps. When storing, fold covers and keep in a fabric storage bin to prevent dust. Have extra covers on hand for quick style changes.
14. Botanical Print Gallery Wall
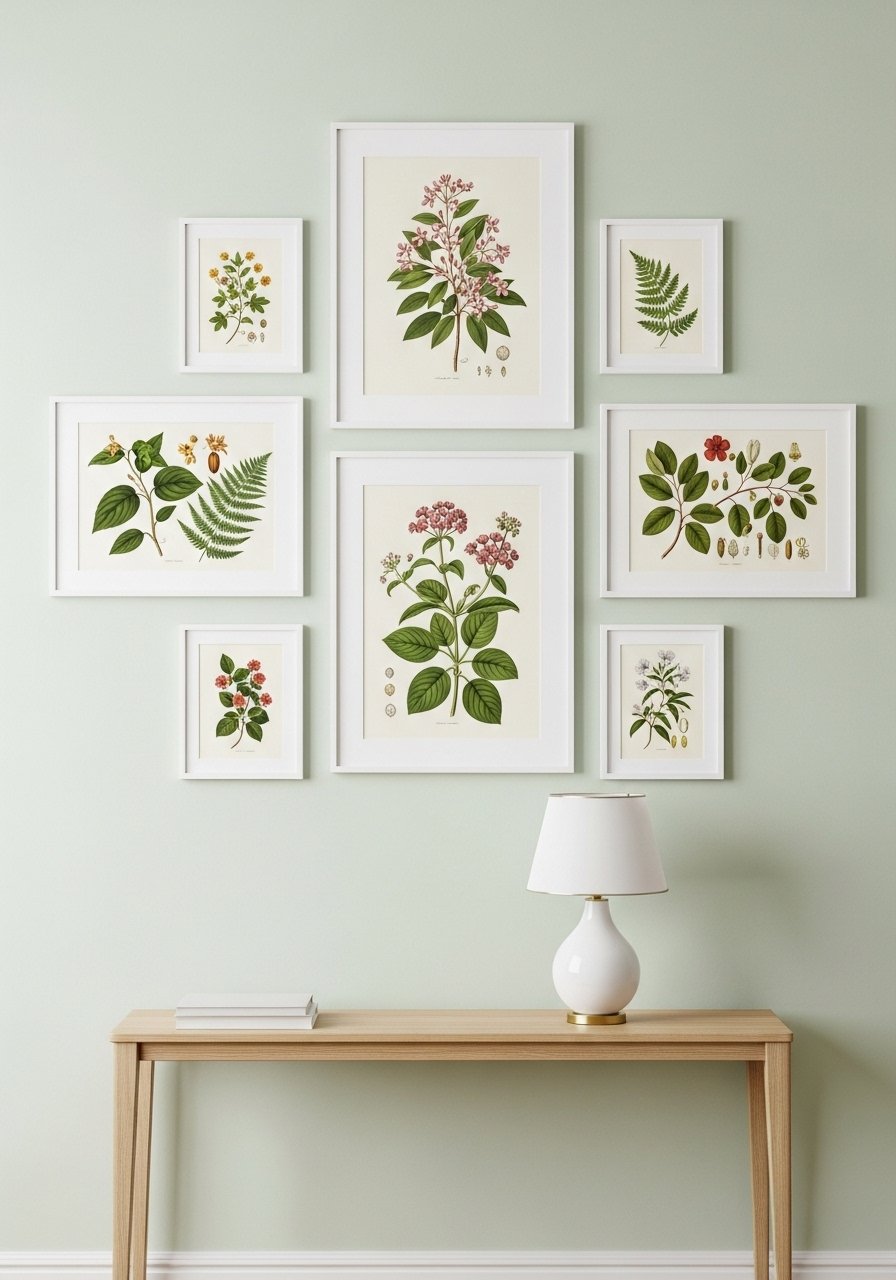
A botanical print gallery wall is an easy route to green home decor that stays chic. Mix vintage prints with modern illustrations for a collected effect.
Ingredients
- 6–8 botanical prints (varied sizes)
- Matching frames (or mix for eclectic look)
- Picture hanging kit
- Measuring tape
- Level
- Blue painter’s tape for layout
Instructions
- Lay prints on the floor to test arrangement before hanging.
- Measure and mark wall placement using painter’s tape for spacing.
- Hang the center or largest frame first, then build outward.
- Use a level for each piece to keep lines crisp.
- Step back and adjust spacing for visual balance.
How to Serve It
Display above a console with a small lamp and vase. Swap prints seasonally for fresh looks. To protect art, use frames with UV-protective glass and store extras flat in document storage boxes.
15. Green Ceramic Tile Coasters (DIY)
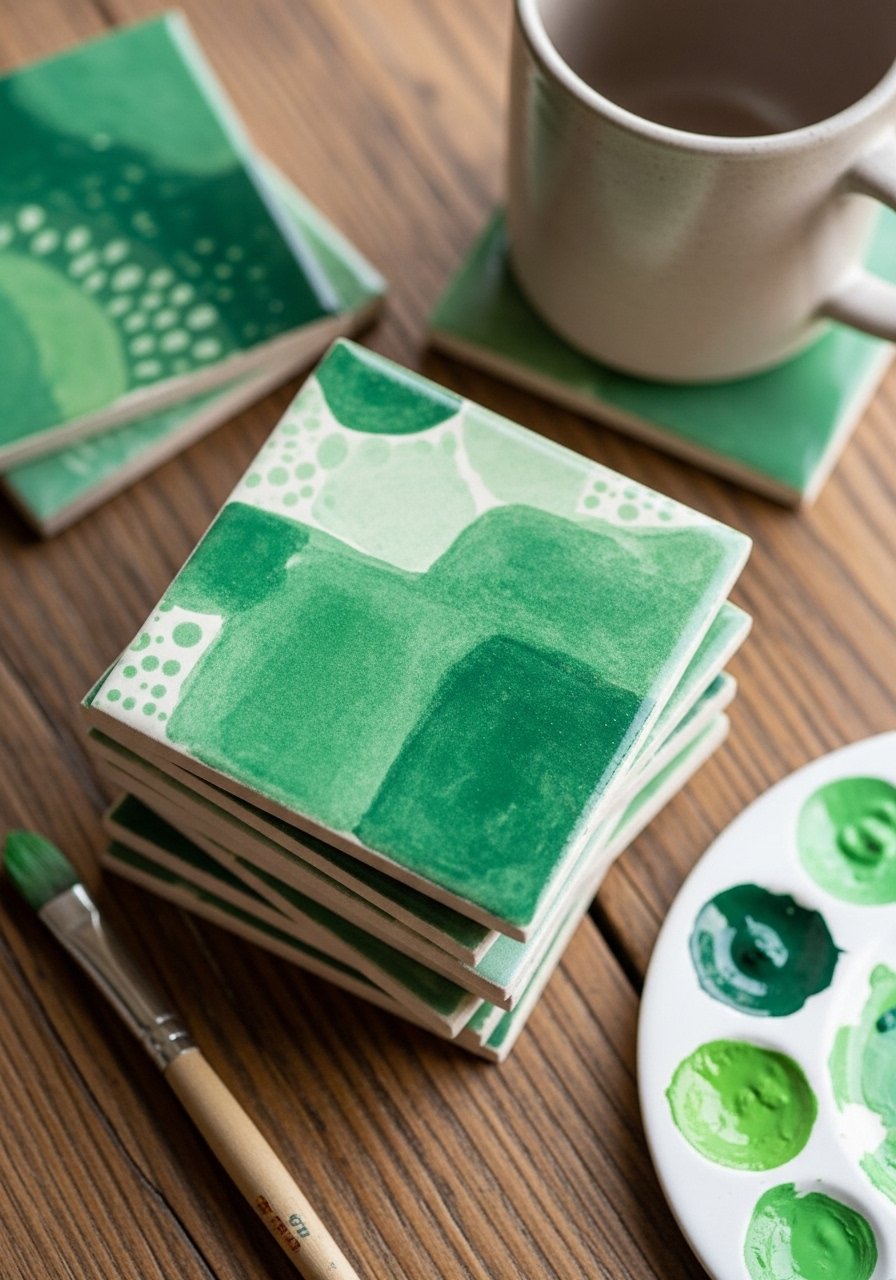
Hand-painted tile coasters add color and function to coffee tables. Use ceramic tiles as blanks and seal them for durability.
Ingredients
- 4 4×4 ceramic tiles
- Ceramic paint in 2–3 green shades
- Fine brush
- Clear sealant spray
- Felt pads for bottoms
- Ruler and pencil
Instructions
- Clean tiles with rubbing alcohol and let dry.
- Sketch simple designs with pencil or freehand with a fine brush.
- Paint designs and allow to dry 24 hours.
- Seal with clear spray according to product directions.
- Affix felt pads to undersides to protect surfaces.
How to Serve It
Stack coasters on a small tray near your sofa or coffee station. These make lovely gifts—wrap in a set with a ribbon. Keep extras in a drawer with silicone baking mats (useful for protecting painting surfaces).
16. Green-Glazed Hanging Planter
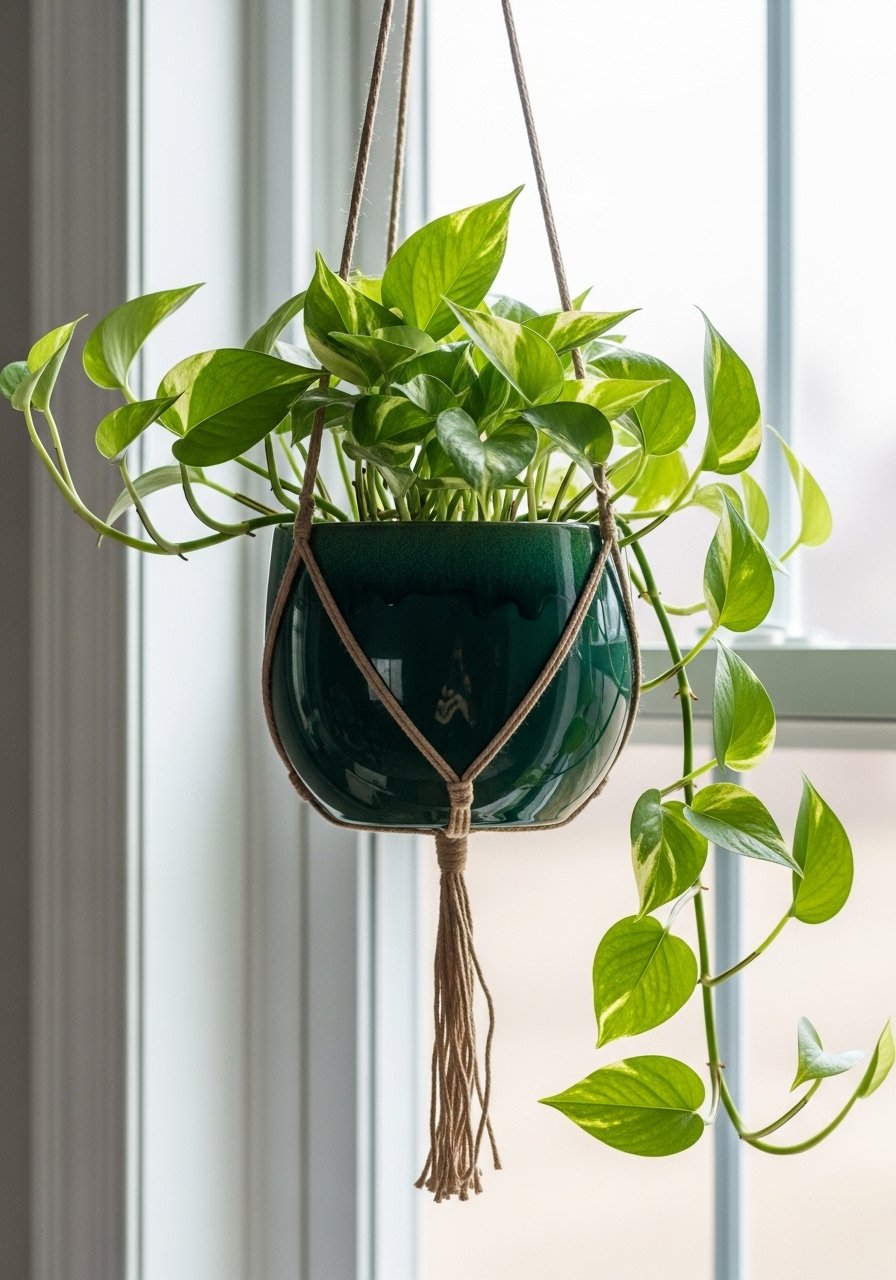
A green-glazed hanging planter draws the eye upward and uses vertical space. The gloss finish reflects light and contrasts with trailing foliage.
Ingredients
- 1 ceramic hanging planter (6–8 inch)
- Macramé hanger or chain
- 1 pothos or trailing plant
- Potting mix, 2 cups
- Plant saucer (optional)
Instructions
- Place saucer inside planter if needed, then add potting mix.
- Center plant and firm soil around roots.
- Hang using macramé hanger at desired height.
- Water sparingly and allow drainage to avoid root rot.
How to Serve It
Hang near a bright window to let foliage trail naturally. Pair with other hanging pots at varied heights for drama. For easy watering, set planters on a plant saucer to catch drips.
17. Sea Glass Mosaic Tray
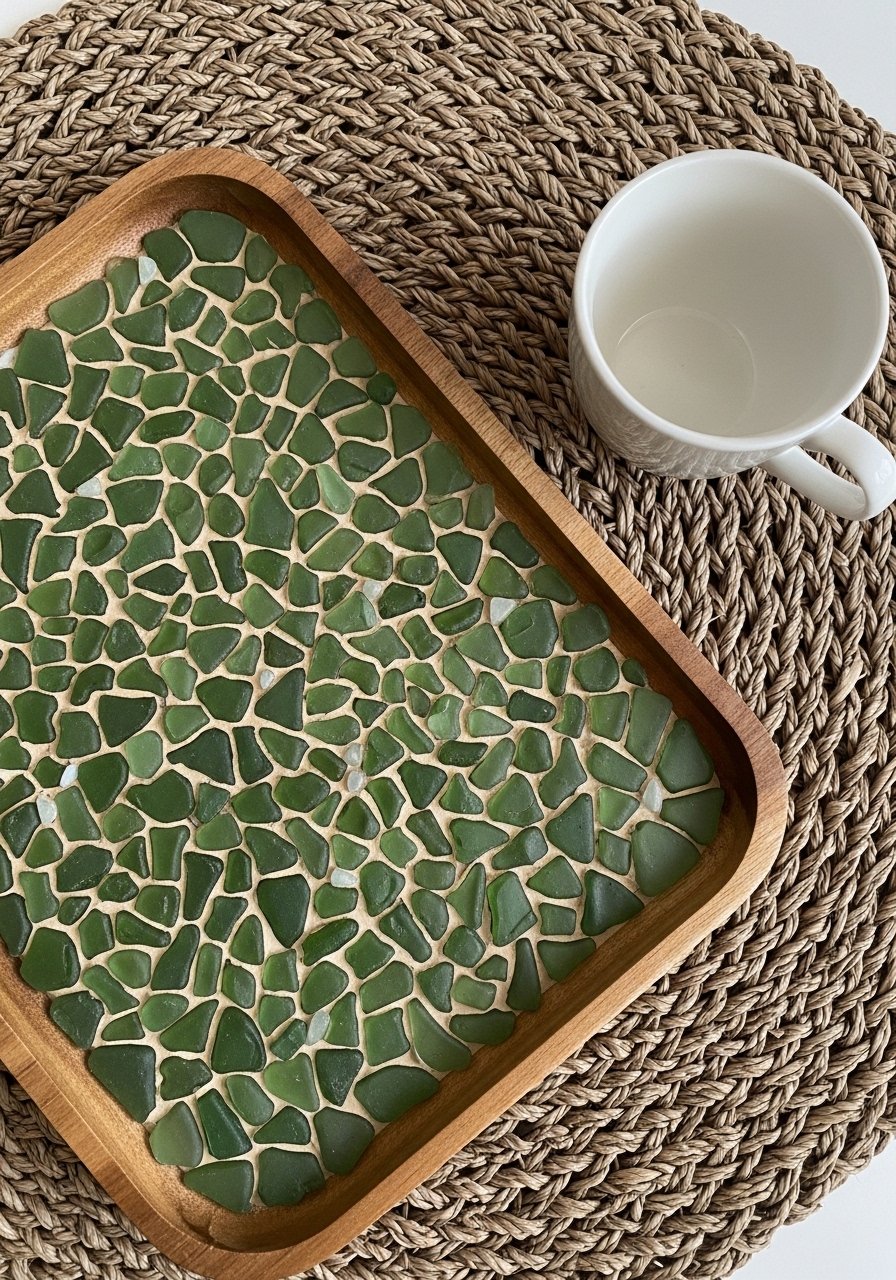
Sea glass adds depth and coastal color to trays and tabletops. A mosaic approach creates a shimmering green focal point that catches light.
Ingredients
- 1 wooden tray with removable base
- Assorted green sea glass pieces
- Tile adhesive
- Grout (neutral tone)
- Sponge and water
- Protective gloves
Instructions
- Arrange sea glass on tray base to plan mosaic pattern.
- Apply tile adhesive and press sea glass pieces firmly.
- Let adhesive cure per instructions (usually 24 hours).
- Spread grout over the mosaic, pressing into gaps, then wipe excess with a sponge.
- Allow grout to fully dry before using the tray.
How to Serve It
Use the tray for drinks or as a decorative landing for keys and mail. For cleaning, wipe gently with a damp cloth. Store on a shelf or use as a coffee table accent—display on a wood serving tray for added polish.
18. Chartreuse Painted Bookshelf Back
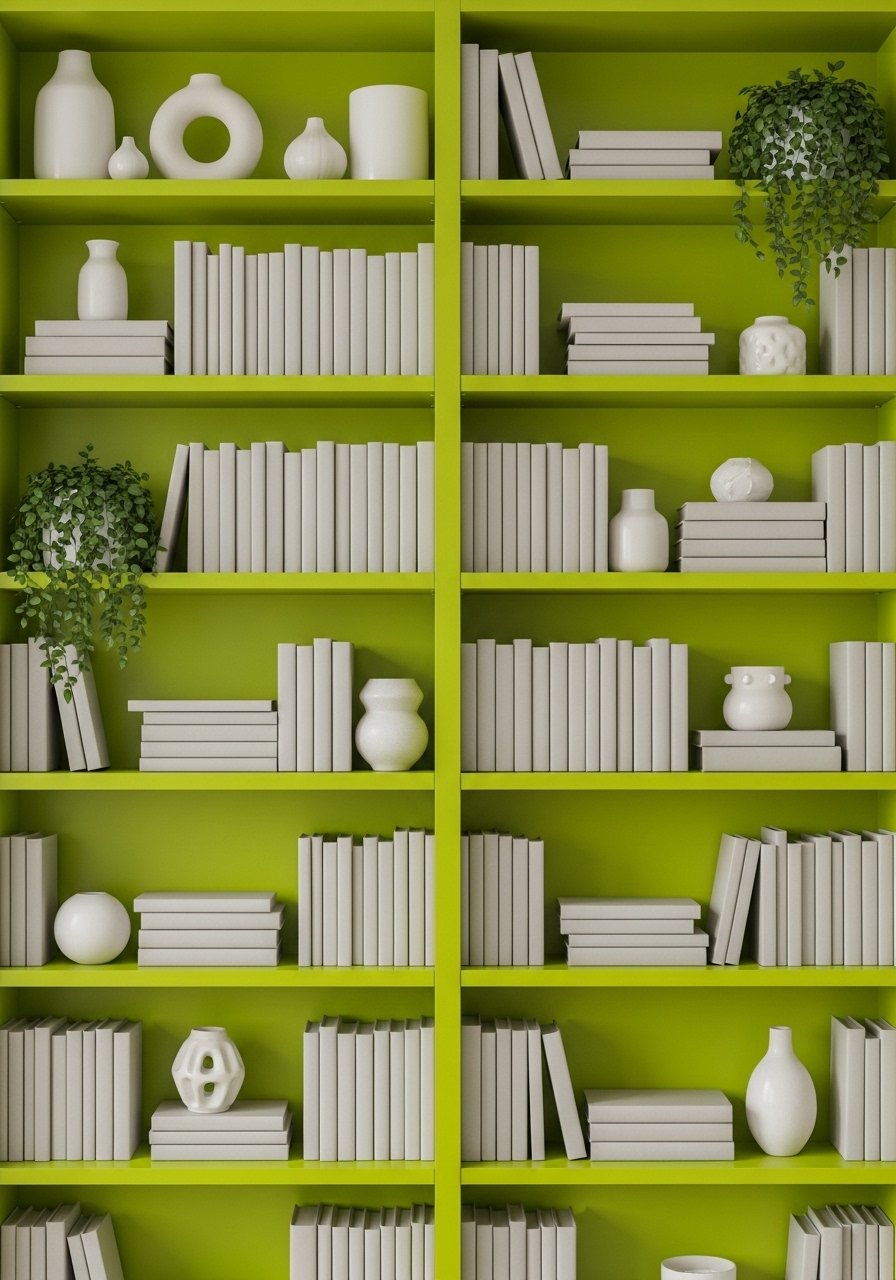
Painting a bookshelf back adds a pop of green without overwhelming the room. It makes shelves feel curated and pulls neutral elements together.
Ingredients
- Sample can of chartreuse or bright green paint
- Small foam roller
- Painter’s tape
- Drop cloth
- Sandpaper (optional)
Instructions
- Empty the bookshelf and sand lightly if surface is glossy.
- Tape edges and lay down a drop cloth.
- Apply two coats of paint with a foam roller, allowing drying time between coats.
- Re-style shelves once paint is dry.
How to Serve It
Place bowls, books, and plants for a collected look. For dusting, remove objects and use a microfiber cloth. If resale is a concern, test paint on the back first. Use a small paint roller set for neat edges.
19. Green Marble Contact Paper Refresh
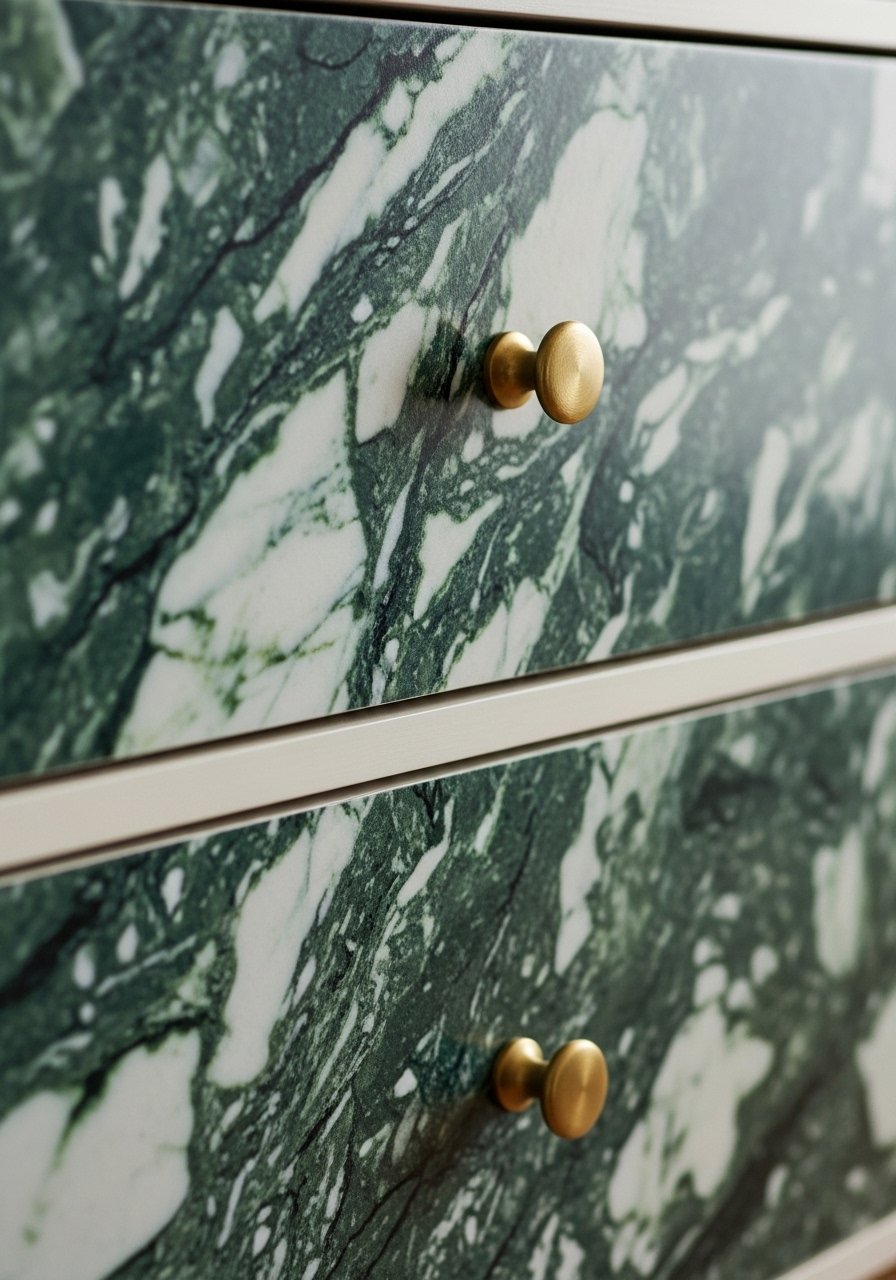
Green marble contact paper refreshes furniture quickly and gives a luxe look for a fraction of the cost. It’s a quick weekend update that reads grown-up and chic.
Ingredients
- 1 roll green marble contact paper (size as needed)
- Utility knife
- Squeegee or credit card for smoothing
- Measuring tape
- Rubbing alcohol for surface prep
Instructions
- Clean and dry the surface fully.
- Measure and cut contact paper slightly larger than surface.
- Peel backing gradually while smoothing with a squeegee to avoid bubbles.
- Trim edges with a utility knife for a seamless finish.
How to Serve It
Use on drawer fronts, table tops, or a bookshelf back. For cleaning, wipe with a damp cloth. Keep extra roll for future touch-ups in a craft storage box.
20. Terracotta Herb Markers (Stamped)
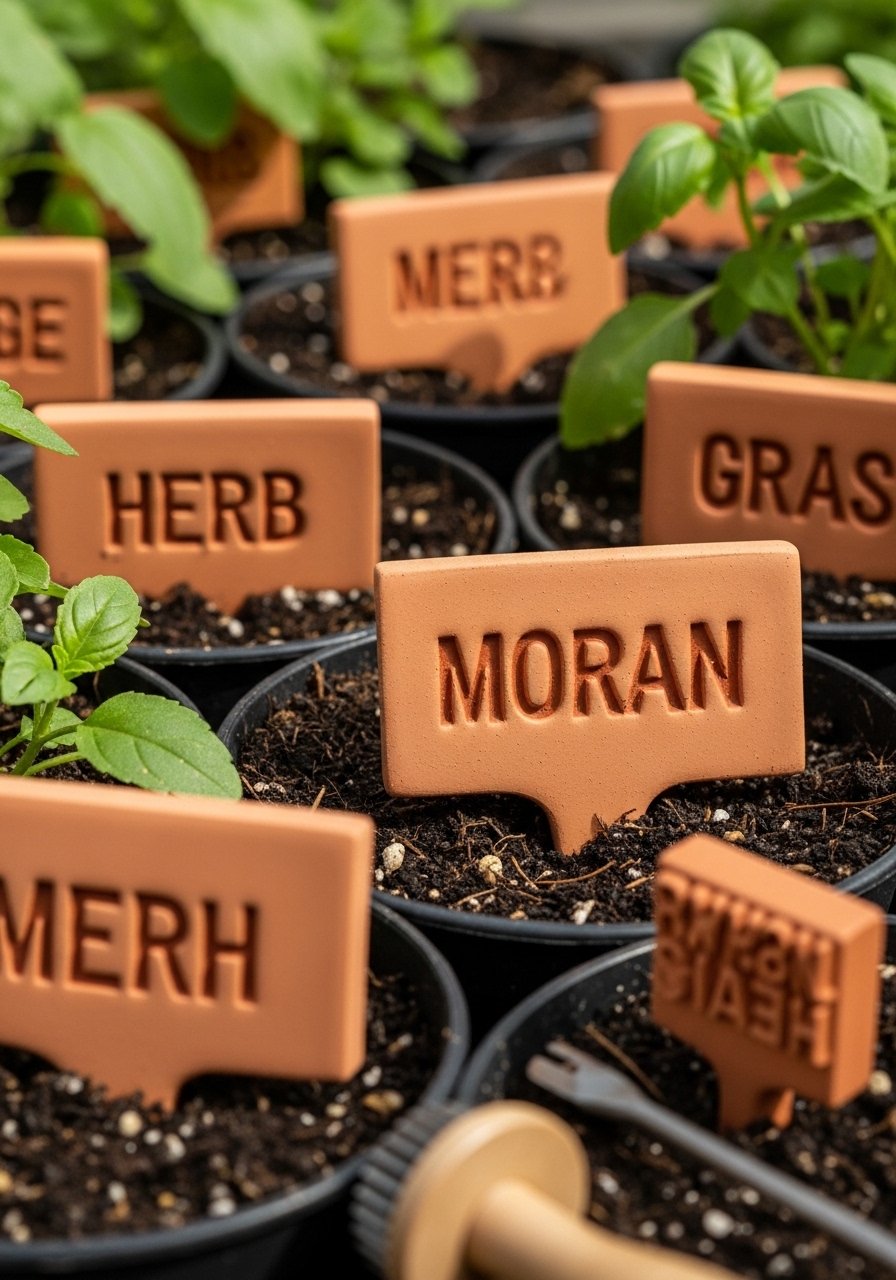
Stamped terracotta markers lend charm to your herb garden and help you remember what’s planted where. They weather naturally outdoors and look curated in pots.
Ingredients
- Air-dry terracotta clay
- Alphabet stamps (small)
- Rolling pin
- Knife or cutter
- Clear sealant spray (optional)
Instructions
- Roll clay to 1/4-inch thickness and cut into small rectangles.
- Stamp herb names onto clay while it’s soft, pressing evenly.
- Let pieces dry fully per clay instructions (24–48 hours).
- Spray with sealant if you want extra weather resistance.
- Place markers into pots, slightly angled for readability.
How to Serve It
Space markers neatly between plants for clear identification. For outdoor use, tuck under a protective eave or use plant labels for longevity.
21. Green-Beaded Curtain Tiebacks
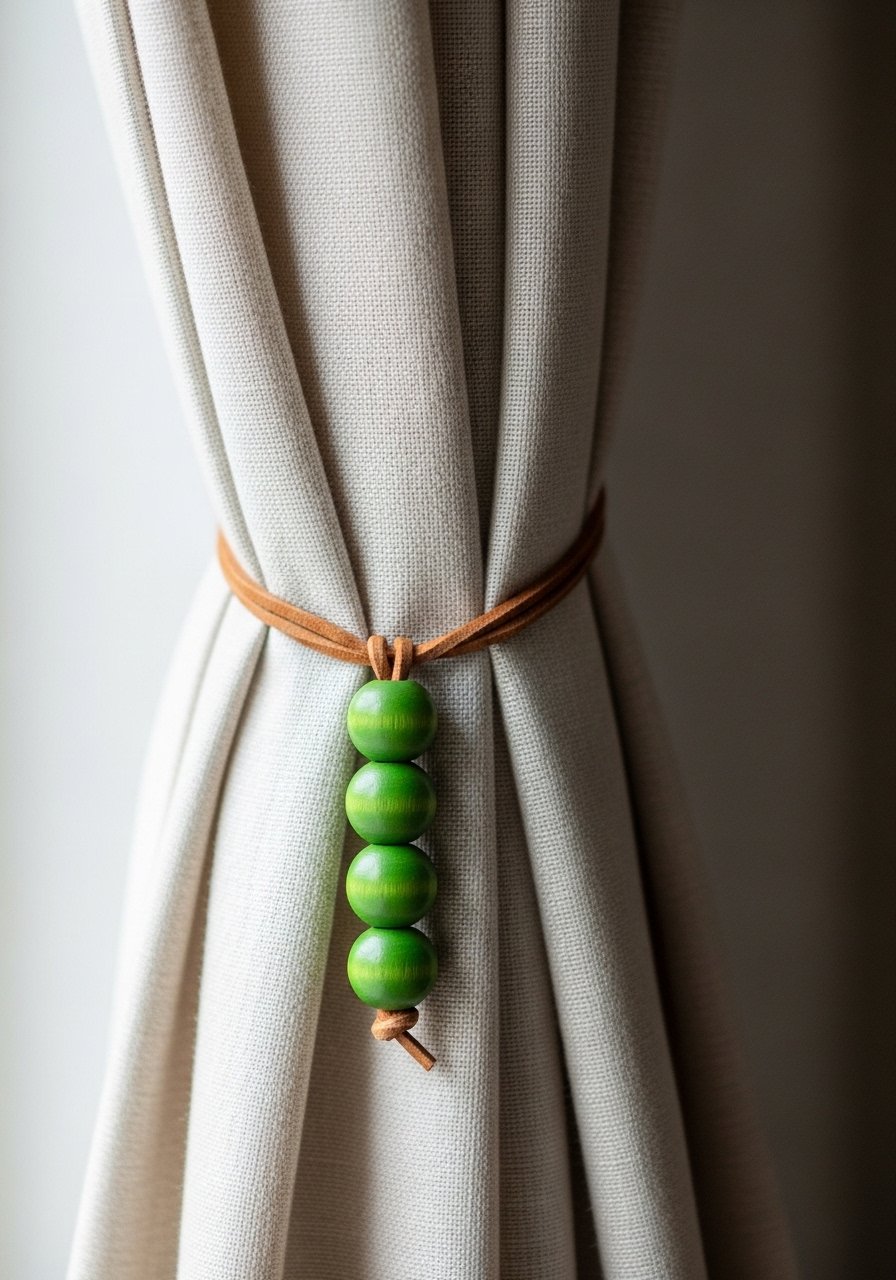
Beaded tiebacks add movement and a handcrafted accent to drapery. Choose beads in varying greens for a boho look that complements natural light.
Ingredients
- 30–40 wooden beads in assorted greens
- Leather cord or cotton rope (24 inches)
- Scissors
- Glue for knot ends
Instructions
- Thread beads onto the cord in desired color order.
- Tie a knot at each end and secure with a dab of glue.
- Wrap tieback around drape and knot to hold open.
How to Serve It
Pair with linen curtains and a woven rug for a relaxed look. Keep extra tiebacks in a drawer near curtains or in a decor storage bin.
22. Green Chalkboard Herb Labels
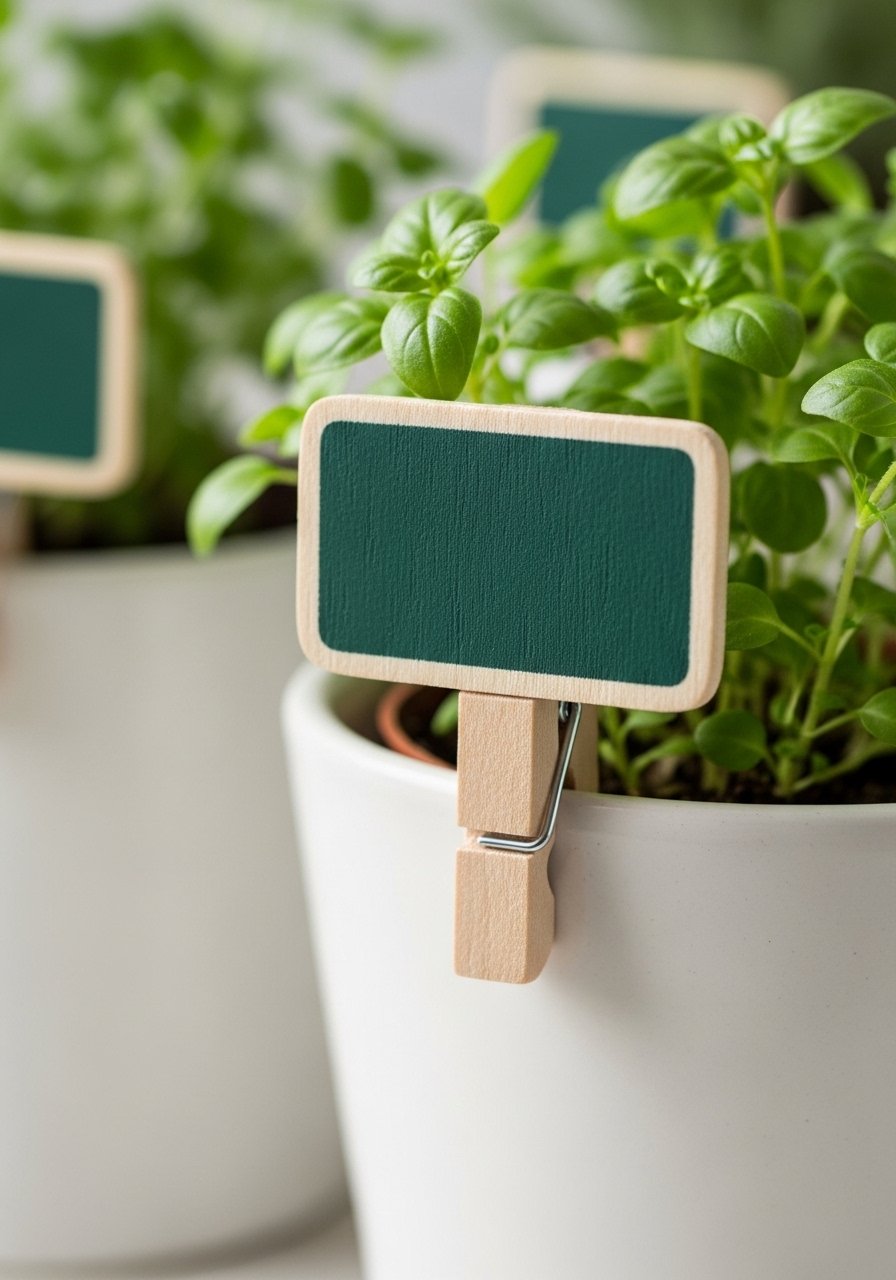
Chalkboard labels painted in green are reusable and stylish. Write the herb name in chalk and change it as you rotate plants.
Ingredients
- Small wooden pegs
- Chalkboard paint (green-tinted)
- Small paintbrush
- Chalk or chalk marker
Instructions
- Paint the flat face of wooden pegs with chalkboard paint and let dry.
- Apply a second coat for even coverage.
- Once dry, write plant names with chalk or a chalk marker.
- Clip onto pot rims or soil-edge for visibility.
How to Serve It
Swap names as you re-pot or change seedlings. Store unused pegs in a small mason jar for tidy access.
23. Green Ombre Tablecloth (Dye Dip)
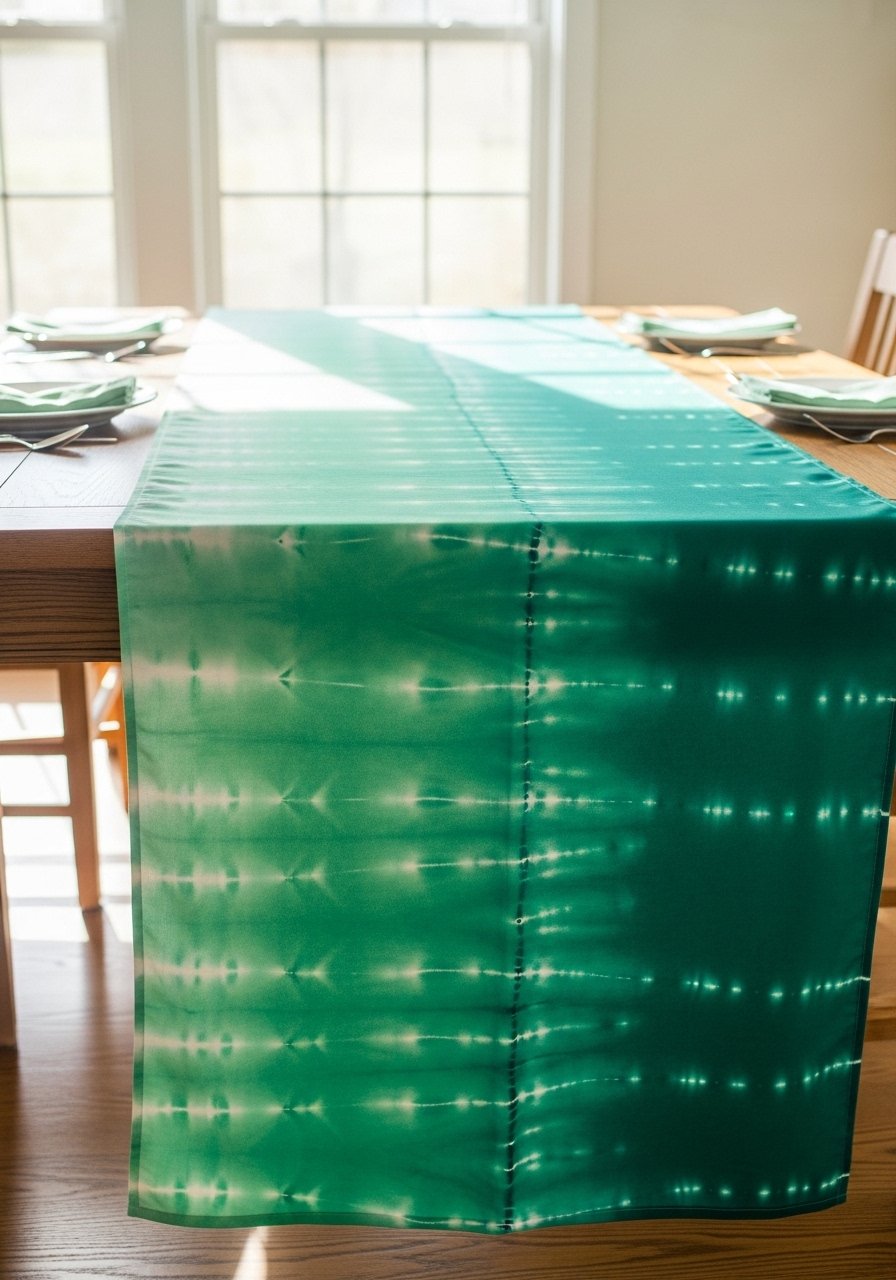
Dip-dyeing a tablecloth creates a beautiful ombre effect that looks organic and handmade. It’s a great way to make an ordinary white cloth distinctly yours.
Ingredients
- 1 60×90 inch linen or cotton tablecloth
- Fabric dye in green
- Large plastic bin for dye bath
- Rubber gloves
- Clothespins and rope (optional for controlled dip)
Instructions
- Mix dye bath per package instructions in a large bin.
- Wet tablecloth and clamp one end if using rope for gradual dip.
- Dip lower portion of cloth into dye for 10–20 minutes for a soft gradient, longer for deeper color.
- Rinse until water runs clear and hang to dry.
How to Serve It
Style with neutral plates and a green centerpiece. For storage, fold and keep in a linen storage bag.
24. Green Rope Coasters

Braided rope coasters are affordable and durable. They add handcrafted charm and protect surfaces from moisture.
Ingredients
- 3 yards cotton rope (green or dyed)
- Hot glue gun
- Scissors
- Measuring tape
Instructions
- Coil the rope tightly starting from one end, securing with small dabs of hot glue.
- Maintain a flat, even coil as you work.
- Continue until coaster reaches 3.5–4 inches in diameter.
- Trim and secure end with glue.
How to Serve It
Use sets under mugs and small plant pots. When not in use, stack in a small woven basket near the coffee station.
25. Green Velvet Footstool Reupholster
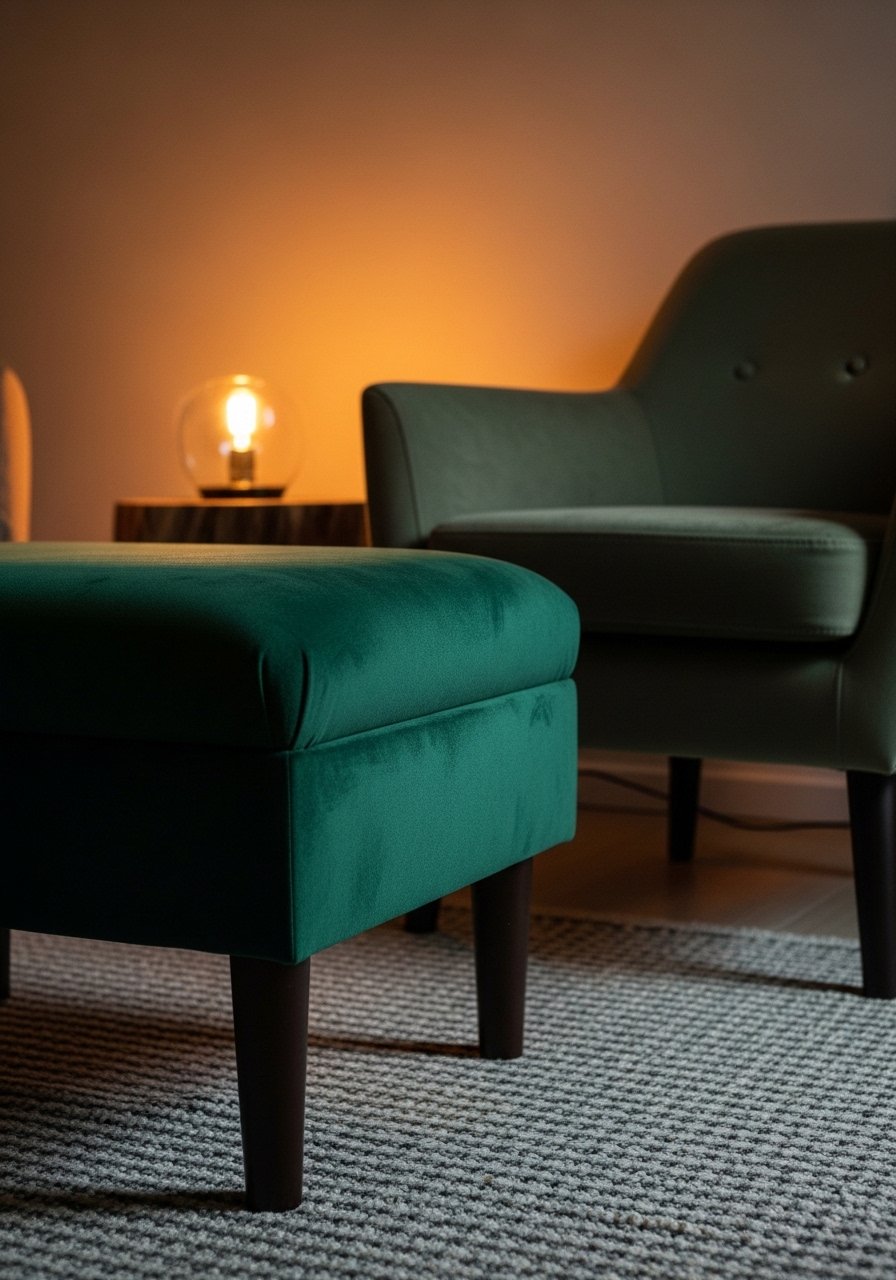
Reupholstering a small footstool in green velvet refreshes seating and adds a luxe touch. The softness invites you to rest your feet and ties into jewel-toned accents.
Ingredients
- 1 small footstool (with removable top)
- 1 yard green velvet fabric
- Staple gun
- Scissors
- Foam padding if needed
Instructions
- Remove the top and old fabric carefully.
- Replace or add foam padding for comfort.
- Cut new velvet allowing 3 inches extra on each side.
- Stretch fabric taut and staple under the stool top, working from center to corners.
- Trim excess fabric and reattach top.
How to Serve It
Place at the foot of a chaise or beside a reading chair. Velvet benefits from occasional vacuuming with an upholstery attachment. Store spare fabric scraps in a fabric organizer.
26. Green Bead Garland for Mantel
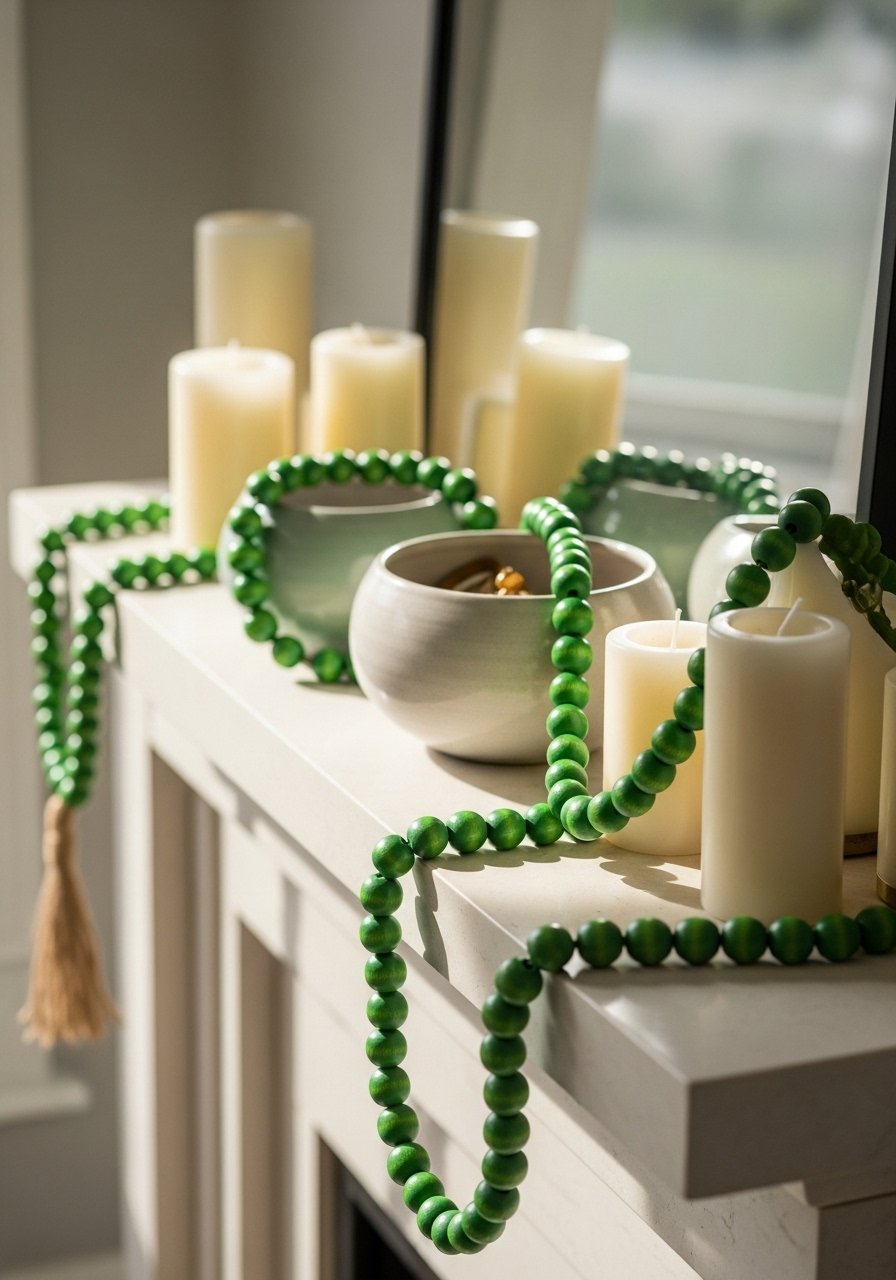
A bead garland draped along the mantel offers casual texture and movement. It layers well with candles and seasonal foliage.
Ingredients
- 40–60 wooden beads in varying greens
- Natural twine
- Glue for securing knots
- Scissors
Instructions
- Thread beads onto twine in a pattern that feels balanced.
- Tie knots at ends and secure with glue for longevity.
- Drape across mantel with soft loops for a relaxed look.
How to Serve It
Pair with pillar candles and framed prints. Keep garland in a decor storage box between seasons to prevent tangling.
27. Fern Bath Shelf Shelfie
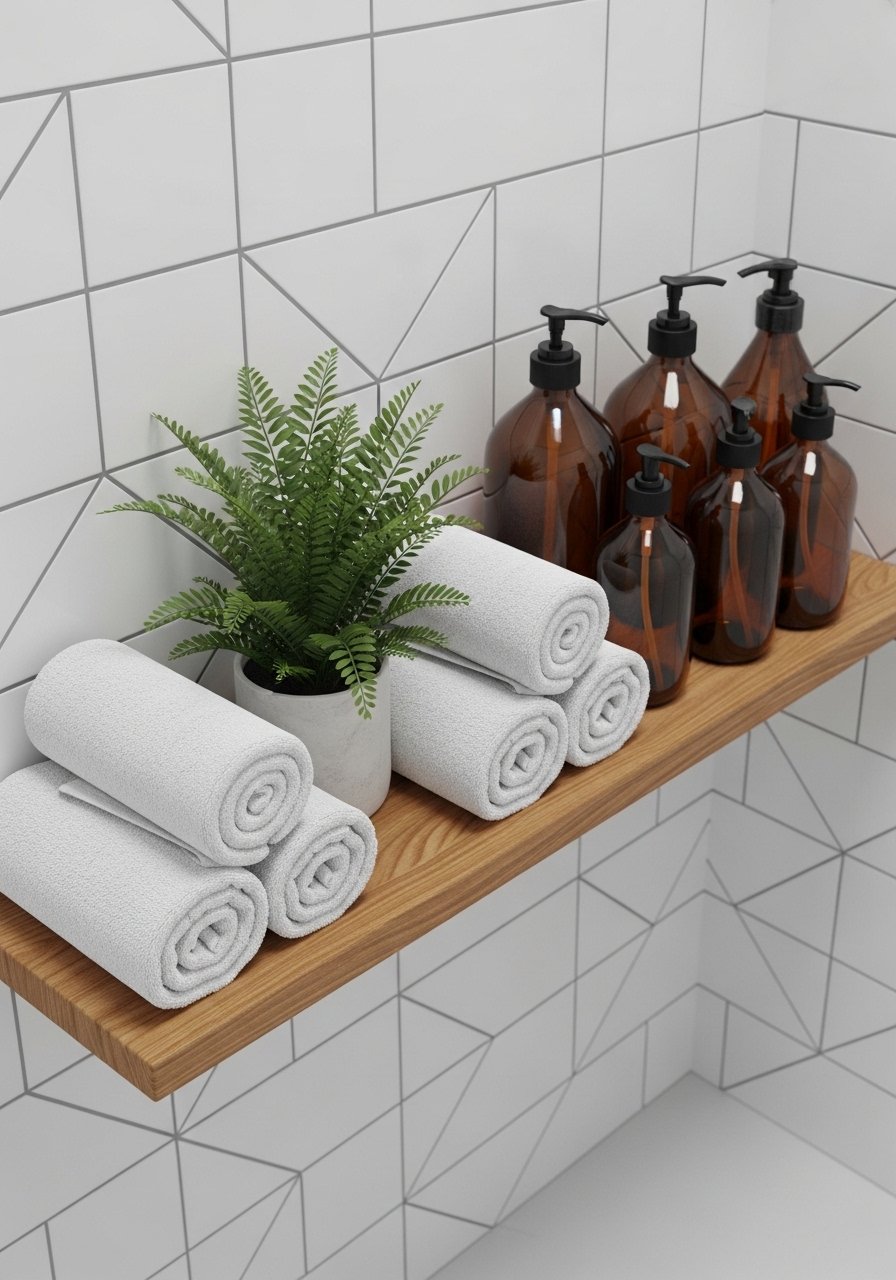
A simple shelf with ferns and amber bottles turns your bathroom into a small green retreat. The living plant adds fresh humidity-loving texture.
Ingredients
- 1 narrow wooden shelf
- 1 potted fern
- Rolled towels
- Amber glass bottles for soaps
- Small tray
Instructions
- Mount shelf at reachable height in bathroom.
- Arrange towels, bottles, and the fern just off-center for balance.
- Water fern and wipe shelf surfaces regularly to prevent water marks.
How to Serve It
Keep a small glass bottle for liquid soap on the shelf. Rotate fern occasionally to get even light and mist leaves during dry seasons.
28. Green Window Film Privacy Screen
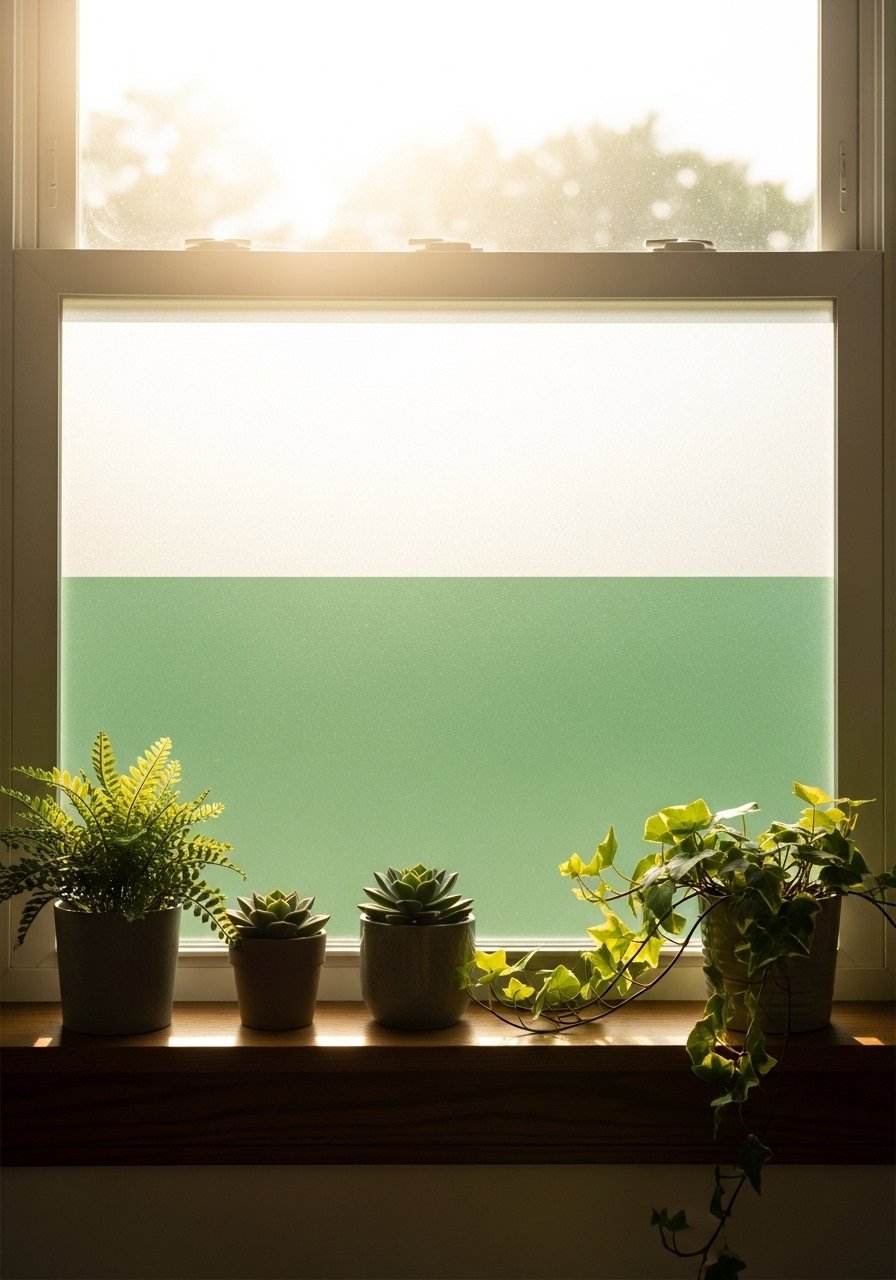
Window film offers privacy while bathing a room in green-hued light. It’s a renter-friendly option that’s simple to install and remove.
Ingredients
- 1 roll static-cling green frosted window film (cut to size)
- Spray bottle with water and a drop of dish soap
- Squeegee
- Utility knife
- Measuring tape
Instructions
- Measure window and cut film slightly larger than pane.
- Spray window with soapy water and peel backing from film.
- Apply film wet, smoothing with a squeegee outward to remove bubbles.
- Trim edges with a utility knife for a perfect fit.
- Allow film to adhere and dry over 24 hours.
How to Serve It
Use on bathroom or street-facing windows to add color and privacy. Remove easily by peeling away and wiping glass. Store extra film flat in a document tube for future use.
Breathe new life into your rooms with these green home decor "recipes"—each one is designed to be approachable, affordable, and quietly beautiful. Try one project this weekend and pin it for later; then share a photo with friends or in your favorite home group. Which of these ideas are you most tempted to try first—the moss frame, the painted bookshelf back, or a living wall frame? If you plan to make several projects, a good set of craft scissors and a durable hot glue gun will speed things along and keep finishes neat. Have fun creating calm, green corners that welcome you home.