You want your home to look polished without blowing the budget. Affordable Home Decor isn't about cheap-looking pieces — it's about smart swaps, texture, and a few simple DIY recipes that mimic high-end finishes. This collection of 29 projects gives you step-by-step "recipes" that are wallet-friendly and deliver that upscale, layered look.
Each project lists exact materials, timings, and tools so you’ll avoid common pitfalls like bubbling paint or sagging shelves. Grab a durable drop cloth and a roll of parchment paper to protect surfaces, and keep a digital kitchen scale handy for measuring glues and resins in small batches. These affordable home decor recipes include display tips, storage ideas, and gentle product recommendations so you can get that luxe look at a fraction of the cost.
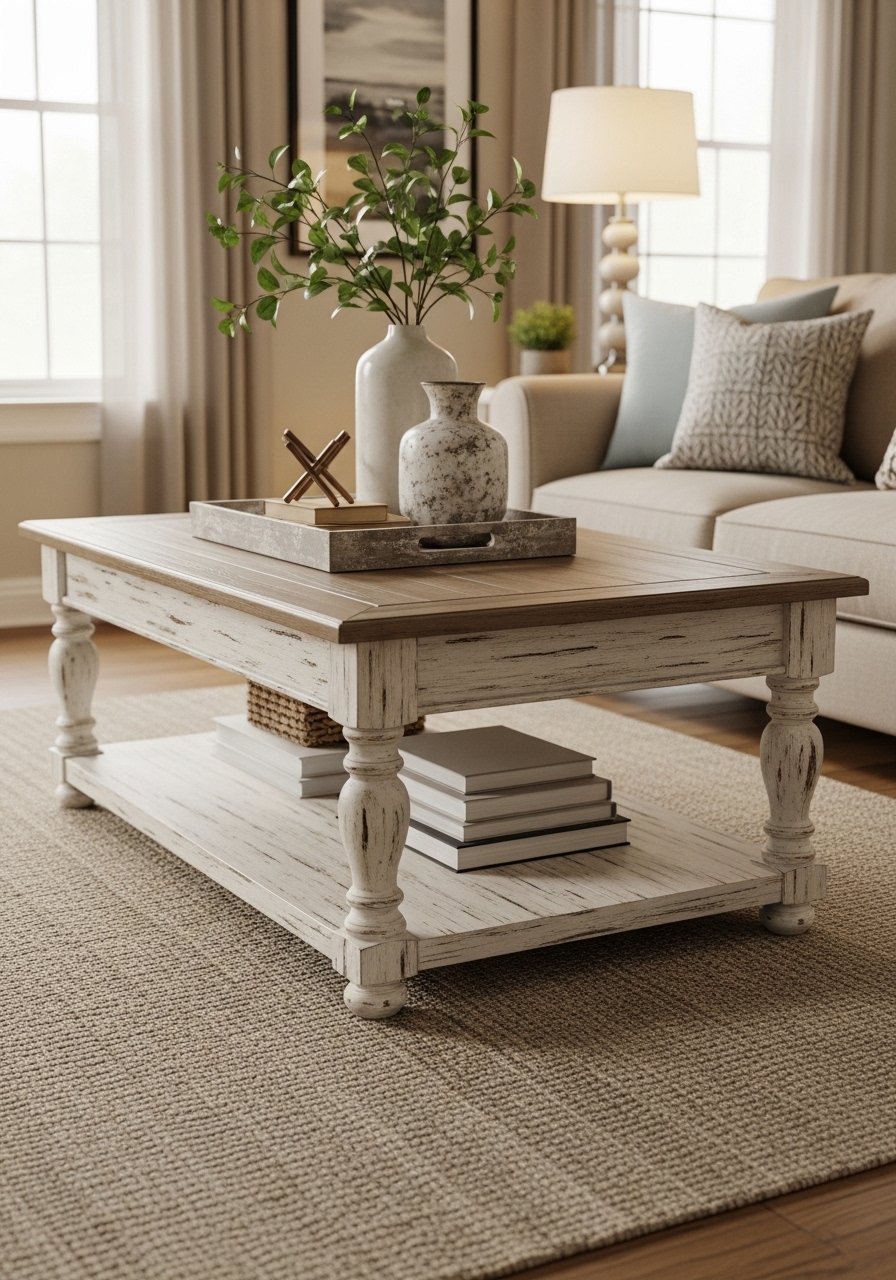
1. Affordable Home Decor: Faux-Marbled Serving Tray
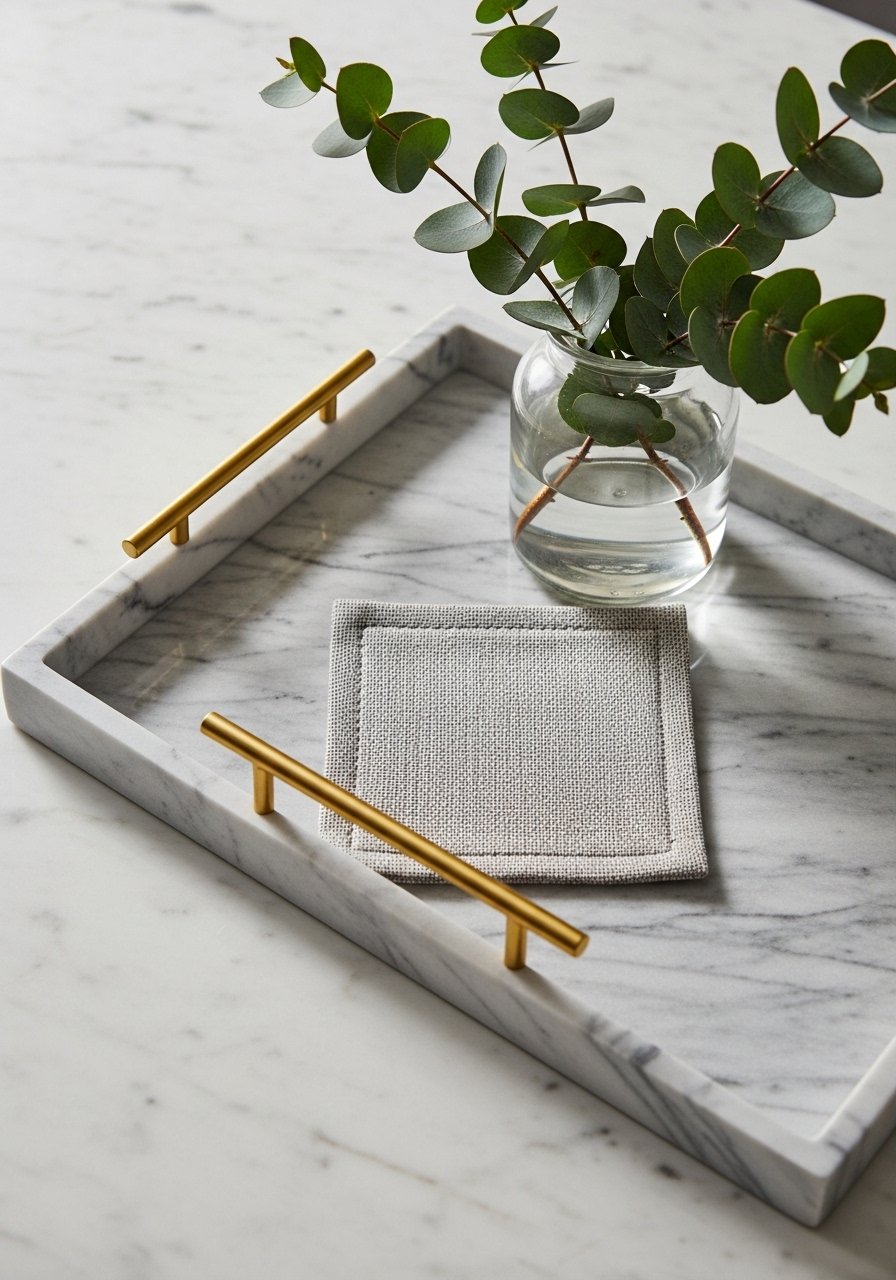
This faux-marble tray looks like a designer piece but costs a fraction. The finish is smooth and glossy with delicate gray veining that catches the light. It’s heavy enough to feel substantial and simple enough to make in an afternoon. If you love clean lines and neutral textures, this tray will fit right into your coffee table styling.
Ingredients
- 1 wooden serving tray (12 x 16 inches)
- 1 cup white acrylic paint
- 1/2 cup light gray acrylic paint
- 1 tsp black acrylic paint
- 2 tbsp clear gloss polyurethane (water-based)
- 1 sheet glossy craft paper (12 x 16 inches)
- 1 roll painter’s tape
- 1 cup water
- 1 foam roller (2-inch)
- 1 small round paintbrush (size 2)
- 1 soft rag
- 2 brass drawer pulls (for handles)
- 1 can matte spray sealer (optional)
Instructions
- Sand the tray lightly until smooth and wipe clean with a damp cloth. Tape off edges where handles will mount.
- Apply one even coat of white acrylic paint with the foam roller. Let dry 30 minutes; repeat for full coverage.
- Tear glossy craft paper into long, thin strips to create veins. Crumple gently, then dab the strips into light gray paint and press onto the painted surface to imprint veining. Work lightly; build layers.
- Mix 1 tsp black paint with 1 tbsp water for a diluted wash. Use the small round brush to add hair-thin veining. Drag a dry finger or rag over a line to soften it if needed.
- Once satisfied, let dry 1 hour, then brush on a thin coat of clear gloss polyurethane. Let dry 2 hours and apply a second coat. Sand lightly with very fine grit between coats if dust appears.
- Drill pilot holes and attach brass drawer pulls as handles. Wipe the tray with a soft rag and optionally spray a light coat of matte sealer to reduce shine on the sides.
- Cure the finish 24 hours before placing drinks on the tray.
How to Serve It
- Place the tray on a coffee table with a stack of books and a small vase. For a chic display, group a scented candle and a ceramic bowl for keys.
- Store on a shelf using a small plate stand when not in use.
- Avoid prolonged water exposure; wipe spills immediately.
- Make-ahead: finish the tray up to a week before gifting or styling.
- For transport, wrap in bubble wrap.
2. Painted Brass Drawer Pulls — High-Glow Hardware
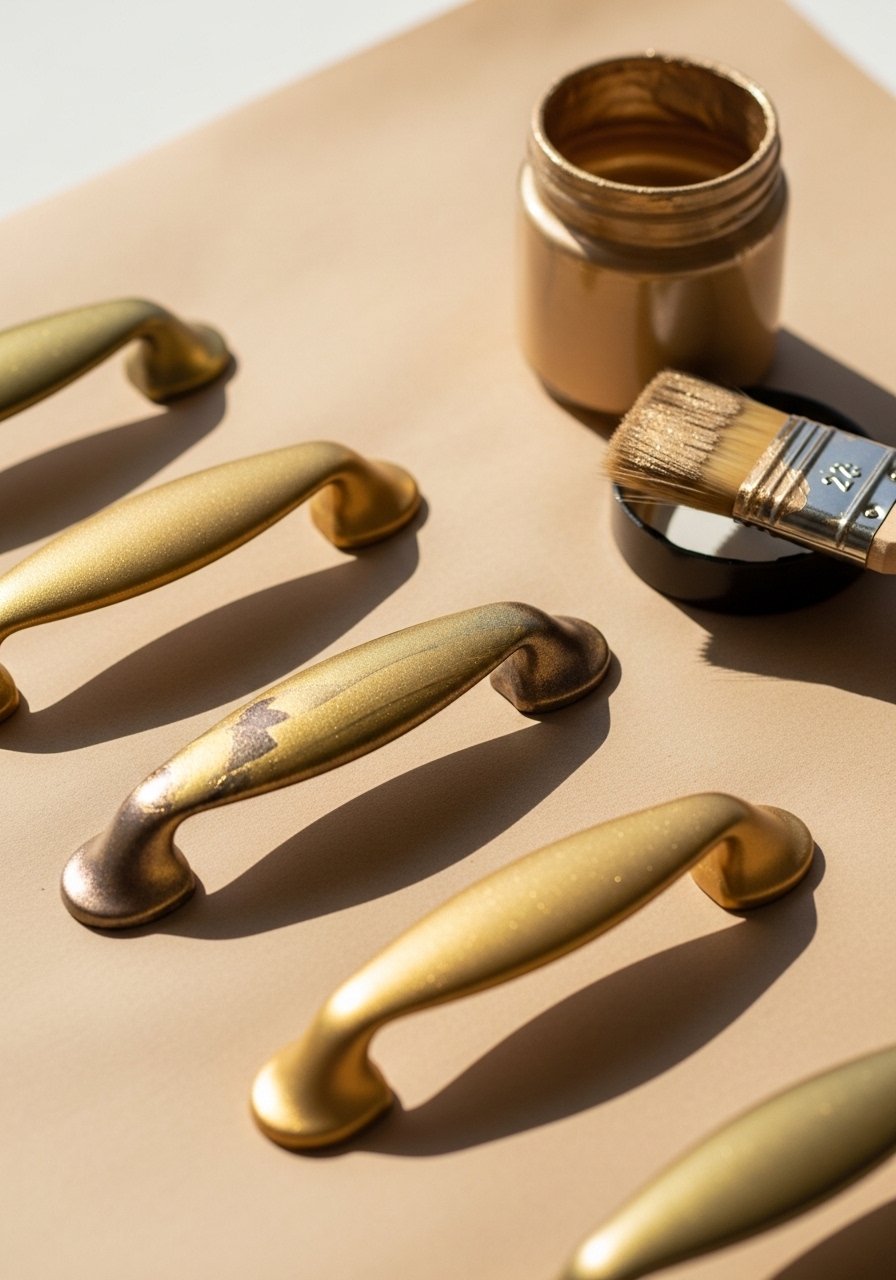
Old hardware can age a whole dresser. A simple painting technique yields gold-like pulls that read upscale. The finish is warm and satin, and the process takes under an hour (plus drying). This is perfect for thrifted furniture or updating builder-grade cabinetry.
Ingredients
- 10 metal drawer pulls (cleaned)
- 1 can metallic gold spray paint (satin)
- 1/2 cup metallic gold acrylic paint
- 1 small paintbrush (size 4)
- 1 sanding sponge (fine grit)
- 1 cup isopropyl alcohol (for cleaning)
- 1 pair nitrile gloves
- 1 roll painter’s tape
- 6 cotton pads
- 1 can clear satin topcoat
- 1 cardboard box (for spray area)
Instructions
- Remove pulls and clean thoroughly with alcohol-soaked cotton pads to remove oils.
- Lightly sand to scuff the surface so paint adheres. Wipe with a dry cloth.
- Place pulls in a cardboard box and apply two light coats of metallic gold spray, 10 minutes apart. Let dry 20 minutes.
- For a brushed satin look, dip the small brush in the metallic gold acrylic and use long strokes across the pull, following metal grain.
- Let cure 1 hour, then spray a clear satin topcoat for protection.
- Reinstall once fully cured (about 4 hours). Tighten screws gently to avoid cracking the finish.
How to Serve It
- Swap these onto a dresser or bathroom vanity to unify finishes.
- Store extra painted pulls in a small parts organizer.
- Pair with new knobs or mixed metals for layered interest.
- Works well for seasonal refreshes—paint a few pulls for holiday flair.
3. Textured Linen Pillow Covers (Affordable Home Decor)
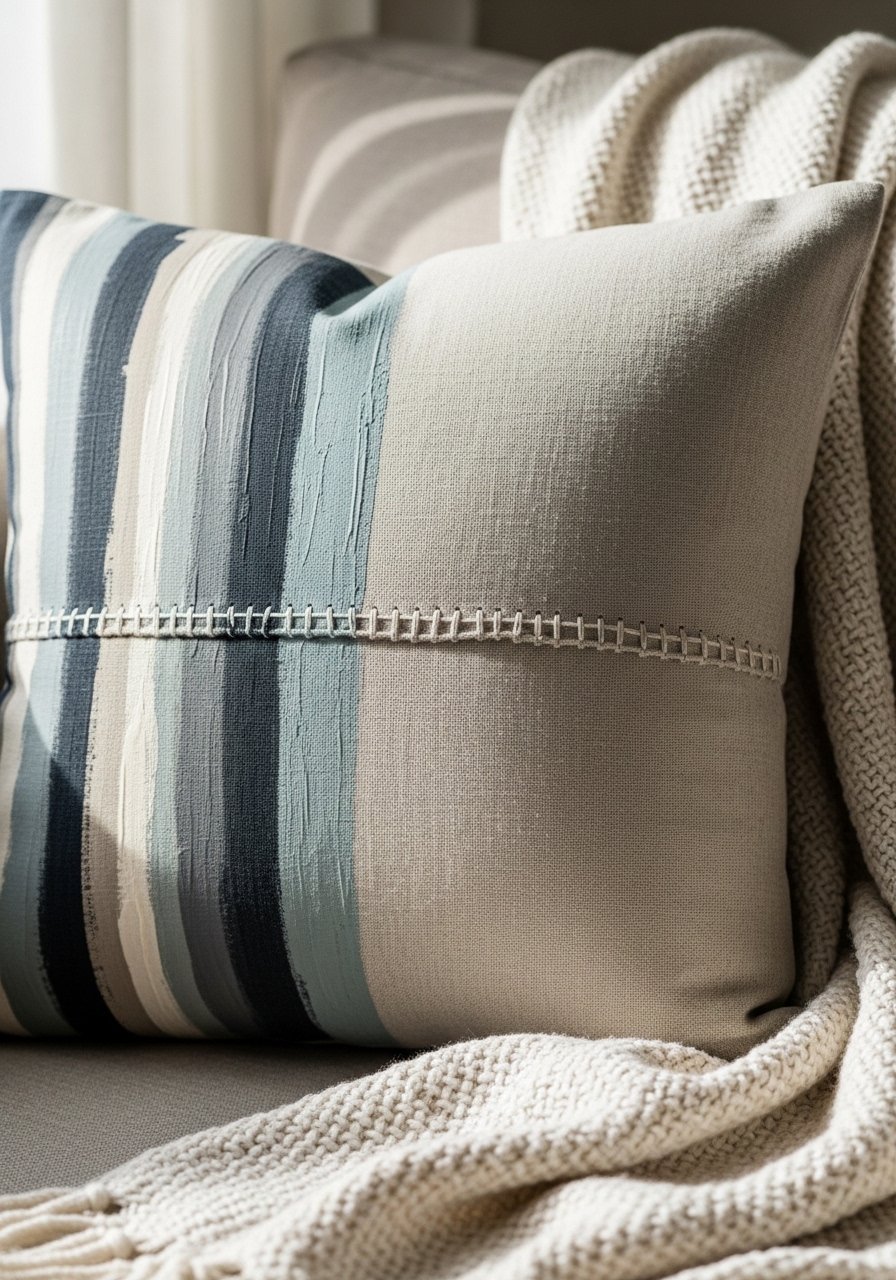
Handmaking pillow covers lets you control fabric, scale, and texture without splurging on designer cushions. These linen covers have a painted stripe technique for subtle texture and a tailored finish that looks boutique. Soft linen feels tactile and lived-in.
Ingredients
- 2 yards heavyweight linen fabric (pre-washed)
- 1/2 yard canvas lining fabric
- 1 cup textile medium
- 1/4 cup acrylic paint (soft gray)
- 1/4 cup acrylic paint (taupe)
- 1/2 yard fusible interfacing
- 1 spool heavy-duty thread
- 4 buttons (optional)
- 1 zipper (18 inch) or envelope closure supplies
- 1 yard painter’s tape (for straight stripes)
- 1 box straight pins
- 1 yard trim or fringe (optional)
Instructions
- Cut two 20 x 20 inch squares from linen for each pillow. Cut a 20 x 20 inch square from lining.
- Iron fusible interfacing onto wrong side of one piece to stabilize the painted area.
- Use painter’s tape to mark stripes. Mix textile medium with acrylic paint per manufacturer instructions.
- Brush paint mixture in even strokes across the taped area. Remove tape while wet for crisp lines. Let dry 1 hour.
- Place right sides together and pin. Sew three sides with a 1/2-inch seam allowance, leaving one side open for the zipper or envelope overlap.
- Finish seams with zigzag stitch or serger. Insert zipper using an invisible zipper foot or sew envelope closure.
- Turn right side out and press. Insert pillow form and add buttons or trim if desired.
How to Serve It
- Layer on a sofa with varying textures: a knit throw and a velvet cushion.
- Store extra covers flat in a linen storage bag.
- Make-ahead: paint and sew covers up to two weeks before use.
- Machine wash cold on a gentle cycle; line dry for best texture.
- Pair with a neutral rug and brass accents to complete a serene vignette.
4. DIY Dip-Dyed Curtains
Give plain curtains a designer ombré without replacing them. Dip-dying adds color and an intentional, modern look. You control how saturated or subtle the gradient is. Works well with cotton or linen blends.
Ingredients
- 2 pre-made cotton curtain panels (84 inch)
- 1 package fiber-reactive dye (navy or teal)
- 1 cup salt
- 1/4 cup soda ash (fixative)
- 2 large buckets
- 1 pair rubber gloves
- 1 measuring cup
- 1 cup warm water
- 1 wooden dowel or hanger for drying
- 1 large drop cloth
Instructions
- Wash curtains to remove sizing. Keep damp.
- Dissolve dye in warm water with salt per dye package directions.
- Fill a bucket with dye solution and another with clean water for rinsing.
- Submerge bottom third of curtain into dye, holding for 5–15 minutes depending on desired depth. For ombré, start with a 5-minute dip, then gradually lift slightly and dip again for softer lines.
- Once satisfied, rinse in clean water until water runs clear. Soak in soda ash solution for colorfastness if required by dye directions.
- Hang on a wooden dowel to dry away from direct sunlight for at least 6 hours.
- Heat-set if dye instructions recommend (some require ironing or dryer).
How to Serve It
- Hang on a simple metal rod for modern contrast.
- Steam lightly to remove wrinkles before hanging.
- Store extra panels in a breathable fabric storage bag.
- Swap dye colors by season for an easy refresh.
- Pair with a textured throw and a plant in a painted terracotta pot.
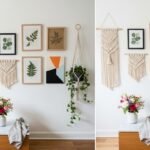
5. DIY Gallery Ledge Styling (Floating Shelf Recipe)
Gallery ledges allow art to look curated like a gallery wall without hammering multiple holes. Building a shallow ledge gives you flexibility to layer frames and decorative objects. The finished piece looks custom and tight-lined.
Ingredients
- 1 pine board, 8 ft x 4 inches x 3/4 inch
- 1 piece 1×2 pine, 8 ft
- 1/2 cup wood glue
- 8 finishing nails
- 1 small bottle wood filler
- 1 can semi-gloss paint or stain
- 2 corner brackets + screws
- 4 wall anchors (suitable for drywall)
- 1 measuring tape
- 1 pencil
- 1 sanding block (120 grit)
- 1 paintbrush
Instructions
- Cut the 8-ft pine board to desired lengths (two 24-inch ledges recommended).
- Glue the 1×2 to the back edge of the board to create a small lip. Clamp and allow to set 30 minutes.
- Nail the pieces together with finishing nails every 6 inches. Fill holes with wood filler; sand smooth after drying.
- Paint or stain the ledge with two thin coats. Dry 1 hour between coats.
- Mount using corner brackets and wall anchors. Use a level to ensure straight placement.
- Let paint cure 24 hours before styling.
How to Serve It
- Lean frames of varying sizes, layer a small ceramic vase, and add a plant.
- Use picture hanging strips for lighter items.
- Rotate art seasonally without rehanging.
- Store spare frames flat in an art portfolio case.
- Works beautifully above a low console or in a hallway.
6. Rope-Wrapped Decorative Tray

Rope adds texture and a coastal-meets-modern vibe. Wrapping a simple tray creates a tactile, upscale look that pairs well with brass or ceramic accessories. The finished tray is sturdy and perfect for entertaining.
Ingredients
- 1 round wooden tray (12-inch)
- 10 ft natural sisal rope (1/2-inch)
- 1/4 cup wood glue
- 1 hot glue gun (low-temp recommended)
- 1 pair scissors
- 4 metal decorative tacks (optional)
- 1 small paintbrush
- 1 can clear matte sealer
- 2 felt pads (for bottom)
Instructions
- Clean tray and lightly sand rim. Mark start point.
- Apply a line of wood glue along a 6-inch section and press rope into glue. Continue wrapping rope snugly, adding small dabs of hot glue every 2 inches for instant hold.
- When you reach the end, tuck the rope underneath the last wrap and secure with a glue dot. Hammer in decorative tacks if desired.
- Brush a light coat of clear matte sealer over rope to help it shed dust. Let dry 1 hour.
- Attach felt pads for surface protection.
How to Serve It
- Style with candles, a stack of coasters, and a small plant.
- Store flat in a closet or upright on a shelf with a tray organizer.
- Clean with a dry brush to remove dust.
- Great as a centerpiece for seasonal swaps.
7. Faux Limestone Planter Makeover
Make basic terracotta read like carved stone with paint and texture. The finish has a soft, weathered look that reads high-end. This technique works on ceramic and concrete planters too.
Ingredients
- 1 terracotta planter (12-inch)
- 1 cup primer (multi-surface)
- 1 cup acrylic paint (ivory)
- 1/2 cup gray acrylic paint
- 1 tbsp brown wash (diluted acrylic)
- 1 natural sea sponge
- 1 foam brush
- 1 small bowl for mixing
- 1 soft cloth
- 1 can matte sealer
- 1 plant and potting mix (as desired)
Instructions
- Clean planter and prime with multi-surface primer. Let dry 1 hour.
- Base coat with ivory acrylic using foam brush. Dry 30 minutes.
- Dab sea sponge into gray paint and lightly stipple for mottled limestone texture. Work in layers.
- Use a diluted brown wash to accent pores and crevices; wipe off excess with soft cloth.
- After 1 hour drying, spray or brush on a matte sealer for protection.
- Replant with your favorite leafy plant and fresh potting mix.
How to Serve It
- Place on a wooden pedestal or woven mat for contrast.
- Water carefully; place a saucer underneath to catch runoff.
- Store extra planters stacked with felt separators.
- Consider grouping planters in odd numbers for a curated look.
8. Elevated Book Stack with Leather Strap
Stacked books anchored with a leather strap feel editorial and intentional. It’s an inexpensive way to look curated — especially when paired with a small vase or sculptural object.
Ingredients
- 6 hardcover books (varied neutral covers)
- 1 leather belt or 2 yards veg-tanned leather strap
- 2 rivets + rivet setter (optional)
- 1 small leather punch
- 1 soft cloth
- 1 small decorative object (ceramic or brass)
- 1 measuring tape
- 1 small brush for dusting
Instructions
- Clean books and select a centerpiece book for the top.
- Stack books in descending size order.
- Measure and cut leather strap to wrap snugly twice around the stack.
- Punch holes and secure with rivets or knot the strap neatly underneath.
- Place decorative object on top to weigh the stack and add interest.
How to Serve It
- Use the stack as a base for candles or a tray.
- Store out-of-season books in a book box to rotate looks.
- Refresh the strap color seasonally for a quick change.
- Works well on consoles, coffee tables, or bedside tables.
9. Gold-Leaf Candle Holders

Gold leaf adds luxury to simple glass votives. Done irregularly, it looks curated rather than fussy. The flicker of candlelight through the gilding creates warm, layered glow.
Ingredients
- 6 glass votive holders
- 1 book of gold leaf sheets
- 1/4 cup gilding adhesive (size)
- 1 soft gilding brush
- 1 small sealant (clear matte)
- 1 small foam brush
- 1 lint-free cloth
- 6 tea lights (unscented)
- 1 small bowl for adhesive
- 1 pair tweezers
Instructions
- Clean glass with alcohol and dry.
- Apply a thin layer of gilding adhesive where you want the leaf to stick. Wait until tacky (per adhesive directions, usually 10–15 minutes).
- Carefully lift a gold leaf with tweezers and press onto tacky adhesive. Use brush to smooth and remove excess.
- Seal gently with a clear matte sealant spray from 8–10 inches away. Let dry 30 minutes.
- Insert a tea light and enjoy the warm glow.
How to Serve It
- Cluster votives on a marble tray or mirrored surface for extra sparkle.
- Store spare leaf sheets flat in a craft organizer.
- Trim gilding edges with a sharp blade for a neat line.
- Perfect for dinner parties or mantle styling.
10. Simple Velvet Headboard (Tuft-Free)
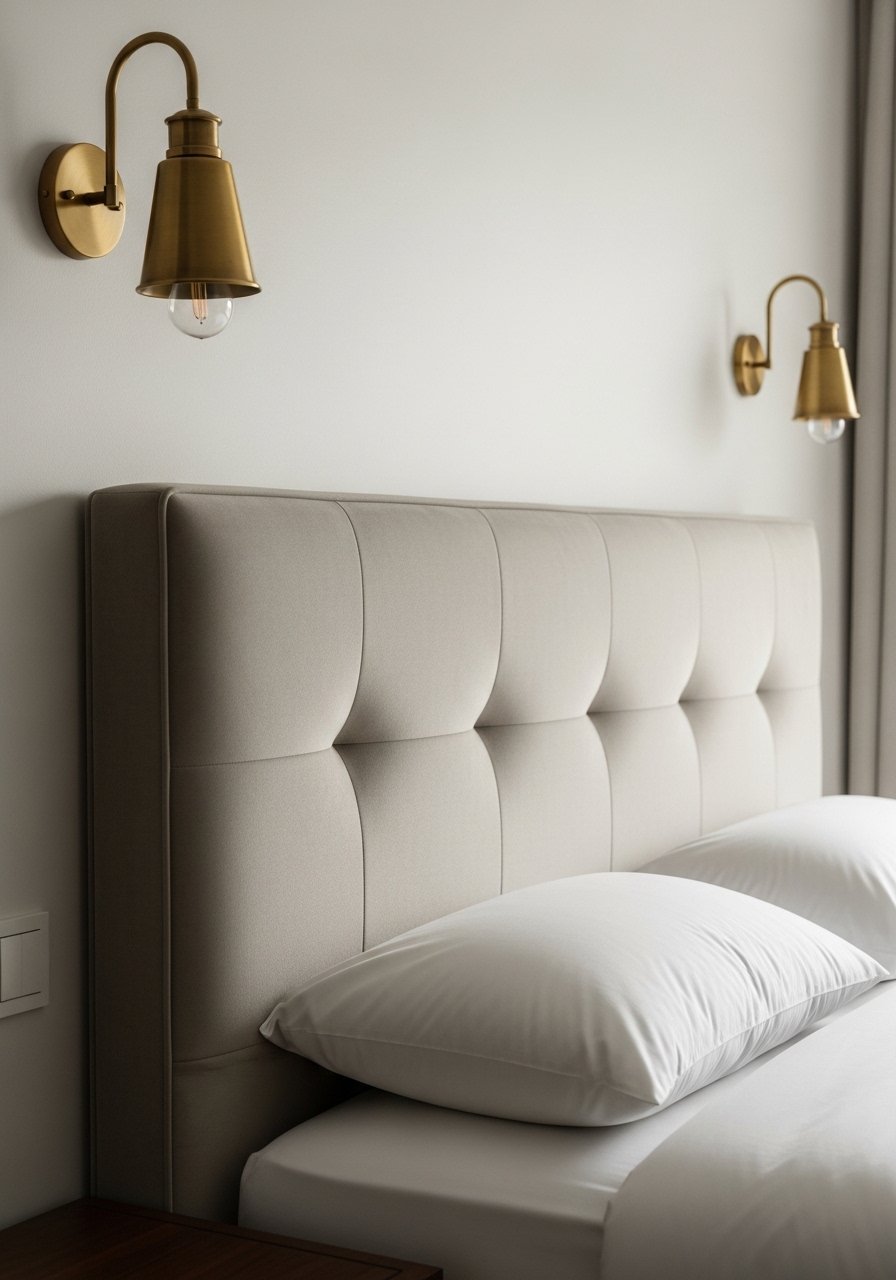
A velvet headboard creates a hotel-room feel for far less. This tuft-free version is streamlined and modern. The result is plush, tactile, and anchors your bedroom with minimal fuss.
Ingredients
- 1 MDF board, cut to headboard size (approx. 60 x 30 inches)
- 2 yards velvet upholstery fabric (extra for stapling)
- 2 inches high-density foam (60 x 30 inches)
- 1 roll batting (60 x 30)
- 1 box heavy-duty staples (1/2 inch)
- 1 electric staple gun
- 1 measuring tape
- 1 can wall-mounting brackets (stand-off style)
- 1 screwdriver
- 1 decorative nail trim (optional)
Instructions
- Cut foam to match MDF board. Lay batting then foam over board.
- Center velvet fabric over foam and staple fabric to the back of the board, pulling taut but not distorted.
- Fold corners neatly and staple. Add decorative nail trim if desired.
- Attach wall-mounting brackets per package instructions. Hang on pre-measured spots above bed.
- Let fabric settle 24 hours before styling the bed.
How to Serve It
- Pair with crisp white linens and a few textured pillows.
- Use an adjustable bed riser if you want added storage below.
- Spot clean with upholstery cleaner; vacuum regularly with a soft brush.
- Works with both slat beds and platform frames.
11. Woven Wall Hanging (Budget Boho)
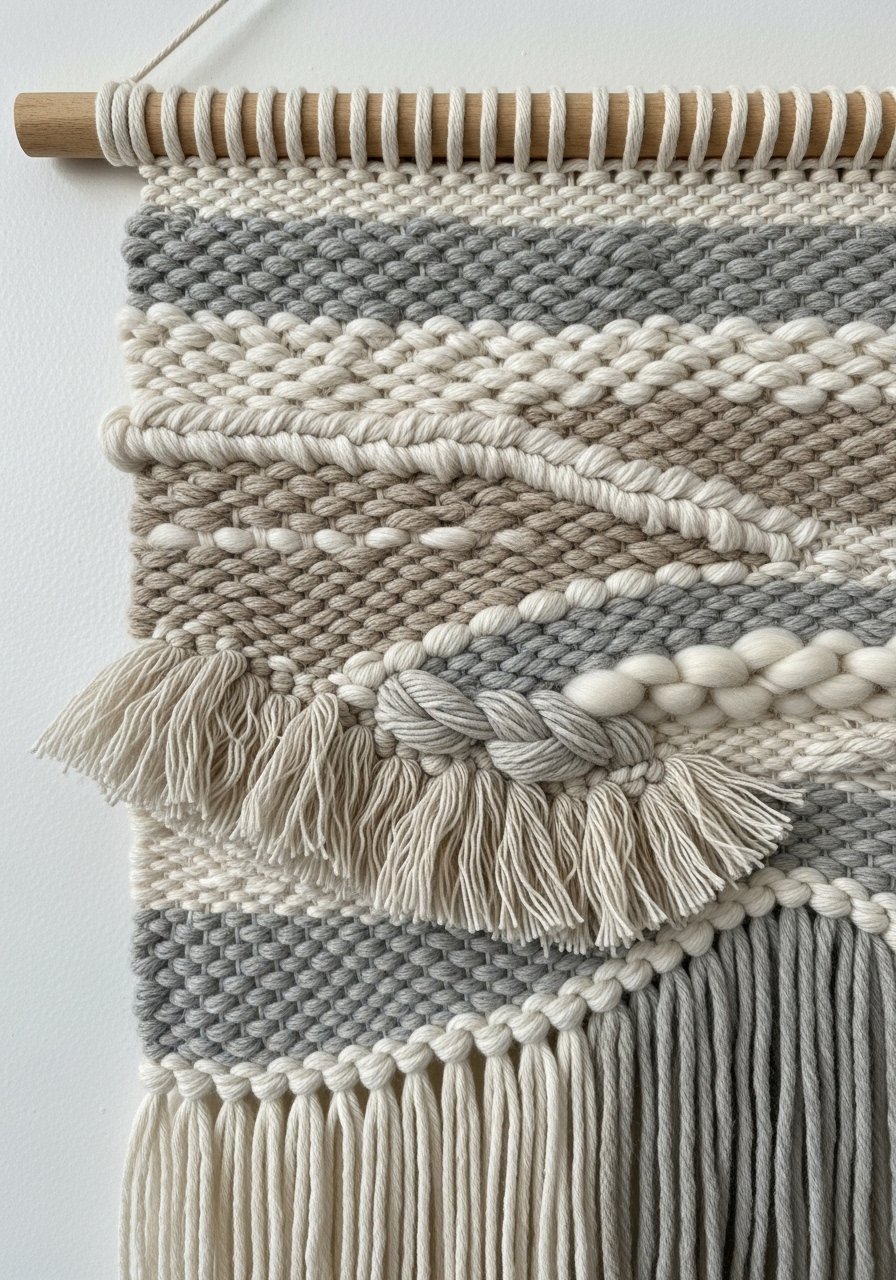
A woven wall hanging adds warmth and texture. This easy pattern focuses on color blocking and fringe, giving a boutique look even at a small scale. Perfect for apartments or renters.
Ingredients
- 1 wooden dowel (24-inch)
- 5 skeins of chunky yarn (neutral tones)
- 1 small skein of accent color
- 1 warp thread cotton (for loom)
- 1 cardboard loom (or homemade)
- 1 wooden tapestry needle
- 1 pair scissors
- 1 measuring tape
- 1 comb or fork (to pack weft tightly)
- 1 twist hemp cord (for hanging)
Instructions
- Set up warp on cardboard loom per measurements, leaving 2 inches extra.
- Weave in chunky yarn using plain weave and add accent color blocks.
- For texture, add rya knots and loops intermittently.
- Once complete, remove from loom and knot warp ends to secure.
- Trim fringe to desired length and attach to dowel. Add hanging cord.
How to Serve It
- Hang above a console or bed for a cozy focal point.
- Store braided with tissue paper in a garment bag.
- Swap accent colors seasonally for fresh looks.
- Combine with a potted plant and brass details for a curated vignette.
12. Framed Fabric Art — Affordable Home Decor Wall Panels
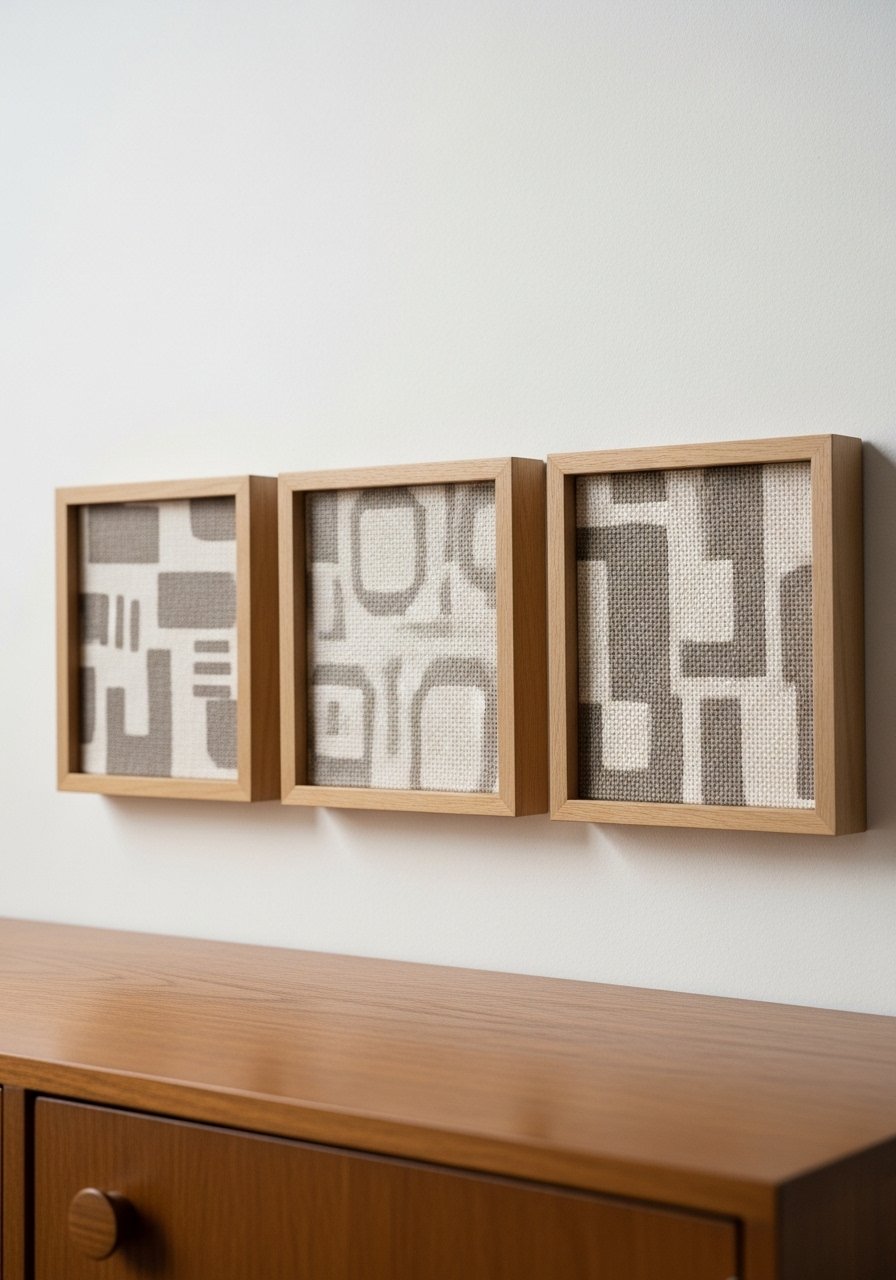
Framed fabric looks like expensive art for much less. Use printed linen or vintage scarves stretched in simple frames to create a cohesive gallery. It’s quick, bold, and budget-friendly.
Ingredients
- 3 picture frames (8 x 10 inch)
- 3 fabric swatches (9 x 11 inch each)
- 1 small utility knife
- 1 ruler
- 1 spray adhesive (fabric-safe)
- 1 foam brush
- 1 backing board (cut to fit frames)
- 1 hanging hardware kit (for each frame)
- 1 lint roller
- 1 soft cloth
Instructions
- Remove the glass from frames (if present), and clean frames.
- Cut fabric 1 inch larger than frame backing. Iron flat.
- Spray a light coat of spray adhesive on backing board; center fabric and smooth with cloth.
- Fold fabric edges over backing and secure with small dabs of glue or tape.
- Reassemble frames without glass for dimensional fabric texture.
- Mount with hanging hardware and level on the wall.
How to Serve It
- Group in a horizontal line above a console or in a powder room.
- Store extra fabric panels flat in a portfolio folder.
- Change fabrics seasonally for a fresh palette.
- Mix framed fabric art with small mirrors for contrast.
13. Repurposed Ladder Shelf

An old ladder becomes a functional shelf with a few boards and brackets. The rustic look pairs well with modern decor and provides quick, vertical storage.
Ingredients
- 1 wooden ladder (leaning type, cleaned)
- 3 pine boards (varied lengths to rest on rungs)
- 6 L-brackets
- 12 screws (wood)
- 1 drill
- 1 measuring tape
- 1 sanding sponge
- 1 can wood stain or paint
- 4 felt pads
Instructions
- Sand ladder rungs and boards; stain or paint to match your palette.
- Place boards across rungs and secure with L-brackets underneath.
- Attach felt pads to the bottom to protect floors.
- Lean ladder securely against the wall, anchoring at the top if desired.
How to Serve It
- Style with folded throws, books, and small plants.
- Store seasonal throws in a woven basket on the bottom shelf.
- Keep ladder away from high-traffic areas to avoid knocks.
- Great in entryways, bathrooms, or as towel storage.
14. Upcycled Ceramic Planters — Two-Tone Finish
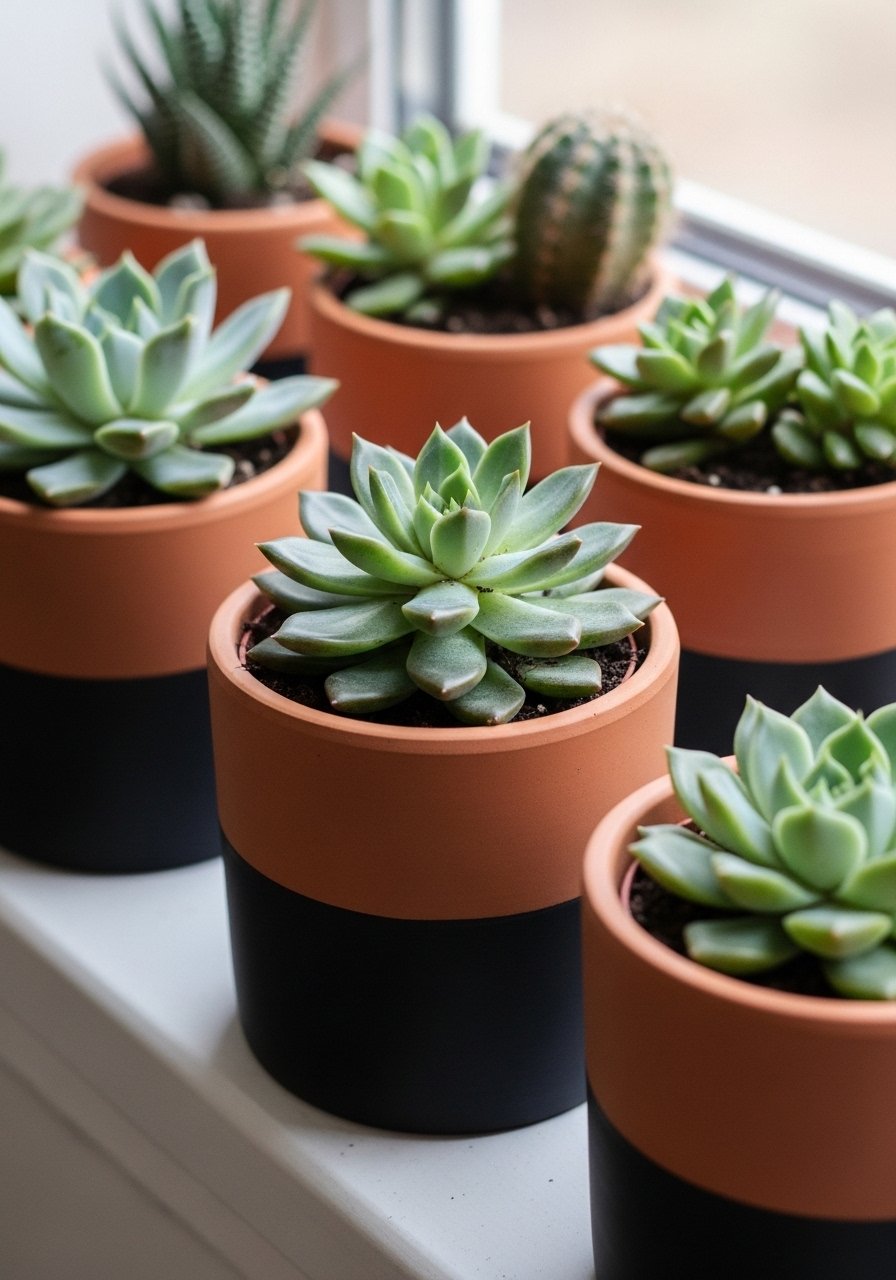
Freshen inexpensive ceramic pots with a modern two-tone paint job. The contrast creates depth and some sculptural quality, giving planters that boutique look.
Ingredients
- 4 small ceramic planters
- 1/2 cup chalk paint (matte black)
- 1/2 cup terracotta acrylic paint
- 1 foam brush
- 1 roll painter’s tape
- 1 cup potting mix
- 4 small succulents
- 1 can clear matte sealer
- 1 small bowl for paint
- 1 soft cloth
Instructions
- Clean and sand planters lightly. Tape off center line for a crisp two-tone edge.
- Paint bottom half matte black and top half terracotta. Let dry 30 minutes.
- Apply sealer to protect finish. Dry 1 hour.
- Fill with potting mix and plant succulents.
How to Serve It
- Group planters in odd numbers on a windowsill or shelf.
- Store extra pots stacked with protective separators.
- Water sparingly; succulents prefer well-drained soil.
- These make great gifts—wrap in tissue and a ribbon.
15. Decorative Rope Mirror Frame
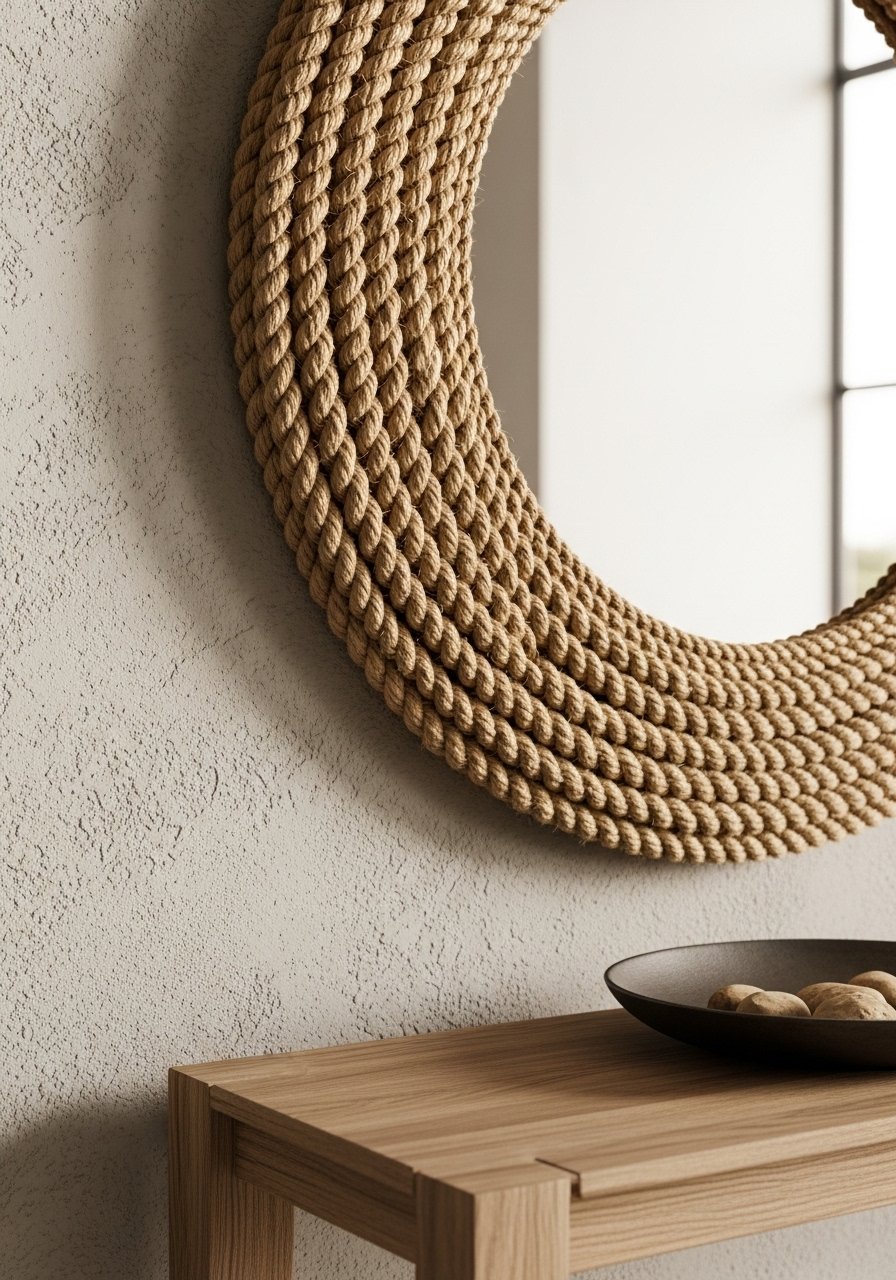
A simple round mirror becomes a feature when wrapped with rope. The tactile edge adds visual weight and pairs beautifully with coastal or neutral schemes.
Ingredients
- 1 round mirror (16-inch)
- 15 ft natural jute rope (3/4-inch)
- 1 tube strong adhesive (mirror-safe)
- 1 caulk gun
- 1 scissors
- 1 soft cloth
- 2 D-ring hangers + screws
- 1 measuring tape
Instructions
- Clean mirror edge and measure rope length for full coverage.
- Apply adhesive in a spiral, pressing rope into place. Work in sections.
- Finish end under a loop for a seamless look and let glue cure 24 hours.
- Attach D-ring hangers to back and hang securely.
How to Serve It
- Hang above a console or in an entryway to reflect light.
- Store spare rope in a craft bin.
- Combine with a small tray and bowl on the console for keys.
- Avoid hanging over heat sources or moisture.
16. Painted Console Table Makeover
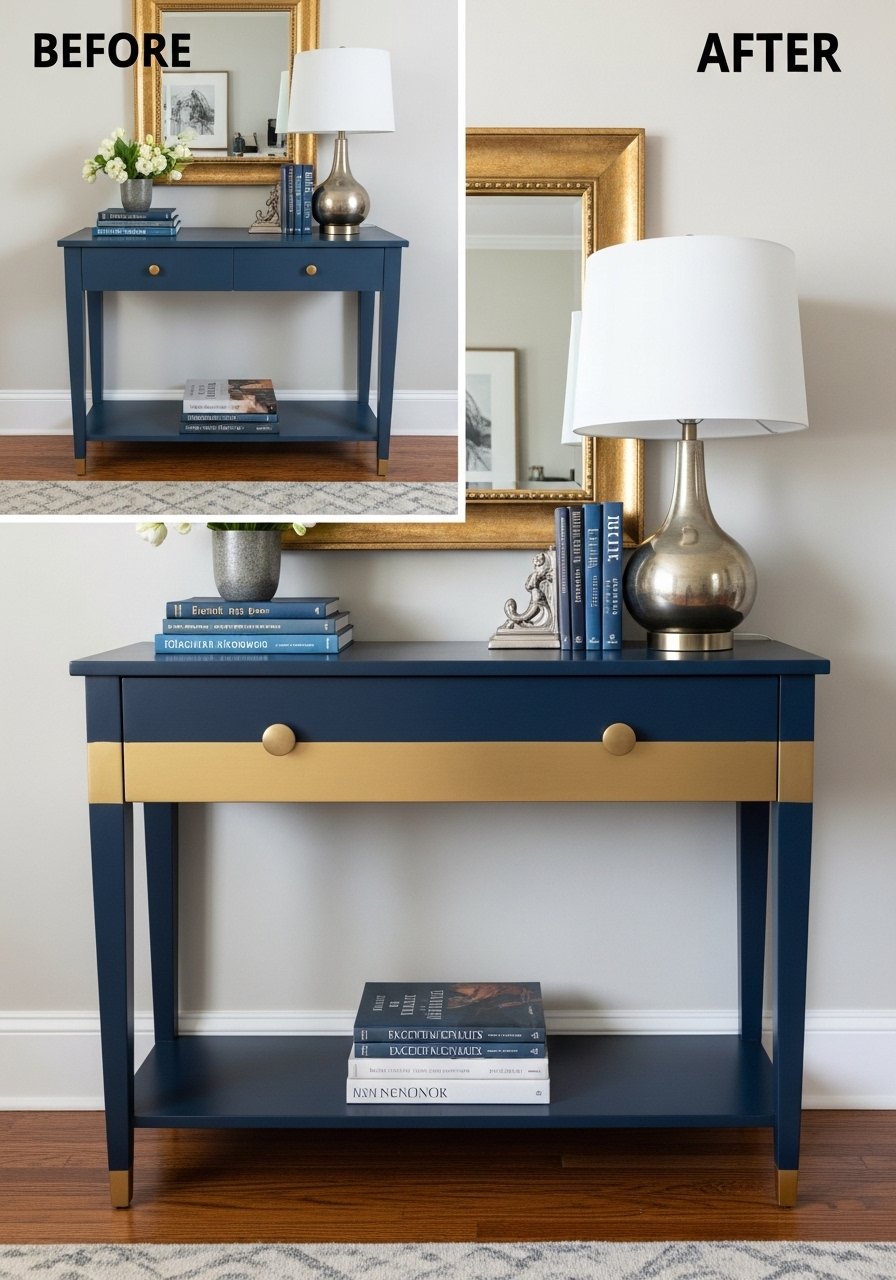
A fresh coat of paint can make a basic console read designer. Choose a deep, grounding color and add a metallic trim for sophistication. This is a quick weekend update.
Ingredients
- 1 console table
- 1 quart primer (bonding)
- 1 quart paint (eggshell or satin, deep navy)
- 1/4 cup metallic gold paint
- 2 small paintbrushes (one angled for trim)
- 1 foam roller
- 1 sanding sponge (fine grit)
- 1 painter’s tape roll
- 1 drop cloth
- 1 can clear topcoat
Instructions
- Clean and sand the table lightly. Tape off areas that won’t be painted.
- Prime table with bonding primer. Dry 1 hour.
- Apply two coats of navy paint with foam roller for smooth finish; dry 1 hour between coats.
- Use angled brush to paint bottom trim with metallic gold. Touch up edges.
- Apply clear topcoat for durability and let cure 24 hours.
How to Serve It
- Style with a lamp, a stack of books, and a small vase.
- Place on a console runner rug to define the zone.
- For high-use surfaces, add felt pads under objects to prevent scratches.
- Works great in entryways or behind sofas.
17. Upholstered Dining Chair Seat Swap

Reupholstering dining seats changes the feel of a room without replacing chairs. Bouclé or velvet instantly reads luxe. The process is straightforward and can be done in an afternoon.
Ingredients
- 4 dining chair seats (removeable)
- 1.5 yards upholstery fabric (bouclé or velvet)
- 1/2 inch high-density foam (if replacing padding)
- 1 batting sheet
- 1 heavy-duty staple gun + staples
- 1 screwdriver (to remove seats)
- 1 measuring tape
- 1 scissors
- 1 upholstery needle and thread (for piping, optional)
Instructions
- Remove seat from chair and measure.
- Replace foam if needed and cover with batting.
- Center fabric over seat, pull taut, and staple under the seat, folding corners neatly.
- Trim excess fabric and reattach seat to chair.
- Repeat for remaining chairs.
How to Serve It
- Pair with a neutral table runner and a centerpiece.
- Store extra fabric in a fabric storage bin.
- Spot clean according to fabric care.
- For extra durability, add a removable slipcover.
18. Pressed-Flower Resin Coasters
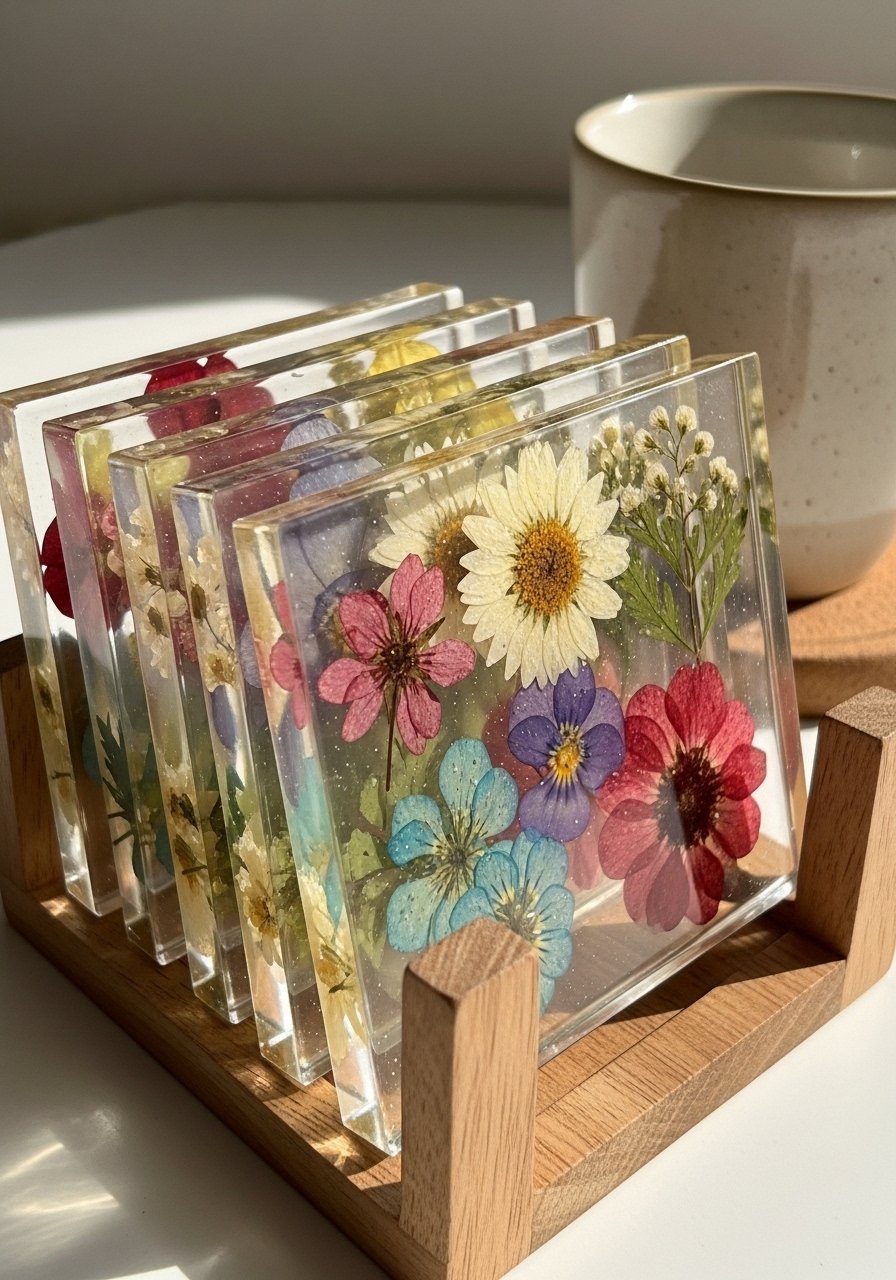
Transparent resin preserves pressed flowers for elegant coasters. The finished pieces look like boutique finds and make thoughtful gifts. Work in a well-ventilated area and use measured resin mixes.
Ingredients
- 4 silicone coaster molds (4-inch)
- 1 kit epoxy resin (measured 1:1 by volume)
- Assorted pressed flowers (flattened and dry)
- 1 disposable mixing cup
- 1 wooden stirring stick
- 1 small torch or heat gun (for bubbles)
- 1 pair nitrile gloves
- 1 measuring cup (for resin)
- 1 soft cloth
- 1 small funnel (optional)
Instructions
- Ensure pressed flowers are completely dry.
- Mix epoxy resin per kit instructions in a disposable cup (measure accurately).
- Pour a thin base layer (~1/8 inch) into molds; place flowers carefully using tweezers.
- Pour remaining resin to desired thickness. Use torch to remove surface bubbles.
- Cure per kit instructions (usually 24–48 hours). Lightly sand edges if needed.
How to Serve It
- Use as coasters or small decorative trays for candles.
- Store stacked in a soft pouch to prevent scratches.
- Clean with a damp cloth; avoid harsh chemicals.
- These make lovely hostess gifts—wrap in tissue paper.
19. Monogrammed Doormat
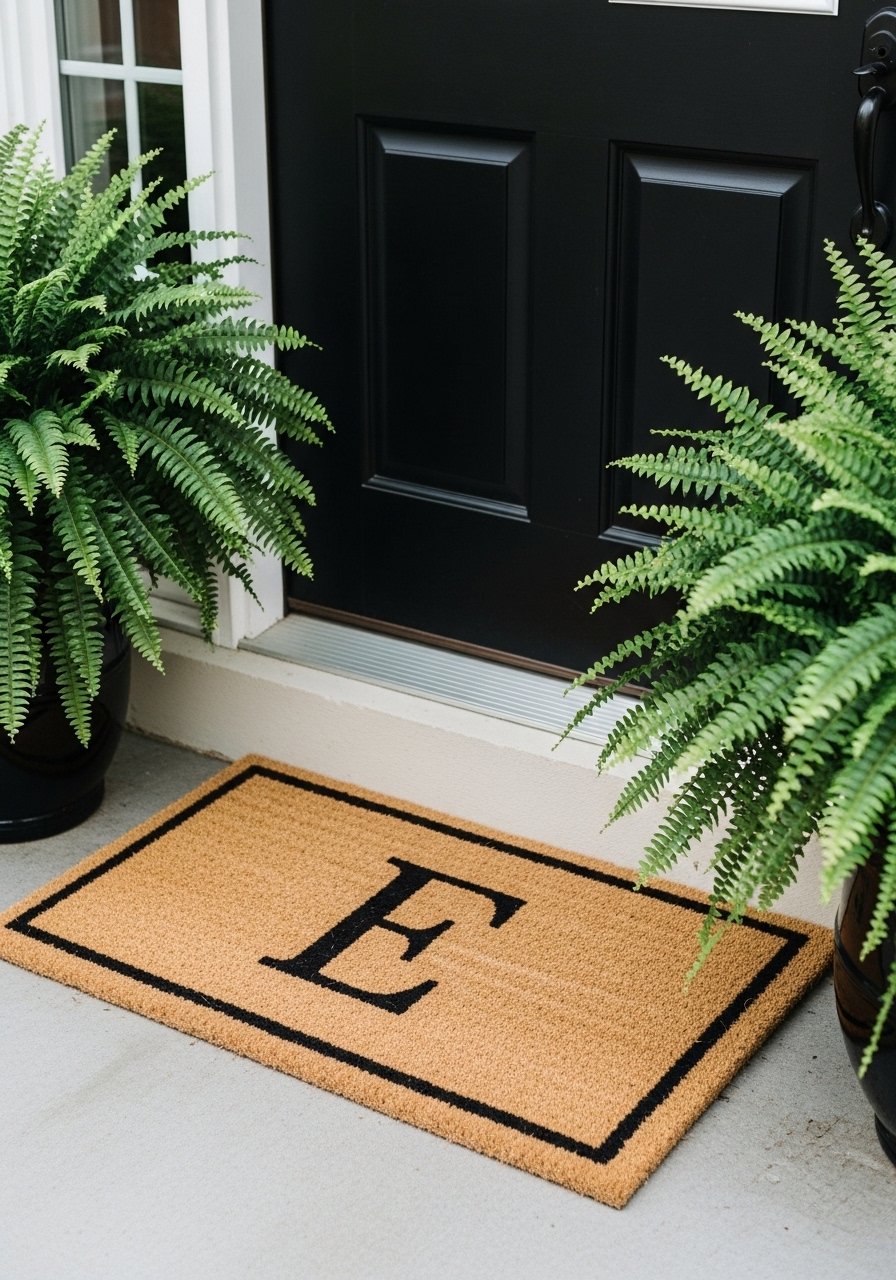
A custom-looking doormat is an easy upgrade. Stenciled monograms make the entry feel considered and personalized. Use outdoor-rated paint for longevity.
Ingredients
- 1 coir doormat (18 x 30 inch)
- 1 stencil letter (12-inch)
- 1/2 cup outdoor acrylic paint (black or dark gray)
- 1 sponge brush
- 1 roll painter’s tape
- 1 small bowl for paint
- 1 measuring tape
- 1 soft cloth
Instructions
- Place mat flat and center stencil using painter’s tape.
- Dab paint lightly with sponge brush; avoid heavy globs.
- Remove stencil carefully while paint is still tacky.
- Let dry 2–3 hours before placing at the door.
How to Serve It
- Place with a durable welcome tray and a seasonal wreath.
- For cleaning, shake and spot clean with mild soap and water.
- Store spare mats flat in a garage organizer.
- Great for rental properties—swap designs easily.
20. Gallery Tray for Entry Styling — Affordable Home Decor Organizer
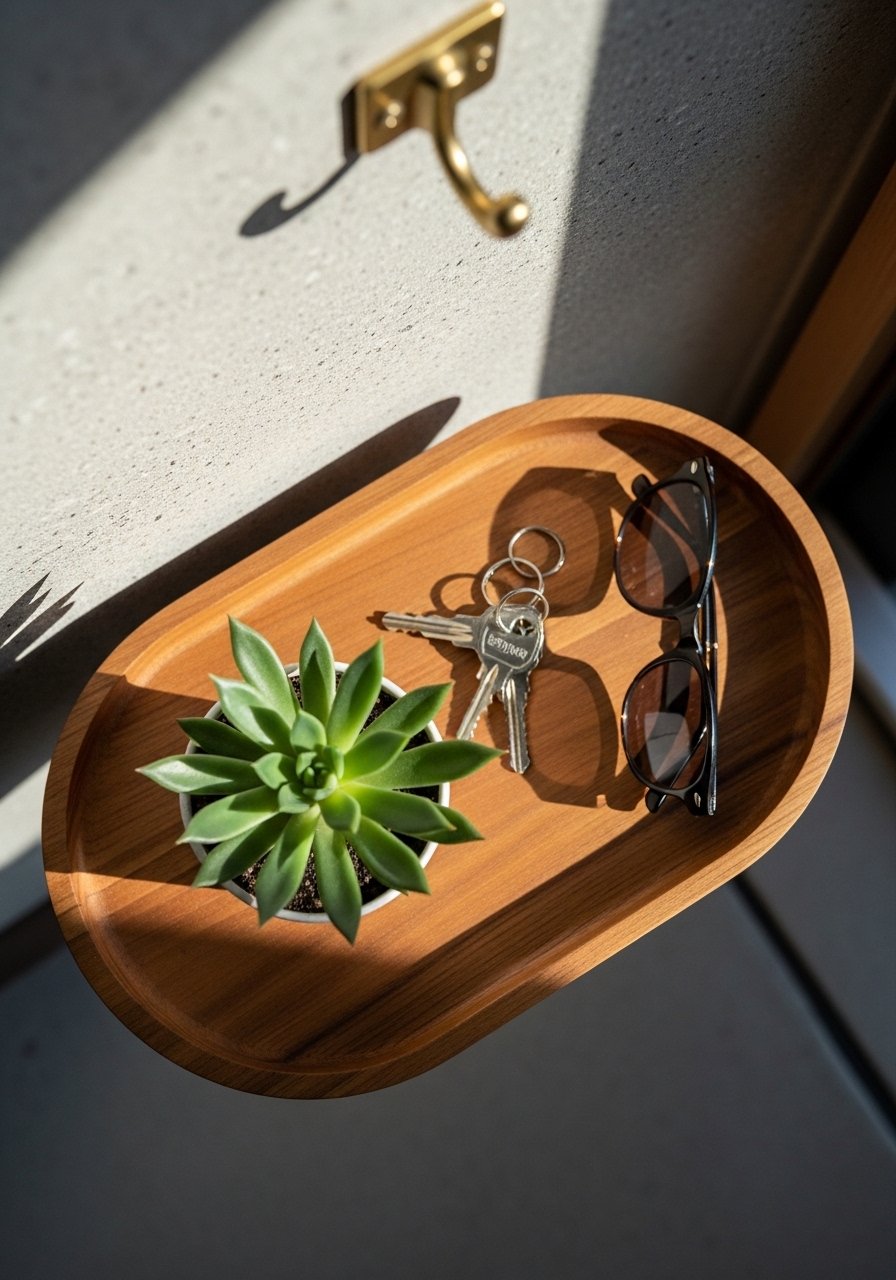
Create a small “drop zone” with a beautiful tray to avoid clutter. A simple wooden tray plus a few bowls looks sophisticated and corralled. It’s a functional decoration that keeps counters tidy.
Ingredients
- 1 oval wooden tray (12 x 8 inch)
- 1 small ceramic bowl
- 1 set brass key hooks (3 hooks)
- 1 adhesive felt pad strip
- 1 small faux succulent
- 1 can clear matte sealer
- 1 soft cloth
- 1 measuring tape
- 1 decorative bowl (for mail)
Instructions
- Place tray near the door, add ceramic bowl for coins and a small bowl for sunglasses.
- Mount brass key hooks nearby for hanging keys.
- Add a faux succulent for texture and a clear sealer on wood if high traffic is expected.
- Arrange items in small groups for a tidy look.
How to Serve It
- Keep a set of spare keys in a small valet dish.
- Store seasonal items in a nearby basket to rotate.
- This tray is ideal for small entryways and works with hooks or a small console.
21. Beaded Chandelier Cover (Softened Lighting)
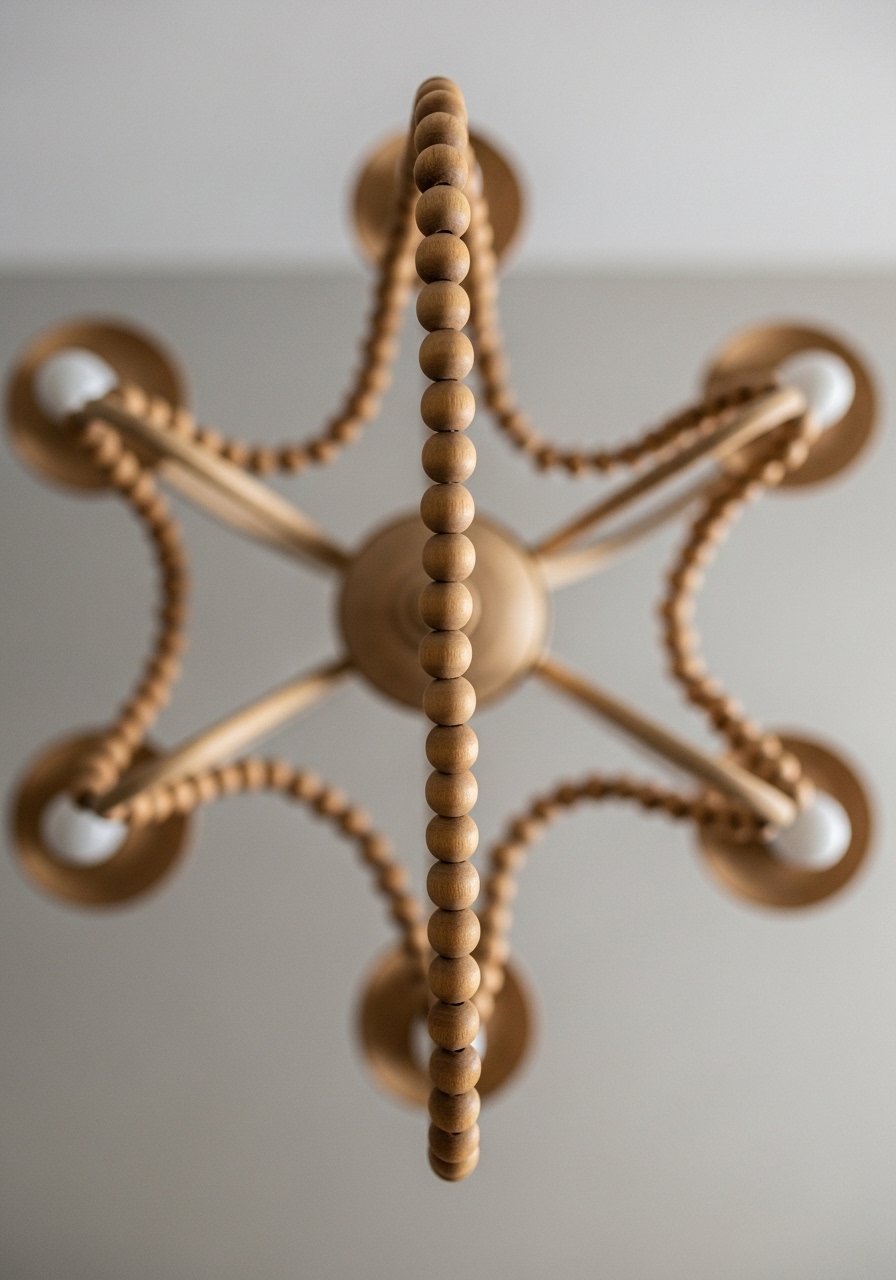
Softening an old light fixture with beads updates the look without rewiring. The beads add warmth and diffuse light beautifully. This works well over a dining table or in a bedroom.
Ingredients
- 3 strands wooden beads (60-inch each)
- 1 small length of chain (for hanging, optional)
- 1 set small hooks (for attaching beads)
- 1 soft cloth
- 1 step ladder
- 1 measuring tape
- 1 pair pliers
- 1 pendant light dusting brush
Instructions
- Turn off power and remove light shade if present.
- Drape bead strands across chandelier arms, securing with small hooks.
- Adjust length for balance and symmetry.
- Replace shade if used and restore power.
How to Serve It
- Dust regularly using a feather duster.
- Store spare beads in a craft organizer box.
- Works best with warm LED bulbs for soft ambiance.
- Ideal for creating a cozy dining atmosphere.
22. Rustic Floating Shelves with Hidden Brackets
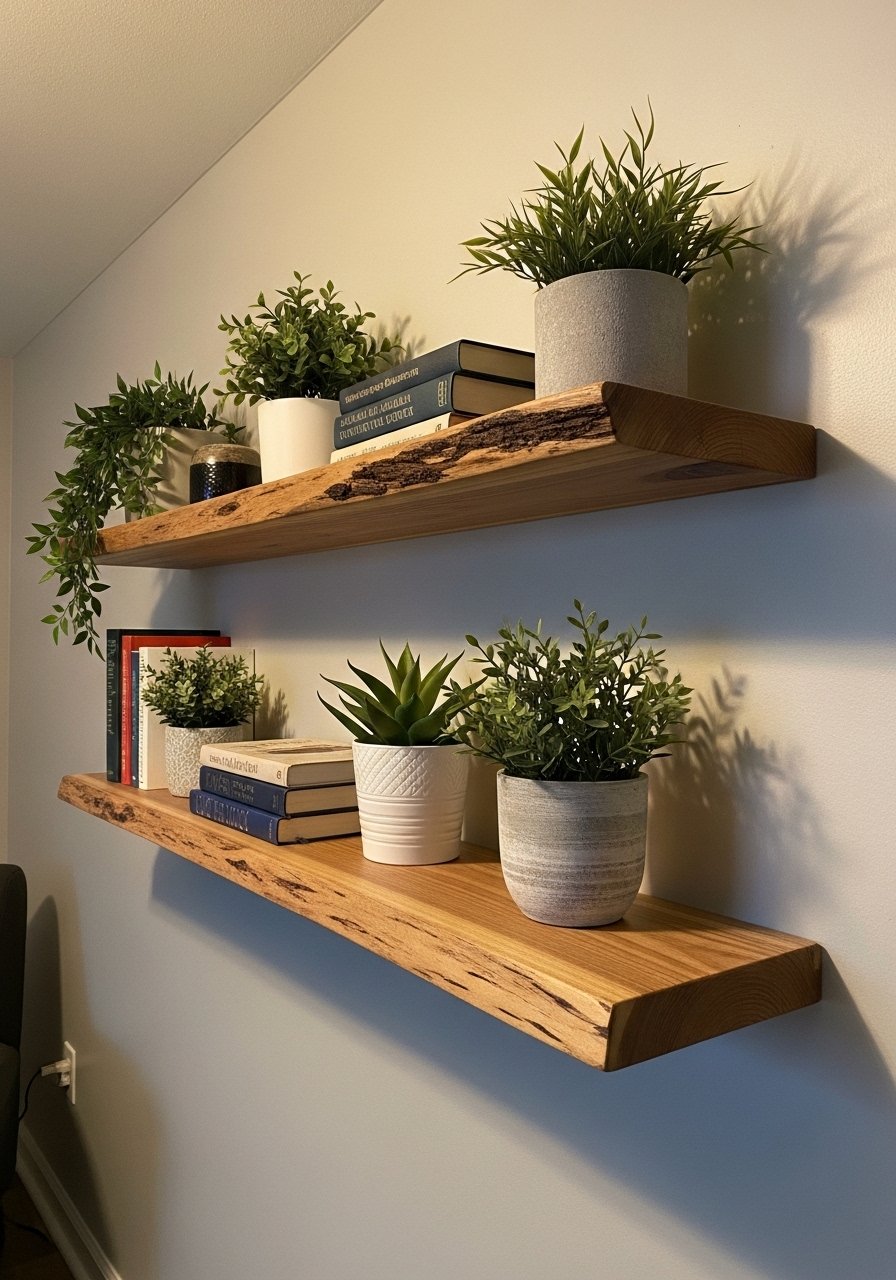
Floating shelves with hidden brackets look custom and declutter surfaces. Live-edge or stained boards give a rustic yet refined look.
Ingredients
- 2 live-edge boards (24 x 8 inch)
- 2 hidden shelf brackets (sized to board depth)
- 8 screws (for brackets)
- 4 wall anchors
- 1 drill
- 1 level
- 1 stain or paint
- 1 cloth for wiping
- 1 can clear polyurethane
Instructions
- Stain or paint boards and apply clear coat; dry 2 hours.
- Install hidden brackets on wall using level and anchors.
- Slide boards onto brackets; secure if bracket includes screws.
- Let set 1 hour before styling.
How to Serve It
- Style with art, ceramics, and small plants.
- Store small items in decorative boxes on the shelves.
- Use Museum putty for fragile items.
- Works in kitchens, bathrooms, and living rooms.
23. Hand-Painted Floorcloth (Budget Rug Alternative)
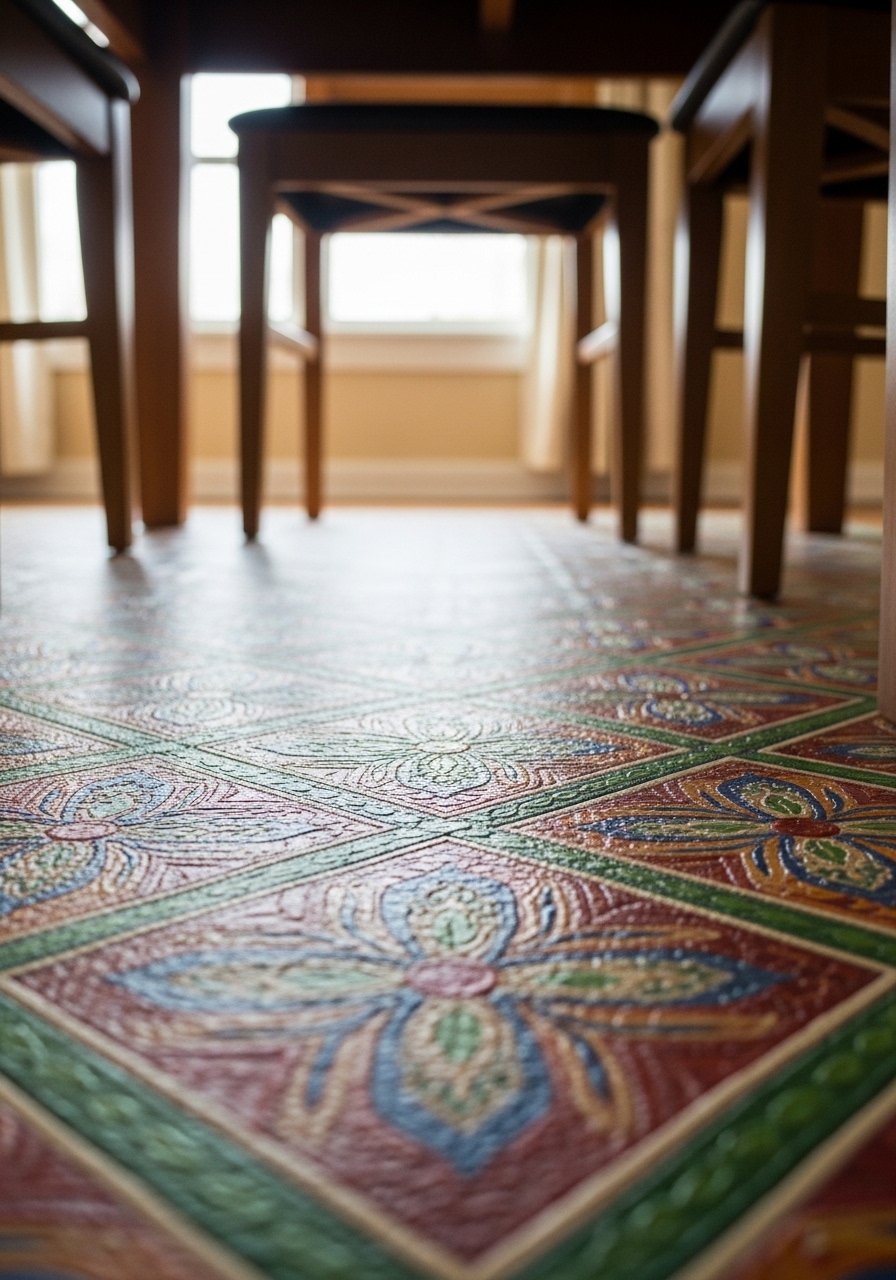
Painted floorcloths create statement rugs at a fraction of the price. Use durable outdoor canvas and marine paint for longevity. They’re perfect for high-traffic areas and easy to clean.
Ingredients
- 1 outdoor canvas drop cloth (4 x 6 ft)
- 1 quart marine or porch-and-patio paint
- 1 quart exterior primer
- 2 paint colors (contrasting)
- 1 foam roller
- 1 measuring tape
- 1 painter’s tape
- 1 can clear exterior sealer
- 1 ruler or straight edge
- 1 pair gloves
Instructions
- Prime the canvas with exterior primer; let dry 2 hours.
- Paint base color evenly and let dry 4 hours.
- Lay out geometric pattern with painter’s tape and fill with accent color.
- Remove tape carefully; let paint cure 24 hours.
- Seal with exterior sealer and allow 48 hours before placing furniture.
How to Serve It
- Use under dining sets, in kids’ rooms, or on covered porches.
- Clean with hose or mild soap for spills.
- Roll and store with stretch wrap for long-term storage.
- Swap for seasonal colors for a fresh look.
24. Macramé Plant Hanger
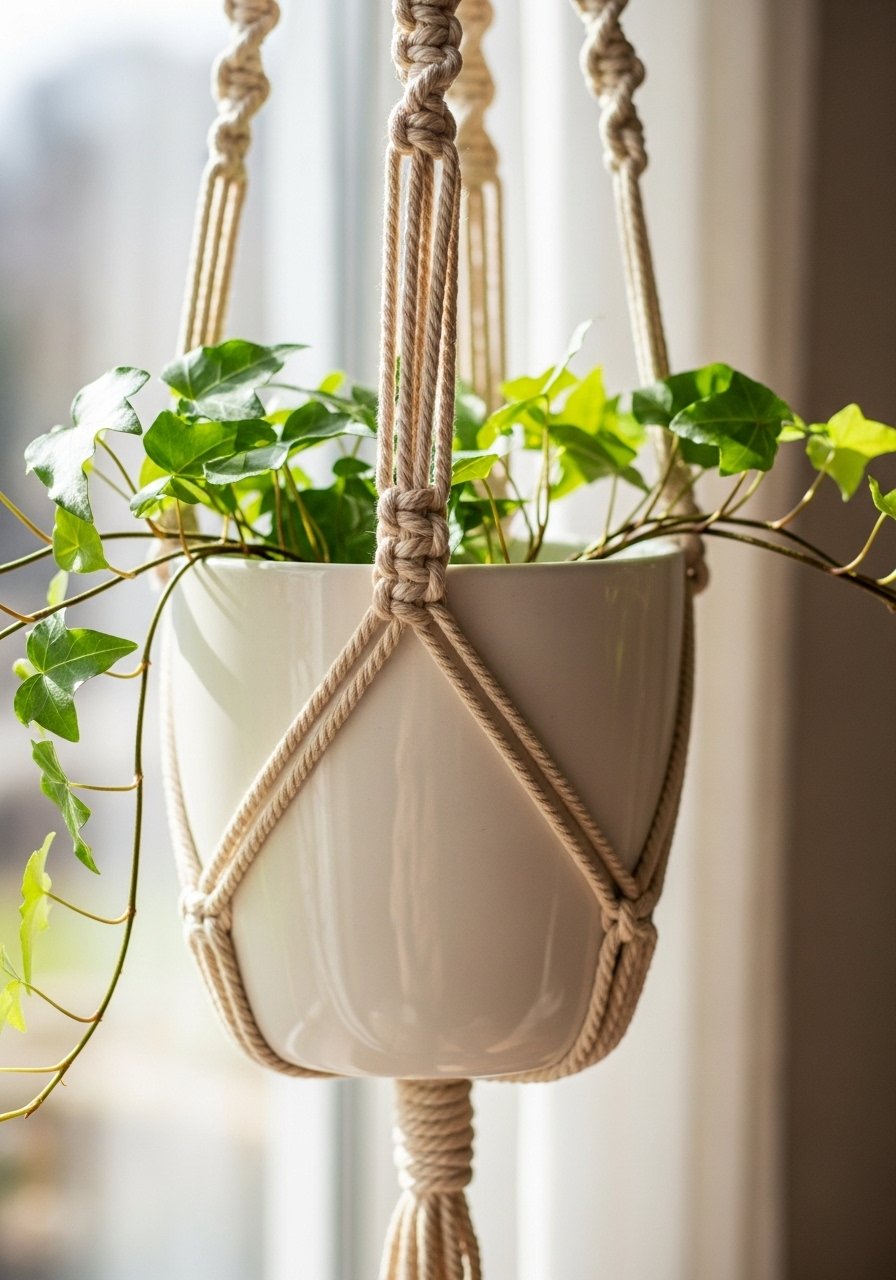
Macramé adds artisan charm without a big expense. A neutral cotton hanger elevates plant displays and brings height into any room.
Ingredients
- 100 ft cotton macramé cord (3mm)
- 1 metal O-ring (2-inch)
- 1 ceramic hanging pot
- 1 measuring tape
- 1 pair scissors
- 1 comb (for tassels)
- 1 wooden dowel (optional for hanging)
Instructions
- Cut 8 cords at 12 feet each. Fold through O-ring and knot.
- Follow square knot and spiral knot sequences to form body.
- Finish with gathering knot and trim tassel to desired length.
- Place pot in hanger and hang near a plant-friendly window.
How to Serve It
- Group several at varied heights for a textured display.
- Store spare cord in a craft tote.
- Rotate plants to ensure even light exposure.
- Works well over shelves or in corners.
25. Stenciled Accent Wall (Peel-and-Stick Friendly)
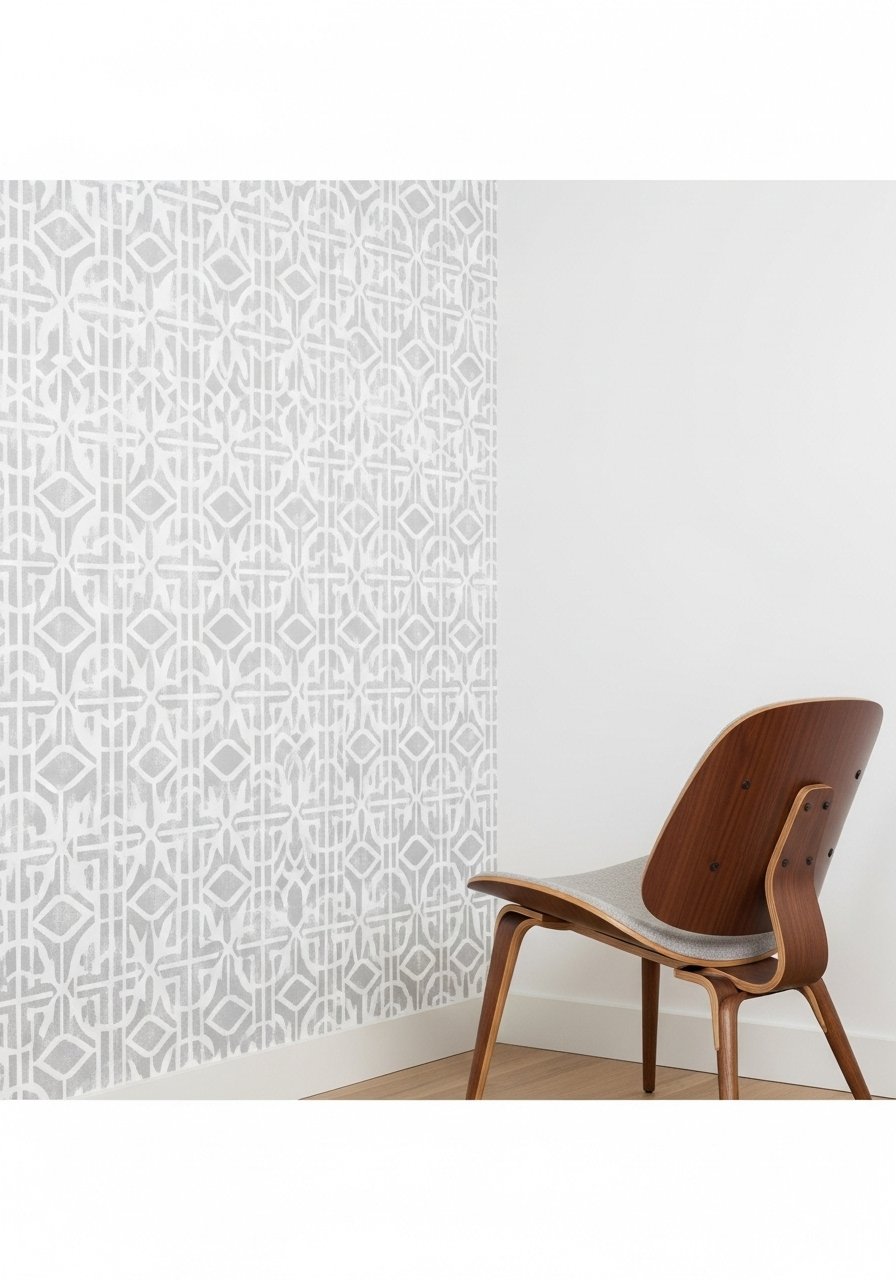
A stenciled accent wall adds pattern and drama for far less than wallpaper. Use a peel-and-stick stencil and removable paint to make it renter-friendly.
Ingredients
- 1 geometric stencil (reusable)
- 1 quart accent wall paint (soft gray)
- 1 small foam roller
- 1 painter’s tape roll
- 1 level
- 1 drop cloth
- 1 measuring tape
- 1 small paint tray
- 1 sponge for touch-ups
Instructions
- Prep wall: clean and repair minor imperfections.
- Position stencil and secure with tape. Use a dabbing motion with foam roller to avoid bleed.
- Move stencil, aligning pattern carefully. Work in sections.
- Touch up small areas with a sponge if bleed occurs.
- Allow paint to dry 2 hours before removing any remaining tape.
How to Serve It
- Pair with minimal furniture to let the pattern shine.
- Store stencil flat in a plastic sleeve.
- This wall works beautifully behind a bed or console.
- For a removable option, use chalk paint that strips easily.
26. Faux Concrete Side Table (Simple Molded Top)
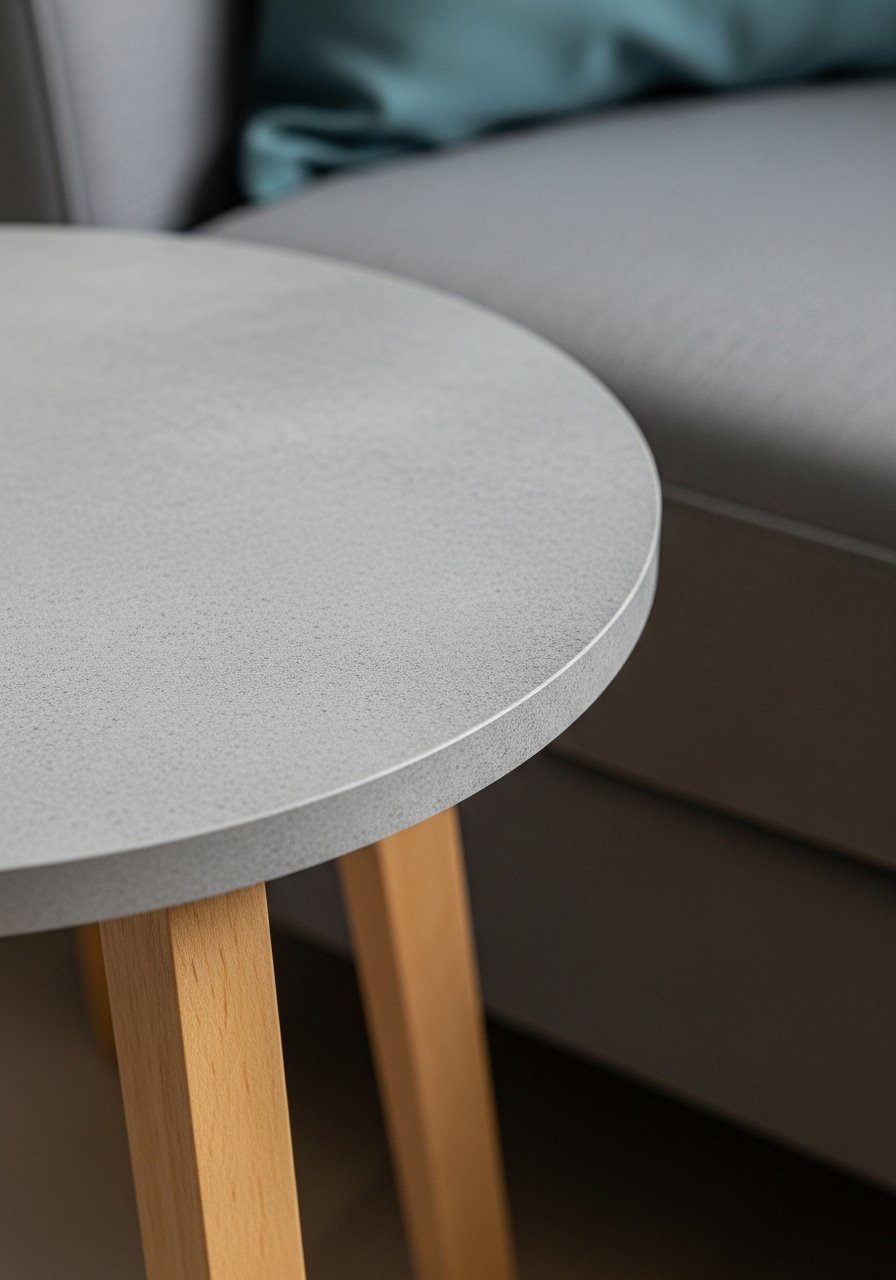
Faux concrete gives industrial polish without the weight. A lightweight MDF top coated with a concrete-style finish looks chic and is easy to handle.
Ingredients
- 1 round MDF tabletop (12-inch)
- 3 wooden hairpin legs
- 1 kit concrete finish (concrete-look paint and texture)
- 1 foam brush
- 1 sanding sponge
- 1 painter’s tape
- 1 clear matte sealer
- 1 screwdriver for leg installation
- 1 soft cloth
Instructions
- Attach hairpin legs to underside of MDF per package instructions.
- Prime the top and apply concrete finish per kit directions, building texture with a trowel or sponge.
- Sand lightly between coats for realism.
- Seal with matte sealer and let cure 24 hours.
How to Serve It
- Use as a side table for drinks or a plant.
- Store extra tables nested or flat with furniture pads.
- Avoid heavy, sharp-impact items on the surface.
- Works well in modern or loft-style rooms.
27. Accent Mirror with Trim Inlay
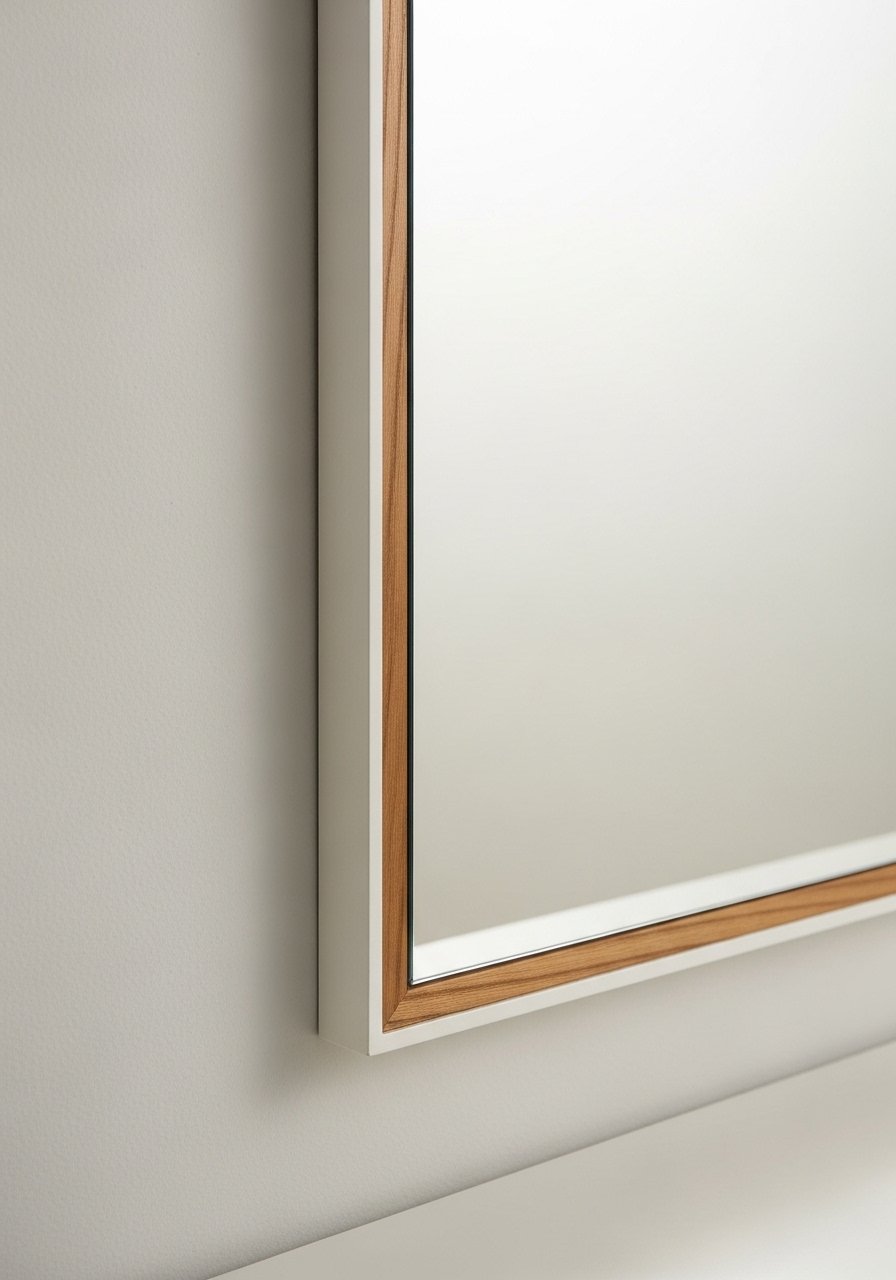
Adding a slim trim to an inexpensive mirror creates depth and a custom frame. Pick a color that ties into room accents for a cohesive look.
Ingredients
- 1 plain mirror (18 x 30 inch)
- 4 strips wood trim (pre-cut)
- 1 tube mirror-safe adhesive
- 1 miter box and saw (for 45-degree cuts) or pre-cut trim
- 1 clamping cloth
- 1 paint sample (accent color)
- 1 small brush
- 1 wall-mount bracket kit
Instructions
- Cut trim to fit and miter corners if needed.
- Paint trim strips and let dry.
- Attach with mirror-safe adhesive and clamp with cloth to avoid marks. Allow 24-hour cure.
- Mount mirror securely per hardware instructions.
How to Serve It
- Lean or hang in entryways and bathrooms.
- Store extra trim in a long storage tube.
- Pair with matching hardware finishes in the room for cohesion.
- Keep away from humid environments unless trim is sealed.
28. Distressed Painted Coffee Table (Chic Patina)
Distressed paint can give a coffee table old-world charm. Use selective sanding for a lived-in patina that reads intentional and cozy.
Ingredients
- 1 coffee table
- 1 quart chalk paint (pale sage)
- 1 small sanding block (120 grit)
- 1 wax for finishing (clear)
- 1 brush for wax
- 1 foam roller for paint
- 1 drop cloth
- 1 painter’s tape
- 1 soft cloth
Instructions
- Clean table and apply one coat of chalk paint. Dry 1 hour.
- Apply a second coat for full coverage.
- Gently sand edges and high points to reveal wood for a distressed look.
- Apply wax with a brush and buff with a soft cloth. Let cure 24 hours.
How to Serve It
- Style with a tray, books, and a small plant.
- Store throws underneath in a woven basket.
- Refresh distressing over time with light sanding and waxing.
- Works well in cottage or eclectic interiors.
29. Entryway Mail & Key Organizer (Budget Built-In Look)
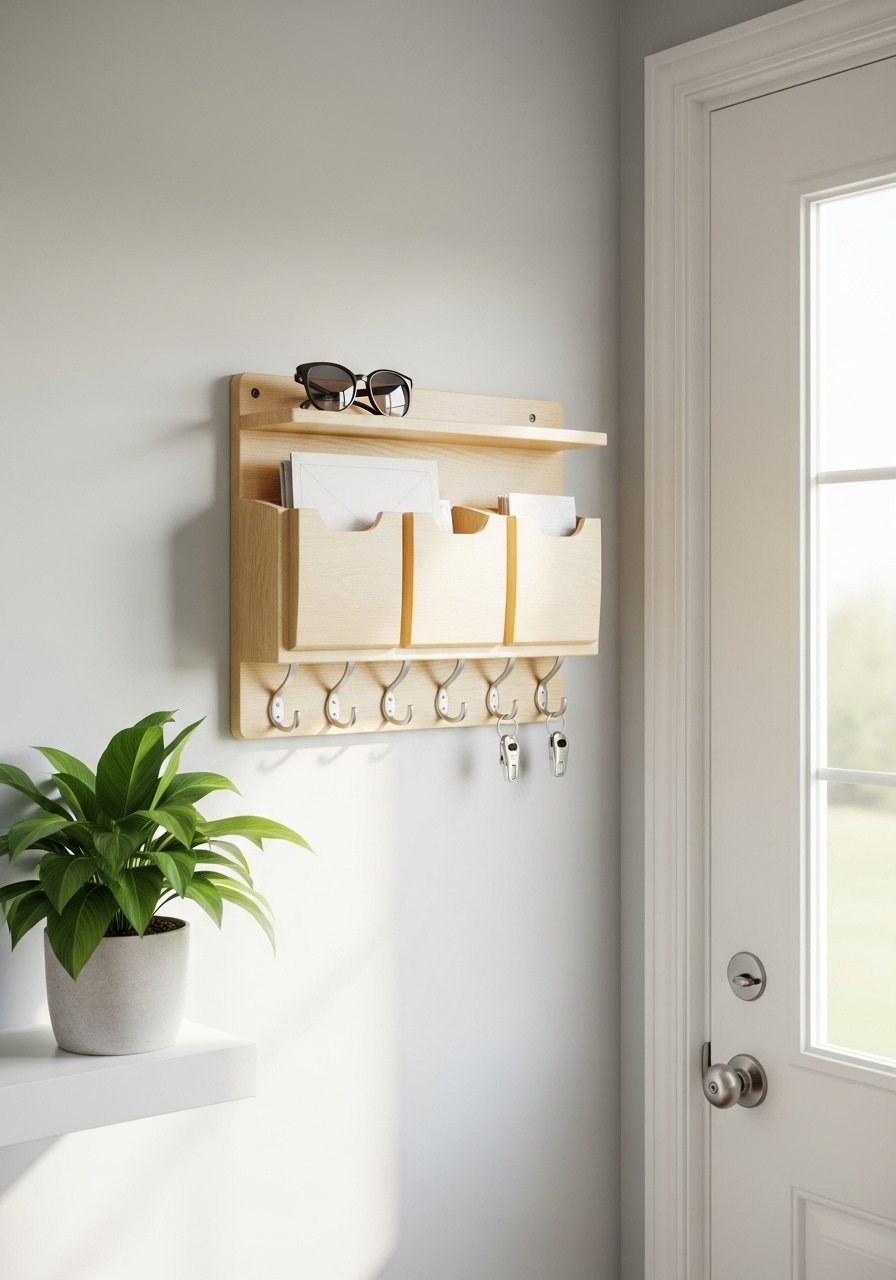
An organized entry looks tidy and curated. This slim organizer gives built-in vibes while staying inexpensive. It corrals mail, keys, and sunglasses so the space reads intentional.
Ingredients
- 1 slim wooden wall organizer (or build from 1/2 inch plywood)
- 4 small brass hooks
- 1 small shelf board (6 x 12 inch)
- 1 can paint (neutral)
- 1 drill
- 4 drywall anchors
- 1 measuring tape
- 1 small cloth
- 1 decorative bowl (for coins)
Instructions
- Paint or stain organizer and shelf; dry completely.
- Mount at eye level using anchors and screws.
- Attach brass hooks for keys beneath shelf.
- Add small bowl for spare coins and zone items.
How to Serve It
- Keep sunglasses and everyday items on the shelf.
- Store seasonal items in labeled boxes in a nearby closet.
- Use wall-mounted baskets for additional storage.
- Rotate décor on the shelf for fresh entryway styling.
Trust the process — small, intentional tweaks make a big visual difference. Try a couple of these affordable home decor recipes this weekend and watch how layering texture and finishes changes a room. Pin this for later and share which project you’ll try first — are you leaning toward the faux-marble tray, framed fabric art, or the painted console? For working across many of these projects, I rely on a reliable hot glue gun and a sturdy measuring tape — they make DIY faster and neater.