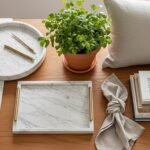
You know that feeling when a blank wall just stares back at you? A little creativity and a few simple materials can turn that space into a statement. These DIY Wall Decor ideas are practical, affordable, and styled so you can match any room—whether you love boho texture, modern lines, or botanical charm.
Inside you'll find 24 hands-on projects that cover woven hangings, wall planters, gallery layouts, stenciled quotes, mirror mosaics, and more. Each project lists exact materials (think rope, dowels, and frame sizes), step-by-step instructions with timing, and smart tool tips—like using a hot glue gun for quick bonds or a rotary tool when shaping wood accents. You'll also find display and care tips so your new pieces last.
Pin a few of these DIY Wall Decor ideas and pick one to try this weekend—grab your tools and let's get started.
1. Macramé Plant Hanger (Boho Wall Pocket)

This macramé plant hanger adds soft texture and greenery to any wall. It’s knot-focused with a gentle drape and a tasseled finish, offering earthy scent and movement when the plant is watered. Perfect for boho lovers and small-space gardeners.
Ingredients
- 3 x 10-yard skeins of 3–4 mm cotton macramé cord
- 1 x 10-inch wooden ring (top hanger)
- 1 x 6-inch ceramic plant pot (3–4" diameter)
- 4 x 4-foot cords cut for main strands
- 1 x scrap piece of cardboard (for tassel)
- 1 x measuring tape
- 1 x pencil
- 1 x small bowl of water (for wetting knots)
Instructions
- Fold four 4-foot cords in half and loop them through the wooden ring using lark's head knots.
- Arrange eight working cords and measure every 6 inches for your first set of square knots.
- Tie three rows of alternating square knots; keep tension even so the hanger looks balanced.
- Create a basket by bringing pairs of cords together and tying one wrap knot around each pair about 8 inches down.
- Place the pot to check fit—adjust distance between knots if needed for a snug cradle.
- Finish with a gathering knot beneath the pot using a separate 1-foot cord; wrap tightly and trim ends.
- Create a tassel by wrapping leftover cord around cardboard, slide off, tie top, and trim fringe evenly.
- Hang from a hook and mist the plant to settle the fibers.
How to Serve It
Display at varying heights in a cluster for a layered look. Try a picture hanging kit rated for 20 lb to secure the ring. Rotate plants monthly for even sunlight. Dust fibers gently with a lint roller and spot-clean stains with mild soap. For travel, unhook and store in a breathable cotton storage bag.
2. Framed Pressed Flowers Gallery
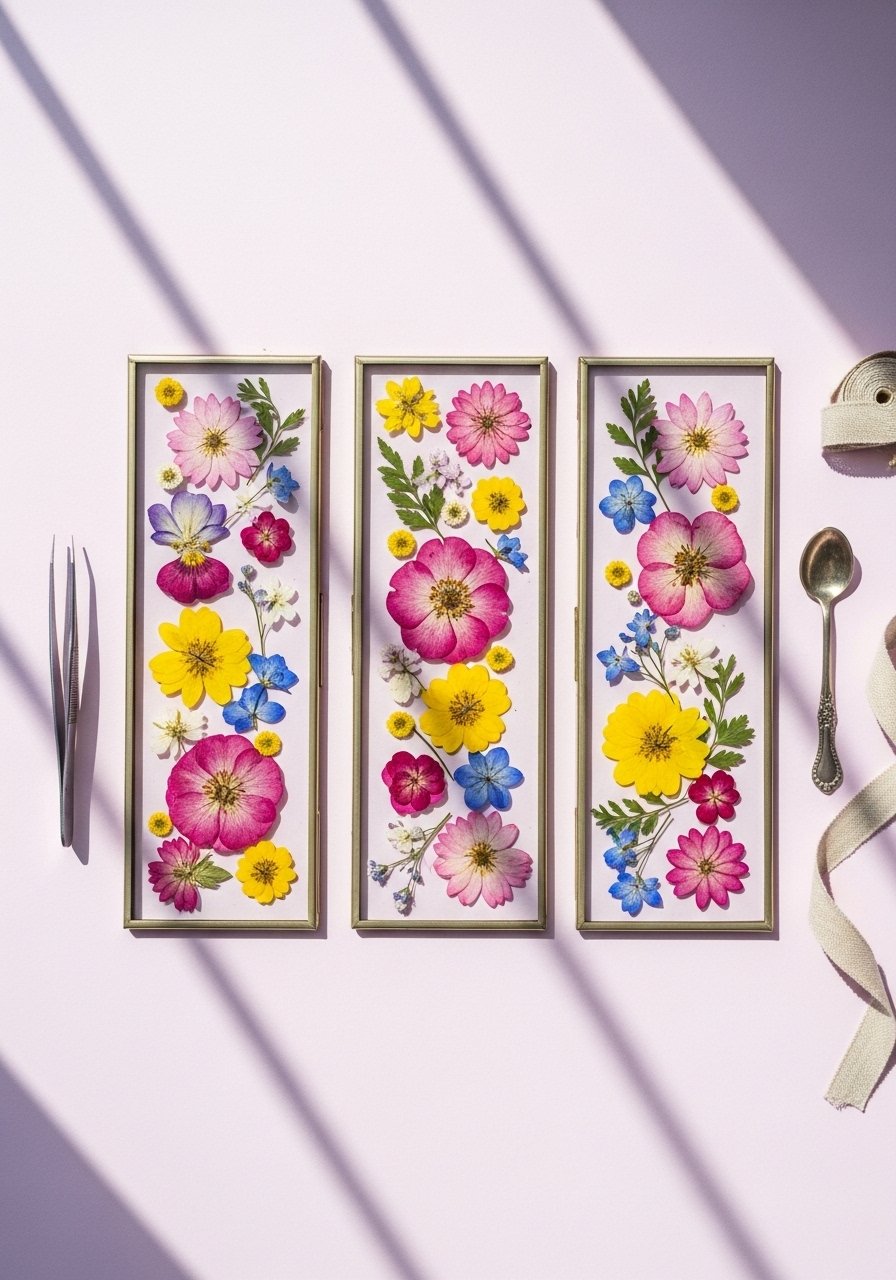
Pressed flowers bring color and nostalgia to your walls. This gallery uses simple frames and varied blooms for a cohesive botanical display. The result smells faintly floral and looks like an eco-friendly art exhibit.
Ingredients
- 6–8 fresh flowers (roses, pansies, ferns) pressed and dried for 2–3 weeks
- 3 x glass or floating frames (8×10 or mix sizes)
- Tweezers
- Acid-free paper for pressing
- Heavy books or a flower press
- Clear archival tape
- Pencil
- Lint-free cloth
Instructions
- Harvest flowers at peak bloom and remove bulky stems.
- Place petals between acid-free paper and sandwich inside a heavy book or press for 2–3 weeks until fully dry.
- Clean glass panels with a lint-free cloth to avoid fingerprints.
- Arrange pressed flowers on the inside surface of one glass pane. Use tweezers to place delicate petals.
- Secure each stem with tiny pieces of clear archival tape on the back.
- Close frames carefully, ensuring no petals are crushed.
- Create a staggered grid on the wall using a level and mark hanging points 12–18 inches apart for visual balance.
- Hang frames and avoid direct sunlight to preserve color.
How to Serve It
Group frames above a console or sofa for an instant focal point. Use command picture hanging strips for rental-friendly display. Rotate framed panels occasionally and keep them out of humid spots (bathrooms). Store extras flat in archival boxes.
3. DIY Wall Decor: Painted Geometric Panels
Geometric panels add modern shape and vivid color to a plain wall. Sharp lines and contrasting hues give a gallery-like feel without the cost of prints. This project suits lovers of minimal and modern styles.
Ingredients
- 3 x 12×12 unfinished wooden panels
- 3 colors of acrylic or chalk paint (sample pots, 4 oz)
- 1 roll painter’s tape (1/2-inch)
- 1 foam roller
- 2 angled paintbrushes (1-inch and 2-inch)
- Sandpaper (220 grit)
- Wood primer (optional)
- Drop cloth
- Rags
Instructions
- Sand panels lightly and wipe clean.
- Apply one coat of primer if using raw wood; let dry 1–2 hours.
- Plan geometric shapes with a pencil and ruler; mask lines with painter’s tape.
- Paint each section with a foam roller for even finish; use angled brushes for edges.
- Apply 2 coats, allowing 30–45 minutes between coats.
- Remove tape while paint is tacky to avoid peeling edges.
- Touch up edges with a small brush and let panels cure 24 hours before hanging.
- Attach D-ring hangers or a cleat system depending on weight.
How to Serve It
Create a trio over a sofa or stagger them down a hallway. For secure mounting, use a French cleat picture hanger. Wipe with a dry cloth when dusty. Swap out colors seasonally or paint-on new shapes for a fresh look.
4. Boho Yarn Wall Hanging
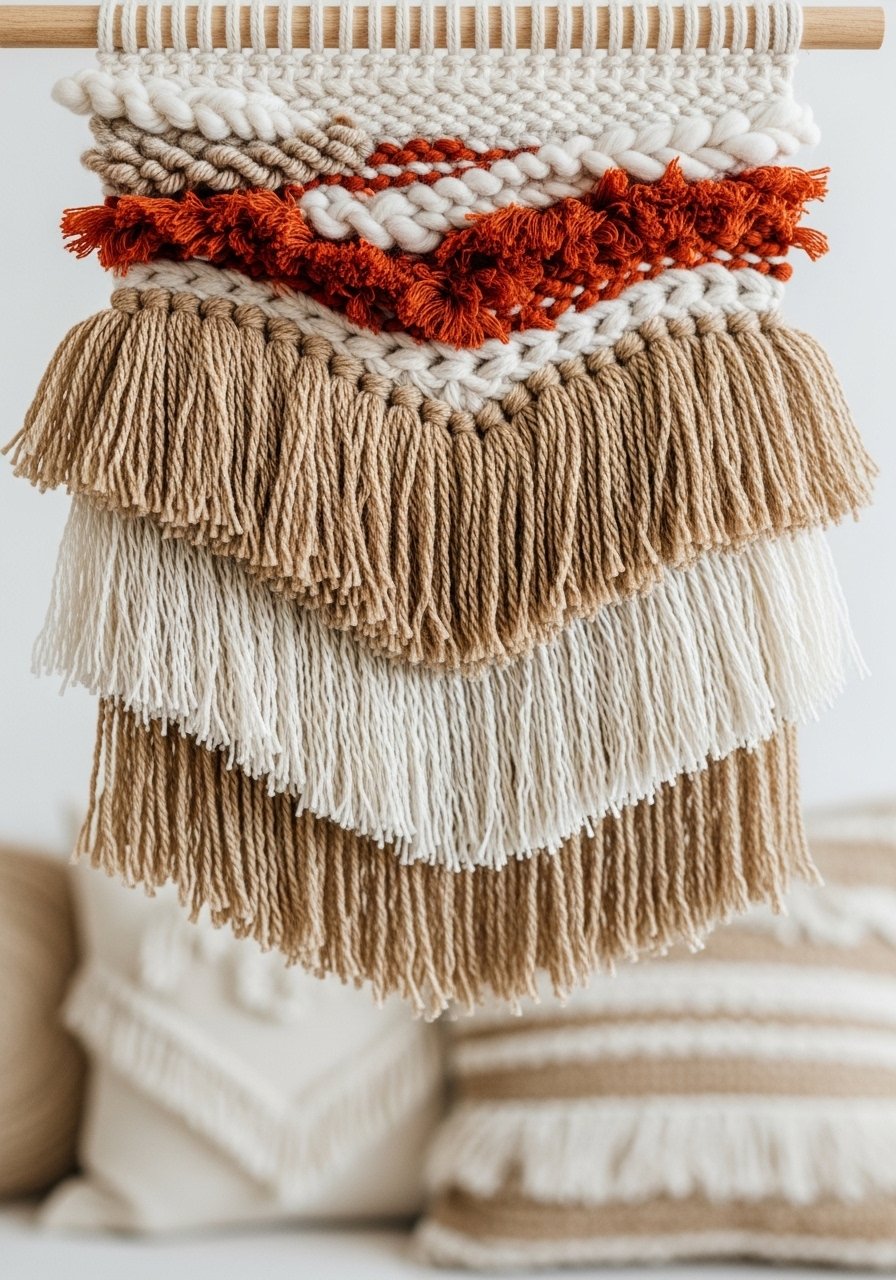
Soft, layered yarn hangings create warm texture and movement. This pattern mixes looped and cut fringe for a tactile piece that smells faintly of fresh cotton.
Ingredients
- 1 x 1-inch wooden dowel (20–24 inches)
- 6–8 different yarn skeins (varied weights and textures), 6–12 yards each
- Scissors
- Measuring tape
- Comb for brushing fringe
- Tapestry needle (optional)
Instructions
- Cut yarn lengths—shorter for top rows (8–12 inches), longer for fringe (18–24 inches).
- Fold yarn in half and attach to dowel using lark’s head knots across the dowel.
- Create patterns by alternating textures and colors; leave negative space for visual interest.
- Trim bottom into a gentle V or straight edge.
- Comb fringe gently with a wide-tooth comb to flare fibers.
- Seal the dowel ends with a dab of wood glue if desired and attach a hanging cord.
- Hang and step back to trim any uneven strands.
How to Serve It
Position above a bed or reading nook for softness and sound dampening. Use a heavy-duty wall anchor kit for secure mounting. To refresh, steam lightly (keeping distance) and re-comb fringe. Store flat or hanging to avoid tangles.
5. Upcycled Wooden Pallet Art
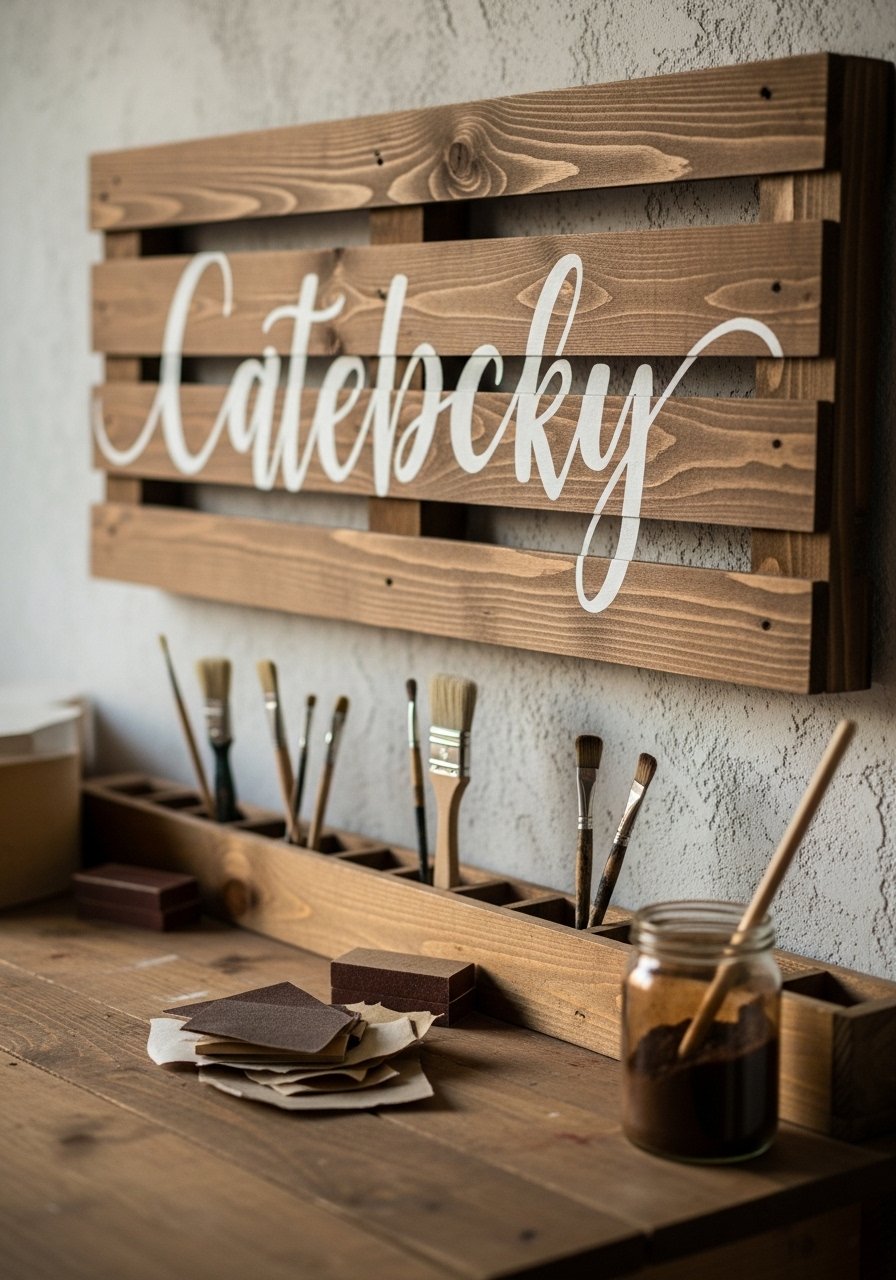
Pallet wood gives character and a weathered backdrop for typography or stenciled motifs. This approach is budget-friendly and produces a robust, tactile piece with a faint woody scent.
Ingredients
- 1 pallet board (cut to 24×12 inches)
- 1 can wood stain (sample)
- 1 jar chalk or latex paint (for lettering)
- 1 stencil or printed lettering
- 1 foam brush and 1 angled brush
- 1 sanding block
- Painter’s tape
- Rags
- Protective gloves
Instructions
- Disassemble pallet and sand the surface smooth, removing splinters.
- Stain the wood with a rag, wiping off excess; allow 2–3 hours to dry.
- Position stencil and secure with painter’s tape.
- Apply paint in thin layers—2 light coats to prevent bleed.
- Remove stencil while paint is tacky and touch up edges.
- Distress lightly with sandpaper for a vintage look.
- Seal with a matte clear coat if desired; dry 24 hours.
- Attach D-rings or sawtooth hangers and mount on wall.
How to Serve It
Feature above an entry table or in rustic kitchens. Use a 9-inch paint stirrer set and lined drop cloth while painting. Wipe with a dry cloth and avoid humid areas to keep finish intact. For outdoor porches, use exterior sealer.
6. Floating Shelf Cluster
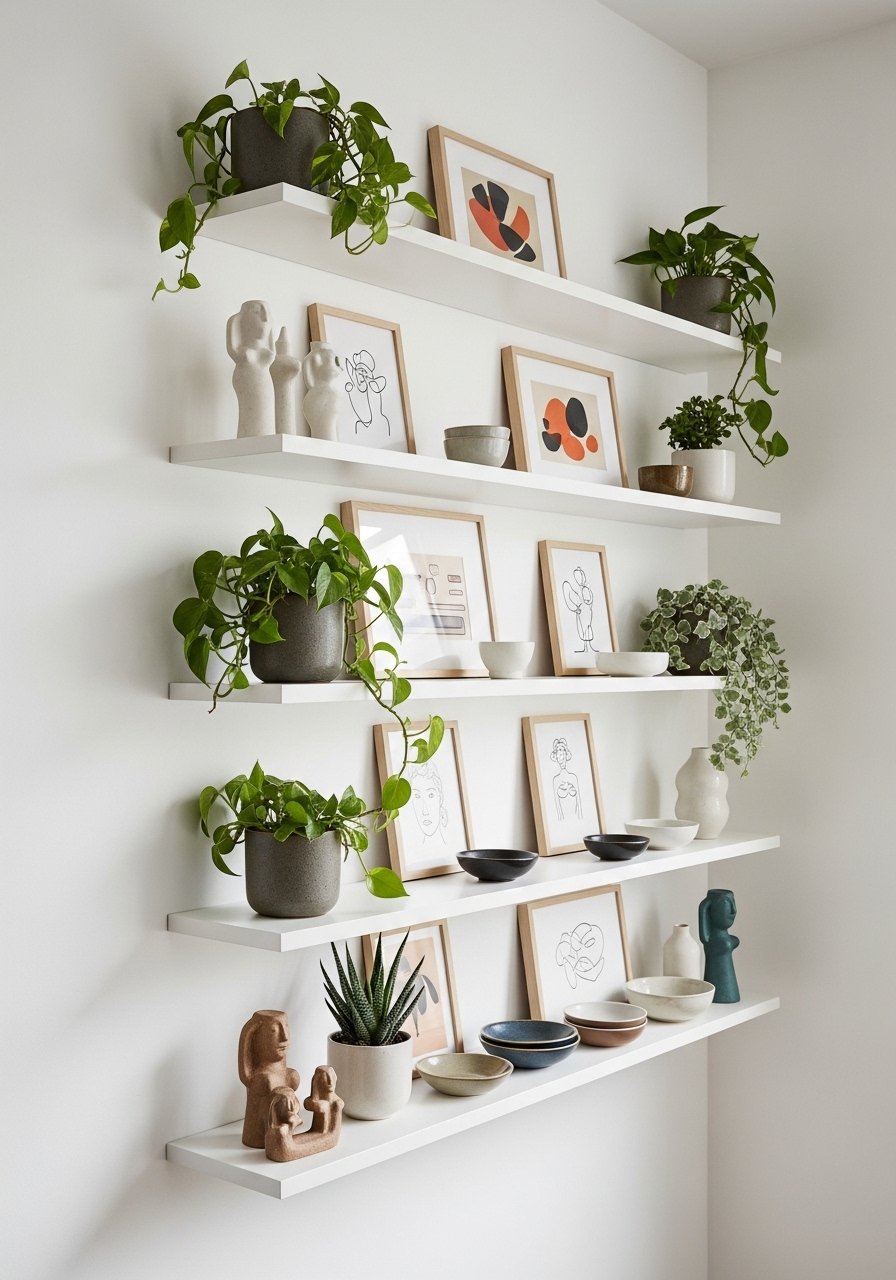
Floating shelves make your wall useful and pretty. Small staggered shelves create depth and let you rotate decor quickly—great for seasonal styling.
Ingredients
- 3–5 floating shelves (8–12 inches wide)
- Anchors and screws rated for shelf weight
- Level
- Stud finder
- Drill
- Small decor items (pots, frames)
Instructions
- Decide layout and mark stud locations with a stud finder.
- Measure and mark shelf placement; use level for straight lines.
- Drill pilot holes and install anchors where no studs exist.
- Secure shelf brackets or mounting plates to wall.
- Slide shelves onto brackets until they click or sit flush.
- Style with lightweight items first, balancing size and color.
- Check level and load capacity before adding heavier pieces.
How to Serve It
Create asymmetrical clusters for visual interest. Use decor hooks with anchors for stability. Dust regularly and avoid overloading—rotate items for fresh styling. For kitchen walls, use ceramic-safe mats under plants to prevent moisture rings.
7. Washi Tape Patterned Accent

Washi tape is removable and renter-friendly—perfect for temporary patterns. Create geometric murals or frames without paint, and change them whenever you crave a new look.
Ingredients
- 6-8 rolls of washi tape in coordinating colors/patterns
- Measuring tape
- Pencil
- Scissors
- Level
Instructions
- Clean the wall surface with a dust-free cloth.
- Lightly mark layout lines with pencil where tape will sit.
- Apply tape strips carefully, smoothing as you go to avoid bubbles.
- Use a level for straight patterns and scissors to trim clean edges.
- Layer tapes for contrast, overlapping slightly for crisp lines.
- Remove tape by peeling gently from one corner when you’re ready to change.
How to Serve It
Create a temporary focal stripe behind a bed or desk. Keep extra rolls in a craft caddy. Use decorator’s level for precision. Avoid using on freshly painted walls—wait 2–3 weeks after painting to prevent paint lift.
8. DIY Wall Organizer Grid
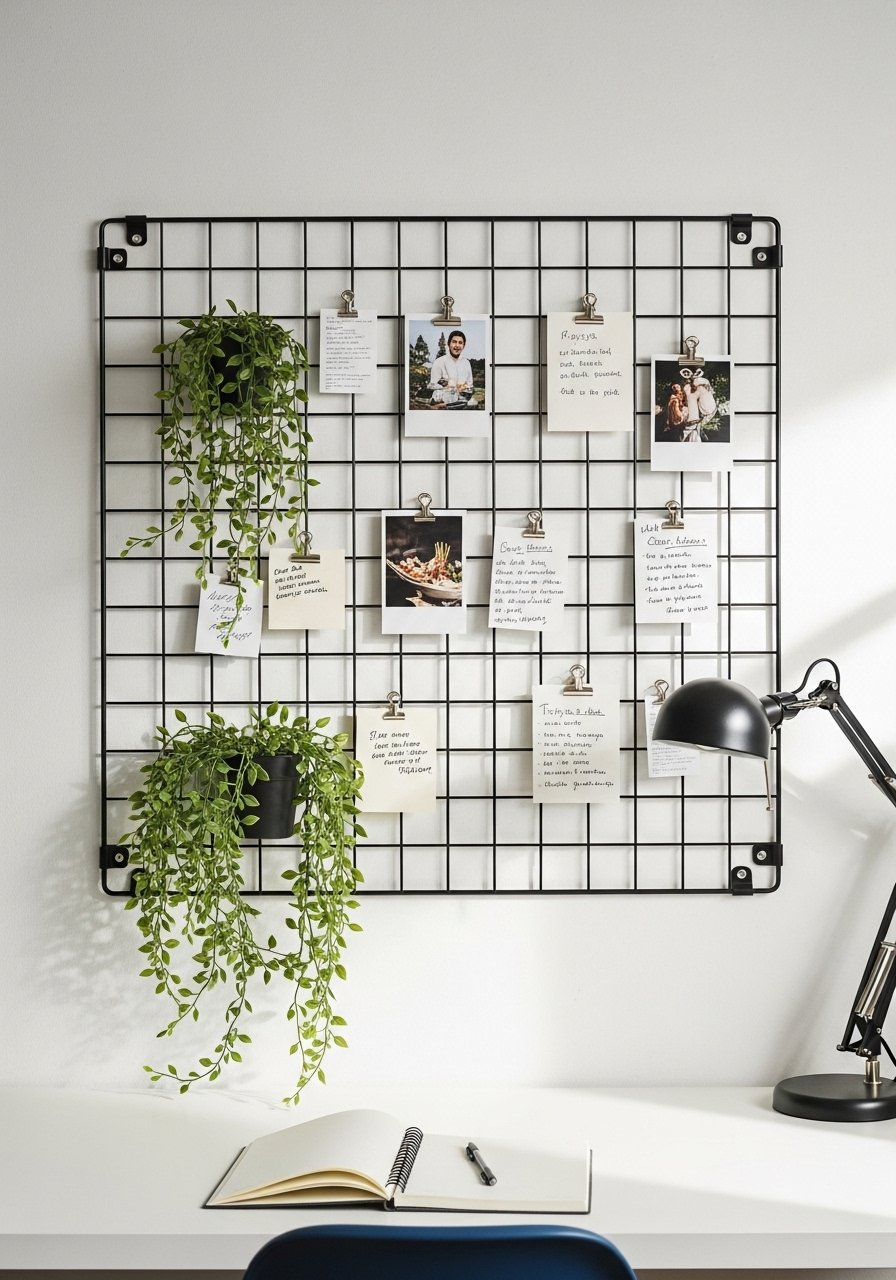
A metal grid is both functional and decorative—ideal for organizing photos, notes, and small planters. It adds an industrial touch and smells like cool metal.
Ingredients
- 1 metal grid panel (24×24 inches)
- 6–8 S-hooks or binder clips
- 2 small hanging planters
- Screws and anchors
- Level
- Decor items (prints, lights)
Instructions
- Hold grid in place and mark mounting points.
- Drill pilot holes and insert anchors for a flush mount.
- Secure grid with screws; ensure it’s level.
- Attach clips and S-hooks for hanging items.
- Add photos, notes, and small planters.
- For lighting, weave a battery fairy light with clips along the grid.
How to Serve It
Place above a workspace for visual inspiration. Use a set of binder clips and S-hooks to hang items neatly. Wipe down metal with a dry cloth; avoid wet plants that could cause rust—use liners in planters.
9. Stenciled Quote Panel
A stenciled quote lets you personalize walls with typography. Crisp letters and a neutral background make a simple but meaningful focal point.
Ingredients
- 1 x 16×20 wooden panel
- 1 letter stencil set or printable stencil
- 1 can chalk paint (sample)
- 1 black acrylic paint (2 oz)
- 1 stencil brush or foam pouncer
- Painter’s tape
- Sandpaper
- Rag
Instructions
- Sand panel and apply a base coat of chalk paint; dry 1–2 hours.
- Position stencil and secure with tape.
- Dab paint with stencil brush—use minimal paint to prevent bleeding.
- Remove stencil carefully and touch up any stray marks.
- Lightly sand edges for a softened look and wipe clean.
- Seal with clear matte spray and attach hanging hardware after 24 hours.
How to Serve It
Center above a console or cluster with small frames. Use a stencil brush set for clean edges. Avoid humid spots for longer life. Store panel flat in a dry area if not displaying.
10. Driftwood Mobile / Coastal Wall Hanging

Driftwood and shells create airy coastal charm. The mobile softly clinks and moves with air currents, bringing a beach scent memory to your room.
Ingredients
- 3–5 pieces of driftwood (varied lengths)
- 20–30 small shells or sea glass
- Nylon thread or fishing line
- Beads (wooden or glass)
- Scissors
- Drill with 1/16" bit (or a rotary tool)
- Measuring tape
- Small eye screws (for mounting)
Instructions
- Drill small holes in driftwood where you plan to tie threads.
- Cut threads to varying lengths (6–24 inches).
- Thread shells and beads, knotting between each element.
- Tie strands to driftwood evenly for balance.
- Stack driftwood pieces by tying with a central thread or hooking together.
- Add an overhead hanger and test balance—adjust strand positions as needed.
- Hang near a window or porch and enjoy the gentle movement.
How to Serve It
Hang in a sunroom or near a bathroom (away from direct moisture). Use a rotary tool kit for drilling delicate holes. Dust gently and periodically check knots. For storage, nest strands in tissue paper inside a box.
11. Leather Tassel Fringe Wall Art
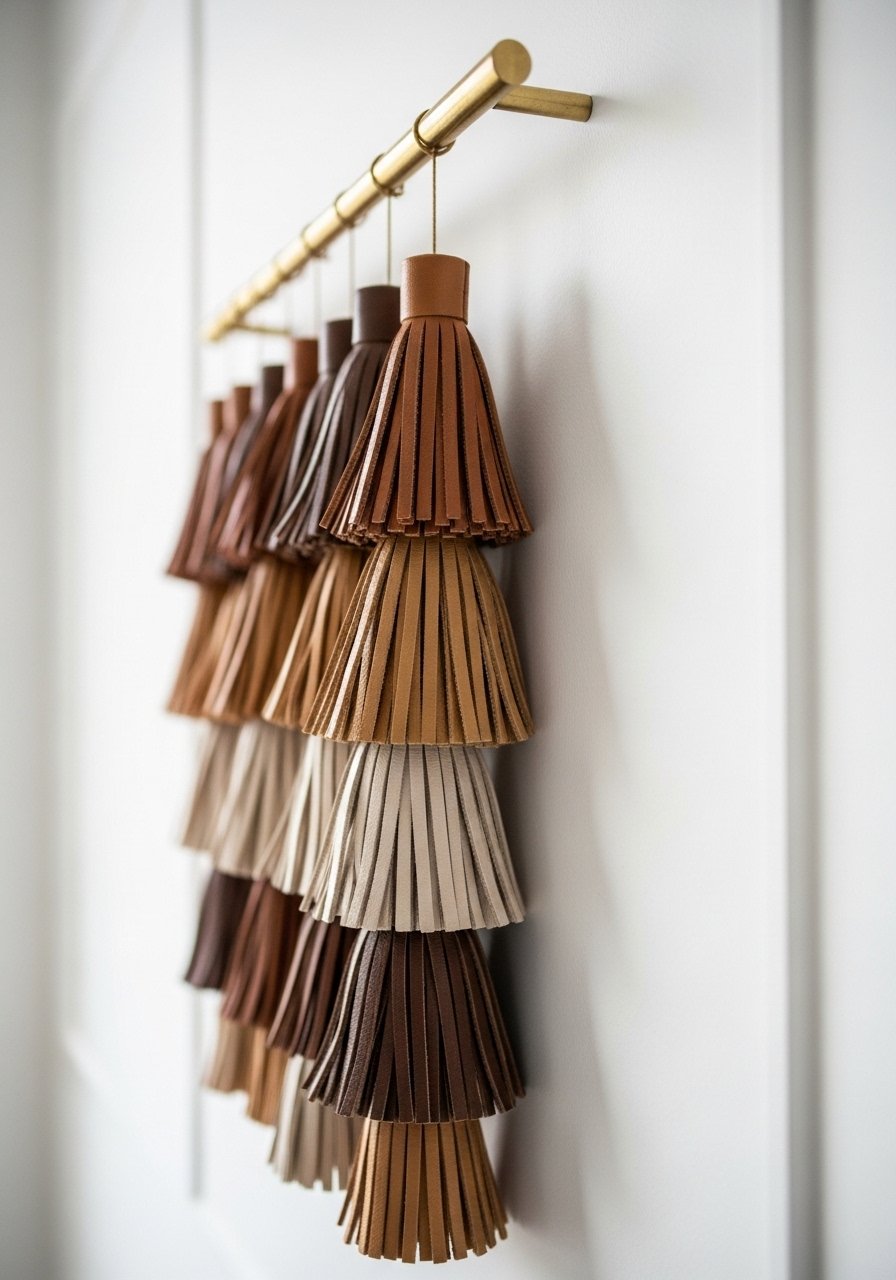
Leather tassels bring a contemporary tactile element—smooth, warm, and a little luxe. The layered fringe creates depth without heavy weight.
Ingredients
- 1 brass rod or wooden dowel (24 inches)
- 4–6 leather strips (faux or real, 1–2 feet each)
- Scissors
- Ruler
- Hole punch
- Leather glue (optional)
- Cord for hanging
Instructions
- Cut leather into strips of desired width and length; fold strips and punch holes for hanging.
- Thread onto the rod in overlapping rows to build density.
- Secure ends with leather glue or knots.
- Trim fringe bottoms into a clean line or V shape.
- Attach hanging cord to rod and test balance.
How to Serve It
Position over a mantel for a polished look. Use brass hanging rod and strong wall anchors. Wipe with a dry cloth and keep away from direct sunlight to prevent fading. Store flat if not used.
12. Embroidery Hoop Art Series
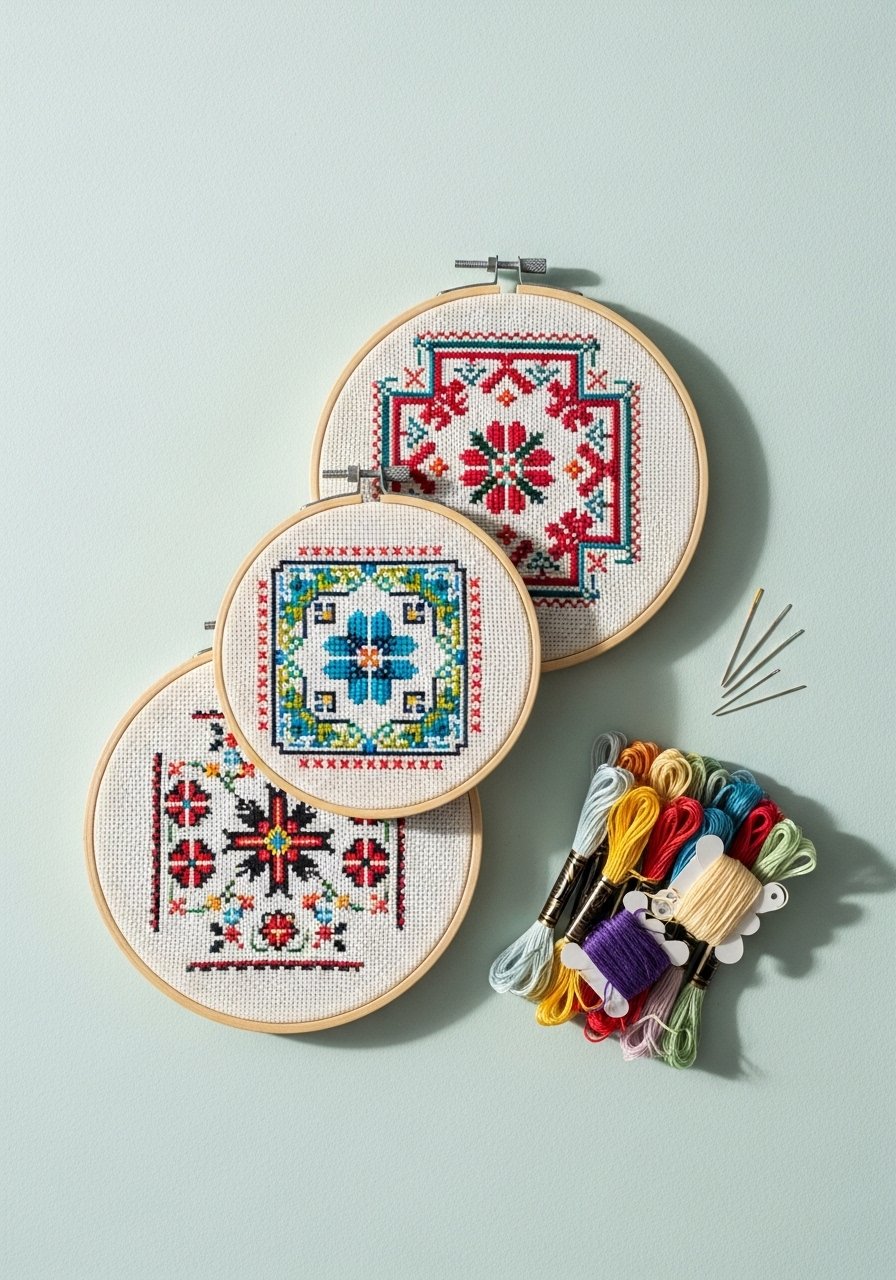
Embroidery hoop art offers small canvases packed with color and pattern. Mix fabric prints and stitched motifs for a charming handmade cluster.
Ingredients
- 3–5 embroidery hoops (4–8 inch)
- Assorted fabric scraps
- Embroidery floss (multiple colors)
- Embroidery needles
- Scissors
- Iron
- Glue gun (optional)
Instructions
- Stretch a fabric scrap taut in each hoop and tighten the screw.
- Sketch a simple design with pencil or transfer a print.
- Stitch using backstitch, satin stitch, or french knots—use contrasting colors for impact.
- Trim excess fabric leaving 1 inch at back; fold and secure with glue or whip stitch.
- Hang hoops in a playful cluster using small nails or adhesive hooks.
How to Serve It
Mix patterned and plain fabrics for texture. Use a small embroidery kit for starter tools. Clean gently and avoid washing lined pieces. Store in a breathable box between seasons.
13. Chalkboard Accent Wall Panel
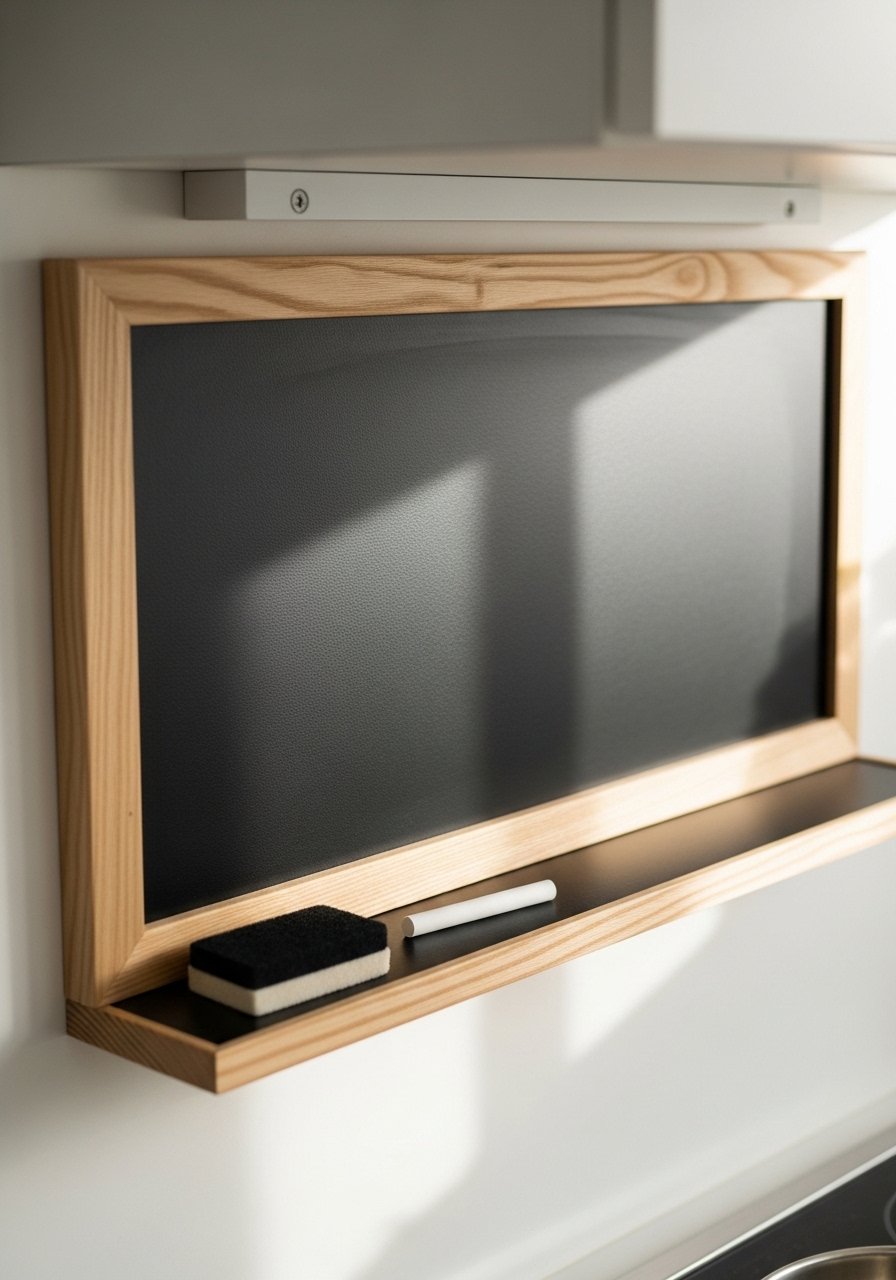
A chalkboard panel is practical and playful—leave notes, draw seasonal art, or change quotes weekly. Matte black adds contrast and a cafe vibe.
Ingredients
- 1 12×24 wooden panel
- 1 can chalkboard paint (8 oz)
- Paint roller
- Sandpaper
- Painter’s tape
- Chalk sticks and eraser
- Mounting hardware
Instructions
- Sand and clean the panel.
- Apply two thin coats of chalkboard paint; allow 1–2 hours between coats.
- After full cure (24 hours), season the board by rubbing chalk over surface and erasing.
- Mount on wall with secure hardware.
- Use a damp cloth to clean when needed.
How to Serve It
Use in kitchens, kids' rooms, or offices for rotating lists. A small chalk set keeps it tidy. Avoid abrasive cleaners; re-seal edges annually if used frequently.
14. DIY Mirror Mosaic
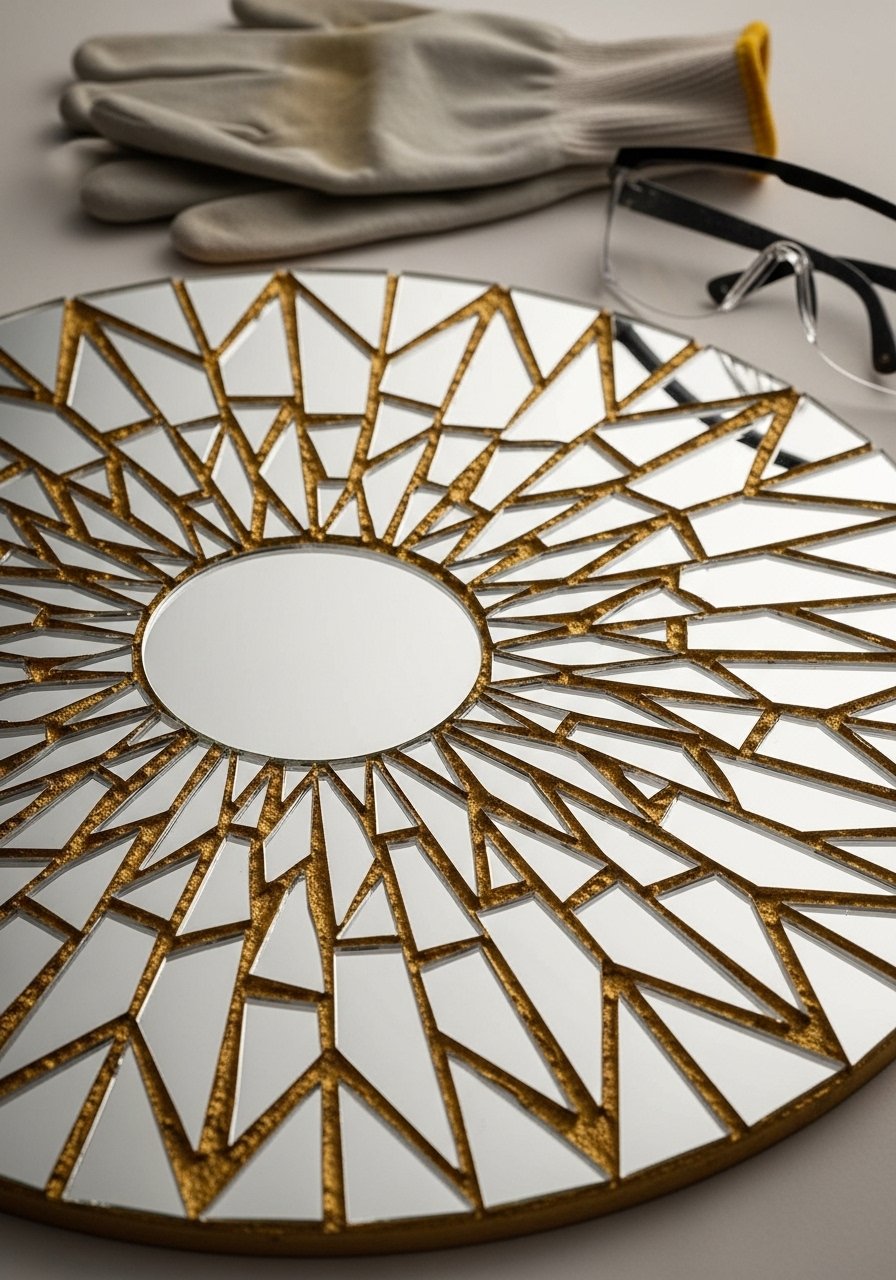
Mirror mosaics add shimmer and reflect light, making small rooms feel larger. This project uses cut glass or mirror tiles for a sparkling focal.
Ingredients
- 1 central mirror (8–12 inches)
- 2–3 small mirrored tiles or glass pieces
- Tile adhesive
- Grout (chalky or colored)
- Tile nippers or glass cutter
- Safety gloves and goggles
- Sponge and bucket
Instructions
- Wear safety gear and cut tiles to desired shapes with nippers.
- Apply tile adhesive around central mirror and press tiles into place in a radial pattern.
- Let adhesive cure per manufacturer instructions (12–24 hours).
- Mix grout and work into spaces between tiles with a grout float.
- Wipe excess grout with a damp sponge and buff residues after 30–60 minutes.
- Polish mirror and allow full cure before hanging.
How to Serve It
Hang above consoles or in entryways to boost light. Use safety goggles and gloves. Avoid heavy impacts; secure with a French cleat for larger pieces.
15. Painted Plate Wall Display
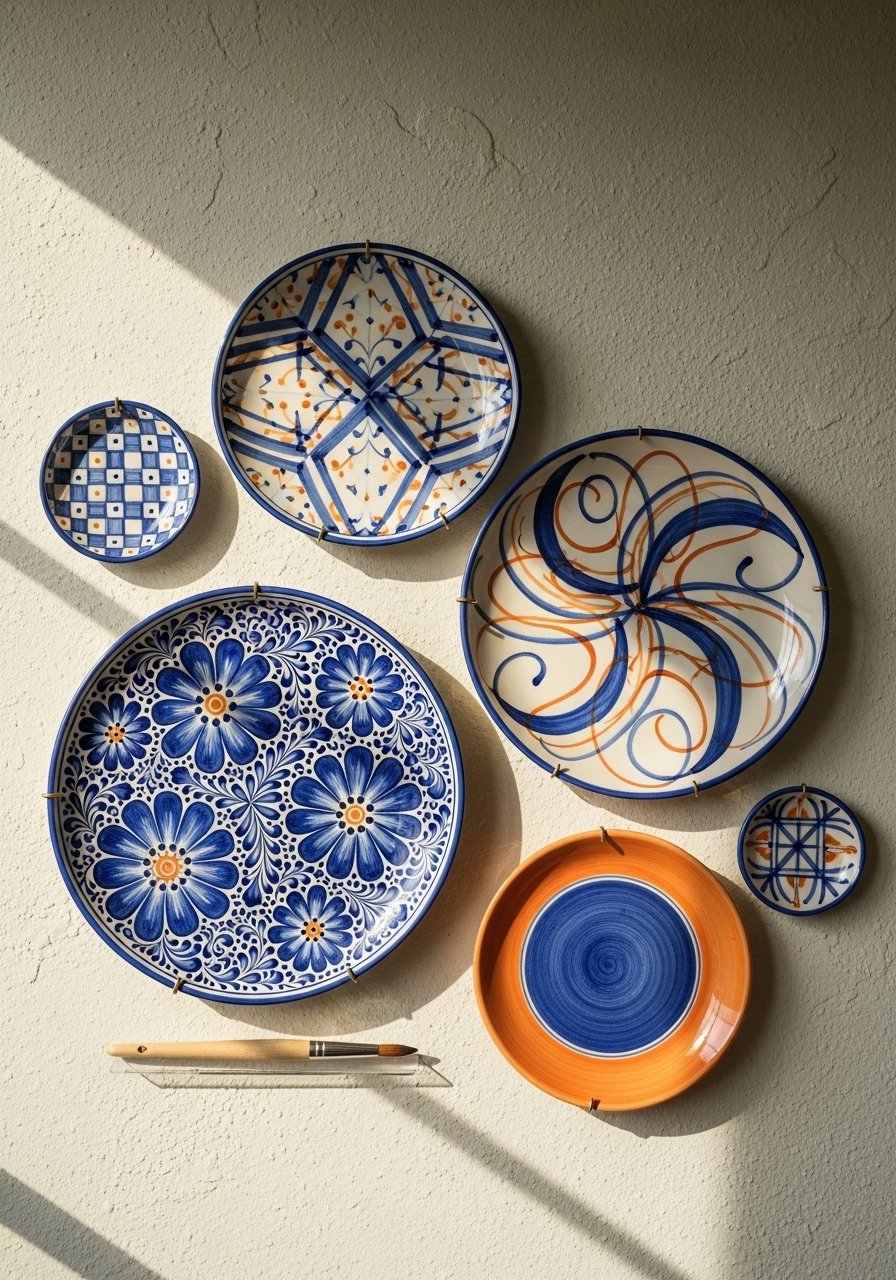
A plate display adds pattern and color with an eclectic, collected feel. Hand-paint inexpensive plates for a bespoke collection.
Ingredients
- 6–9 plain ceramic plates (varied sizes)
- Ceramic paint or porcelain markers
- Paintbrushes
- Oven for curing (per paint instructions)
- Plate hangers or adhesive hooks
- Ruler and pencil for layout
Instructions
- Clean plates and sketch designs lightly with pencil.
- Paint designs using ceramic paint; follow directions for drying.
- Cure painted plates in the oven if required by paint—follow paint label for temperature/time.
- Attach plate hangers or use adhesive plate discs rated for ceramics.
- Plan layout on floor first, then hang from center outward.
How to Serve It
Mix painted and vintage plates for contrast. Use adhesive plate hangers for cleaner look. Hand wash plates gently and avoid placing in dishwasher if hand-painted.
16. Map Collage Wall (Travel Memory Display)
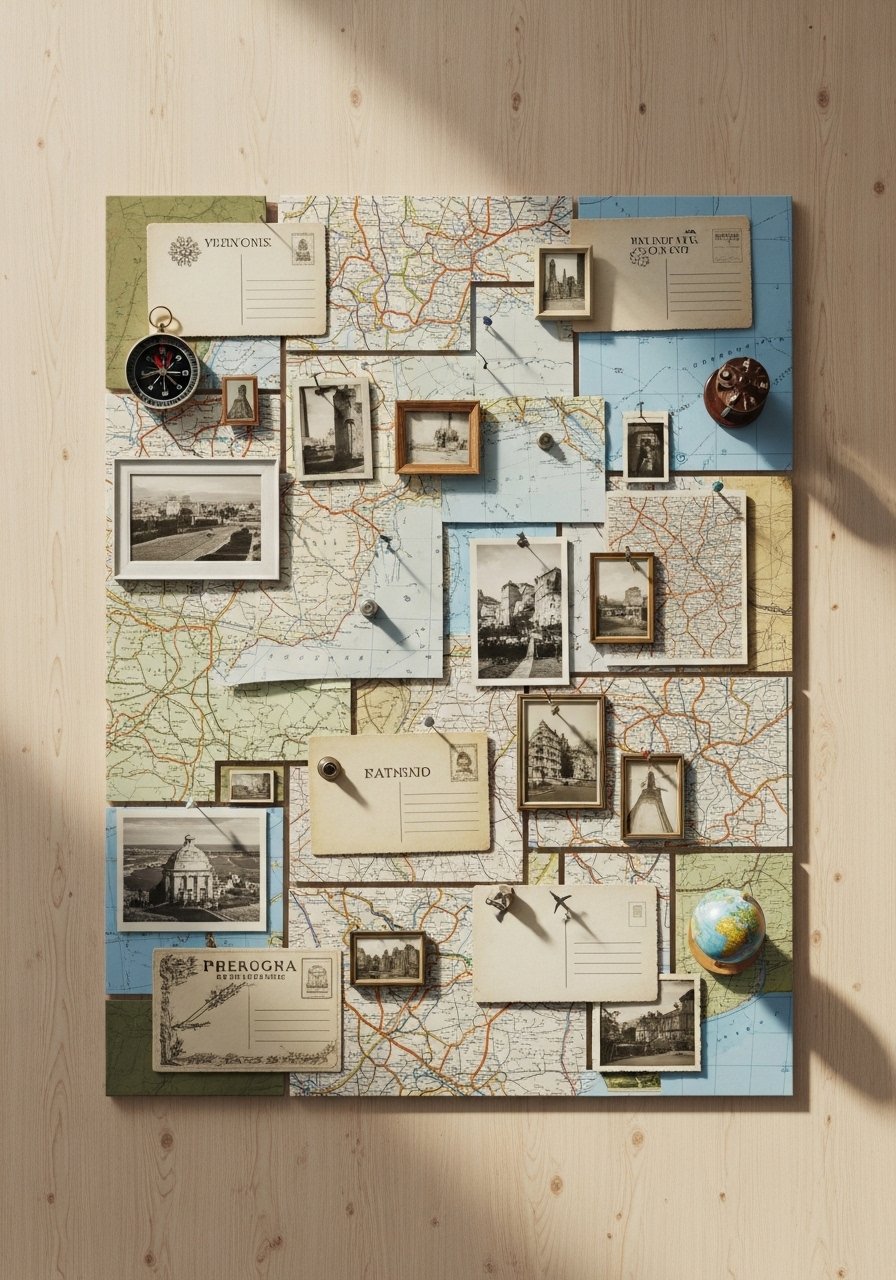
Display memories with a layered map collage. Combine maps, postcards, and photos to create a travel story on your wall.
Ingredients
- Assorted vintage or printed maps
- 12–20 postcards or photos
- Corkboard panel or foam board (24×36)
- Double-sided tape or push pins
- Ruler
- Scissors
- Frame (optional)
Instructions
- Mount maps on cork or foam board using double-sided tape.
- Arrange postcards and photos, balancing color and subject matter.
- Pin or tape items, leaving some corners lifting for a layered look.
- Frame the collage for a finished look or hang as-is.
- Add labels with small handwritten tags for dates and places.
How to Serve It
Hang in a hallway or office for daily inspiration. Use acid-free tape to protect prints. Replace items as you travel more—store extras in a photo box.
17. Floating Fabric Panel (Tapestry Mount)
A fabric panel adds pattern and softness without heavy frames. Use a statement textile or vintage scarf mounted on a wooden hanger for instant mood.
Ingredients
- 1 fabric panel or tapestry (24×36 or larger)
- 1 wooden hanger rod or curtain rod
- 2 leather straps or fabric loops
- Sewing needle and thread or glue
- Measuring tape
Instructions
- Hem edges if needed for a clean finish.
- Create loops or attach leather straps across the top to slide onto the rod.
- Mount the rod with brackets, ensuring level placement.
- Hang fabric and adjust drape for smooth fall.
How to Serve It
Layer over an accent-painted wall for contrast. Use a wall-mounted curtain rod set. For washing, follow fabric care—spot-clean or dry-clean as appropriate.
18. Pegboard Art & Storage Wall
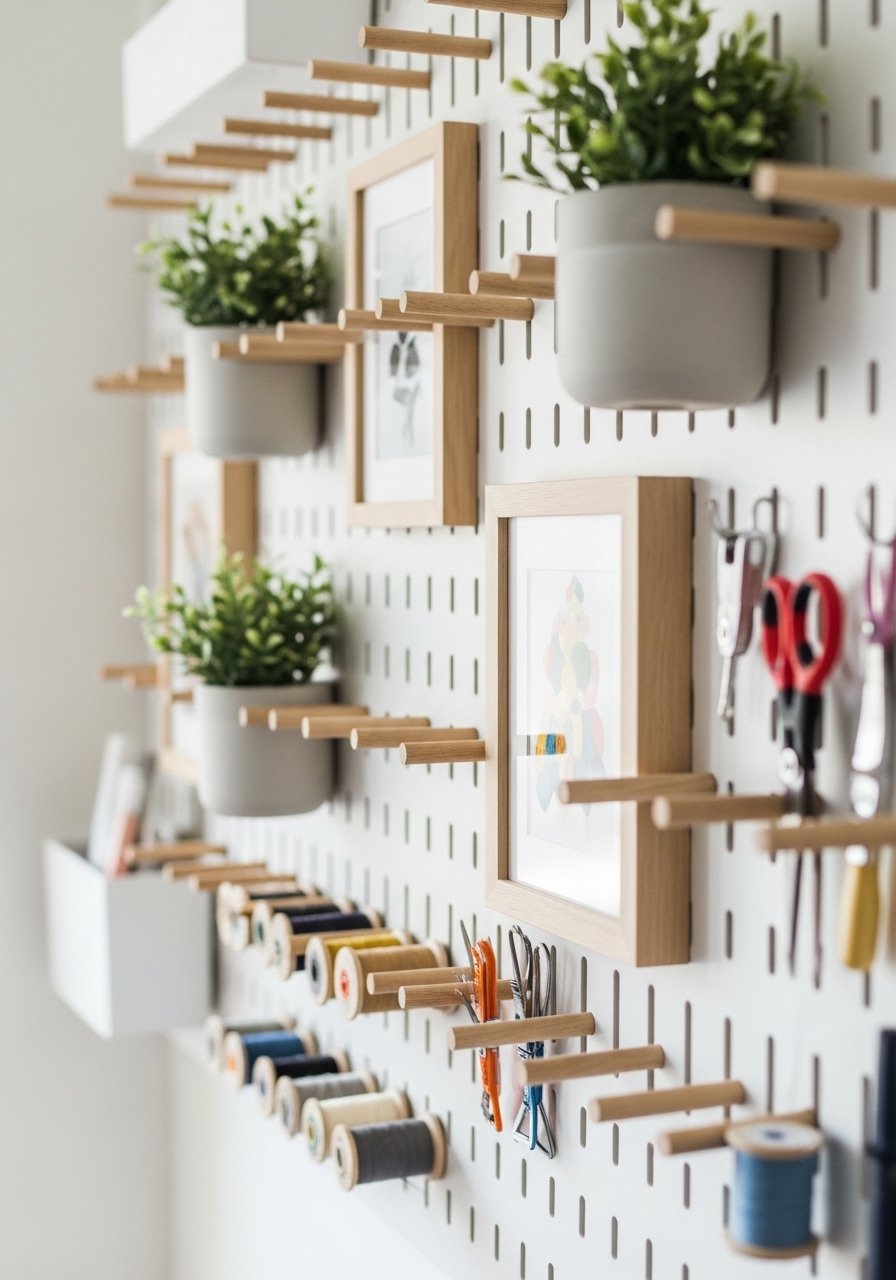
A painted pegboard blends utility and style—great for craft rooms, kitchens, or entryways. Swap hooks and shelves as needs change.
Ingredients
- 1 pegboard panel (18×24 inches)
- Assorted pegs, hooks, and mini-shelves
- Paint and primer
- Drill and screws
- Level
- Decor items
Instructions
- Prime and paint pegboard to desired color; dry 2–3 hours.
- Mount on wall with spacers to allow peg insertion angled outward.
- Arrange hooks and accessories to hold items—planters, mail trays, keys.
- Rearrange modularly as storage needs change.
How to Serve It
Install above a desk or near an entry for quick drop zones. Use a pegboard accessory kit to customize. Clean painted surfaces with a damp cloth and avoid overloading pegs beyond weight limits.
19. Reclaimed Window Picture Display
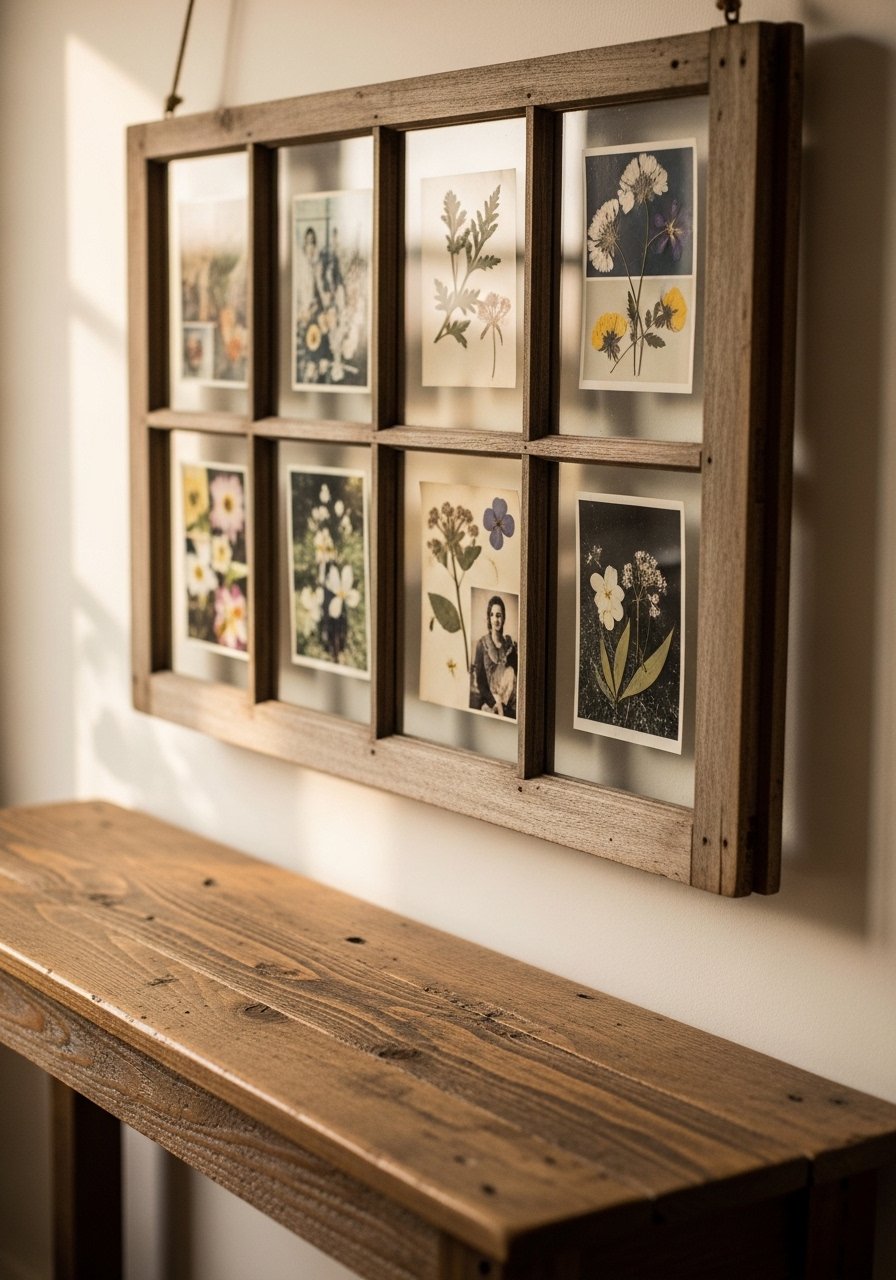
Old window frames offer vintage charm and segmented displays for photos or small artworks. Each pane tells a little story.
Ingredients
- 1 reclaimed multi-pane window frame
- Frosted acrylic sheets or glass replacements
- Small photos or prints
- Double-sided tape
- Sandpaper
- Clear sealant (optional)
Instructions
- Clean and sand the window frame; replace broken glass with acrylic if needed.
- Mount photos onto acrylic with double-sided tape.
- Insert panels into each pane opening and secure.
- Seal frame edges if using outdoors.
How to Serve It
Group window frames in an echelon pattern on a wall. Use a clear acrylic sheet pack for safe glass replacements. Keep out of direct humid exposure to avoid warping.
20. Cork Tile Message Wall
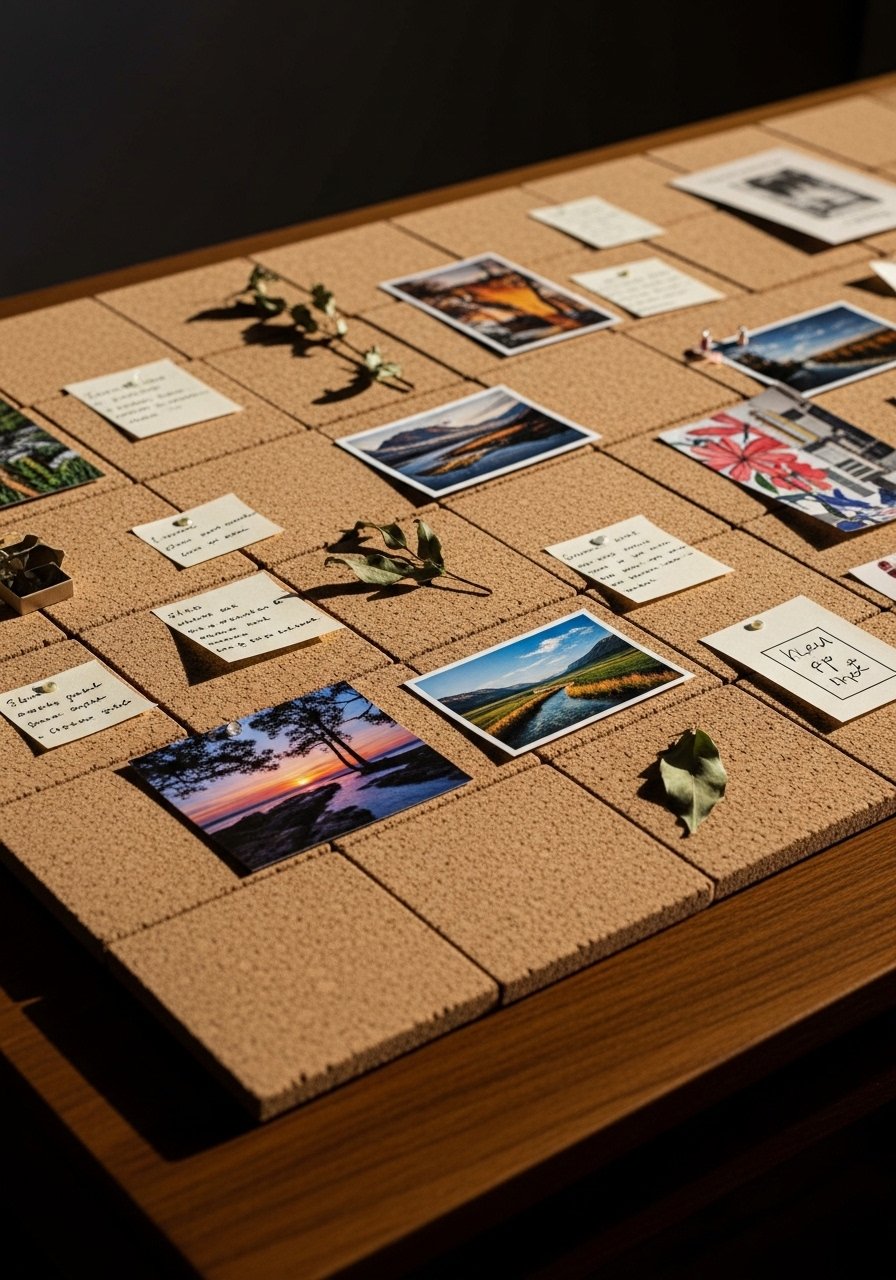
Cork tiles create a tactile, pin-friendly surface for rotating notes, photos, and inspiration. It’s functional and textured.
Ingredients
- 6–12 cork tiles (12×12 inches)
- Adhesive (recommended for tiles)
- Pins
- Ruler
- Pencil
Instructions
- Plan layout and mark wall dimensions.
- Apply adhesive to tile backs and press firmly onto wall.
- Allow adhesive to cure per packaging (24 hours).
- Pin photos, notes, and lightweight decor to tiles.
How to Serve It
Create a message board in kitchens or offices. Use slick adhesive for tiles. Keep heavy items off the cork; replace tiles easily if worn.
21. DIY Fabric-Wrapped Canvas Panels
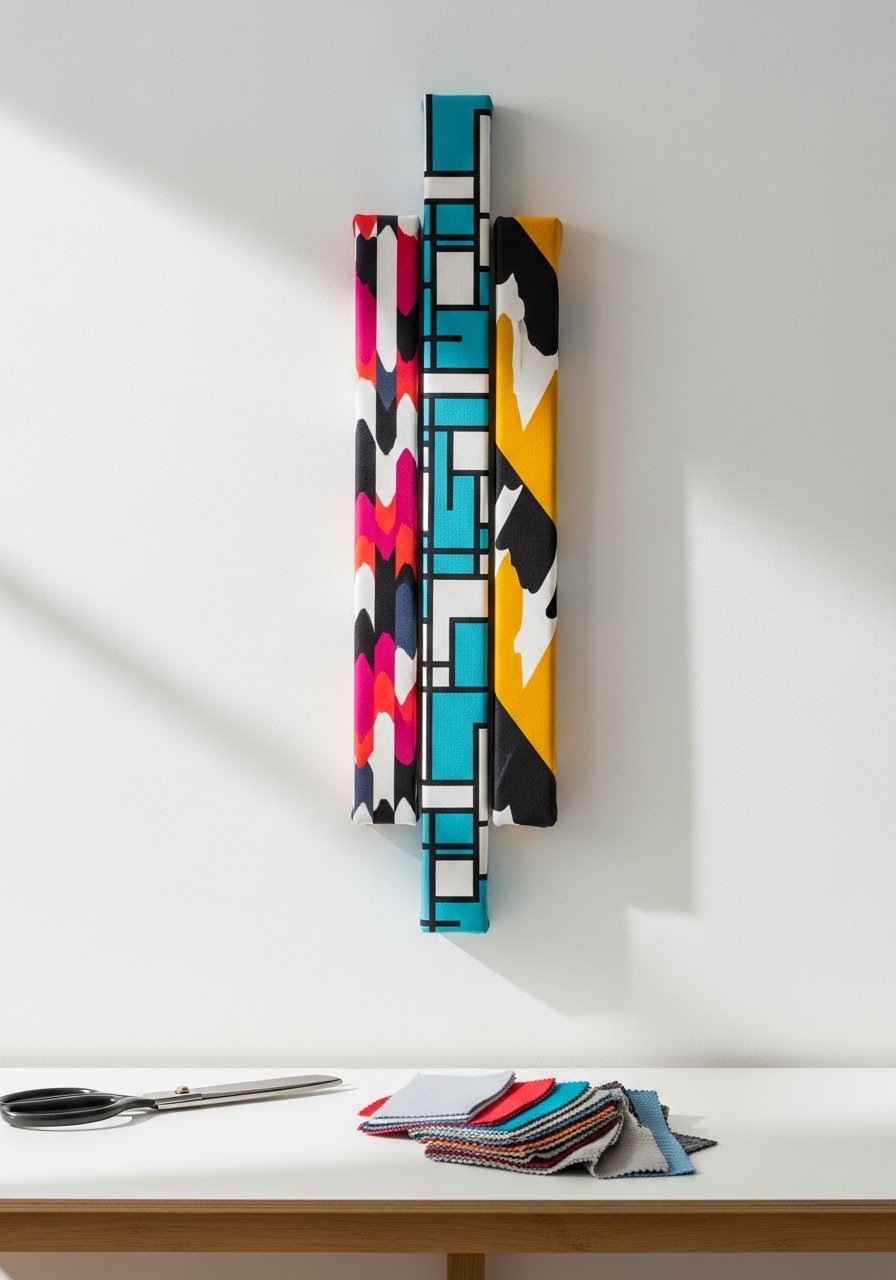
Fabric-wrapped panels are an easy way to add pattern and color. Stretch fabric over canvases for clean, framed textile art.
Ingredients
- 3 thin canvas panels (8×24 inches)
- 3 fabric swatches (24×30 inches)
- Staple gun and staples
- Scissors
- Measuring tape
Instructions
- Center fabric over canvas and wrap edges, pulling taut.
- Staple fabric to the back of the canvas every 1–2 inches.
- Trim excess fabric and fold neat corners.
- Mount panels in a vertical column for a modern tableau.
How to Serve It
Swap fabrics seasonally for an instant refresh. Use a heavy-duty staple gun. Spot clean fabrics or choose washable materials when possible.
22. Book Page Collage Art
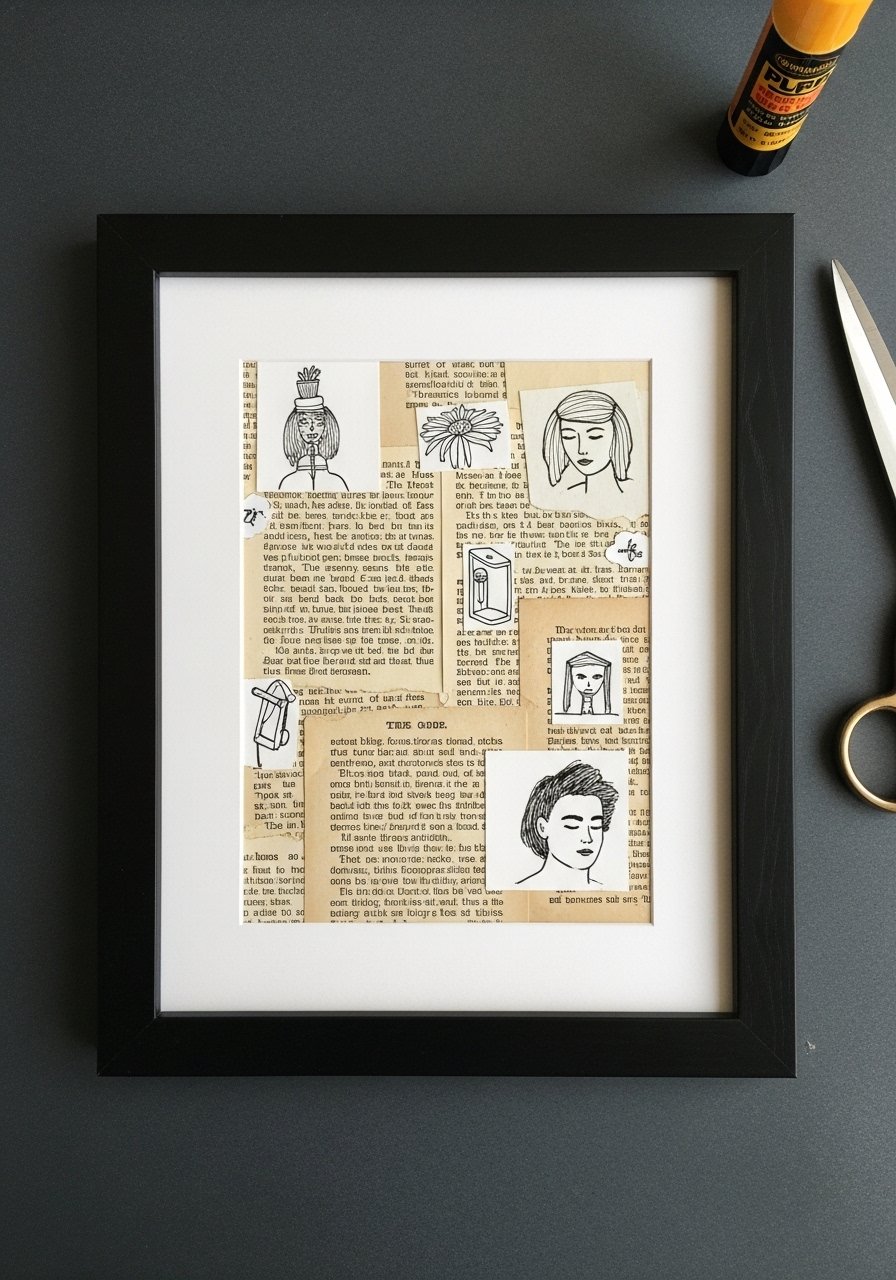
Book page collage is literary and textured—ideal for libraries or reading nooks. Layer pages, illustrations, and small sketches for depth.
Ingredients
- 10–20 book pages (vintage or printed)
- 1 11×14 frame
- Glue stick or archival glue
- Scissors
- Small brush for smoothing
Instructions
- Arrange pages on backing board to form an appealing composition.
- Overlap edges and glue down slowly, smoothing with a brush.
- Add small sketches or typed quotes for interest.
- Frame with glass or leave open for texture.
How to Serve It
Hang near bookshelves or create a gallery cluster. Use archival glue sticks to prevent yellowing. Keep out of humid rooms.
23. Mirror Tile Sunburst
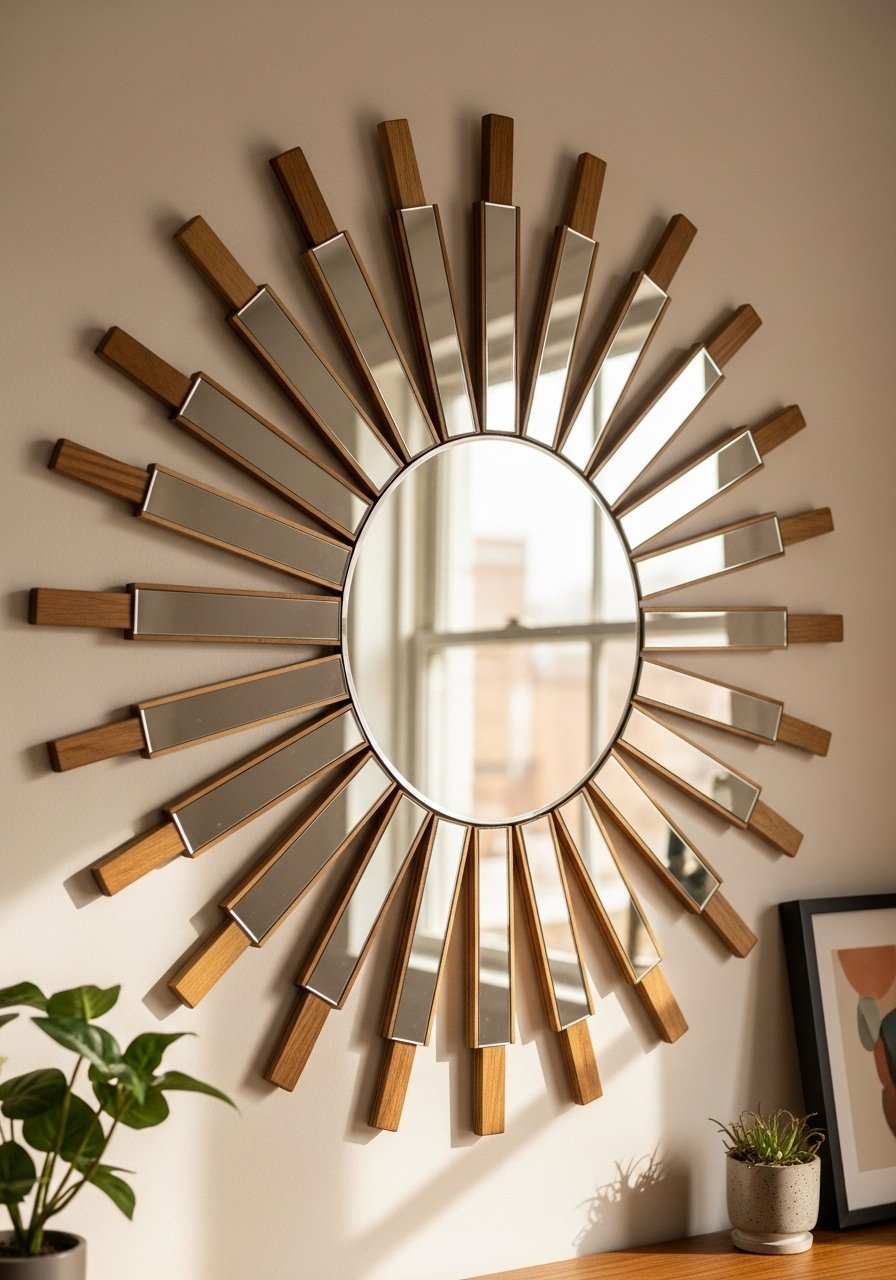
A sunburst mirror brings sculptural shine. Use small mirror tiles and painted wood or metallic rays for dynamic reflections.
Ingredients
- 1 central round mirror (8–12 inches)
- 12–20 small mirror tiles or cut mirror pieces
- Thin wood slats for rays
- Strong adhesive
- Gold or metallic spray paint
- Safety gear
Instructions
- Spray paint wood slats and let dry 1–2 hours.
- Arrange slats radially around central mirror and attach with adhesive.
- Glue mirror tiles between slats for sparkle.
- Allow full cure and attach a secure hanging mount.
How to Serve It
Place where it catches morning light. Use a set of small mirror tiles. Keep away from moisture and check mounts periodically.
24. Neon Quote Light (DIY LED Strip Sign)
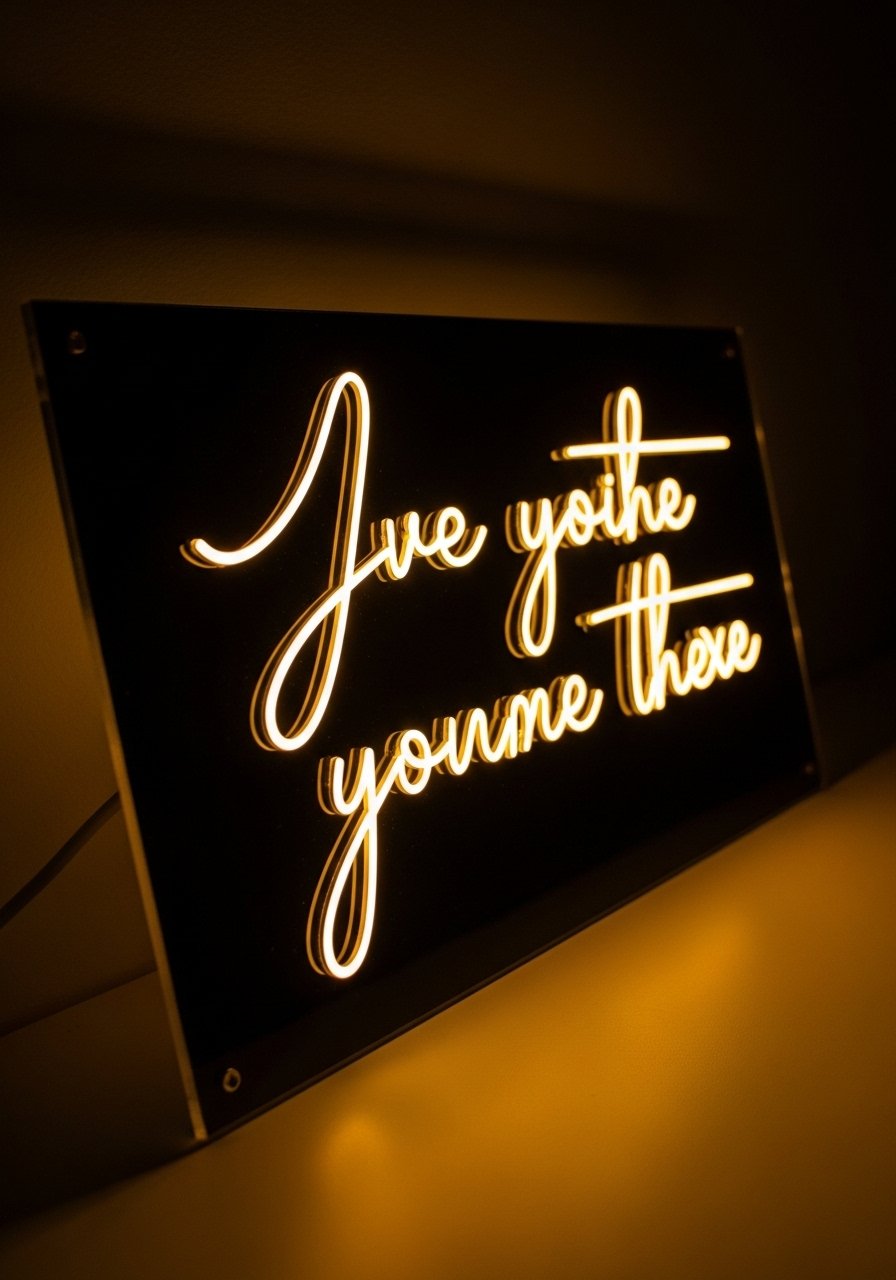
A faux neon LED strip sign gives that neon vibe without the cost or fragility. Use flexible LED neon rope lights to trace a short quote for a cozy glow.
Ingredients
- 1 LED neon flex rope light (8–12 feet)
- 1 black acrylic backing panel (cut to quote size)
- Small cable clips and adhesive
- Pencil for tracing
- Power adapter (included with rope light)
- Zip ties
Instructions
- Design the quote in a script font and print full-size as a template.
- Secure template under acrylic and trace with pencil.
- Attach LED rope along the traced line using small cable clips and adhesive—bending gently.
- Secure overlaps with zip ties and hide the adapter behind the panel.
- Test the sign and mount with a French cleat.
How to Serve It
Hang over a bed or media console for soft ambient lighting. Use LED neon flex rope light and ensure your outlet location matches the adapter length. Turn off after extended use for longevity.
You now have 24 creative DIY Wall Decor ideas with practical materials, clear steps, and helpful tool suggestions. Try one that suits your style this weekend, pin your favorites for later, and share a photo with friends or family when you're done—people love a before-and-after. If you plan to tackle several projects, a good cordless drill kit will speed many steps and keep your workspace tidy. Which project are you excited to make first?