Welcome to a fresh take on Modern Farmhouse Decor that feels current, cozy, and totally doable. If you love warm wood tones, simple neutrals, and a little bit of vintage charm, these 27 DIY "recipes" will help you craft that lived-in, stylish farmhouse look room by room.
Each project is written like a step-by-step recipe so you can gather materials, work in order, and get consistent results. You'll find projects for wall art, tabletop accents, shelving styling, and quick furniture refreshes that blend classic farmhouse lines with modern finishes. I use tools like my KitchenAid stand mixer when staging the kitchen and keep a cast iron skillet handy for photos—it makes the space feel lived-in and warm.
Flip through these 27 easy recipes for Modern Farmhouse Decor, pick a few that match your skill level, and get ready to make your home feel welcoming and refreshed.
1. Rustic Wooden Centerpiece “Recipe”
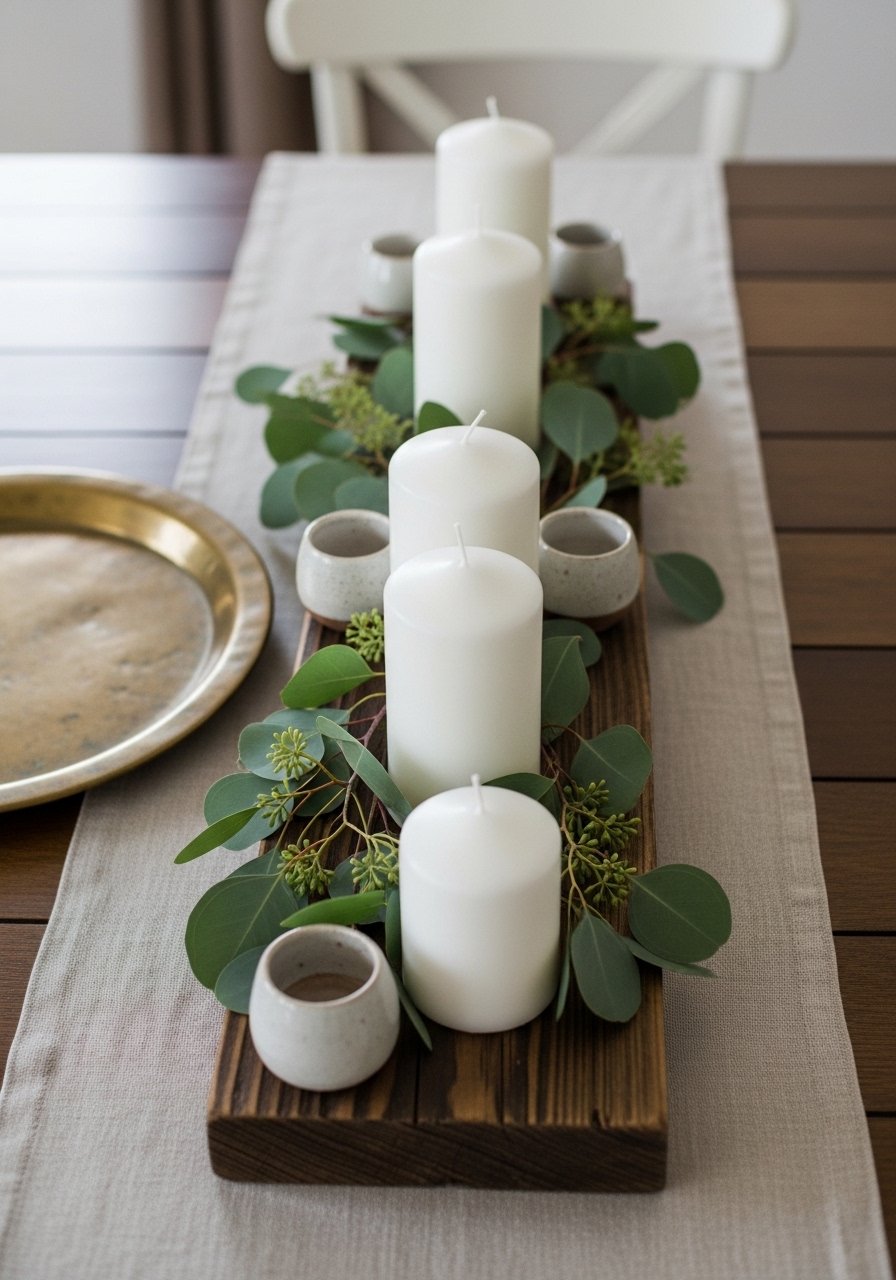
This rustic wooden centerpiece is a quick way to add texture and warmth to your table. It brings a natural, slightly weathered look that pairs nicely with simple white pottery and fresh greenery. The centerpiece smells faintly of wood and looks great layered with candles for soft light.
Ingredients
- 1 reclaimed wood board, 36 inches x 6 inches
- 2 tbsp beeswax paste (for finishing)
- 1 cup dried eucalyptus sprigs
- 3 white pillar candles (3-inch)
- 4 small ceramic votives
- 1 fine-grit sanding block
- 1 paintbrush (1-inch)
- 1 rag, lint-free
- Wood glue (optional)
- 1 small paint tray
Instructions
- Sand the board with the fine-grit sanding block until smooth but still rustic. Wipe with a lint-free rag.
- If the board has cracks, add a dab of wood glue and clamp for 30 minutes.
- Warm beeswax in a tray and brush onto the board with the paintbrush; rub in with the rag for a soft sheen.
- Arrange the three pillar candles evenly along the center.
- Tuck eucalyptus sprigs around the candles, securing with small dabs of glue if windy.
- Place ceramic votives between candles for added texture.
- Let beeswax cure 30 minutes before moving.
- Test stability on your table; adjust spacing so candles have at least 3 inches clearance from greenery.
How to Serve It
Place the centerpiece on a linen runner down the middle of your table. Add a tray under the candles for safety and swap seasonal greenery—sprigs of rosemary or fresh pine work well. Store extra eucalyptus in an airtight container to keep it fresh. Make ahead and assemble the day of your event for best scent and look.
2. Farmhouse Chalkboard Menu Sign
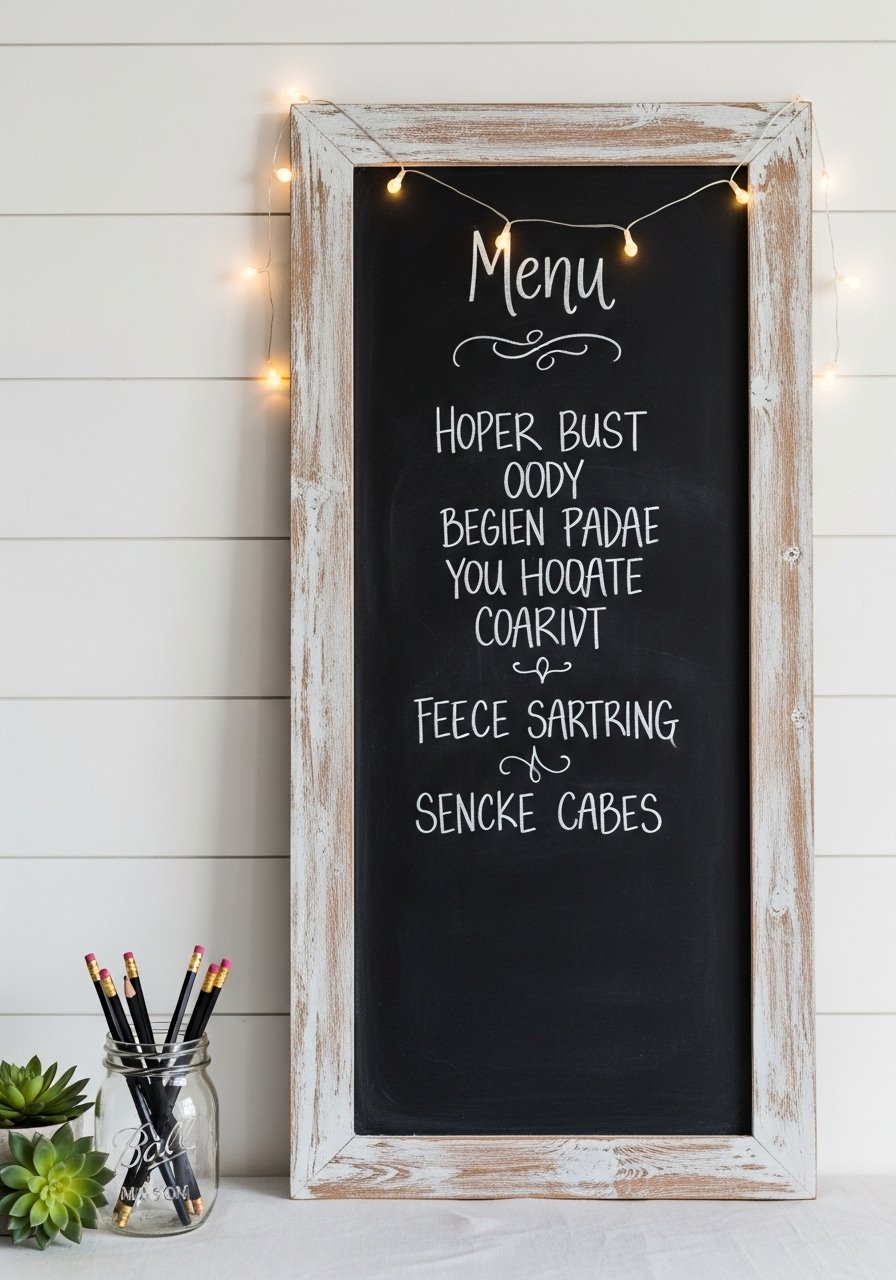
A chalkboard menu adds practical charm to a kitchen or entryway. The matte black surface contrasts beautifully with white shiplap and looks hand-drawn — perfect for weekly meal plans or greeting notes. You’ll love the texture of the chalk on the deep black board.
Ingredients
- 1 framed chalkboard, 18 x 24 inches
- 1 chalk marker set (white + colored)
- 2 brass hooks
- 1 length jute twine (24 inches)
- 4 small wood screws
- 1 sanding sponge
- 1 bottle white chalkboard cleaner
- Optional: stencils for lettering
Instructions
- Clean the chalkboard surface with the chalkboard cleaner; let dry.
- Lightly sand frame edges for a distressed look.
- Thread jute twine through two brass hooks and screw hooks to the top back of frame.
- Practice lettering on scrap paper, then write your menu with the chalk marker.
- Use stencils for headers like "Tonight" or "This Week."
- Hang on a wall with a picture hanging kit rated for the chalkboard’s weight.
- Erase and refresh chalk monthly to avoid ghosting.
How to Serve It
Lean the chalkboard above a small console table and place mason jars with chalk next to it. Pair with a small shelf underneath to hold keys or receipts. For seasonal looks, change header colors or add a paper wreath across a corner.
3. Modern Farmhouse Decor Mason Jar Centerpiece
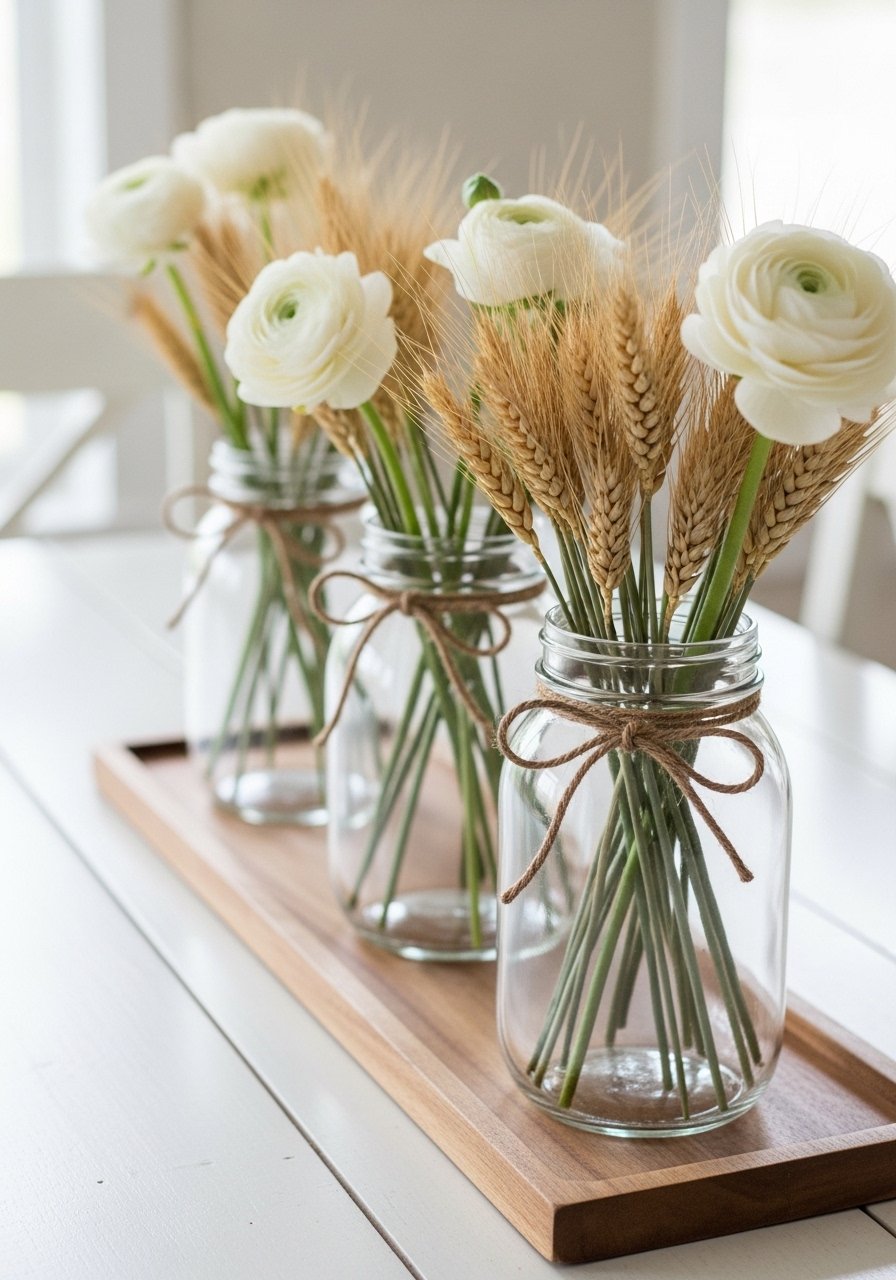
Mason jars are a farmhouse staple—this modern twist pairs clear jars with minimalist stems for a clean, fresh look. It’s lightweight, smells lightly of dried wheat, and feels casual but polished. Great for brunches and dinner parties.
Ingredients
- 3 quart mason jars
- 1 wooden serving tray, 14 x 6 inches
- 12 stems dried wheat
- 6 stems white ranunculus (silk or fresh)
- 3 rolls twine, natural
- 1 floral foam strip (optional)
- Scissors
- 1 small spray bottle with water (if using fresh flowers)
Instructions
- Tie twine around each jar neck and knot neatly.
- Place floral foam in jars if using silk stems for stability.
- Trim stems to about 8-10 inches so they sit nicely in the jar.
- Arrange ranunculus and wheat, alternating heights.
- Group jars on the wooden tray and adjust stems for balance.
- Mist fresh flowers lightly with the spray bottle.
- Place on table and rotate occasionally so sunlight hits evenly.
How to Serve It
Center the tray on a table and surround with linen napkins for a casual farmhouse set. If storing, wrap jars in tissue and keep dry. For a long-term display, swap fresh for silk flowers and tuck a small battery tea light in one jar for evening ambiance.
4. Distressed Picture Frame Collage
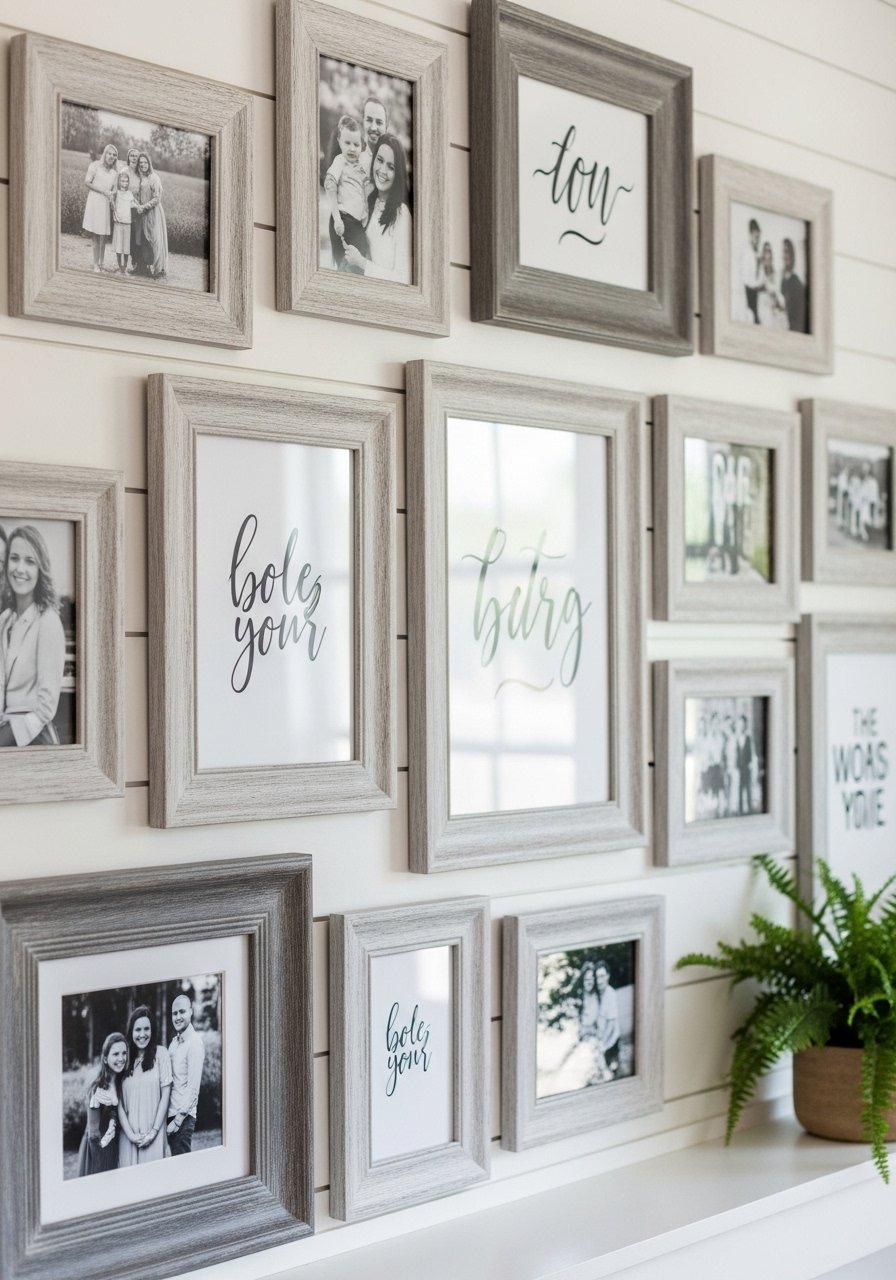
Create a cozy focal wall with mismatched frames that look collected over time. Distressing the frames adds vintage character and softens the gallery. The overall effect is layered and personal, like a curated story of your home.
Ingredients
- 6-8 assorted wooden frames (various sizes)
- 1 can white chalk paint
- 1 can gray chalk paint
- 1 sanding block
- 1 small paintbrush
- 12 frame hanging hooks
- Measuring tape
- Pencil
- Level
Instructions
- Lightly sand frames to remove glossy finish.
- Paint frames in white or gray with chalk paint; let dry 30 minutes.
- Rub edges with sanding block for a distressed effect.
- Measure and mark gallery layout on the wall using the measuring tape and pencil.
- Hang frames with hooks using a level for straight lines.
- Mix photographs and prints to create balanced negative space.
- Step back and tweak spacing until it feels right.
How to Serve It
Pair the gallery wall with a narrow console table and a table lamp. Swap prints seasonally—botanical prints in spring, cozy quotes in winter. For storage, keep extra hanging hooks in a small jar on the console.
5. Painted Farmhouse Bench “Recipe”
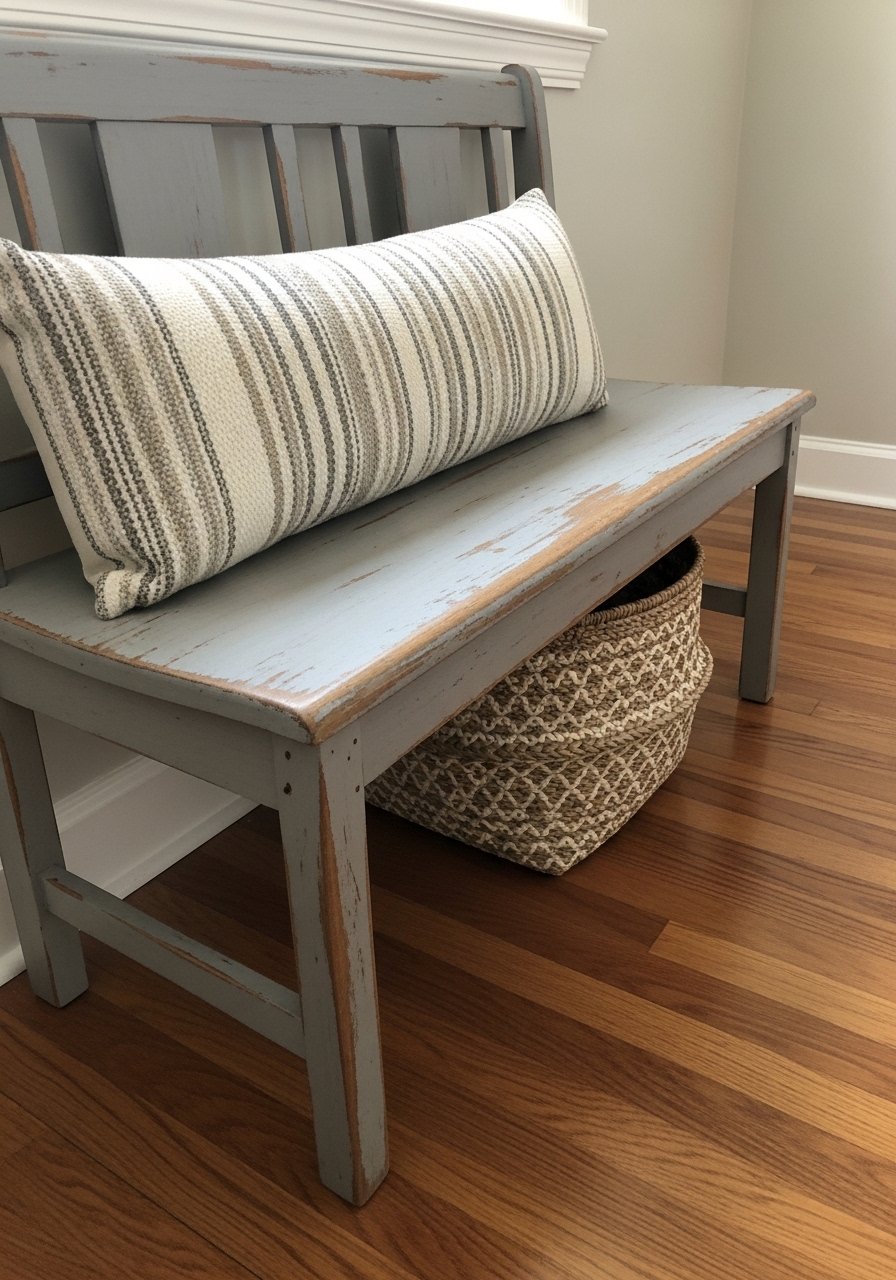
A painted bench at your entry instantly adds seating and charm. This version uses soft gray with intentional wear for that modern farmhouse vibe. It smells faintly of paint and looks inviting when styled with pillows.
Ingredients
- 1 unfinished wooden bench (48 inches)
- 1 quart satin paint, soft gray
- 1 sanding sponge
- 1 wood primer, quart
- 2 foam brushes
- 1 rag for distressing
- 2 throw pillows
- 1 can clear matte sealer
Instructions
- Sand the bench to remove splinters and smooth surfaces.
- Apply one coat primer; dry 1 hour.
- Paint two coats of soft gray, letting each coat dry 2 hours.
- Gently sand edges and corners for a distressed look.
- Wipe dust, then spray or brush on a clear matte sealer; dry 2 hours.
- Add throw pillows and place basket underneath for shoes.
- Allow full cure 24 hours before sitting.
How to Serve It
Place the bench in an entryway and top with a woven basket for shoes. For cleaning, wipe with a damp cloth. Make ahead by painting in a garage and assembling indoors to avoid paint smell.
6. Galvanized Planter Box
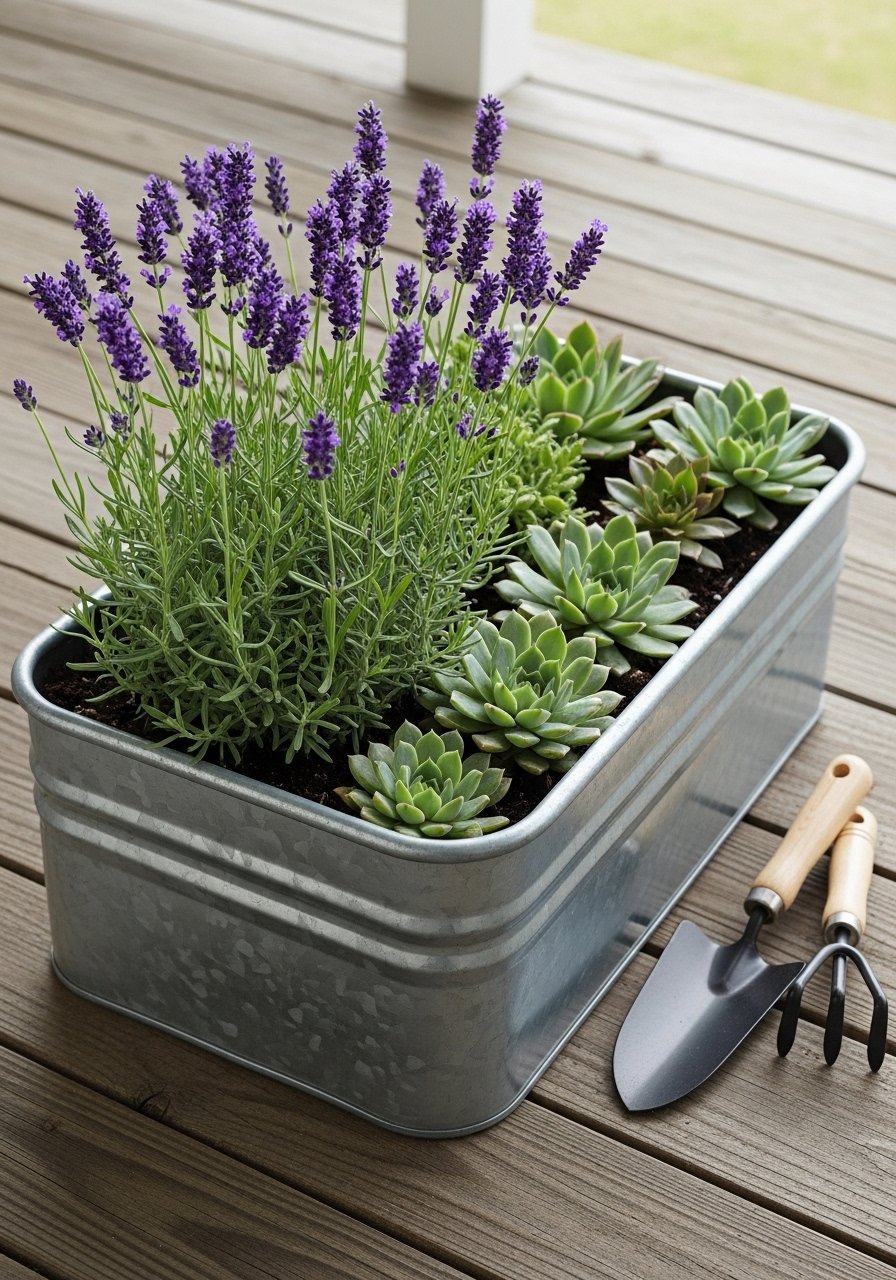
Galvanized planters bring an industrial edge to farmhouse styling. They patina over time and are low-maintenance—great for herbs or small blooms that add greenery and scent to your porch or kitchen windowsill.
Ingredients
- 1 galvanized planter box (24 x 8 inches)
- Potting soil, 6 quarts
- 4 small lavender plants
- 6 assorted succulents
- 1 bag small river stones
- Gardening gloves
- Hand trowel
- Water mister
Instructions
- Fill planter one-third with potting soil.
- Arrange plants to stagger heights, placing lavender at the back.
- Add soil around plants and press lightly to remove air pockets.
- Top with river stones for drainage and clean look.
- Water gently with the mister.
- Place on porch or sunny windowsill and rotate weekly for even growth.
How to Serve It
Group with other metal accents like a metal watering can and place on a sturdy shelf. To overwinter, bring inside and water sparingly. Make a set of three different-sized planters for tiered interest.
7. Reclaimed Wood Floating Shelf
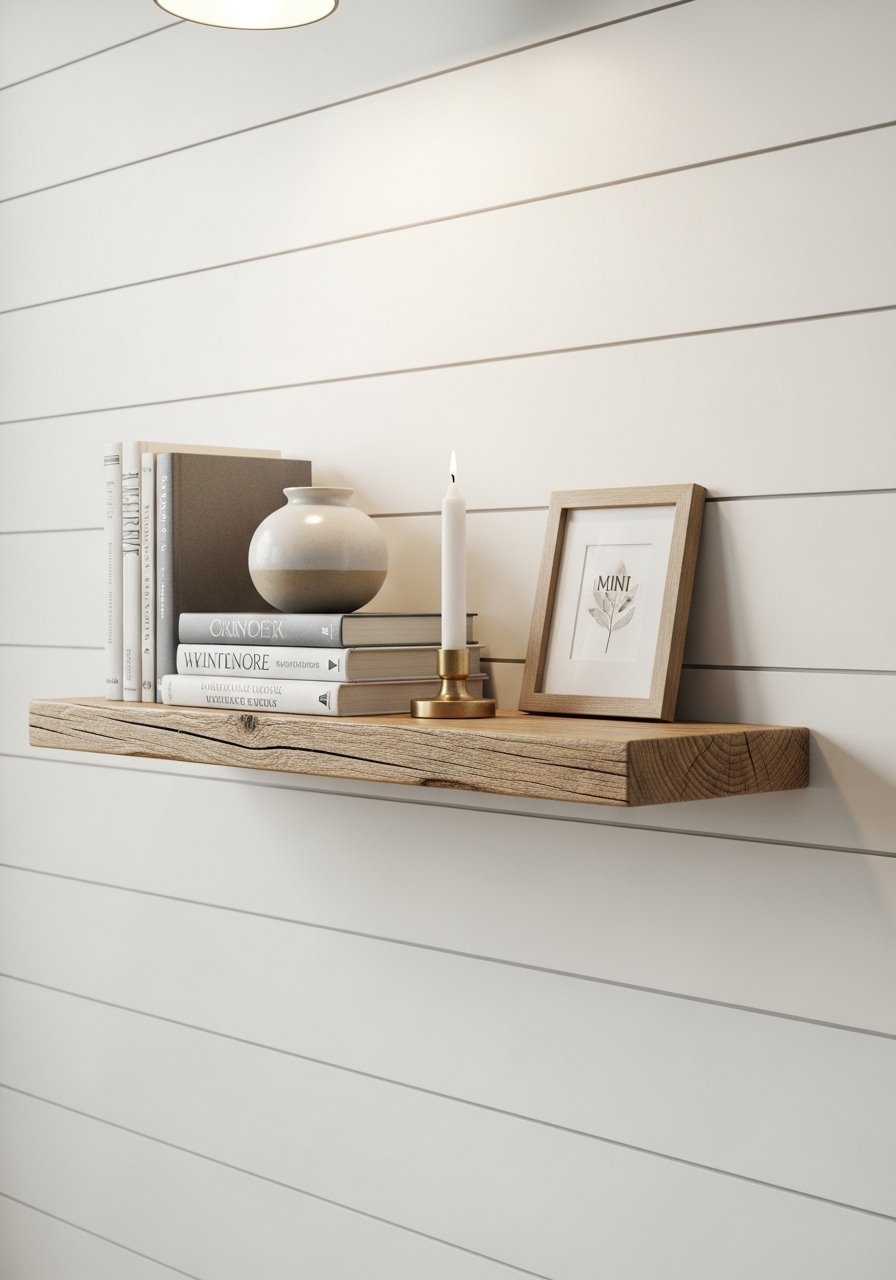
Floating shelves in reclaimed wood add storage and farmhouse warmth without bulky furniture. They’re great for displaying dishes, glassware, or curated decor. The wood has a dry, warm scent and shows beautiful grain.
Ingredients
- 1 reclaimed wood plank, 36 x 8 inches
- 1 floating shelf bracket kit (36-inch)
- Screws and anchors
- Drill
- Stud finder
- Level
- 1 small paint rag
Instructions
- Use the stud finder to locate studs and mark with pencil.
- Attach the floating shelf bracket to the wall using screws/anchors.
- Slide the reclaimed plank onto the bracket and secure per kit instructions.
- Level the shelf and tighten all screws.
- Style with books, trays, and pottery.
- Dust weekly to maintain the rustic look.
How to Serve It
Stack plates and bowls on a shelf in the kitchen and add ceramic pitchers for height. Use a bracket kit rated for the weight of your display. Store seasonal decor in labeled airtight containers when rotating displays.
8. Neutral Pom-Pom Throw Pillow Covers

These simple pillow covers add tactile interest without overpowering a neutral sofa. The pom-pom trim gives a handcrafted feel while keeping lines modern. They’re soft to the touch and add cozy texture.
Ingredients
- 2 linen pillow covers, 20 x 20 inches
- 1 spool cream pom-pom trim (2 yards)
- Fabric glue or sewing kit
- Measuring tape
- Pins
- Scissors
- 1 pillow insert per cover
Instructions
- Measure and pin pom-pom trim around the pillow cover edges.
- Sew in place with a simple stitch or use fabric glue, pressing trim firmly.
- Trim excess trim and let glue cure 24 hours if used.
- Insert pillow form and zip closed.
- Fluff and place on sofa or bench.
How to Serve It
Mix with striped or plaid pillows for layered texture. Store spare covers in a breathable cotton bag. For washing, spot clean trim or hand wash gently and air dry. Use a fabric glue recommended for textiles.
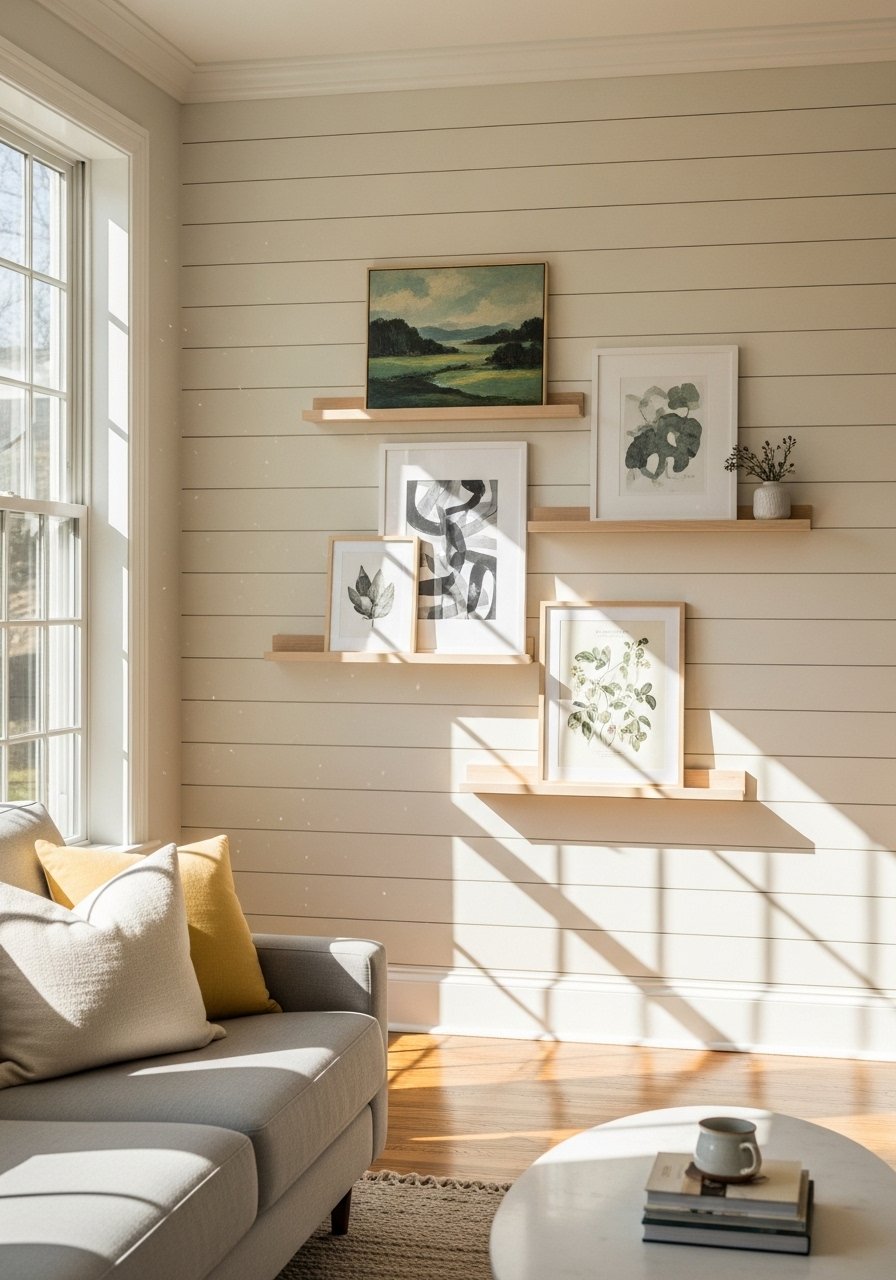
9. Modern Farmhouse Decor Open Shelving Styling
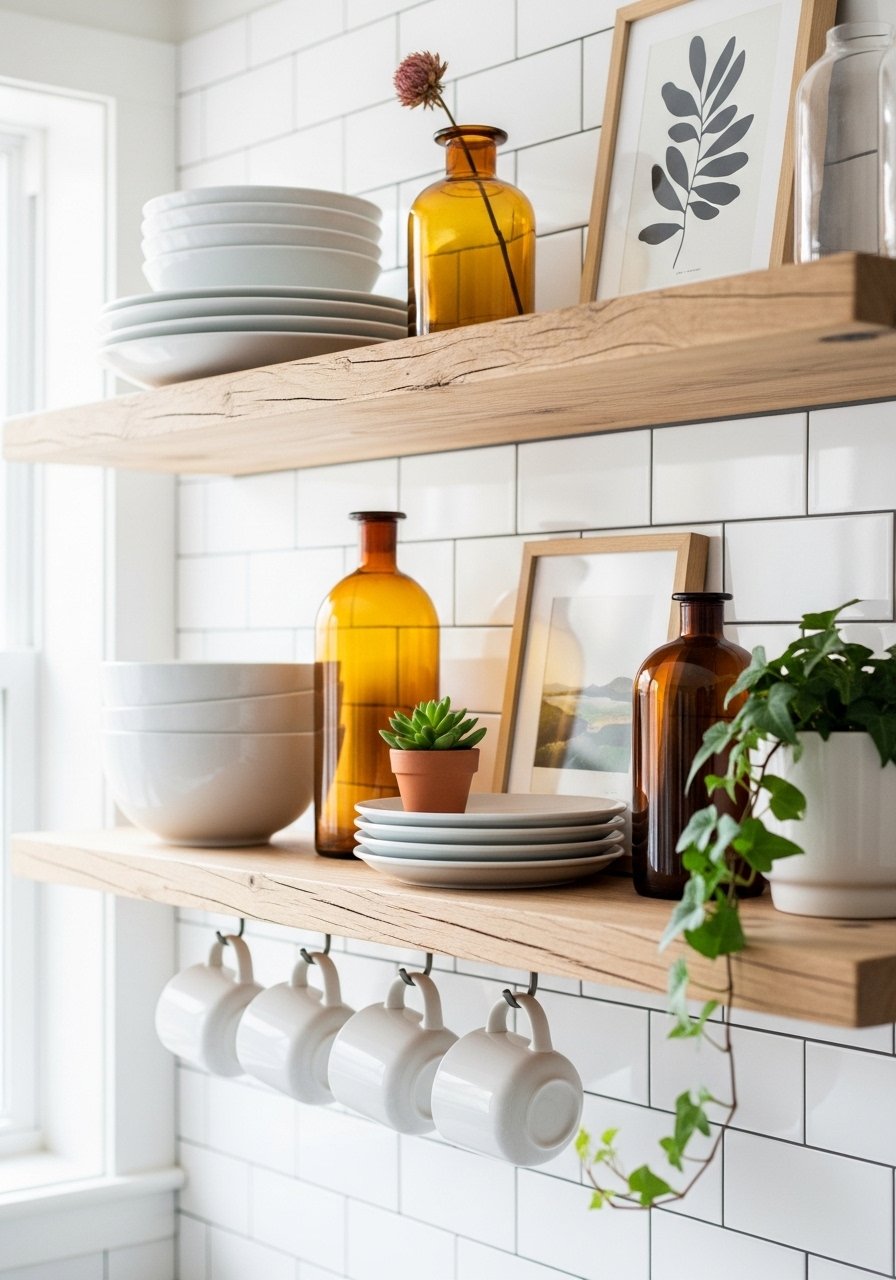
Open shelving styled in a clean, modern farmhouse way keeps the kitchen airy while showcasing favorite pieces. Mix textures—ceramic, glass, wood—to get that curated but lived-in look. The arrangement smells faintly of lemon if you add citrus bowls.
Ingredients
- 2 floating shelves (36 inches)
- 10 white dinner plates
- 6 ceramic mugs
- 3 glass jars (for dry goods)
- 1 small potted plant
- 1 framed print
- Shelf brackets and hardware
- Measuring tape
Instructions
- Install shelves into studs using brackets.
- Start styling by placing larger items (plates, jars) at intervals.
- Layer bowls and mugs for depth.
- Add greenery and a framed print to break the monotony.
- Maintain balance by repeating similar colors across shelves.
- Rotate items seasonally to keep the look fresh.
How to Serve It
Group open shelving displays with matching ceramic canisters to store staples. Wipe shelves weekly and keep frequently used items within easy reach. For kitchen staging, add a wood cutting board leaning against the backsplash.
10. Farmhouse Rope-Wrapped Vase

Wrap a simple vase in jute rope for instant rustic appeal. It’s an easy weekend craft and gives vases a tactile, coastal-farmhouse look. Pampas grass adds soft movement that feels modern yet timeless.
Ingredients
- 1 tall glass vase
- 30 feet natural jute rope
- Hot glue gun and sticks
- Scissors
- Pampas grass, 5 stems
- 1 measuring tape
Instructions
- Heat the hot glue gun and test on scrap.
- Start gluing rope at the vase’s base, wrapping tightly and gluing every 2 inches.
- Continue wrapping until you reach desired height; cut and glue the end securely.
- Trim any loose fibers.
- Insert pampas stems and fluff.
How to Serve It
Place on a console or mantel with other natural textures like a woven placemat. Keep rope-wrapped vases away from water unless protected; use silk stems if worried about moisture. Store extra rope in a dry bin.
11. Vintage Ladder Blanket Rack
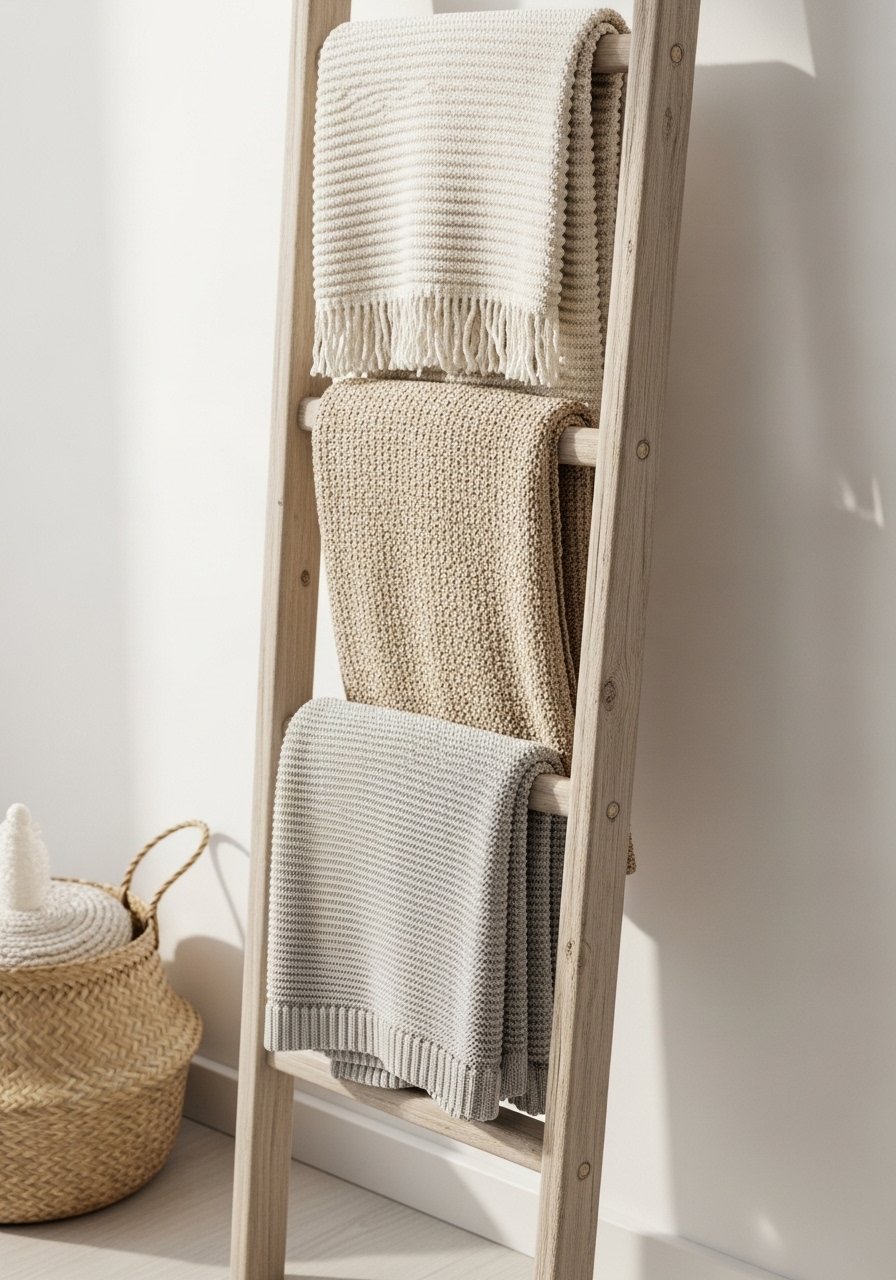
An old ladder repurposed as a blanket rack brings vertical interest and handy storage. The ladder’s worn finish pairs perfectly with chunky knits and adds a relaxed, cozy vibe to any room.
Ingredients
- 1 reclaimed wooden ladder (6 feet)
- 2 chunky knit throws
- 1 woven basket
- Wall bumpers (for ladder base)
- Sandpaper
Instructions
- Clean and lightly sand ladder rungs.
- Lean ladder at about a 10-degree angle against the wall; use wall bumpers at base to protect paint.
- Drape throws over rungs, arranging lengths for visual interest.
- Place the woven basket beside the ladder for extra storage.
- Check stability; brace if necessary.
How to Serve It
Place by a fireplace or sofa and add a chunky knit throw for texture. For small homes, use a shorter ladder as towel storage in a bathroom. Store seasonal throws in labeled storage bins.
12. Weathered Window Frame Mirror
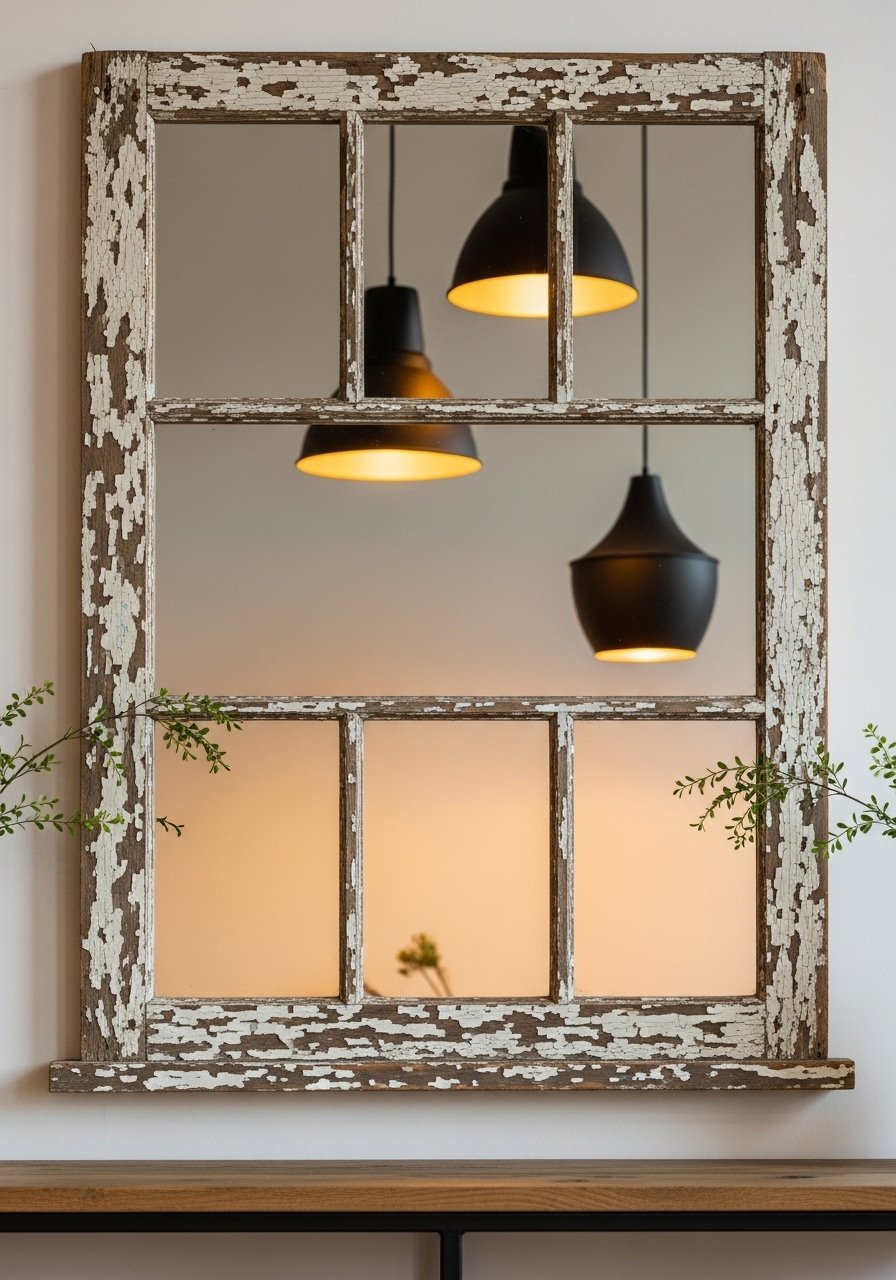
Turn an old window into a mirror for an instant farmhouse focal point. The subdivided panes add architectural interest and reflect light to open small spaces.
Ingredients
- 1 vintage window frame (24 x 36 inches)
- 1 mirror cut to fit panes (or mirrored acrylic)
- Mirror adhesive
- Hanging hardware
- Sandpaper
- Whitewash paint (optional)
Instructions
- Clean and sand the frame.
- Paint or whitewash if desired; dry 1 hour.
- Affix mirror pieces into panes using mirror adhesive; press firmly.
- Attach heavy-duty hanging hardware to back.
- Hang securely and check level.
How to Serve It
Hang above a console with a table lamp and a small tray for keys. Use mirrored acrylic for lighter weight if hanging on drywall. Store spare mirror pieces safely while working.
13. Shiplap Accent Wall “Recipe”
A shiplap wall adds instant farmhouse character and a textural backdrop for art and shelves. It’s surprisingly approachable with pre-cut shiplap boards and basic tools, and it brightens a room by reflecting light.
Ingredients
- 8 shiplap boards (8 ft)
- Cordless drill
- Finish nails, 1.5 inch
- Measuring tape
- Level
- Paint (soft cream)
- Caulk and caulk gun
- Paintbrush
Instructions
- Measure wall height and mark studs with a stud finder.
- Start at the bottom, nail first board into studs every 12 inches.
- Butt boards tightly and continue upward, staggering seams.
- Fill nail holes with putty and caulk seams.
- Paint or touch up edges with a brush.
- Let paint cure 24 hours before mounting shelves or art.
How to Serve It
Use the shiplap wall as a backdrop for a floating shelf display or large mirror. For small rooms, choose a lighter paint to keep the space feeling open. Store leftover boards in a dry place for future touchups.
14. Industrial Pipe Towel Rack
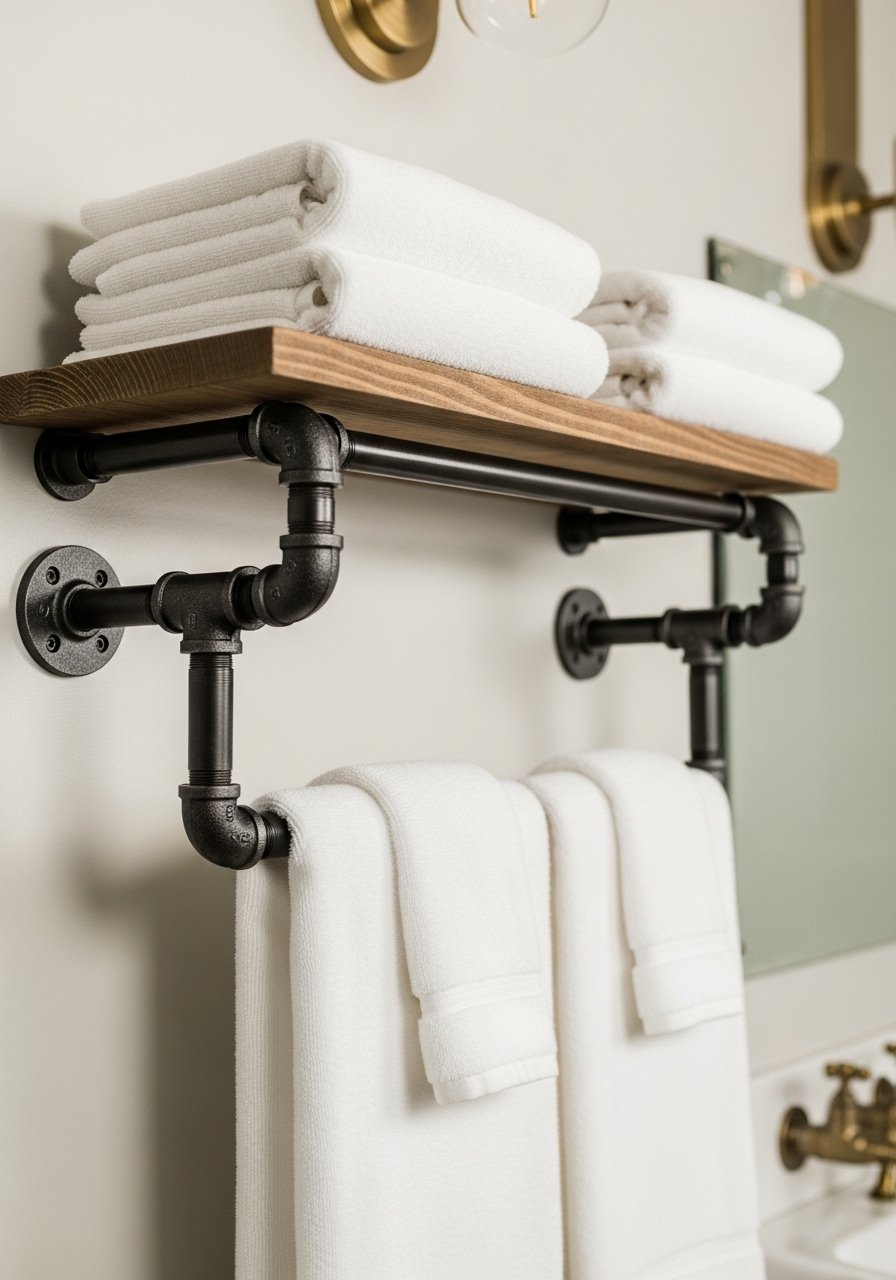
Industrial pipe hardware adds a masculine, modern edge to farmhouse bathrooms or kitchens. This towel rack is sturdy, compact, and pairs well with wood and white tile for contrast.
Ingredients
- 2 black steel pipe flanges
- 2 pipe nipples (6 inches)
- 1 length black steel pipe (24 inches)
- Screws and anchors
- Drill
- Towels (2)
Instructions
- Assemble pipe by screwing nipples into flanges and threading the long pipe between.
- Mark placement under shelf or on wall and screw flanges into studs.
- Hang towels and adjust for even spacing.
- Wipe pipe with dry cloth to remove fingerprints.
How to Serve It
Pair with a woven hand towel and a small shelf above for toiletries. For humid areas, consider galvanized pipe to prevent rust. Store extra fittings in a labeled jar for repairs.
15. Modern Farmhouse Decor Farm Table Runner
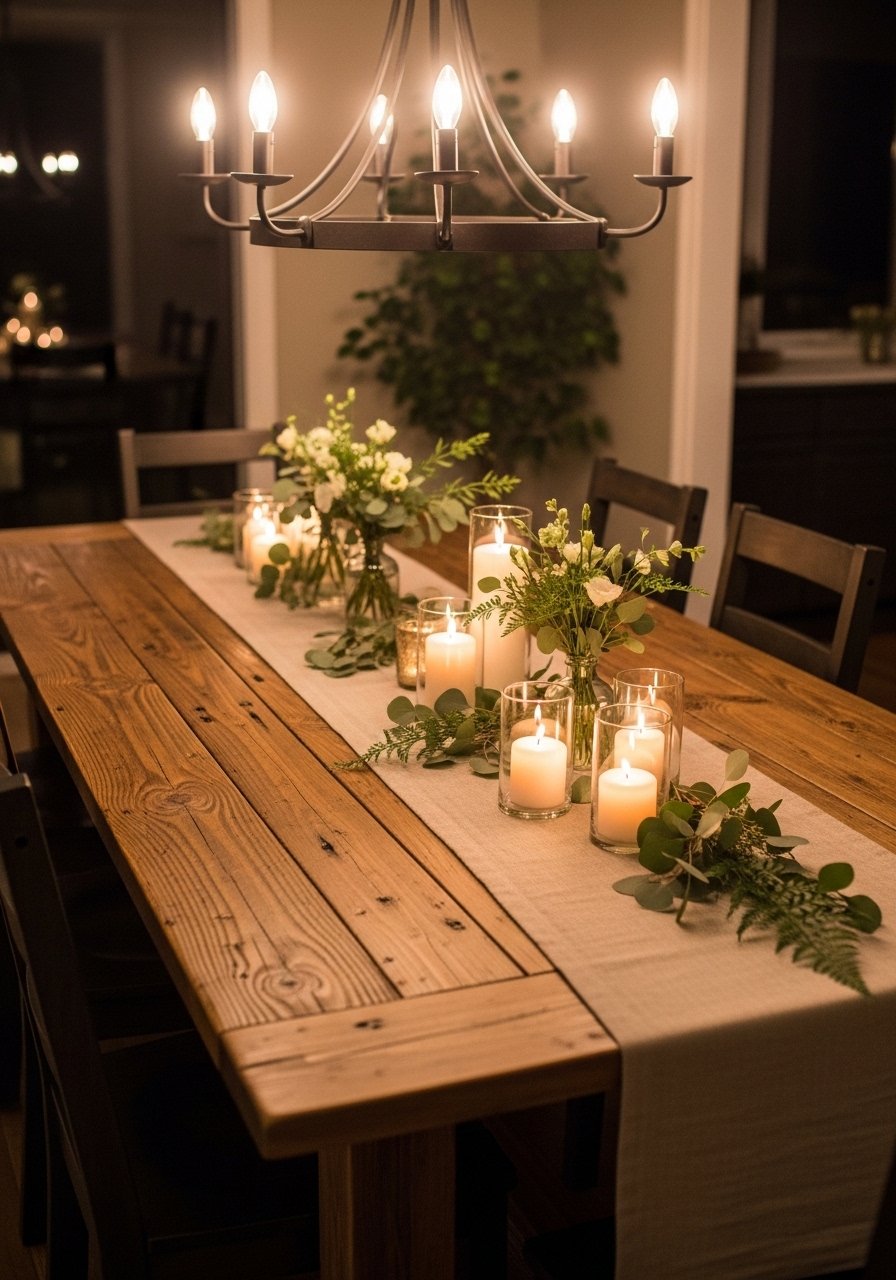
A simple linen runner anchors a long table and pulls together mixed dinnerware for family-style meals. The natural texture keeps the look casual and comfortable, perfect for weekday dinners or weekend brunch.
Ingredients
- 1 linen table runner, 108 x 16 inches
- 3 pillar candles (varying heights)
- 1 small greenery garland, 60 inches
- 1 wooden tray, 30 x 8 inches
- Scissors
- Matches or lighter
Instructions
- Lay runner down the center of the table.
- Place the wooden tray in the middle and arrange candles on it.
- Tuck greenery along either side of the tray.
- Light candles shortly before guests arrive for ambiance.
- Replace greenery seasonally for a new look.
How to Serve It
Complement with linen napkins and simple white dishes. Store the runner folded in a linen bag between uses. For safety, use a tray under candles and never leave lit candles unattended.
16. Barn Door Picture Frame
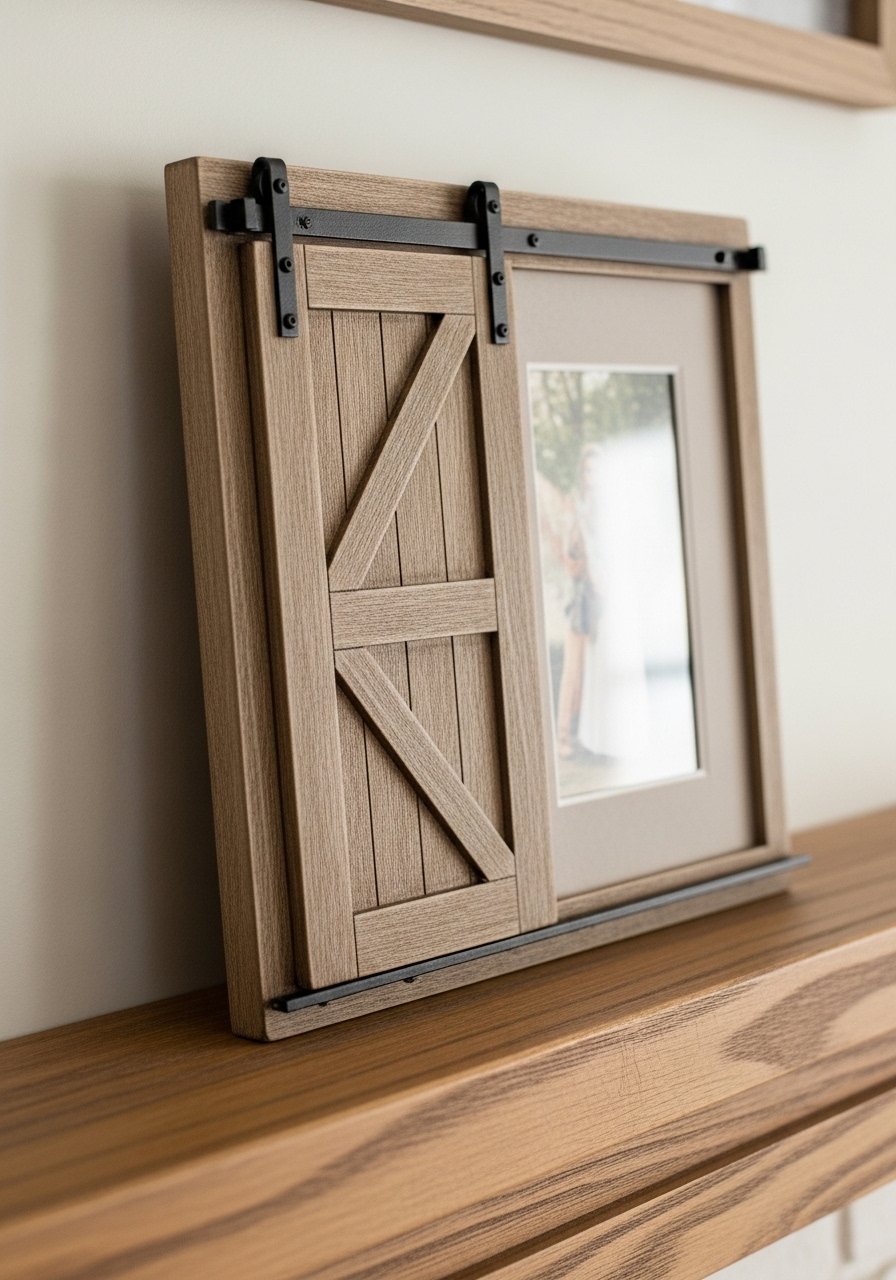
Mini barn doors used as frames add a playful, scaled-down rustic element to mantels or shelves. The tiny sliding detail brings motion and charm to a tabletop vignette.
Ingredients
- 1 small frame (8 x 10 inches)
- 2 thin wood strips (for barn doors)
- 1 mini sliding barn hardware (toy size)
- Wood glue
- Paint or stain
- Sandpaper
Instructions
- Sand and stain or paint the wood strips.
- Glue strips to the front of the frame to mimic barn doors.
- Attach mini sliding hardware and test the movement.
- Insert photo and place on mantel.
How to Serve It
Mix with other small frames and a small ceramic vase. Store extra prints in an archival box. Rotate photos to keep the display personal.
17. Simple Whitewashed Dresser
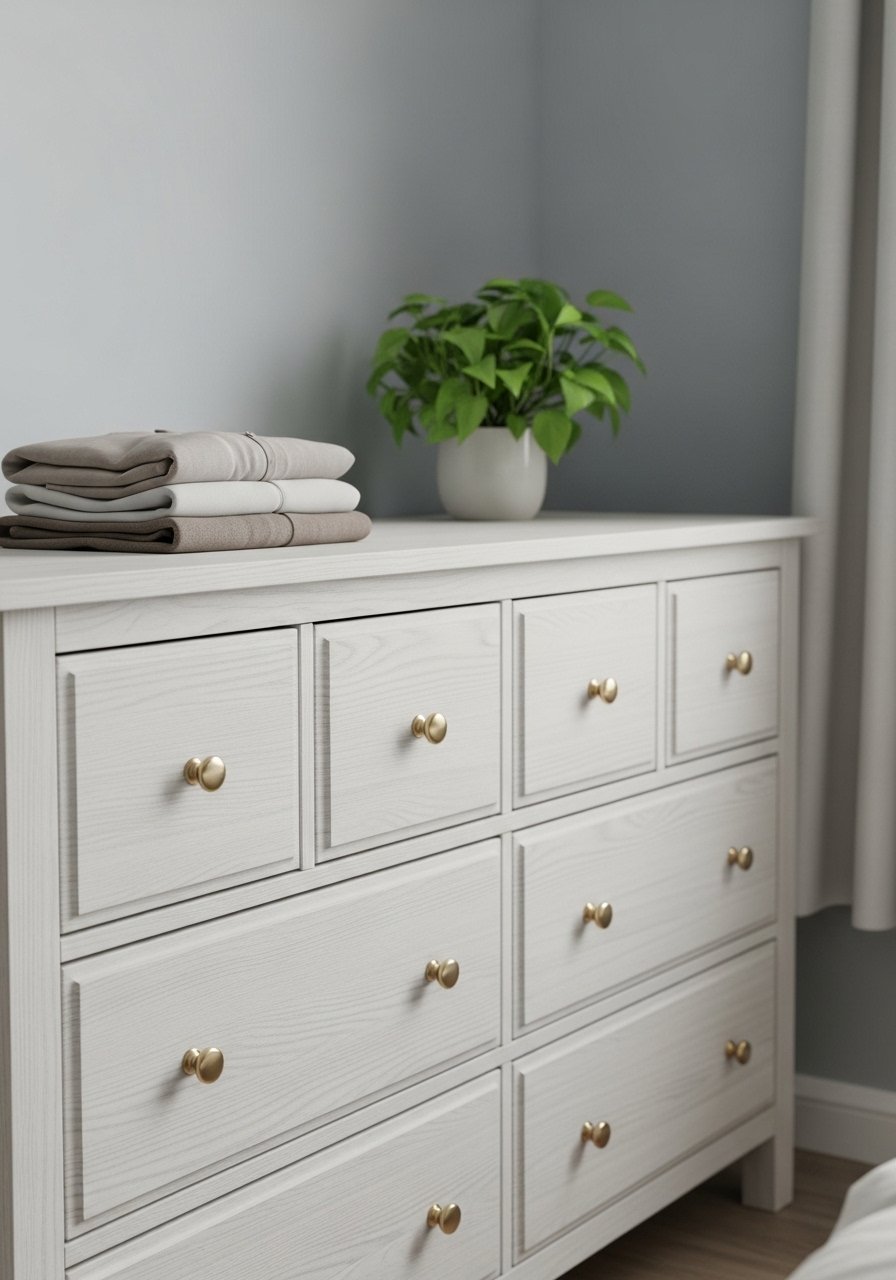
Whitewashing brightens a heavy dresser while preserving the wood grain. The result is a soft, airy piece that fits perfectly into a modern farmhouse bedroom.
Ingredients
- 1 wooden dresser
- 1 quart white paint (diluted)
- 1 cup water (for wash)
- Paintbrush
- Sandpaper
- New drawer knobs (brass)
- Rag
Instructions
- Remove hardware and sand surface lightly.
- Mix paint and water to a thin wash.
- Brush on the wash, then quickly wipe with a rag to expose grain.
- Let dry and add a second coat if needed.
- Reattach with new brass knobs.
- Dry 24 hours before placing items on top.
How to Serve It
Use in a bedroom with neutral bedding and a brass knob set. Store off-season clothing in vacuum storage bags to save dresser space. Touch up with diluted paint for maintenance.
18. Burlap-Wrapped Storage Jars
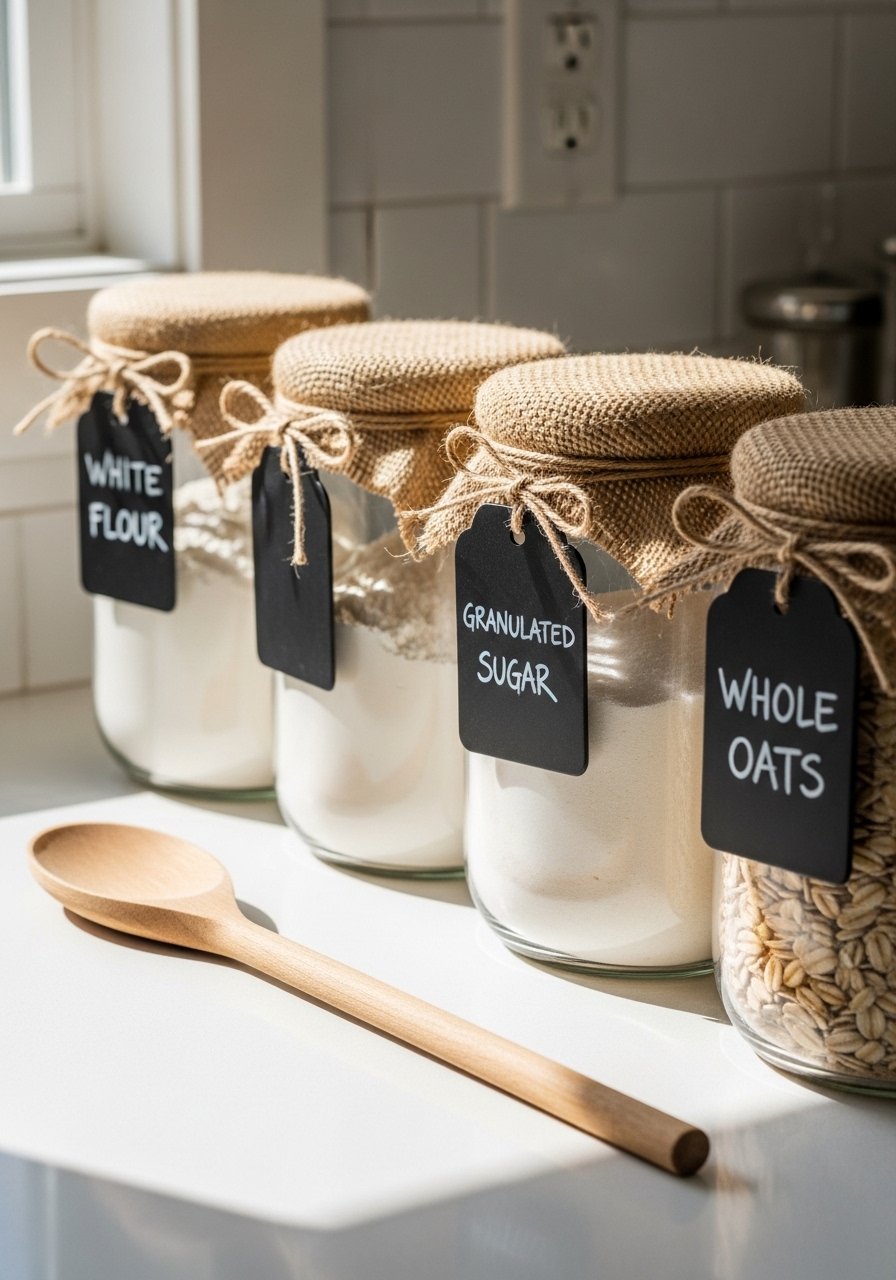
Wrap clear jars with burlap for an instant farmhouse pantry refresh. It hides labels you don’t love, adds warmth, and keeps staples organized while still visible.
Ingredients
- 3 glass storage jars (1 quart)
- 1 roll burlap fabric
- 1 spool twine
- 3 chalkboard labels
- Scissors
- Hot glue gun
Instructions
- Cut burlap to fit around each jar with slight overlap.
- Glue edges together and trim excess.
- Wrap twine around the neck and tie in a bow.
- Attach chalkboard labels and write contents.
- Fill jars and arrange on a shelf.
How to Serve It
Group with a wooden spoon set and a small scale. Store jars away from direct sunlight to protect contents. For airtight storage, keep extra supplies in labeled airtight containers.
19. Copper Pipe Floating Towel Holder
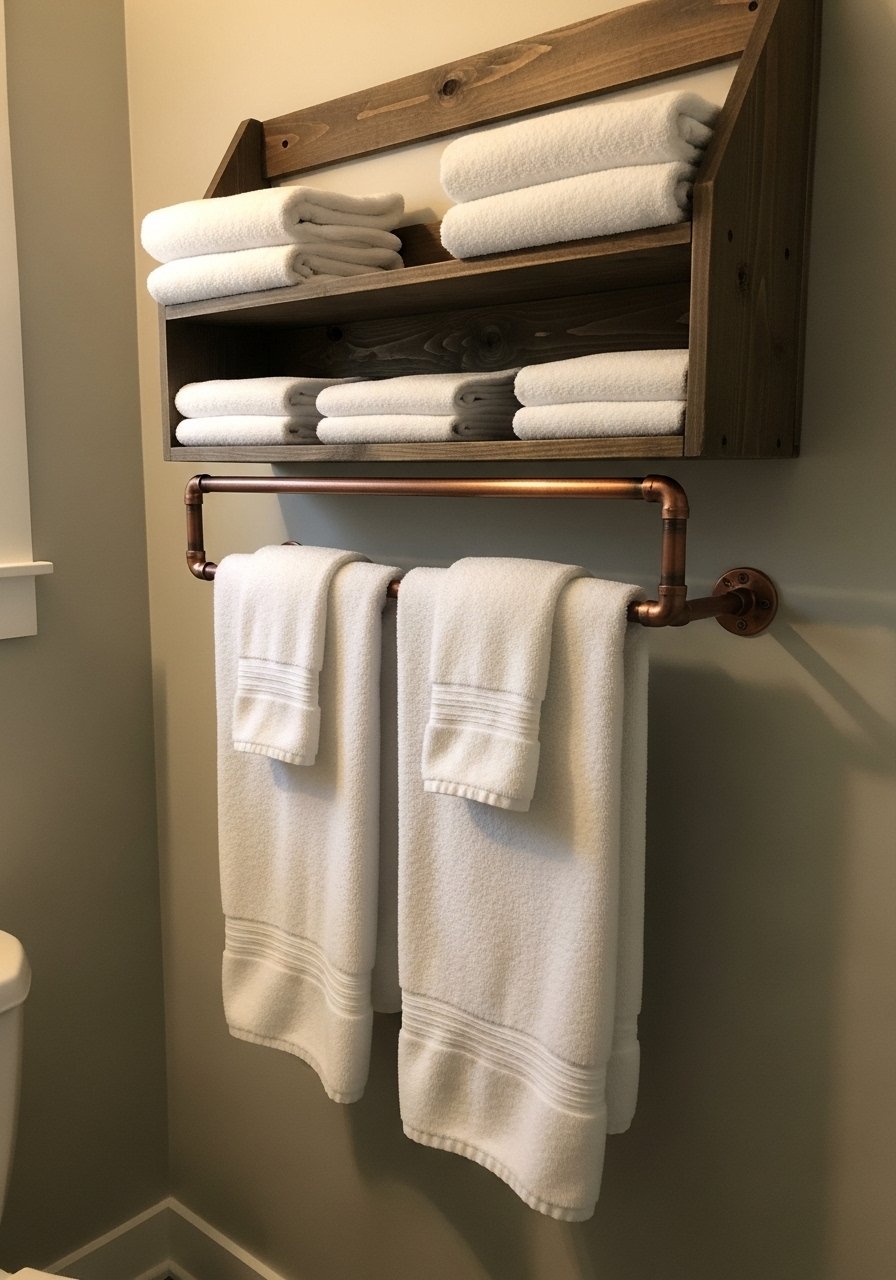
Copper pipe adds warmth and a hint of metallic contrast to farmhouse bathrooms. Over time it takes on a soft patina that adds personality without being showy.
Ingredients
- 2 copper pipe flanges
- 1 copper pipe (18 inches)
- 2 pipe nipples
- Screws and anchors
- Drill
- Hand towel
Instructions
- Assemble pipe and flanges, then attach to wall at desired height.
- Tighten securely into studs or use anchors.
- Hang hand towel and test stability.
- Wipe clean with a soft cloth.
How to Serve It
Pair with a ceramic soap dish. To speed patina, let it age naturally or use a light vinegar wipe to brighten. Keep replacement parts handy in a small box.
20. Hand-Painted Typography Sign
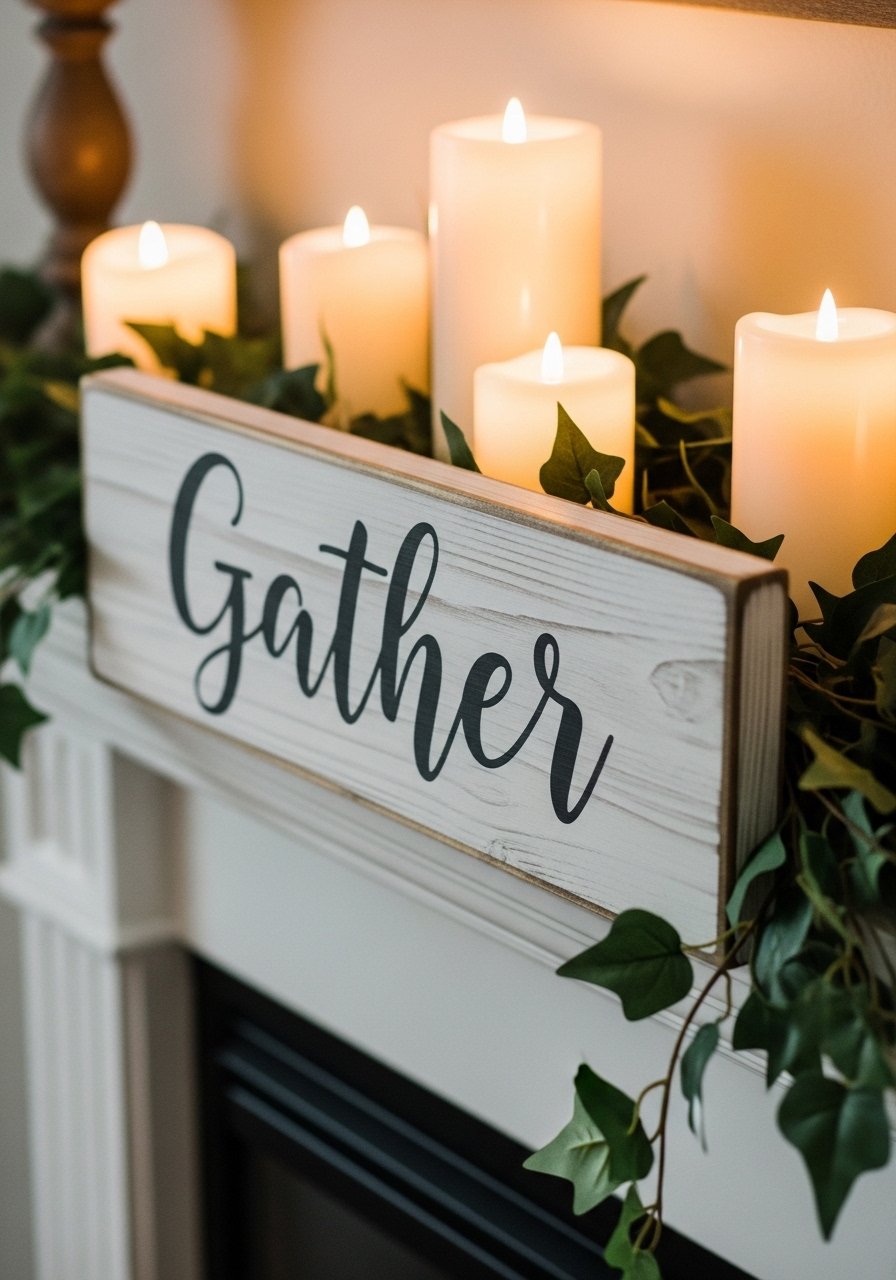
A hand-painted sign with a single word adds warmth and personality. Choose a meaningful word and play with script for a soft, friendly touch that fits any room.
Ingredients
- 1 wooden sign board (12 x 24 inches)
- 1 can white chalk paint
- 1 jar charcoal acrylic paint
- Paintbrushes (1 and 2-inch)
- Pencil
- Sandpaper
- Clear matte sealer
Instructions
- Paint the board with white chalk paint and dry.
- Lightly sketch word in pencil.
- Paint the word with charcoal acrylic using a steady hand.
- Sand edges for a worn look and seal with matte sealer.
- Let dry 24 hours before hanging.
How to Serve It
Prop on a mantel with a small picture frame. Rotate words seasonally—“Thanks” for fall, “Joy” for winter. Store extra signage flat to avoid warping.
21. Mini Herb Garden in Wooden Crates
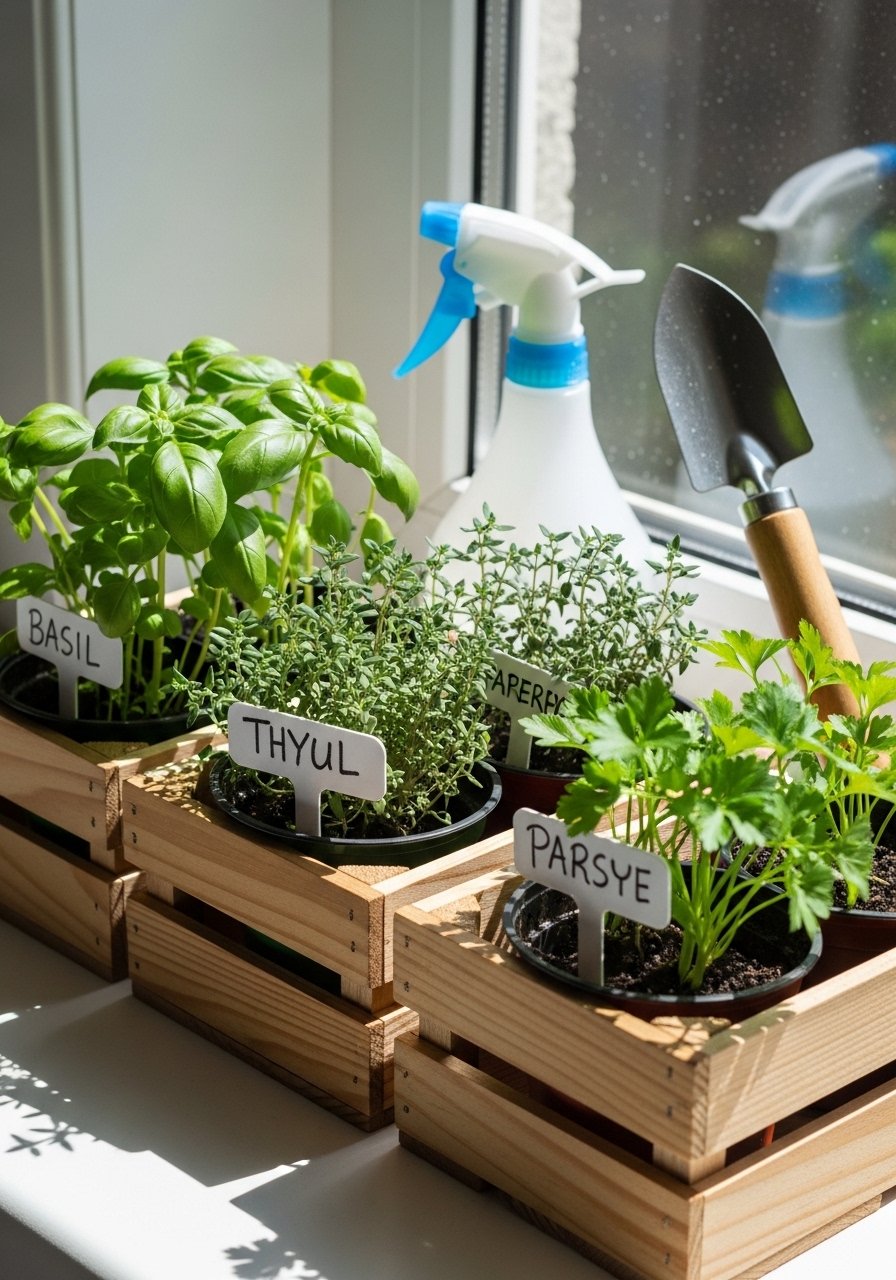
A trio of crate herb gardens brings scent and practicality to the kitchen. Fresh herbs look great and make cooking more enjoyable—snip as you go for bright flavor.
Ingredients
- 3 small wooden crates
- 3 plastic plant pots (4-inch)
- Potting soil
- Basil, thyme, parsley seedlings
- Small labels and marker
- Hand trowel
- Spray bottle
Instructions
- Fill pots with potting soil and plant seedlings.
- Place pots into crates and label each herb.
- Water lightly and place on sunny windowsill.
- Trim herbs regularly to encourage growth.
- Rotate pots weekly for even sunlight.
How to Serve It
Use fresh herbs in cooking and store extra seeds in a labeled envelope. For cleanup, keep a small watering can nearby. Replace herbs seasonally.
22. Layered Rug Look with Jute and Flatweave

Layering a natural jute rug with a soft flatweave rug adds depth and comfort while protecting flooring. The textured base grounds the room; the soft rug brings pattern and coziness.
Ingredients
- 1 jute rug, 6 x 9 feet
- 1 flatweave rug, 5 x 7 feet
- Rug pad (non-slip)
- Measuring tape
- Scissors (for pads)
Instructions
- Place jute rug centered in room.
- Add rug pad on top to prevent slipping.
- Center flatweave rug over the jute, allowing the jute border to show.
- Adjust furniture placement for balance.
- Vacuum both rugs regularly.
How to Serve It
Pair with a woven basket for throws. For high traffic, rotate rugs every few months to even wear. Store an extra pad for replacement.
23. DIY Beaded Chandelier Pull
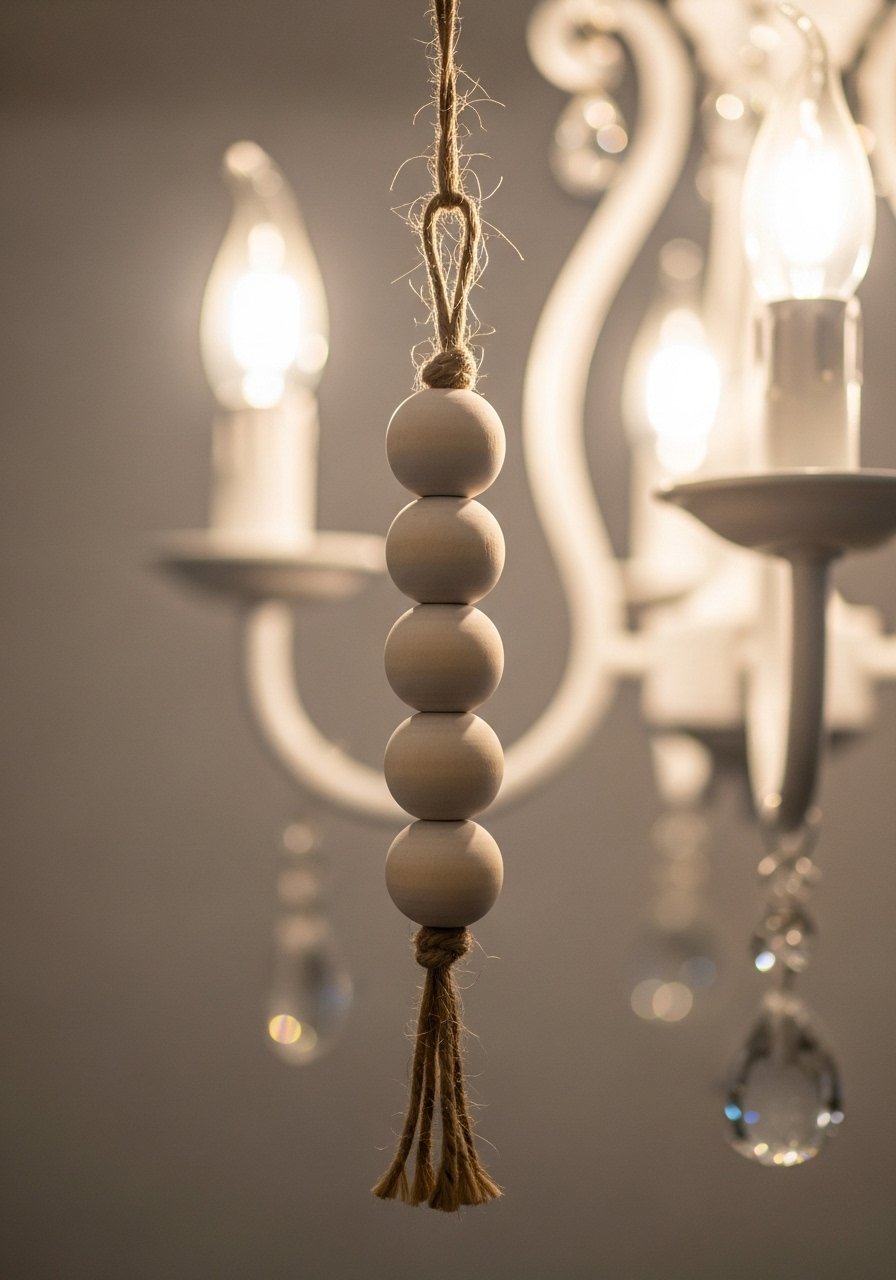
This little charm adds texture to overhead lighting and is an easy way to add personality. Wooden beads bring warmth and a soft, tactile detail that reads handcrafted.
Ingredients
- 10 wooden beads (large)
- 6 feet natural twine
- Hot glue gun
- Scissors
- Key ring or small hoop
Instructions
- Thread beads onto twine and knot between beads to secure spacing.
- Attach key ring at the top and glue knot for security.
- Loop onto chandelier pull chain.
- Trim twine and tuck knots.
How to Serve It
Switch beads seasonally or paint a few for contrast. Keep extra beads in a craft box. Use a small key ring set for attaching.
24. Painted Mason Jar Pendant Lights
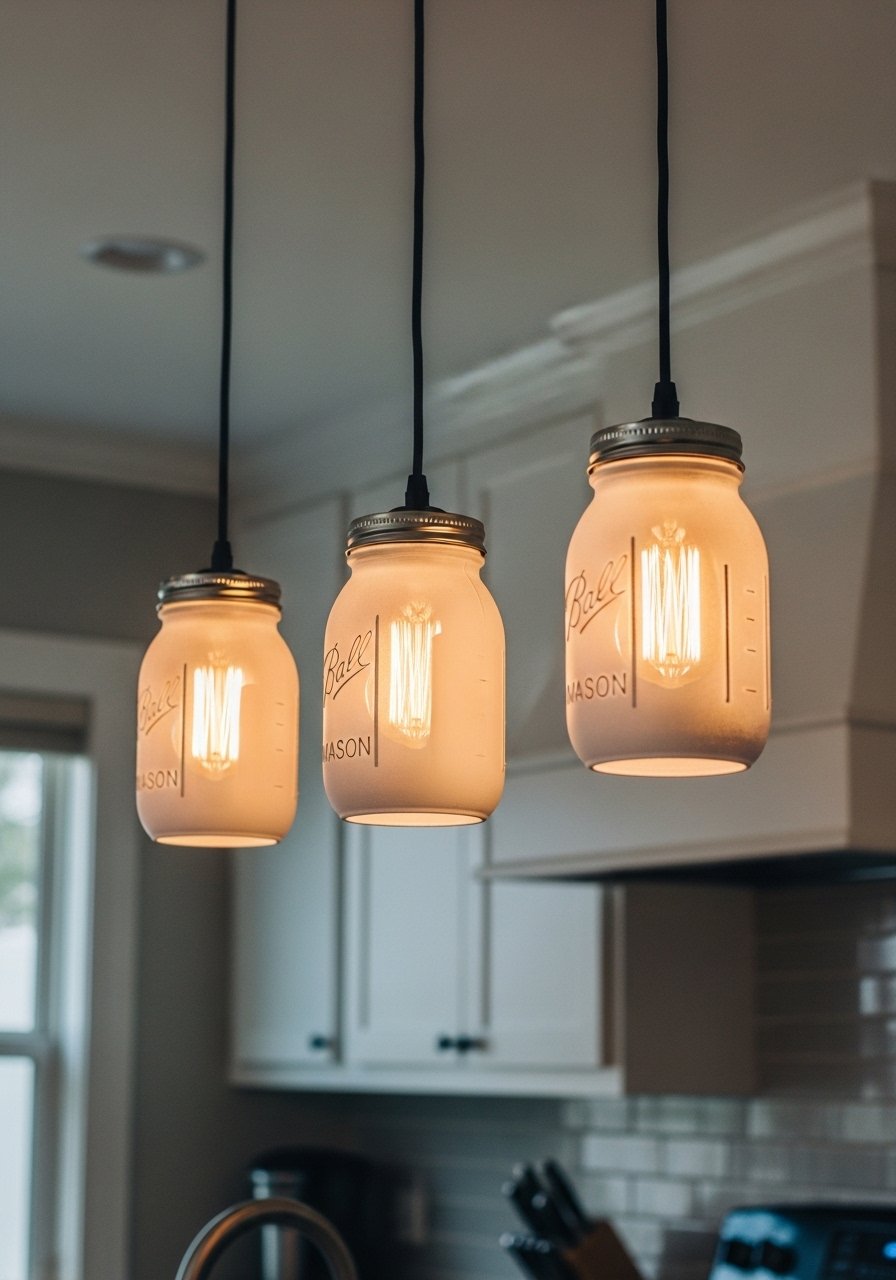
Turn mason jars into pendant lights for a modern farmhouse twist. The painted jars soften the light and create a simple, cohesive look above an island or table.
Ingredients
- 3 mason jars
- 3 pendant light kits (with sockets and cords)
- Spray paint, matte white
- Drill with glass bit
- Vintage-style bulbs (3)
- Wire nuts
Instructions
- Spray paint jar exteriors and let dry 24 hours.
- Drill hole in jar lid for socket; follow kit instructions for wiring.
- Thread cord through lid and secure socket.
- Install bulb and hang at desired height.
- Test wiring with a circuit tester if unsure.
How to Serve It
Hang over an island and pair with wooden bar stools. For safety, ensure secure wiring and consult an electrician if needed. Store extra bulbs in a labeled box.
25. Farmhouse Console Table Styling Guide
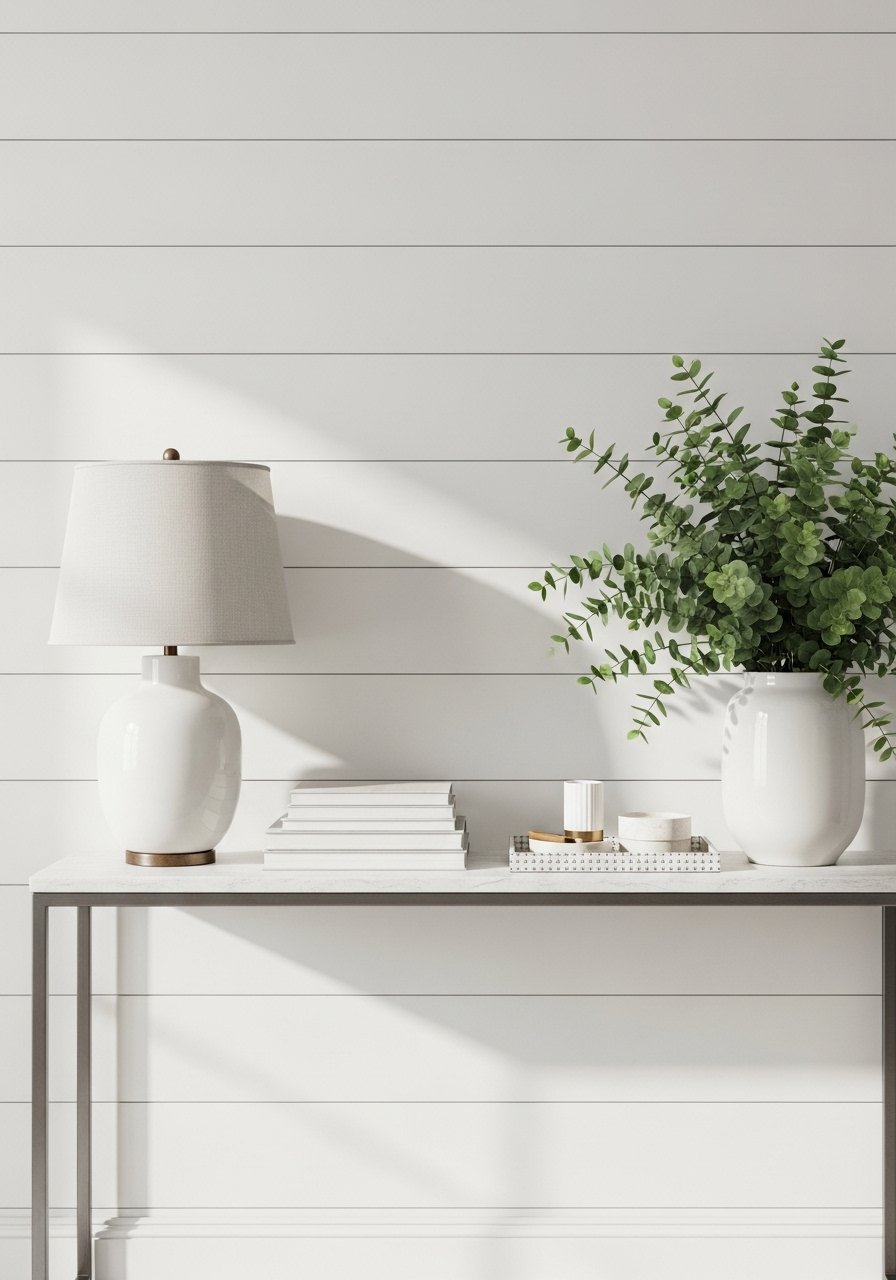
A styled console gives an entryway instant personality. Balance functional items with decorative touches for a welcoming first impression.
Ingredients
- 1 console table
- 1 table lamp
- 1 stack of books
- 1 small tray
- 1 vase with eucalyptus
- 1 decorative bowl for keys
- Picture frame (8 x 10)
Instructions
- Place lamp at one end and stack books on the other for balance.
- Add tray near the center for outgoing mail.
- Tuck vase and frame together for layering.
- Keep a small bowl for keys and coins.
- Refresh greenery weekly.
How to Serve It
Use a decorative tray to keep items corralled. Rotate items seasonally and store extras in labeled bins under the console.
26. Farmhouse Window Box for the Porch
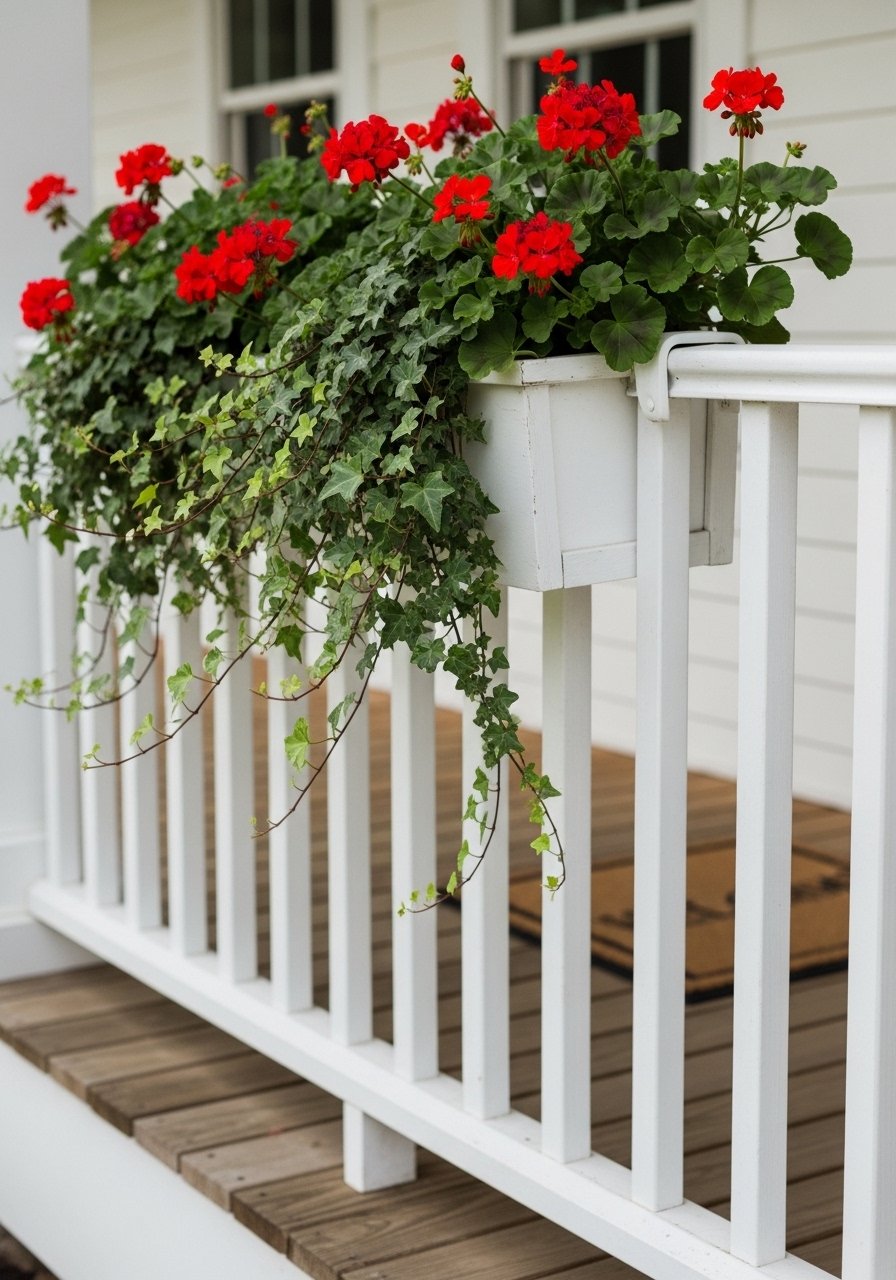
A classic window box brightens curb appeal and adds color to a farmhouse exterior. Choose plants that handle your local sun exposure for long-lasting blooms.
Ingredients
- 1 wooden window box, 36 inches
- Potting soil, 8 quarts
- Geraniums, 4
- Ivy, 2 trailing plants
- Landscape fabric
- Mounting brackets
- Drill
Instructions
- Line box with landscape fabric and fill halfway with soil.
- Plant geraniums toward the back and ivy at the front for trailing.
- Add remaining soil and press gently.
- Attach mounting brackets and secure to railing or sill.
- Water thoroughly and maintain weekly.
How to Serve It
Add a small watering can nearby for easy care. Replace blooms seasonally and store box inside during freezing weather.
27. Neutral Wreath with Cotton Stems
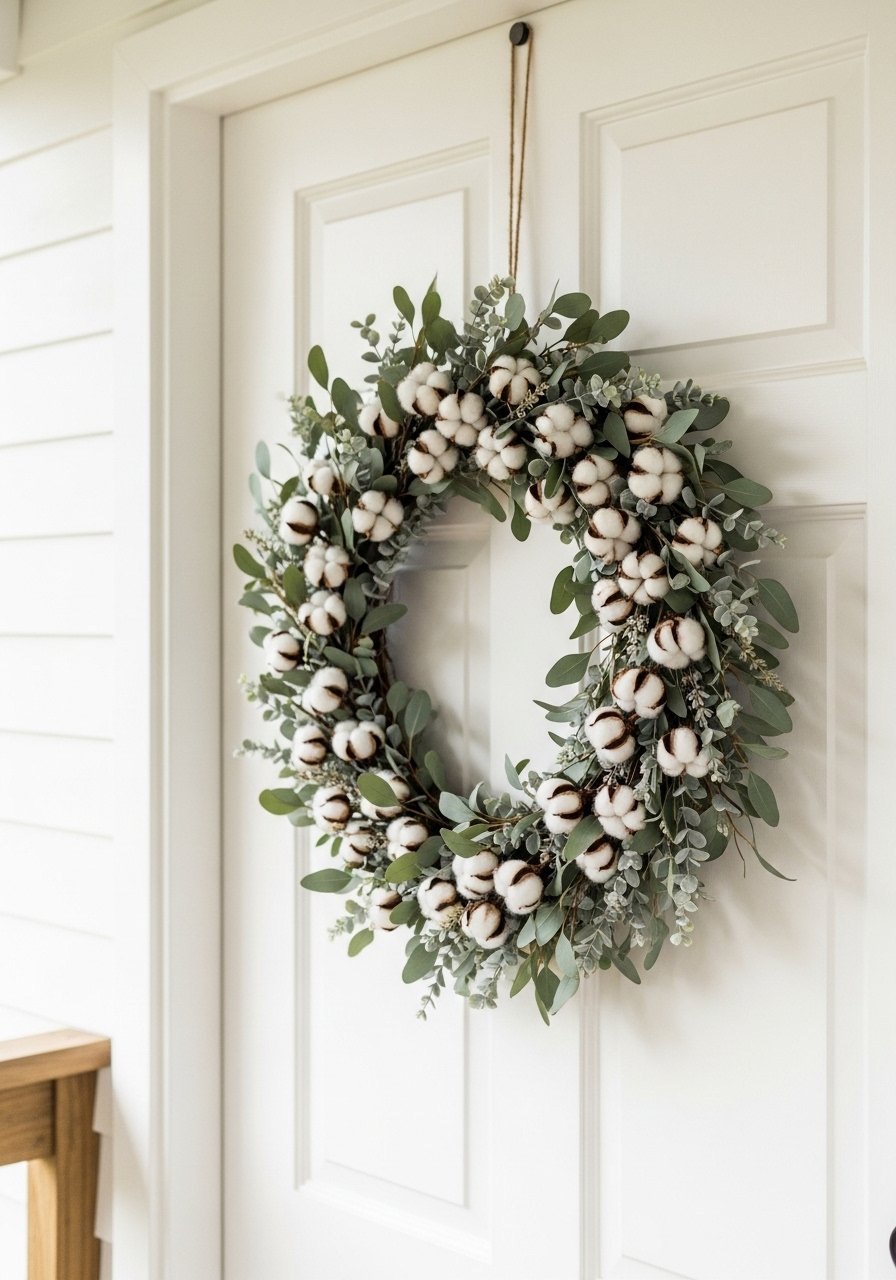
A cotton-wreath blends softness and texture for a subtle farmhouse look that works year-round. The cotton bolls add visual interest without heavy color.
Ingredients
- 1 grapevine wreath base, 18 inches
- 6 cotton stems
- 6 eucalyptus stems
- Floral wire
- Wire cutters
- Twine for hanging
Instructions
- Arrange cotton and eucalyptus around half to three-quarters of the wreath.
- Secure stems with floral wire, wrapping tightly.
- Tuck loose bits into the grapevine and trim excess.
- Attach twine loop for hanging.
- Hang on door and adjust elements for balance.
How to Serve It
Hang on the front door or above a mantel. Store in a breathable wreath bag when not in use. Freshen eucalyptus scent by misting lightly.
Wrap up your weekend projects with a plan—pick two or three doable ideas and gather your materials so you can work in focused sessions. These 27 recipes for Modern Farmhouse Decor span quick crafts to small woodworking projects, so there’s something for every skill level and budget. Save or pin this article to return when you’re ready to tackle the next one, and share which project you’ll try first in the comments. If you want one tool that helps with most of these projects, I reach for a reliable cordless drill—it speeds assembly and makes mounting so much easier.