You’ve seen them on your For You page—easy, bold, and oddly satisfying. These Viral TikTok Recipes are the ones people replicate, remix, and share with friends. I picked 12 of the most repeatable hits that actually taste great and are beginner-friendly.
You’ll find step-by-step instructions, exact temperatures and timings, and pantry-friendly swaps so you can make them tonight. I also weave in helpful tools like my go-to cast iron skillet for crisp edges and a hand mixer when a recipe calls for quick whipping. Save or pin this for your next kitchen session—these Viral TikTok Recipes cover sweet breakfasts, dinner wins, and dessert-worthy treats you’ll actually repeat.
1. Baked Feta Pasta — The Viral TikTok Recipe That’s Still Worth the Hype
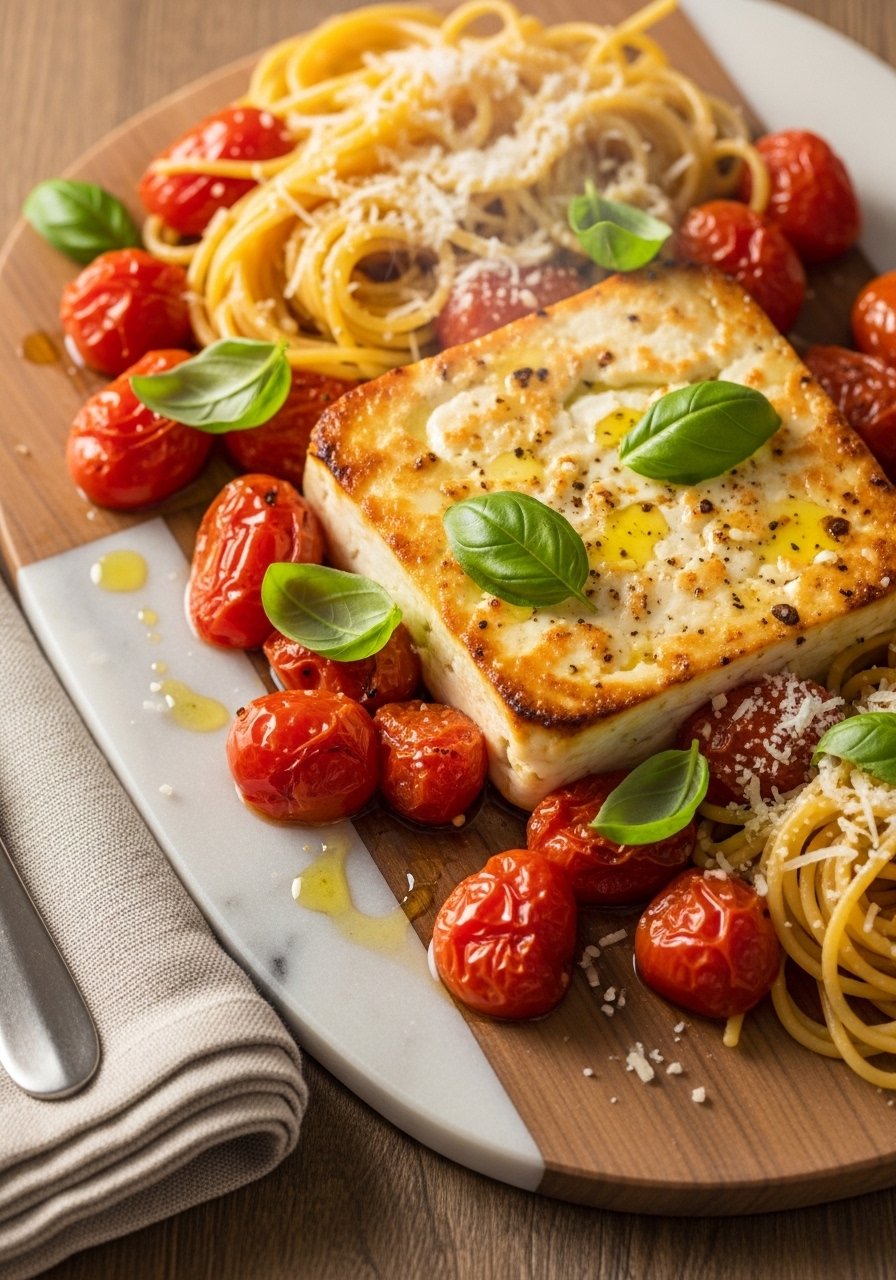
This baked feta pasta gives you jammy tomatoes and a silky sauce in one pan. It’s tangy, creamy, and perfect for weeknights. The texture contrast—roasted tomato pop versus creamy feta—keeps every bite interesting. Home cooks love this for its minimal hands-on time and big payoff.
I roast the tomatoes on a heavy baking sheet so the edges caramelize instead of steaming.
Ingredients
- 1 (8 oz) block feta cheese
- 1 lb cherry tomatoes
- 3 tbsp olive oil
- 4 cloves garlic, thinly sliced
- 1 tsp red pepper flakes
- Salt and black pepper, to taste
- 12 oz dried pasta (fusilli or penne)
- 1/4 cup pasta cooking water (reserved)
- 2 tbsp chopped fresh basil
- 1 tbsp lemon juice
- 1 tbsp grated Parmesan (optional)
- 1 tsp dried oregano
Instructions
- Preheat oven to 400°F (205°C). Line a baking sheet with parchment paper.
- Place feta block in the center of the sheet. Scatter cherry tomatoes and garlic around it. Drizzle with 3 tbsp olive oil, sprinkle red pepper flakes, oregano, salt and pepper.
- Roast for 30–35 minutes, until tomatoes burst and feta is soft with golden edges.
- Meanwhile, cook pasta in salted boiling water according to package timing until al dente. Reserve 1/2 cup pasta water, then drain.
- Remove sheet from oven. Using a fork or an offset spatula, mash the feta and tomatoes together until you have a chunky sauce. Add 1/4 cup reserved pasta water if needed.
- Toss the cooked pasta into the baking sheet, stirring to coat well. Add lemon juice and extra pasta water to loosen the sauce if needed. Taste and adjust salt.
- Finish with fresh basil and grated Parmesan. Serve warm.
How to Serve It
Serve family-style straight from the baking sheet for a casual vibe. Garnish with extra basil and a drizzle of olive oil. Pair with a crisp green salad and crusty bread. Store leftovers in airtight containers for up to 3 days and reheat gently in a skillet. Make-ahead: roast the feta and tomatoes a day ahead and finish tossing with freshly cooked pasta.
2. Dalgona Whipped Coffee — Frothy TikTok Coffee Treat
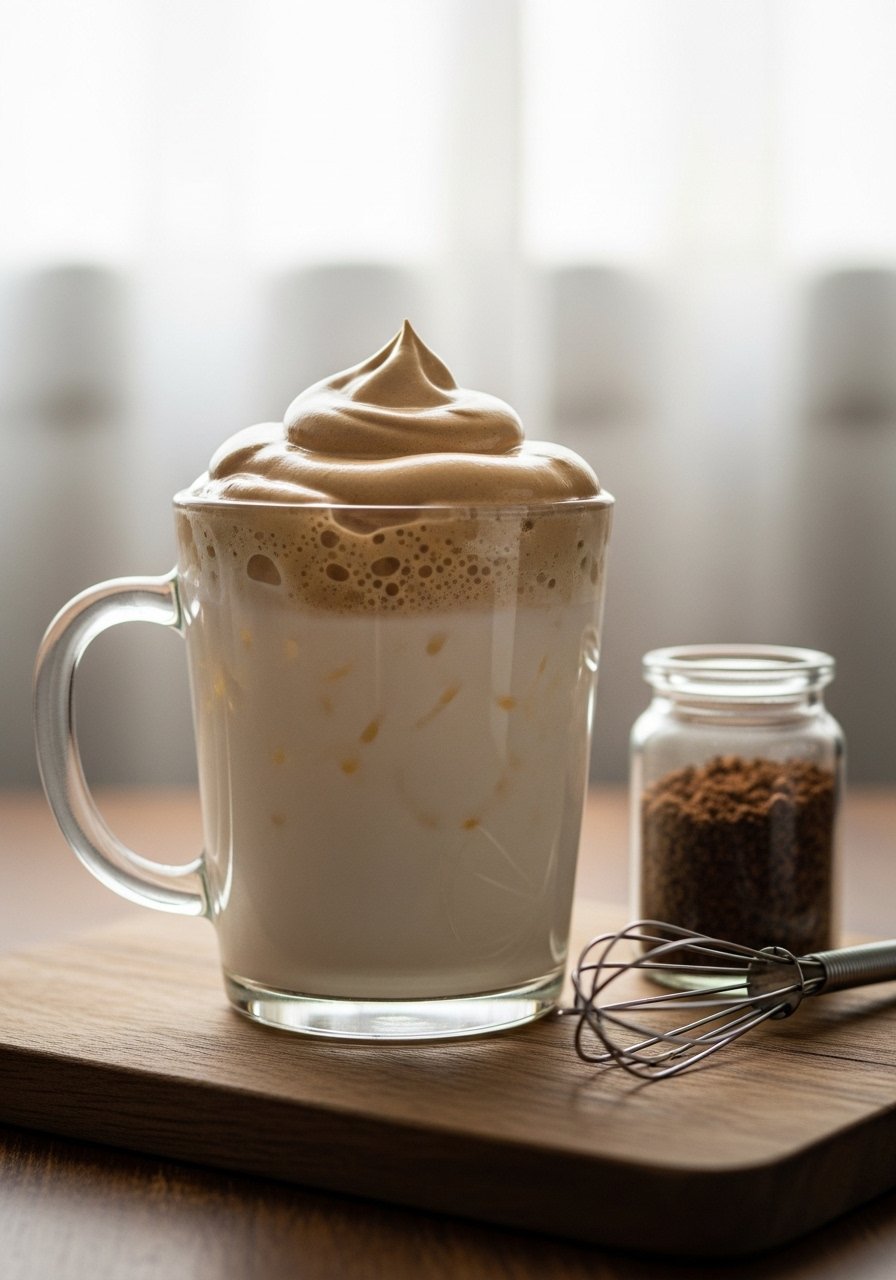
Dalgona coffee is light, frothy, and perfectly Instagrammable. It’s sweet and creamy with a strong coffee aroma that wakes you up. If you want that cloud-like foam, a handheld electric mixer makes it effortless.
This drink is for anyone craving a café-style treat at home with minimal gear.
Ingredients
- 2 tbsp instant coffee granules
- 2 tbsp granulated sugar
- 2 tbsp hot water (near-boiling)
- 1 cup milk (whole, oat, or almond)
- Ice cubes, as needed
- 1/4 tsp vanilla extract (optional)
- Pinch of cocoa powder or cinnamon for dusting
- 1 tbsp sweetened condensed milk (optional, for richer sweetening)
- Extra hot water if foam is too thick
- Small pinch of salt (to balance sweetness)
Instructions
- Add instant coffee, sugar, and hot water to a medium bowl.
- Use a hand mixer to whip on high for 2–4 minutes until stiff, glossy peaks form.
- If whipping by hand, whisk vigorously for 6–8 minutes until light and foamy.
- Fill a glass with ice and 1 cup milk. Stir in vanilla and condensed milk if using.
- Spoon the coffee foam over the milk. Dust with cocoa or cinnamon.
- Stir to combine before sipping or enjoy layered for photos.
How to Serve It
Serve in a clear glass to show the layers. Use a mason jar for a rustic presentation. Pair with a simple butter cookie or banana bread slice. Store leftover foam in a covered jar for a few hours in the fridge, then re-whip briefly before using.
3. Cloud Bread — Fluffy, Soft, Puffy TikTok Classic

Cloud bread is an airy, meringue-like loaf that’s soft and slightly sweet. It’s light as a cloud and perfect for sandwiches or sweet toast. This one rises into glossy, cloudlike puffs with a slightly crisp exterior.
A digital kitchen scale helps for precise egg measurements for consistent results.
Ingredients
- 3 large egg whites, room temperature
- 3 tbsp granulated sugar
- 1/4 tsp cream of tartar
- 1/2 tsp vanilla extract
- Pinch of salt
- 1 tbsp cornstarch (optional for stability)
- 1 tbsp powdered sugar for dusting
- 2 tsp butter, melted (for brushing, optional)
- Optional: 1 tsp lemon zest or 1/4 tsp cinnamon for flavoring
Instructions
- Preheat oven to 300°F (150°C). Line a baking sheet with a silicone baking mat or parchment.
- In a clean bowl, whisk egg whites with cream of tartar and salt until soft peaks form.
- Slowly add sugar while whipping until stiff, glossy peaks form and sugar is dissolved (about 3–5 minutes with an electric mixer).
- Gently fold in vanilla and cornstarch (if using) with a spatula, maintaining air.
- Spoon or pipe rounds onto the prepared sheet using a piping bag for uniform shapes.
- Bake for 25–30 minutes until tops are dry and slightly golden. Turn off oven and let cool inside for 10 minutes for best texture.
- Brush with melted butter if desired and dust with powdered sugar.
How to Serve It
Serve warm with jam, honey, or a smear of cream cheese. They’re lovely stacked with fresh berries. Store in a paper bag for up to 24 hours to keep the exterior crisp, or use airtight containers for softer results.
4. Mini Pancake Cereal — Tiny, Spoonable Breakfast Fun

Pancake cereal turns breakfast into a playful spoonable treat. Tiny pancakes are tender with golden edges and soak up syrup and butter in the best way. It’s perfect for weekend mornings or brunch with kids.
A non-stick griddle pan or large skillet and a squeeze bottle make batter control simple.
Ingredients
- 1 cup all-purpose flour
- 1 tbsp granulated sugar
- 1 tsp baking powder
- 1/4 tsp baking soda
- 1/4 tsp salt
- 1 cup buttermilk (or 1 cup milk + 1 tbsp lemon juice)
- 1 large egg
- 2 tbsp melted butter, plus more for skillet
- 1 tsp vanilla extract
- Maple syrup, for serving
- Fresh berries or banana slices for topping
- Optional: powdered sugar for dusting
Instructions
- In a bowl, whisk flour, sugar, baking powder, baking soda, and salt.
- In another bowl, whisk buttermilk, egg, melted butter, and vanilla.
- Combine wet and dry ingredients until just mixed—don’t overmix.
- Transfer batter to a squeeze bottle or use a tablespoon to form small dollops.
- Heat a lightly greased non-stick griddle pan over medium-low. Pipe tiny pancakes (~1-inch).
- Cook 1–2 minutes until tiny bubbles form; flip and cook another 30–60 seconds.
- Serve piled in a bowl, drizzle with maple syrup and add fruit.
How to Serve It
Serve straight in bowls with butter, syrup, and fresh fruit. For leftovers, store in a glass meal prep container and reheat in a toaster oven for 2–3 minutes to crisp edges. Great for brunch boards or a fun party breakfast.
5. TikTok Tortilla Hack Quesadilla — Folded, Crispy, Portable (A Viral TikTok Recipe)
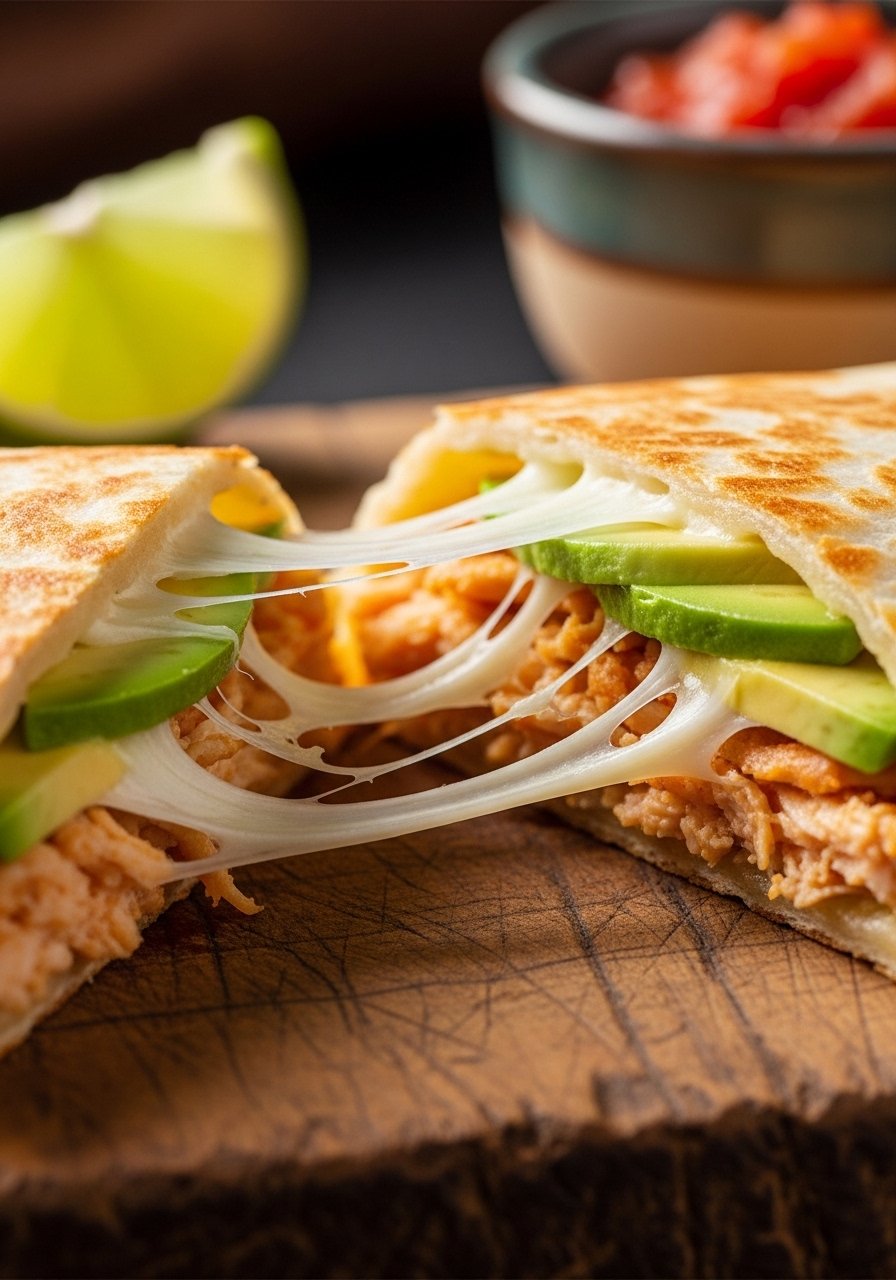
The tortilla hack folds fillings into four layers so every bite has crisp cheese and melty goodness. It’s portable, customizable, and gets perfectly toasted in a cast iron skillet.
This is perfect for busy lunches, snackers, and anyone who loves crunchy cheese edges.
Ingredients
- 4 large flour tortillas
- 2 cups shredded cheddar or Mexican blend
- 1 cup cooked shredded chicken (or black beans for vegetarian)
- 1 avocado, sliced
- 1/4 cup sour cream or Greek yogurt
- 1/4 cup diced red onion
- 2 tbsp chopped cilantro
- 1 tbsp lime juice
- Salt and pepper, to taste
- 1 tbsp butter or oil for skillet
- Optional: pickled jalapeños or salsa for serving
Instructions
- Heat a cast iron skillet over medium heat and add a small pat of butter.
- Place one tortilla on a plate. Sprinkle cheese over half the tortilla in a semicircle.
- Add chicken, avocado slices, red onion, cilantro, and a squeeze of lime on top of the cheese. Fold one side over to cover fillings, then fold into quarters following the tortilla hack pattern so the tortilla becomes layered.
- Place the folded tortilla seam-side down in the skillet.
- Cook 2–3 minutes per side until golden and cheese is melted. Press lightly with a spatula.
- Transfer to a cutting board and slice into wedges. Repeat with remaining tortillas.
How to Serve It
Serve with sour cream, salsa, and a wedge of lime. Pack in a glass meal prep container for lunch—reheat in a skillet for the best crisp. They’re also great cut into small wedges for party platters.
6. Baked Oats (Single-Serve) — Comfort Breakfast That’s Viral for a Reason

Baked oats turn oatmeal into a cake-like morning treat. It’s creamy, slightly sweet, and endlessly adaptable—berry, chocolate, or banana-PEANUT butter versions all work. I bake mine in a ramekin so it’s quick and perfect for one.
A ceramic ramekin and an oven-safe spoon make single-serve baking effortless.
Ingredients
- 1/3 cup rolled oats
- 1/2 tsp baking powder
- 1 tbsp brown sugar
- 1/4 tsp cinnamon
- Pinch of salt
- 1/3 cup milk (any kind)
- 1/2 a ripe banana, mashed (or 1/4 cup applesauce)
- 1 large egg
- 1 tbsp peanut butter (or chocolate chips)
- 1/2 tsp vanilla extract
- Optional: 1 tbsp chia seeds or flaxseed for texture
- Optional: sliced banana or berries for topping
Instructions
- Preheat oven to 350°F (175°C). Grease a ramekin with butter or oil.
- In a bowl, mix oats, baking powder, brown sugar, cinnamon, and salt.
- Whisk in milk, mashed banana, egg, peanut butter, and vanilla until combined.
- Pour into the prepared ramekin and smooth the top.
- Bake 20–25 minutes until set and a toothpick comes out mostly clean.
- Top with banana slices or berries and a drizzle of peanut butter.
How to Serve It
Serve warm straight from the ramekin with a sprinkle of cinnamon. Store leftovers in the fridge in glass meal prep containers and reheat for 45 seconds. Make-ahead: mix dry ingredients in a jar and add wet ingredients in the morning for a fast bake.
7. Hot Honey Butter Salmon — Sweet-Spicy Glaze from TikTok
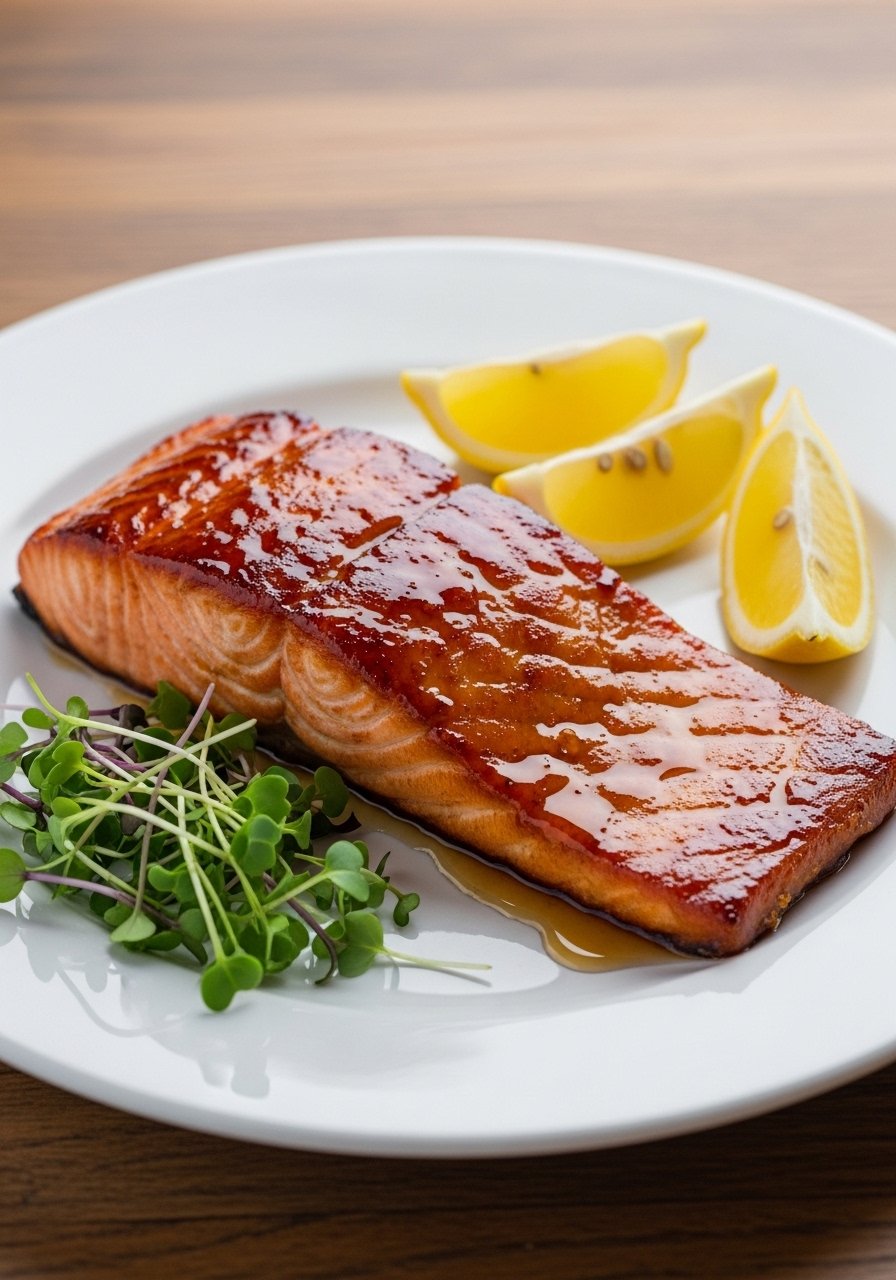
This salmon gets a sticky sweet-spicy glaze that caramelizes beautifully. The hot honey adds a bright kick while butter keeps the fish rich and glossy. Pan-searing in a non-stick skillet then finishing in the oven yields a crisp exterior and tender interior.
It’s an elegant dinner with minimal effort.
Ingredients
- 4 (6 oz) salmon fillets, skin on
- 2 tbsp butter
- 1/4 cup honey
- 1–2 tsp crushed red pepper or sriracha (adjust for heat)
- 2 cloves garlic, minced
- Salt and black pepper
- 1 tbsp lemon juice
- 1 tsp soy sauce or tamari
- 1 tbsp chopped parsley
- Lemon wedges, for serving
- Optional: 1 tsp apple cider vinegar for brightness
Instructions
- Preheat oven to 400°F (205°C).
- Pat salmon dry and season with salt and pepper.
- Heat a non-stick skillet over medium-high heat with oil. Sear salmon skin-side down for 3–4 minutes until crisp.
- Flip and transfer skillet to oven for 4–6 minutes depending on thickness and desired doneness (internal temp 125–130°F for medium). Use an instant-read thermometer to check.
- While salmon finishes, melt butter in a small saucepan. Add honey, garlic, red pepper, soy sauce, lemon juice, and simmer 1–2 minutes until glossy.
- Brush hot honey butter over cooked salmon before serving. Garnish with parsley and lemon.
How to Serve It
Serve over steamed rice or with a simple salad and roasted veggies. Store leftovers in airtight containers for up to 2 days. Reheat gently in a skillet or oven to preserve texture. Hot honey also doubles as a dipping sauce or glaze for roasted carrots.
8. 3-Ingredient Peanut Butter Cookies (Plus Mix-Ins) — Simple, Viral, and Satisfying
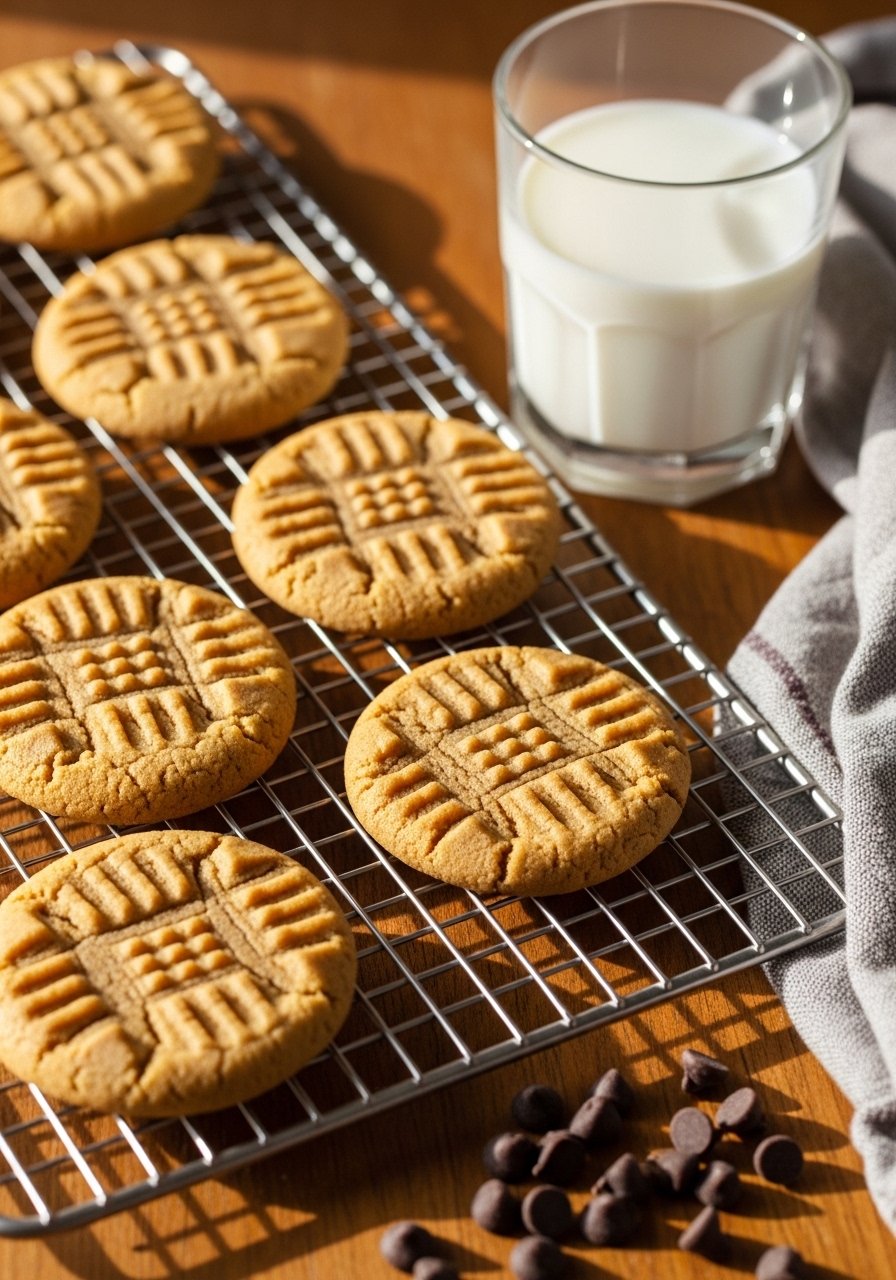
These peanut butter cookies became a TikTok staple because they’re fast and reliably tender. Adding optional mix-ins like chocolate chips or sea salt keeps them interesting. A silicone baking mat prevents sticking and helps you get even browning.
They’re for quick cookie cravings and beginner bakers.
Ingredients
- 1 cup creamy peanut butter
- 3/4 cup granulated sugar
- 1 large egg
- 1 tsp vanilla extract
- 1/2 tsp baking powder
- 1/8 tsp salt
- 1/4 cup chocolate chips (optional)
- 2 tbsp rolled oats (optional for texture)
- Flaky sea salt for topping (optional)
- 1 tbsp melted butter (optional for richer flavor)
Instructions
- Preheat oven to 350°F (175°C). Line a baking sheet with a silicone baking mat.
- In a bowl, mix peanut butter, sugar, egg, and vanilla until combined. Fold in chocolate chips or oats if using.
- Scoop 1.5 tbsp dough per cookie and roll into balls. Place 2 inches apart on the sheet.
- Press each cookie with a fork to make a crisscross pattern.
- Bake 9–11 minutes until edges are golden—don’t overbake to keep them soft.
- Cool on sheet for 5 minutes, transfer to a rack to finish cooling. Sprinkle sea salt if desired.
How to Serve It
Serve with milk or coffee. Store in airtight containers for up to 4 days. Make-ahead: dough keeps well in the fridge for 3 days or freeze baked cookies for up to 2 months.
9. Corn Ribs with Chili-Lime Seasoning — A Viral TikTok Recipe for Snacky Sides
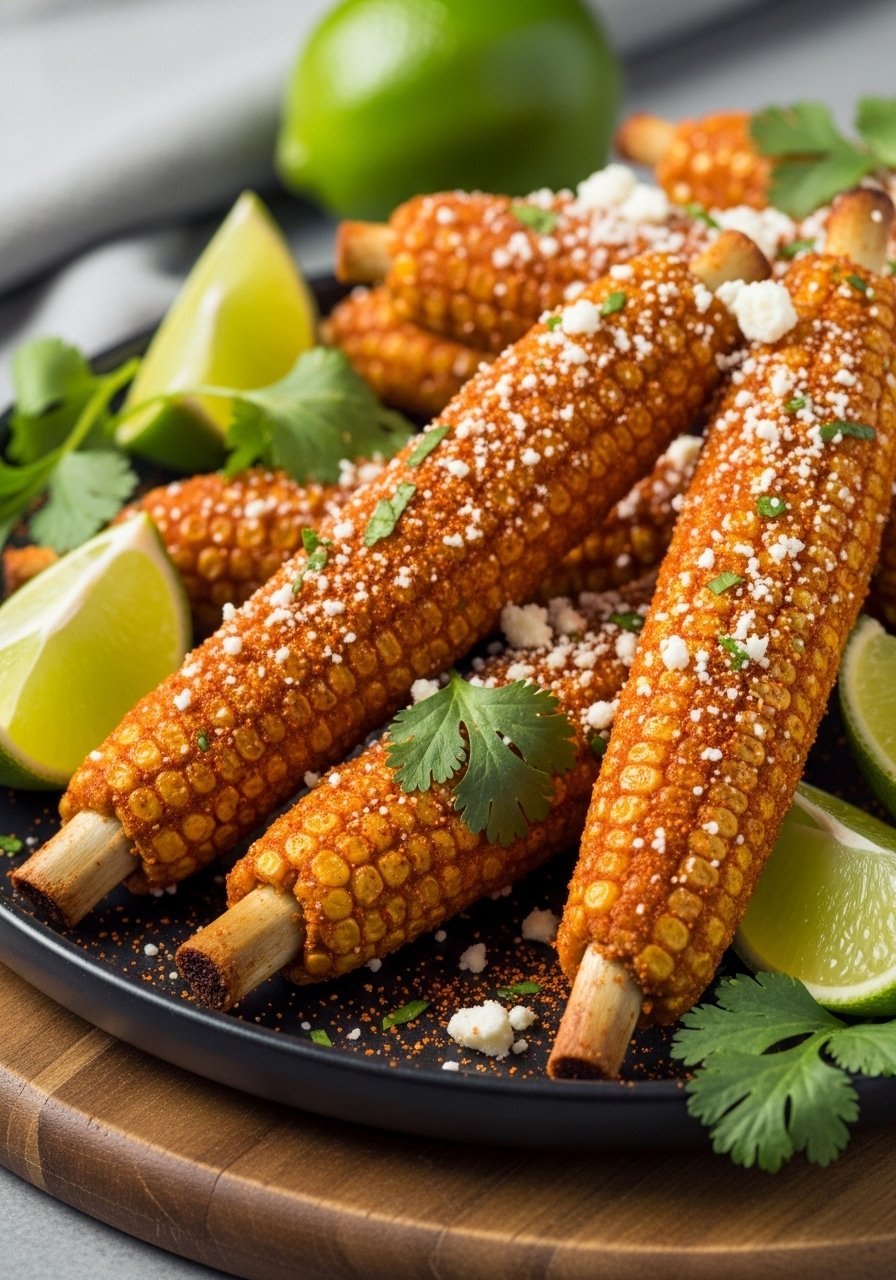
Corn ribs are the showstopping snack that tears corn into rib-like wedges, grilled or air-fried until crisp and coated in tangy chili-lime butter. They’re smoky, crunchy, and addictive—the perfect side for summer grilling.
An air fryer or oven with a baking sheet works well.
Ingredients
- 4 ears fresh corn, husks removed
- 2 tbsp melted butter
- 1 tbsp olive oil
- 1 tsp smoked paprika
- 1/2 tsp chili powder
- Zest of 1 lime
- 1 tbsp lime juice
- Salt and pepper
- 1/4 cup grated cotija or Parmesan
- 2 tbsp chopped cilantro
- Optional: pinch of cayenne for extra heat
Instructions
- Preheat air fryer to 400°F (200°C) or oven to 425°F (220°C).
- Cut each corn cob into 3–4 lengthwise wedges using a sharp chef’s knife.
- Mix melted butter, olive oil, paprika, chili powder, lime zest, and juice.
- Brush corn ribs evenly with the mixture and season with salt and pepper.
- Air-fry in a single layer for 12–15 minutes, turning halfway, until edges char. For oven: arrange on a baking sheet and roast 18–22 minutes, turning once.
- Sprinkle with cotija and cilantro before serving.
How to Serve It
Serve hot with extra lime wedges and a drizzle of crema or sour cream. Store any leftovers in the fridge in airtight containers and reheat in the air fryer for 3–4 minutes to crisp.
10. Hasselback Potatoes — Thinly Sliced, Crispy, and Soft Inside
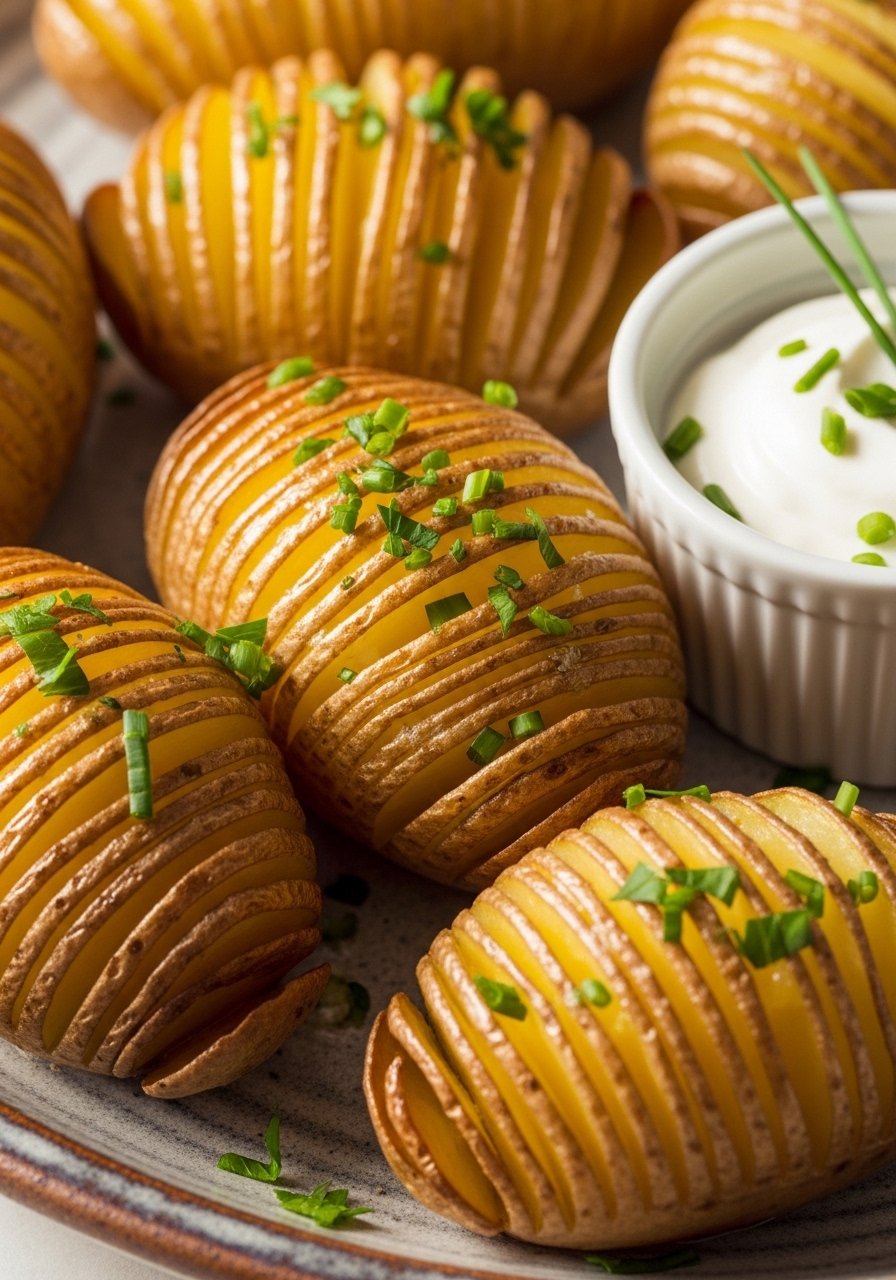
Hasselback potatoes are thinly sliced almost to the base and brushed with butter for an elegant presentation and incredible crispness. They’re fluffy inside and crispy between the cuts.
Use a sharp chef’s knife and a baking sheet for best results.
Ingredients
- 4 medium Yukon Gold or Russet potatoes (~1.5–2 lb total)
- 3 tbsp melted butter
- 2 tbsp olive oil
- 3 cloves garlic, minced
- 1 tsp fresh thyme leaves or rosemary
- Salt and freshly ground black pepper
- 2 tbsp grated Parmesan
- 2 tbsp chopped chives
- Optional: 1 tbsp Dijon mustard
- Optional: 1 tbsp breadcrumbs for extra crunch
Instructions
- Preheat oven to 425°F (220°C) and line a baking sheet.
- Scrub potatoes and pat dry. Make thin slices about 1/8-inch apart, stopping before cutting all the way through (use chopsticks on either side as guides).
- Mix melted butter, olive oil, garlic, thyme, salt, and pepper.
- Brush butter mixture into each cut, making sure it seeps between slices.
- Bake 45–60 minutes, brushing occasionally, until edges are crispy and centers are tender (test with a fork).
- Sprinkle with Parmesan and breadcrumbs in the last 10 minutes if using.
- Finish with chives and serve.
How to Serve It
Serve as a side with roast chicken or steak. Spoon sour cream and chives on top or place on a serving platter for company. Store cooled leftovers in airtight containers for up to 3 days and reheat in oven to re-crisp.
11. Two-Ingredient Banana "Nice" Cream — Viral Frozen Treat
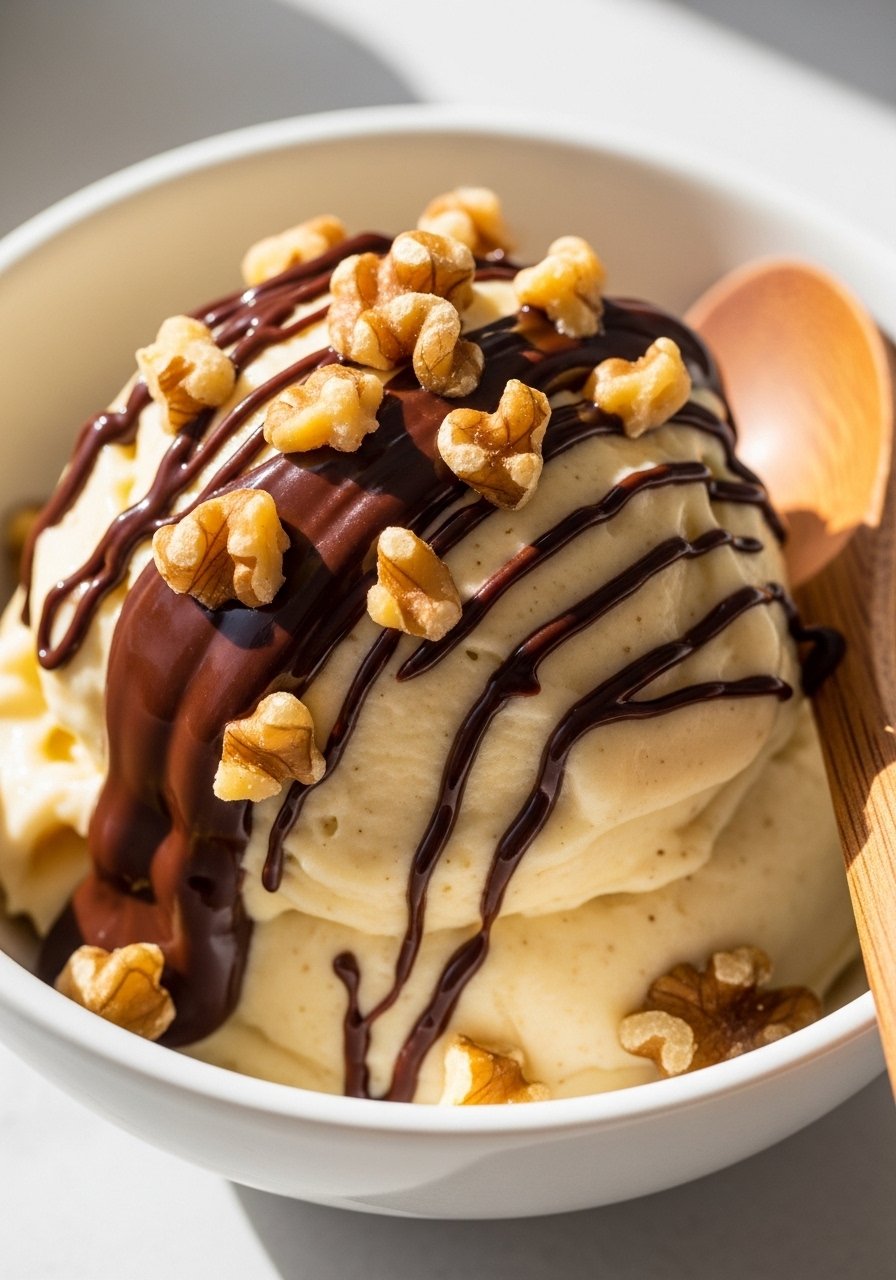
Two-ingredient banana nice cream is the frozen dessert that mimics ice cream with just bananas and an add-in like peanut butter or cocoa. It’s creamy, naturally sweet, and delightfully simple. An immersion blender or food processor makes the process silky.
Perfect for a healthy dessert or snack that feels indulgent.
Ingredients
- 3 ripe bananas, peeled, sliced and frozen
- 1–2 tbsp peanut butter or cocoa powder (for chocolate)
- 1 tsp vanilla extract (optional)
- Pinch of salt
- 2 tbsp milk if needed for blending
- Optional toppings: chopped nuts, chocolate chips, sliced fruit
- Optional: 1 tbsp honey or maple syrup if extra sweetness is desired
- Optional: 1 tbsp cocoa nibs for crunch
Instructions
- Freeze sliced bananas on a tray for at least 2 hours or overnight until solid.
- Add frozen banana slices and peanut butter (or cocoa) to a food processor or use an immersion blender in a tall container.
- Blend in short pulses, scraping down sides, until smooth and creamy. Add 1–2 tbsp milk if the mixture needs help.
- Taste and add a touch of sweetener or vanilla if desired.
- Serve immediately for soft-serve texture or freeze 30–60 minutes for firmer scoops.
How to Serve It
Serve in bowls with toppings like chopped nuts, chocolate shavings, or fresh berries. Store leftover nice cream in a glass container in the freezer; let soften 5–10 minutes before scooping.
12. Sheet-Pan Garlic Butter Chicken and Veggies — Simple, Viral One-Pan Dinner
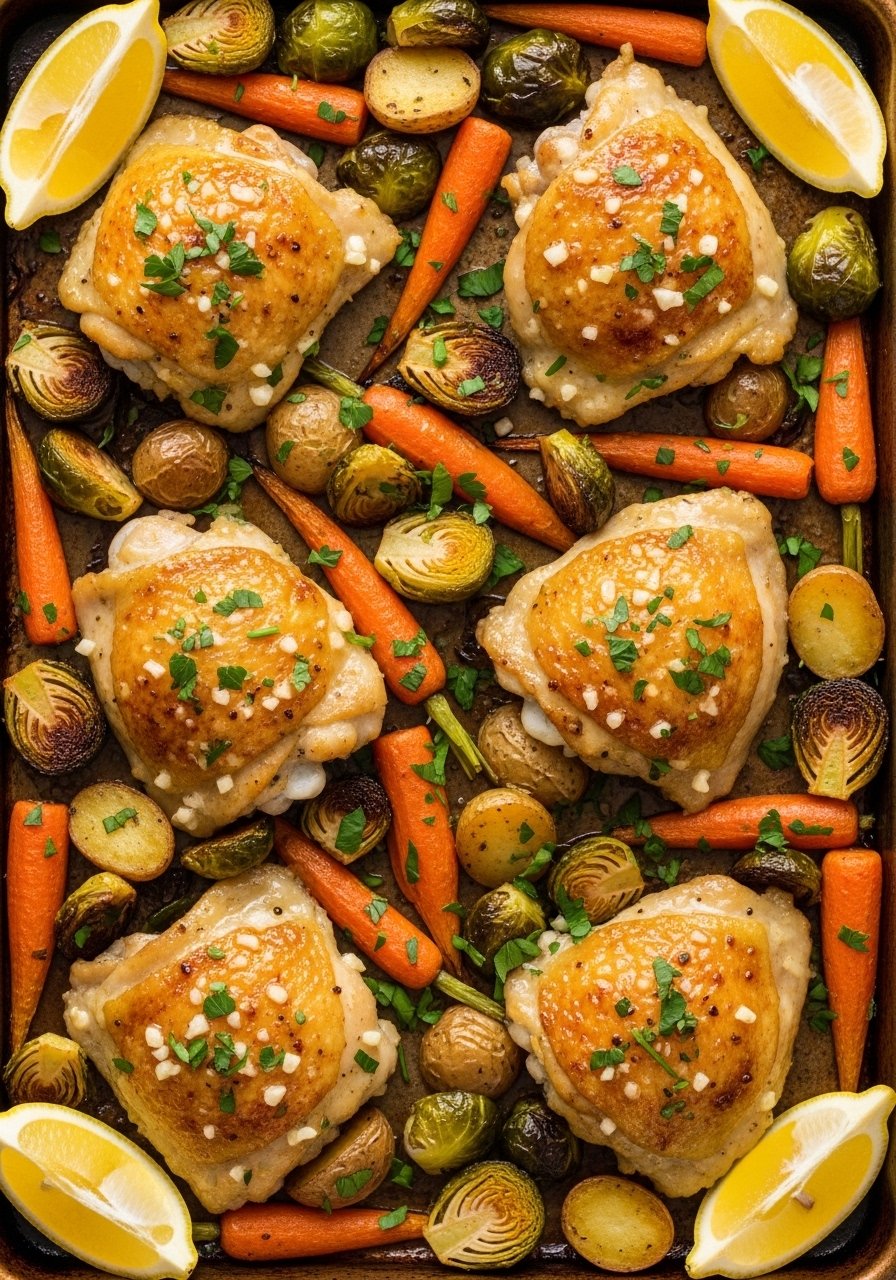
Sheet-pan dinners went viral for a reason: minimal cleanup, big flavors, and even cooking. This garlic butter chicken roasts with vegetables seasoned to caramelized perfection. The garlic butter bastes the chicken for deep flavor and crispy skin.
Use a rimmed baking sheet and a meat thermometer to hit perfect doneness.
Ingredients
- 4 bone-in, skin-on chicken thighs
- 3 tbsp melted butter
- 4 cloves garlic, minced
- 1 tbsp olive oil
- 1 tsp smoked paprika
- 1 lb baby potatoes, halved
- 2 cups Brussels sprouts, halved
- 1 large carrot, sliced
- Salt and black pepper
- 1 tbsp fresh thyme or rosemary
- 1 lemon, zested and juiced
- Optional: 1 tsp honey for a glaze
Instructions
- Preheat oven to 425°F (220°C). Line a rimmed baking sheet.
- Toss potatoes, Brussels sprouts, and carrots with olive oil, salt, pepper, and half the thyme. Spread on the sheet.
- In a bowl, mix melted butter, garlic, smoked paprika, lemon zest, and honey (if using).
- Pat chicken dry, season with salt and pepper, and nestle among the vegetables. Brush chicken generously with garlic butter.
- Roast 30–40 minutes until vegetables are tender and chicken reaches 165°F internal temp (check with an instant-read thermometer).
- Broil for 2–3 minutes if you want extra crisp skin. Rest chicken 5 minutes before serving.
- Finish with lemon juice and remaining thyme.
How to Serve It
Serve straight from the pan with extra lemon wedges. Leftovers keep well in airtight containers for up to 3 days. Reheat in a hot oven or air fryer to keep the skin crisp.
These 12 Viral TikTok Recipes cover breakfasts, snacks, dinners, and desserts that actually deliver on texture and flavor. Try one tonight, or pin the whole list for later. Which one will you make first? Share your photos with friends or family and tag someone to cook alongside you.
One last tip: a silicone baking mat set will save time on cleanup and help many of these recipes release cleanly from pans—worth keeping in your kitchen rotation.